Biltema 12-1011 Bruksanvisning
Biltema
skrumaskin
12-1011
Les nedenfor 📖 manual på norsk for Biltema 12-1011 (12 sider) i kategorien skrumaskin. Denne guiden var nyttig for 2 personer og ble vurdert med 4.5 stjerner i gjennomsnitt av 2 brukere
Side 1/12

Art. 12-1011
1
© 2018-10-12 Biltema Nordic Services AB
SE
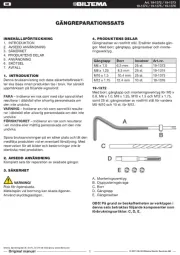
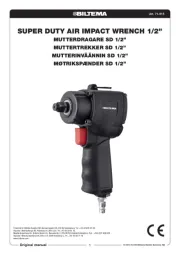
POPNITSADAPTER FÖR SKRUVDRAGARE
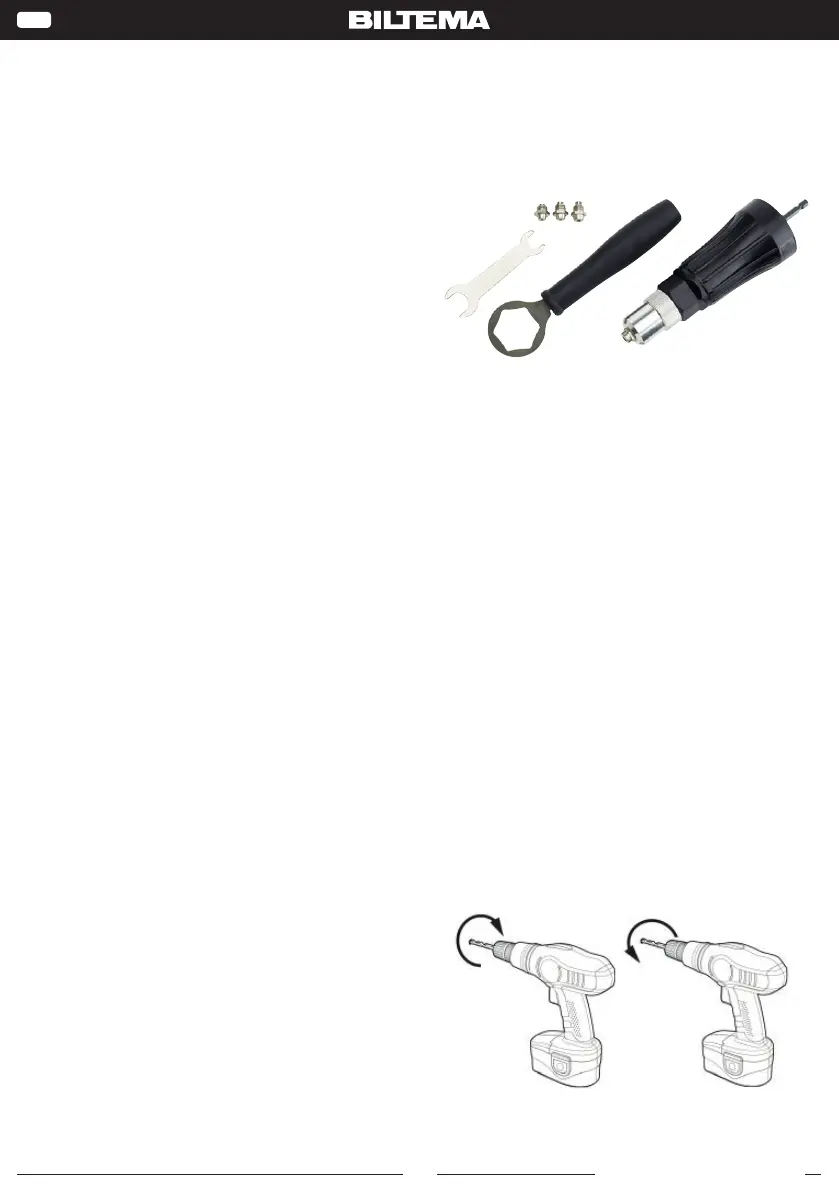
5. ÖVERSIKTSBILD
6. UPPACKNING
Öppna förpackningen och kontrollera att ingen del
saknas eller har skadats under transporten. Förpack-
ningen innehåller följande delar
• 1 st. popnitsadapter
• 1 st. förlängningshandtag
• 2 st. u-nycklar,
• 1 st. insexnyckel
• 4 st. nosstycken
7. ANVÄNDING
Före användning
OBS! Adaptern kräver en sladdlös borrmaskin på
14,4 V eller mer. Sladdlös 18 V borrmaskin rekom-
menderas för fastsättning av större blindnitar.
1. Ställ in borrmaskinen på det lägsta varvtalet (ro-
tationshastighet). Se instruktionshandboken som
medföljer borrmaskinen.
2. Installera borrfästet i borrmaskinen och dra åt
borrchucken ordentligt så att borrfästet sitter fast
ordentligt.
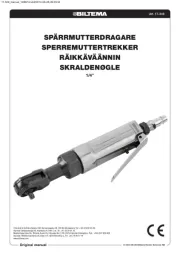
3. Observera vald rotationsriktning på borrmaskinen.
Om borrmaskinens riktningsväljare är inställd på
medursrotation [BILD 1], fäster borrfästet (drar
inåt). Om borrmaskinens riktningsväljare är inställd
på motursrotation [BILD 2], släpper borrfästet
trycker utåt).
Inställning av verktyget: borrläge
1. INTRODUKTION
Denna bruksanvisning och dess säkerhetsföreskrifter
ska läsas innan produkten tas i bruk. Spara bruks-
anvisningen på en säker plats och låt den medfölja
produkten vid en eventuell försäljning. Med reserva-
tion för att bilder och beskrivningar inte är identiska
med produkten.
2. ANVÄNDNINGSOMRÅDE
Popnitsadaptern 12-1211 monteras på en skruvdra-
gare/borrmaskin för enkel och effektiv montering
av popnitar. Popnitsadaptern ska användas enligt
föreskrifterna i denna bruksanvisning.
Satsen innehåller 4 st. nosstycken som kan användas
till popnitar av:
• aluminium och stål i storlekarna: 1/8", 5/32",
3/16", ¼"; 3,2, 4,0, 4,8, 6,4 mm
• rostfritt stål i storlekarna: 1/8", 5/32", 3/16"; 3,2
mm, 4,0, 4,8mm
VARNING! För popnitar i rostfritt stål är maximal
storlek 3/16" eller 4,8 mm, annars nns risk för haveri.
3. SÄKERHET
Läs alltid igenom instruktionerna noggrant före
användning.
FÖRSIKTIGHET
• Förvaras utom räckhåll för barn.
• Använd skyddsglasögon och skyddshandskar
när du använder verktyget.
• Sträck dig inte eftersom du då kan tappa balan-
sen eller fotfästet.
• Se till att åskådare och barn be nner sig på ett
säkert avstånd när du använder verktyget.
• Förvara verktyget utom räckhåll för barn och
andra personer som inte har vana av att använda
verktyget.
VARNING!
• Verktyget får inte användas för andra ändamål än
de avsedda. All annan användning är förbjuden.
• Verktyget får inte användas i explosiv miljö och
får inte komma i kontakt med klor eller vätska
eller gas som innehåller klor.
BEFORE OPERATING
1. Please set power drill to the setting of lowest RPM (rotation speed). Please consult the instruction manual
of your power drill.
2. Cordless Drill of 14.4V or above is required. 18V cordless drill is highly recommended when fastening
larger blind rivets and rivet nuts.
3. Install drill attachment into power drill and tighten power drill chuck firmly so that the drill attachment is
securely installed.
4. Please note the rotation direction of power drill. When power drill rotation is in the clockwise direction
[FIGURE 1], the drill attachment fastens (pulling in).
When the power drill rotation is in the counterclockwise direction [FIGURE 2], the drill attachment
releases (pushing out).
Figure 1
Figure 2
TOOL SETUP: BLIND RIVETS
Figure 3
To set up the drill attachment for fastening blind rivets, please see the above picture for the direction of
assembly of parts [Figure 3]. Please choose the appropriate size of Nosepiece for the blind rivet to be used.
Biltema, Garnisonsgatan 26, 2nd FL, SE-254 66 Helsingborg. www.biltema.com

Art. 12-1011
2
© 2018-10-12 Biltema Nordic Services AB
SE
FÖRSIKTIGHET: Om blindniten som ska användas är
svår att sätta fast, kommer kraften i motursriktningen
att vara högre. Vi rekommenderar att du installerar
förlängningshandtaget [BILD 7]. Och vi rekommen-
derar också starkt att du startar borrmaskinen på låg
hastighet.
9. Tryck in startknappen på borrmaskinen tills blind-
niten har satts fast.
10. Om skaftet på niten går av, släpp upp startknap-
pen.
11. Ändra riktningsväljaren på borrmaskinen så att
den roterar moturs.
12. Ta tag i borrfästet med ett fast grepp och tryck
sedan in startknappen på borrmaskinen långsamt.
13. När du hör ett <klickande> ljud släpper du upp
startknappen.
14. Vinkla borrmaskinen nedåt, skaftet på niten bör då
falla ut.
VARNING! För popnitar i rostfritt stål är maximal
storlek 3/16" eller 4,8 mm, annars nns risk för haveri.
För information om hur du förbereder borrfästet för
fastsättning av blindnitar, se bilden ovan som visar
riktningen för montering av delarna [Bild 3]. Välj
lämpligt nosstycke för den blindnitstyp som ska
användas.
Se bilden nedan för information om installation av
adapterfäste och justerskruv [Bild 4]. Justerskruven
ska sitta inuti adaptern. Använd en 3 mm insexskruv
för att skruva in justerskruven så att den trycker mot
adapterfästet. Vid demontering ska justerskruven
lossas först.
Användningsinstruktion: blindnitar
1. Montera borrfästet i borrmaskinen.
2. Ta tag i borrfästet med ett fast grepp.
3. För riktningsväljaren på borrmaskinen till moturs-
rotation och tryck sedan kort på startknappen på
borrmaskinen.
4. När du hör ett <klickande> ljud släpper du start-
knappen och borrfästet.
5. Sätt i blindniten i borrfästet.
6. Sätt i huvudet på blindniten i arbetsstycket.
7. Ändra riktningsväljaren på borrmaskinen så att
den roterar medurs.
8. Ta tag i borrfästet med ett fast grepp och tryck
sedan in startknappen på borrmaskinen långsamt.
Please see the picture below for the installation detail for Jawcase Assembly, Adapter and Set Screw [Figure 4].
The Set Screw should be inside the Adapter. Use 3mm Hex Key to screw the Set Screw so that the Set Screw
pushes firmly on the Jawcase Assembly. When disassembling, please loosen Set Screw first.
Figure 4
OPERATING INSTRUCTION: BLIND RIVETS
1. Install the drill attachment to power drill.
2. Grip and hold the drill attachment firmly.
3. Switch power drill to rotate in counterclockwise direction and then trigger the power drill.
4. When <click, click> sound is heard, release the trigger and the drill attachment.
5. Insert blind rivet into the drill attachment.
6. Insert head of blind rivet into the workpiece.
7. Switch power drill to rotate in the clockwise direction.
8. Grip and hold the drill attachment firmly and then press the trigger of power drill slowly.
CAUTION: If the blind rivet to be used is difficult to fasten, the counter-rotational force will be stronger. It is
recommended to install the Extension Handle [FIGURE 7]. And it is highly recommended to start the power drill
slowly.
Figure 5
9. Press the trigger until blind rivet is fastened.
10. When rivet stem breaks, release the trigger.
11. Switch power drill to rotate in counterclockwise direction.
12. Grip and hold the drill attachment firmly and then press trigger of the power drill.
13. When <click, click> sound is heard, release the trigger.
14. Point the power drill in downward direction and the rivet stem should fall out.
BEFORE OPERATING
1. Please set power drill to the setting of lowest RPM (rotation speed). Please consult the instruction manual
of your power drill.
2. Cordless Drill of 14.4V or above is required. 18V cordless drill is highly recommended when fastening
larger blind rivets and rivet nuts.
3. Install drill attachment into power drill and tighten power drill chuck firmly so that the drill attachment is
securely installed.
4. Please note the rotation direction of power drill. When power drill rotation is in the clockwise direction
[FIGURE 1], the drill attachment fastens (pulling in).
When the power drill rotation is in the counterclockwise direction [FIGURE 2], the drill attachment
releases (pushing out).
Figure 1
Figure 2
TOOL SETUP: BLIND RIVETS
Figure 3
To set up the drill attachment for fastening blind rivets, please see the above picture for the direction of
assembly of parts [Figure 3]. Please choose the appropriate size of Nosepiece for the blind rivet to be used.
Nosstycke
Manschett
för blindnitar
Adapterfäste
Adapter
Justerskruv
Returfjäder
Hus
Please see the picture below for the installation detail for Jawcase Assembly, Adapter and Set Screw [Figure 4].
The Set Screw should be inside the Adapter. Use 3mm Hex Key to screw the Set Screw so that the Set Screw
pushes firmly on the Jawcase Assembly. When disassembling, please loosen Set Screw first.
Figure 4
OPERATING INSTRUCTION: BLIND RIVETS
1. Install the drill attachment to power drill.
2. Grip and hold the drill attachment firmly.
3. Switch power drill to rotate in counterclockwise direction and then trigger the power drill.
4. When <click, click> sound is heard, release the trigger and the drill attachment.
5. Insert blind rivet into the drill attachment.
6. Insert head of blind rivet into the workpiece.
7. Switch power drill to rotate in the clockwise direction.
8. Grip and hold the drill attachment firmly and then press the trigger of power drill slowly.
CAUTION: If the blind rivet to be used is difficult to fasten, the counter-rotational force will be stronger. It is
recommended to install the Extension Handle [FIGURE 7]. And it is highly recommended to start the power drill
slowly.
Figure 5
9. Press the trigger until blind rivet is fastened.
10. When rivet stem breaks, release the trigger.
11. Switch power drill to rotate in counterclockwise direction.
12. Grip and hold the drill attachment firmly and then press trigger of the power drill.
13. When <click, click> sound is heard, release the trigger.
14. Point the power drill in downward direction and the rivet stem should fall out.
Adapterfäste Justerskruv Insenyckel

Art. 12-1011
3
© 2018-10-12 Biltema Nordic Services AB
SE
8. SERVICE & UNDERHÅLL
Rengör och smörj gängorna på adaptern regelbundet
och efter intensiv användning. Smörj gängorna med
ett smörjfett av hög kvalitet som är avsett speciellt för
glidytor med högt tryck och låg hastighet, exempelvis
rullager. Ta även bort eventuellt skräp på insidan av
borrfästet. Smörjfettet kan även appliceras på de
invändiga spåren.
För blindnitsfunktionen, demontera adapterfästet
för att ta bort skräp och rengör delarna. Smörj även
adaptern utvändigt med högkvalitativt smörjfett.
9. AVFALL
Sopsortera enligt lokala föreskrifter.
MAINTENANCE
Please clean and lubricate of the threads of adapter regularly and after extensive use. Please lubricate the
threads using high quality grease designed for high pressure, low speed sliding surfaces such as grease for
bearings. Please also clean debris out of the inside of the drill attachment. Grease can also be applied to the
tracks inside.
For blind rivet function, disassemble Jawcase Assembly to remove debris and clean the parts. Please grease
the outside of jaws with high quality grease.
Gängor Invändiga
MAINTENANCE
Please clean and lubricate of the threads of adapter regularly and after extensive use. Please lubricate the
threads using high quality grease designed for high pressure, low speed sliding surfaces such as grease for
bearings. Please also clean debris out of the inside of the drill attachment. Grease can also be applied to the
tracks inside.
For blind rivet function, disassemble Jawcase Assembly to remove debris and clean the parts. Please grease
the outside of jaws with high quality grease.
Adapter Käftar Påskjutare
adapter
Adapter-
fjäder
Adapter-
skruv
Produkspesifikasjoner
Merke: | Biltema |
Kategori: | skrumaskin |
Modell: | 12-1011 |
Trenger du hjelp?
Hvis du trenger hjelp med Biltema 12-1011 still et spørsmål nedenfor, og andre brukere vil svare deg
skrumaskin Biltema Manualer
10 September 2025
9 September 2025
9 September 2025
9 September 2025
9 September 2025
9 September 2025
9 September 2025
9 September 2025
9 September 2025
1 September 2025
skrumaskin Manualer
- skrumaskin DeWalt
- skrumaskin AEG
- skrumaskin Toolcraft
- skrumaskin Cleco
- skrumaskin Ryobi
- skrumaskin Dremel
- skrumaskin Omega
- skrumaskin Hitachi
- skrumaskin Milwaukee
- skrumaskin Makita
- skrumaskin Einhell
- skrumaskin Metabo
- skrumaskin Worx
- skrumaskin Craftsman
- skrumaskin Hikoki
- skrumaskin Parkside
- skrumaskin Black Decker
- skrumaskin Kress
- skrumaskin Gedore
Nyeste skrumaskin Manualer
9 September 2025
8 September 2025
8 September 2025
8 September 2025
8 September 2025
8 September 2025
8 September 2025
8 September 2025
7 September 2025
7 September 2025