Gorenje IQ634USC Bruksanvisning
Les nedenfor 📖 manual på norsk for Gorenje IQ634USC (2 sider) i kategorien Komfyr. Denne guiden var nyttig for 2 personer og ble vurdert med 4.5 stjerner i gjennomsnitt av 2 brukere
Side 1/2

en (10-14)
Please consult the extended manual for
detailed instructions.
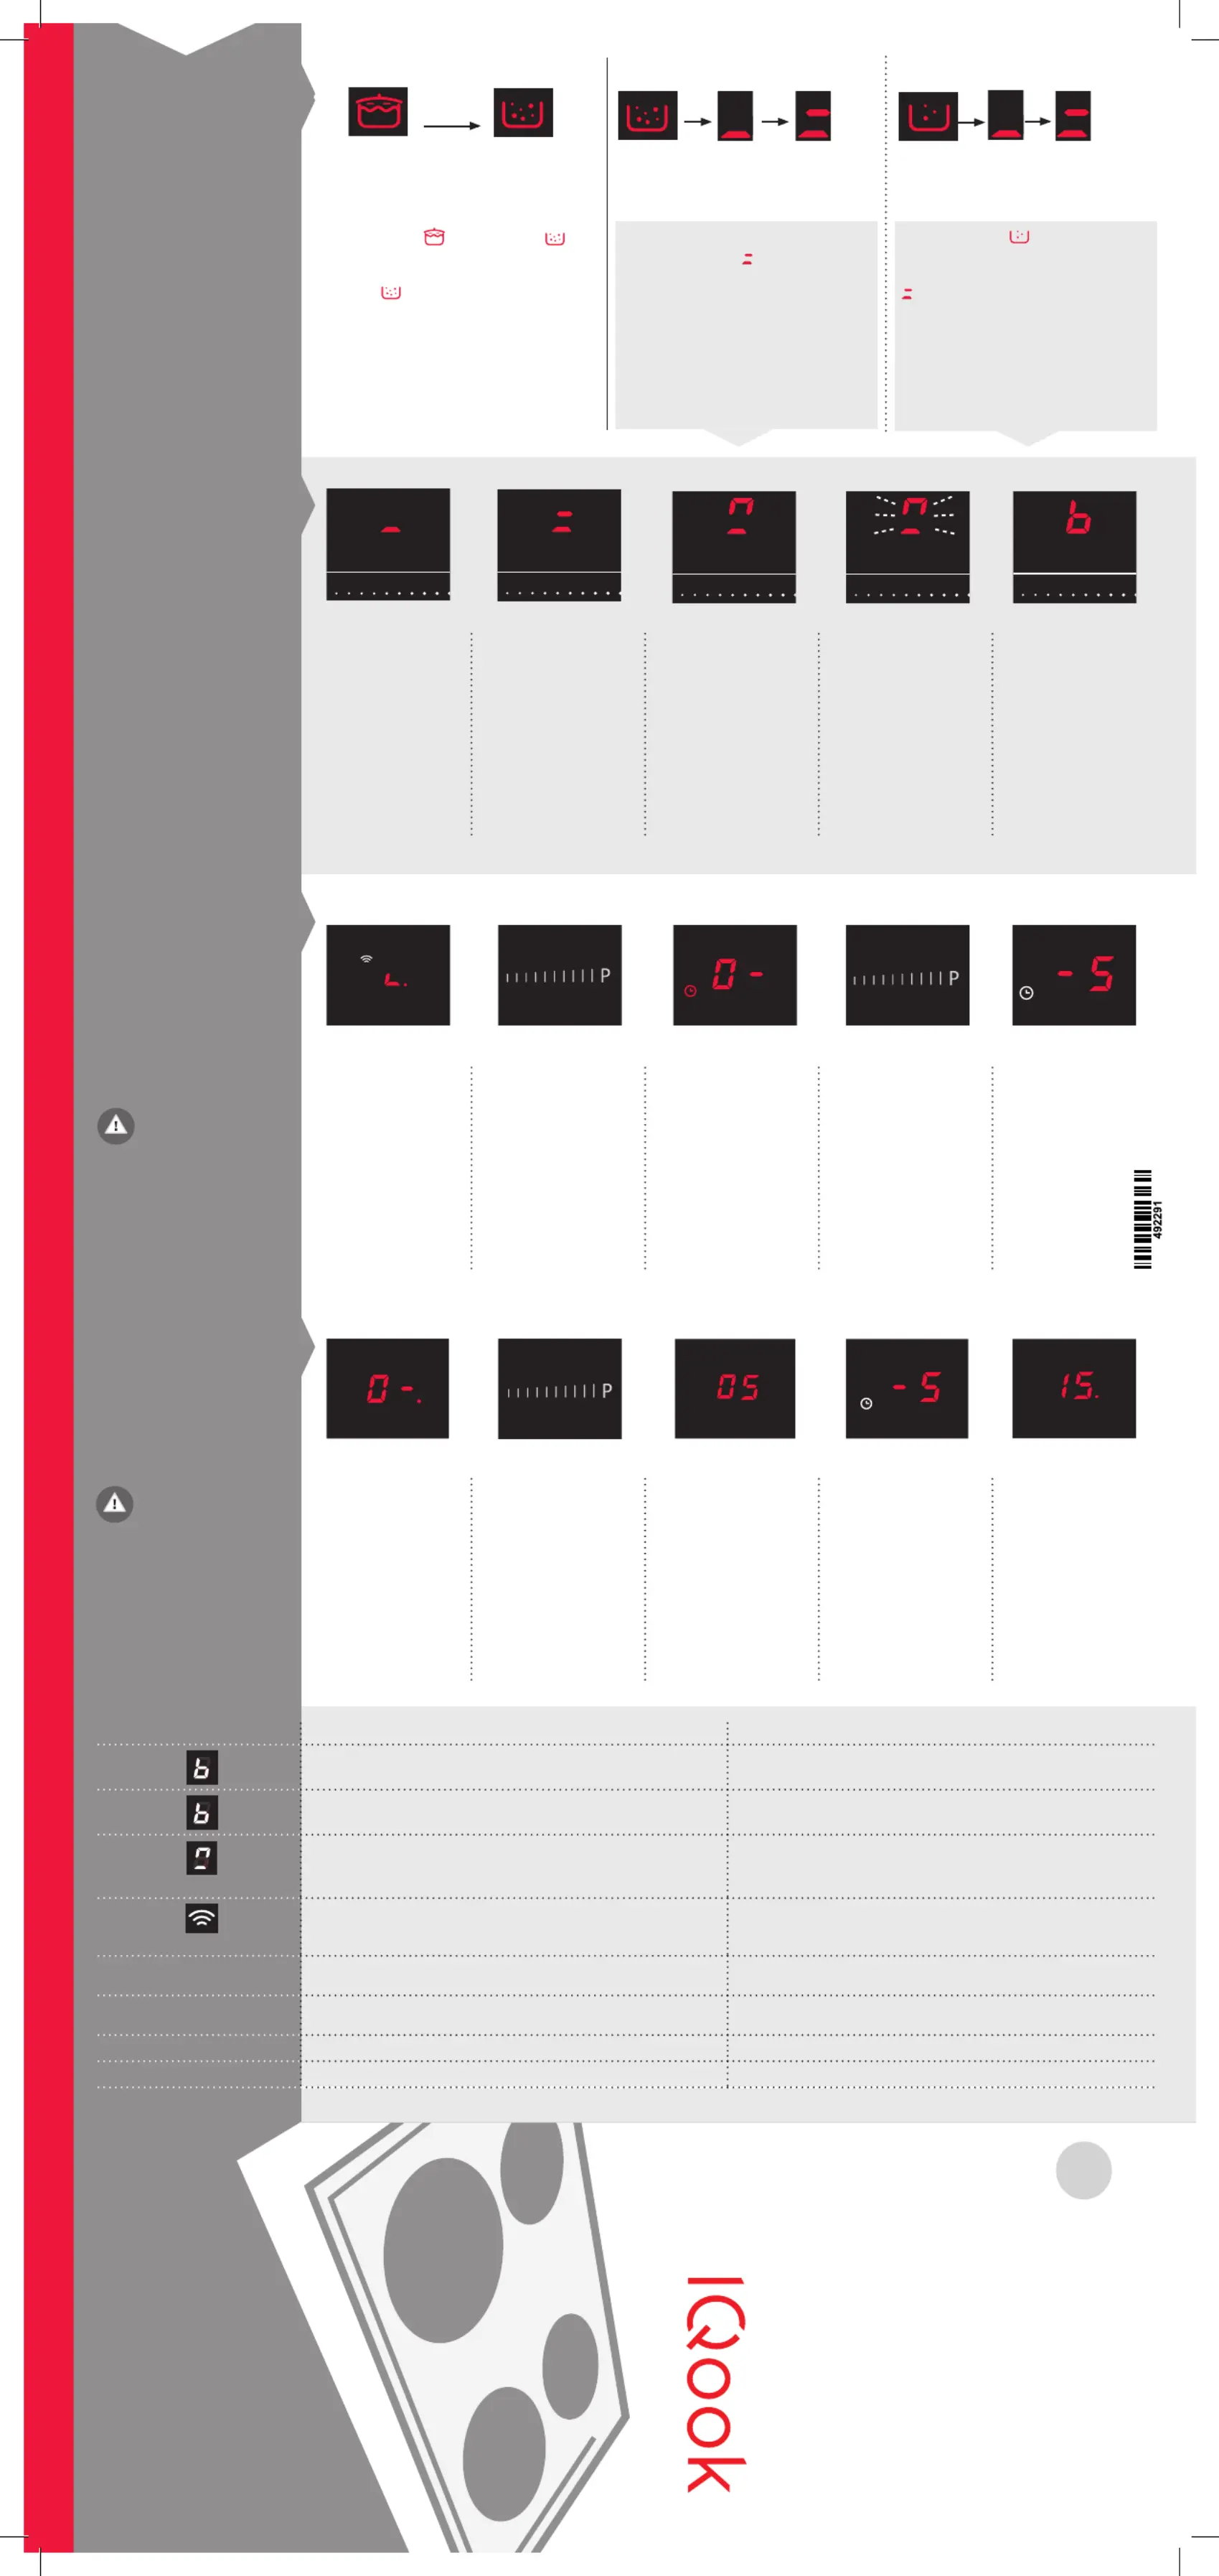
QUICK REFERENCE GUIDE
Use of the IQcook system
EN
The minute minder
will remain active after
the hob is switched off.
Touch the timer
function key.
Display "CL" will
turn to "0".
Touch the slider
to set the value
between 1 and 9
minutes.
Confirm the setting
by touching the
timer key.
The display will turn
to "X" (X ... selected
value). Now set the
value "1x to 9x". The
value will be stored
and the countdown
will start.
Confirm the setting
by touching the
timer key.
If no cooking zone
is selected, the
cooking hob will
be switched off
automatically after
a few seconds and
the minute minder
display will be
saved.
The countdown
timer is connected to
the active cooking zone.
When the cooking time
expires, the cooking
zone will be switched
off.
Touch the cooking
zone selector key.
Use the slider to set
the cooking power
level.
Touch the slider
to set the value
between 1 and 9
minutes.
Confirm the setting
by touching the
timer key.
Touch the timer
function key.
Display "CL" will
turn to "0" and the
symbol (clock) will
flash, indicating
the active cooking
zone.
The display will
turn to "X" (X ...
selected value).
Now set the
value "1x to 9x".
The value will be
stored and the
countdown will
start.
MINUTE
COUNTDOWN
CONTROL
LIGHTS DURING
OPERATION
The water/oil is
not boiling/has not
heated up yet.
The water/oil is
boiling/has heated
up. Place the food
into the pot.
The symbol will
flash and if you
remove the lid,
there will be a beep.
Replace the lid!
Press anywhere on
the slider.
Remove the lid
(only with cooking
with a large amount
of water – method
2). Put the food into
the pot or pan and
press any field on
the slider.
SmartSense
- This control
system makes
sure the food in
the pot or pan
does not boil
over if there is
a shortage of
liquid.
(for functions that
require the use of the
lid)
SLOW COOKING
1
Select the symbol. The
symbol will be lit up.
Symbol
, after five seconds, it will
go out.
2
When the water heats up,
the symbol
will light up.
This function is suitable for
dishes that take longer to cook –
with slow heating by maintaining
the temperature.
3
Select the symbol which
will start to flash.
When milk heats up, the symbol
will light up.
Method 1 Method 2
O P E R A T I N G M O D E S
S E T T I N G T H E C L O C K
5 sek.
(depending on model)
PROBLEM Possible causes Solution
Boil Sense function is activated. Remove the pan from the cooking zone. (out of liquid)
Boil Sense function is activated.
Pan bottom is wet. Wipe the pan and restart the cooking
process.
(flashing)
The lid was removed. Place the lid back onto the pot or pan.
(flashing)
Battery low, or interrupted communication with the
cooking hob.
Press the key on the IQ sensor or restart the program.
Replace the battery.
F1
Dirty or damaged bottom side of the IQ sensor.
Clean the bottom side of the IQ sensor.
If the bottom side is damaged, do not use the sensor.
F2
Error in communication between the IQ sensor and the
hob.
Replace the battery on the IQ sensor.
F3
IQ sensor battery low. Replace the battery.
F4
Cooking zone is too hot. Wait until the cooking zone cools down.
T R O U B L E S H O O T I N G

50 mm
1
2
A
B
IQ SENSOR
Installation and
removal
P R E P A R I N G T H E C O O K W A R E
F
SWITCHING THE IQOOK
SYSTEM ON/ OFF1
OPERATION OF THE
FUNCTIONS
Touch the slider under the
selected icon with your finger, or
slide your finger across the slider
to select the desired function.
2
COOKING POWER LEVELS
Symbol for
connectivity of the lid
with the control module.
low
medium
high
Activate the IQ
system when the cooking
zone is cooled ("H" is not
lit up).
The IQook system
can only be active on
one cooking zone at a
time.
IQOOK CONTROL
DESCRIPTION
OF THE
FUNCTIONS
C O N T R O L U N I T
The selected
function cannot be
changed to another
function during
operation.
COOKING WITH A LARGE
AMOUNT OF WATER
• Rapid heating of water to the
boiling point and maintaining
the boil.
• Place the food into the pan
at the beginning of the
cooking process.
Dishes: pasta
(spaghetti), frozen
vegetables, gnocchi,
dumplings etc.
SLOW COOKING
Method 1
• to finish cooked
dishes.
• So slowly heat up
and maintain a boil.
Stir the food several
times during cooking.
Dishes: goulash,
stews, sauces, rice
etc.
POACHING
• This function is
suitable for cooking
food in liquid – water,
milk, wine etc.
• for delicate food that
tends to fall apart
easily during cooking
or roasting
• Recommended
cooking temperature
is between 70 and
85 °C.
Food: fish, eggs,
poultry etc.
SLOW COOKING
Method 2
• for heating up milk.
Stir the food several
times during cooking.
Dishes: pudding, rice
soufflé, heating up
milk etc.
BRAISING/SEARING
• for dishes that only
require a small
amount of oil, up to
a level of 1 cm.
Temperature:
150-170°C
175-190°C
195-210°C
Dishes: meat,
pancakes,
vegetables etc.
STEAM COOKING
• steam control,
• even cooking.
• The lid must be in place
throughout the cooking
process.
Dishes – preparation:
food weight/kg water (dl) time
japples 0,5 0,2 7-12
potatoes 0,5 0,6 23-30
cauliflower 0,5 0,4 17-25
peas 0,3 0,2 25-30
chickpeas 0,25 1 25-30
cabbage 0,3 0,4 20-25
hot dogs 0,5 1 8-10
kale 0,5 0,4 20-25
clam 0,3 0,4 13-17
beef 0,3 1 50-60
DEFROSTING
FROZEN FOOD
• Defrosting food and
melting chocolate.
KEEPING THE FOOD
WARM
- Eeps the food at a
temperature of about
70°C.
When STEAM
COOKING, first fill the
pot with water and then
add the food.
O P E R A T I O N
FUNCTION
OPERATION –
WHEN USING
THE LID
During the
cooking process, only
lift the lid briefly (only
with functions that
require the IQ sensor)
and do not place it on
another pot or pan.
1
Fill the pot with
water and food
and place it on the
cooking hob.
2
Cover the
pot with a lid
to which the IQ
sensor is attached.
3a
Touch the
on/off key.
A short beep will be
emitted.
4
Touch the slider to
select the desired
function. If the settings
are not changed within
5 seconds, the other
functions will go out.
Cooking time can also
be set (see Minute
Minder, Countdown
Timer).
5
To establish
the connection,
press the key on the
IQ sensor (on the
lid). The symbol
will light up.
3b
Touch the IQ
key. Select
the cooking zone.
1
IQ sensor
Keep the
lowerside of the
sensor always clean.
2
Installing the sensor
Slowly bring the sensor
close to the ring (which you
have previously attached to
the lid) so that it snaps into
place correctly.
4
Removing the sensor
Hold the lid handle
and use your other hand to
remove the IQ sensor.
3
Do not use the IQ
sensor as a lid handle.
1
The lid fitted with the IQ sensor should fit
the pot or pan . Only use the lids correctly
that came with the pots or pans.
2
Before the start and during the cooking process,
the cooking zone and cookware bottom should be
clean and dry.
COOKWARE
Produkspesifikasjoner
Merke: | Gorenje |
Kategori: | Komfyr |
Modell: | IQ634USC |
Timer: | Ja |
Vekt: | 10000 g |
Bredde: | 600 mm |
Dybde: | 510 mm |
Høyde: | 56 mm |
Barnelås: | Ja |
Antall brennere/kokesoner: | 4 |
Kontrollposisjon: | Front |
Produktfarge: | Sort |
Kontrolltype: | Berøringskontroll |
Plassering av innretning: | Innebygget |
Benke type: | Sonebasert induksjon |
Vanlig kokeområde: | - W |
Trenger du hjelp?
Hvis du trenger hjelp med Gorenje IQ634USC still et spørsmål nedenfor, og andre brukere vil svare deg
Komfyr Gorenje Manualer
21 August 2025
21 August 2025
21 August 2025
21 August 2025
21 August 2025
21 August 2025
21 August 2025
21 August 2025
21 August 2025
21 August 2025
Komfyr Manualer
- Komfyr MSW
- Komfyr Teka
- Komfyr Thomson
- Komfyr Uniprodo
- Komfyr Etna
- Komfyr KitchenAid
- Komfyr Pelgrim
- Komfyr Royal Catering
- Komfyr Bosch
- Komfyr BEKO
- Komfyr Exquisit
- Komfyr Hisense
- Komfyr Balay
- Komfyr Siemens
- Komfyr Arcelik
- Komfyr Danby
- Komfyr Bartscher
- Komfyr Smeg
- Komfyr Hoover
- Komfyr Hotpoint
- Komfyr Nabo
- Komfyr Amica
- Komfyr AEG
- Komfyr Inventum
- Komfyr Artusi
- Komfyr Samsung
- Komfyr Neff
- Komfyr Kogan
- Komfyr Caple
- Komfyr Midea
- Komfyr Candy
- Komfyr Kuppersbusch
- Komfyr Monogram
- Komfyr Westinghouse
- Komfyr Sencor
- Komfyr Bertazzoni
- Komfyr Bauknecht
- Komfyr Frigidaire
- Komfyr Breville
- Komfyr Euromaid
- Komfyr GE
- Komfyr Caso
- Komfyr Edilkamin
- Komfyr Fisher Paykel
- Komfyr Fulgor Milano
- Komfyr Tripp Lite
- Komfyr Boretti
- Komfyr Indesit
- Komfyr Asko
- Komfyr Blaupunkt
- Komfyr Blaze
- Komfyr Philco
- Komfyr ATAG
- Komfyr Palazzetti
- Komfyr Cata
- Komfyr Jotul
- Komfyr Wilfa
- Komfyr Kenmore
- Komfyr Fagor
- Komfyr Cadel
- Komfyr Gaggenau
- Komfyr KKT Kolbe
- Komfyr Duracraft
- Komfyr Rommer
- Komfyr Atosa
- Komfyr Perel
- Komfyr Rangemaster
- Komfyr Harvia
- Komfyr Hestan
- Komfyr Thermador
- Komfyr Honeywell
- Komfyr Econo-Heat
- Komfyr Crosley
- Komfyr Pitsos
- Komfyr Nutrichef
- Komfyr Sogo
- Komfyr Sonnenkonig
- Komfyr JennAir
- Komfyr Yamazen
- Komfyr Kaiser
- Komfyr Blomberg
- Komfyr ZLine
- Komfyr De Dietrich
- Komfyr Orima
- Komfyr Imperial
- Komfyr Fuave
- Komfyr Rowi
- Komfyr Oranier
- Komfyr Ariston Thermo
- Komfyr La Nordica
- Komfyr Jøtul
- Komfyr Blumfeldt
- Komfyr Essentiel B
- Komfyr InAlto
- Komfyr BlueStar
- Komfyr Livn
- Komfyr Leisure
- Komfyr Nemco
- Komfyr Vollrath
- Komfyr Haden
- Komfyr Elvita
Nyeste Komfyr Manualer
21 August 2025
21 August 2025
21 August 2025
21 August 2025
21 August 2025
21 August 2025
21 August 2025
21 August 2025
21 August 2025
20 August 2025