Haier HWR05XCR Bruksanvisning
Haier
Air condition
HWR05XCR
Les nedenfor 📖 manual på norsk for Haier HWR05XCR (45 sider) i kategorien Air condition. Denne guiden var nyttig for 19 personer og ble vurdert med 4.5 stjerner i gjennomsnitt av 2 brukere
Side 1/45

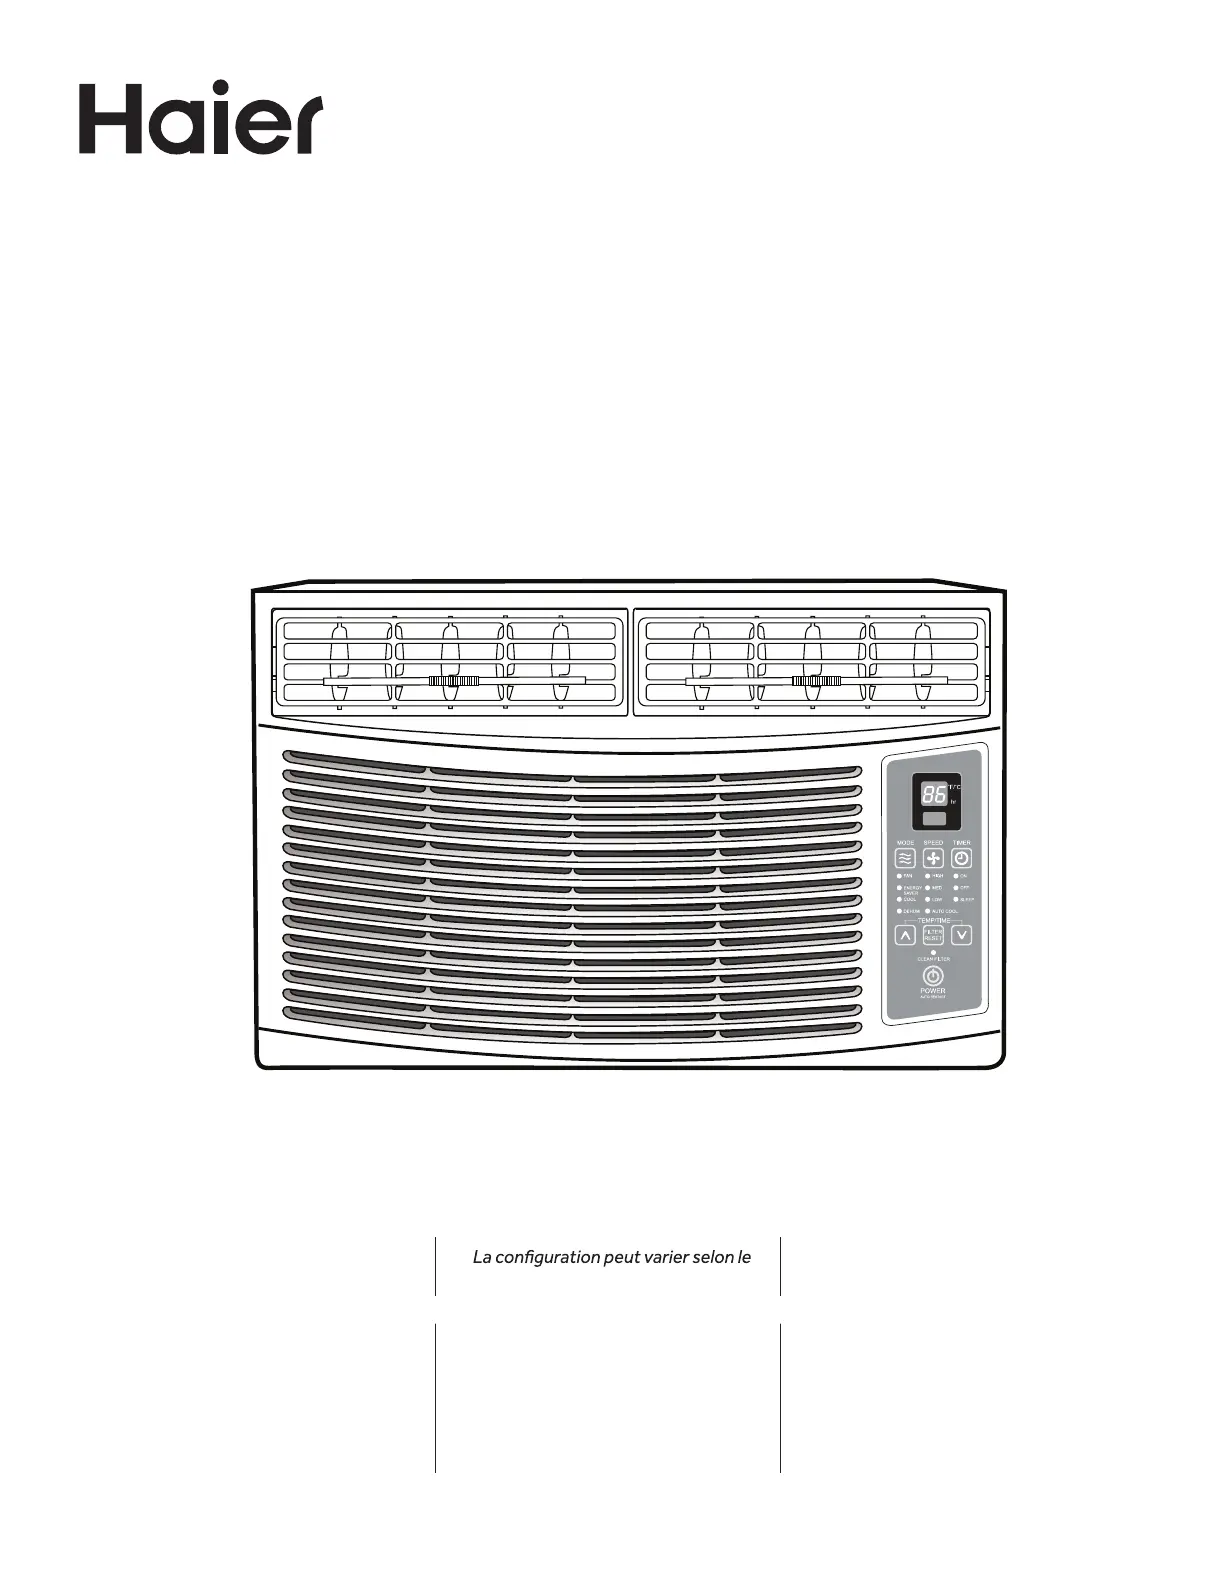
Design may vary by model number.
numéro de modèle.
El diseño puede variar conforme al
número de modelo
This user manual is to be only used for
electronic control 5,000 BTU, 6,000
BTU, 8,000 BTU 10,000 BTU and 12,000
BTU Models. - Some models may have
an additional letter after the model
number.
Ce guide d'utilisation doit être utilisé
strictement avec les modèles à
commande électronique de 5,000 BTU,
6,000 BTU, 8,000 BTU, 10,000 BTU et
12,000 BTU. - Sur certains modèles, le
numéro de modèle peut être suivi d'une
lettre.
Este manual del usuario es únicamente
para utilizar los controles electrónicos
modelos 5,000 BTU, 6,000BTU,
8,000 BTU, 10,000 BTU y12,000 BTU.
Algunos de los modelos pueden tener
una letra adicional después del número
de modelo.
HWR08XCR
HWR10XCR
HWR12XCR
HWR05XCR HWR06XCR
HWE08XCR
HWE10XCR
HWE12XCR
User & Care Guide
Guide d'utilisation et d'entretien
Guía de uso y cuidado
Room Air Conditioner
Climatiseur individuel
Aire acondicionado
de uso doméstico
0010559941


ENGLISH
TABLE OF CONTENTS
PRODUCT REGISTRATION
Thank you for purchasing our Haier
product. This easy-to-use manual will guide
you in getting the best use of your product.
Remember to record the model and serial
numbers. They are on a label on the side of
your unit.
Model number
Serial number
Date of purchase
Staple your receipt to your manual. You will need it to obtain warranty service.
SAFETY INFORMATION.............................................................................................................2
Important Safety Precautions ................................................................................................ 2-3
Operational Safety & Warnings ..................................................................................................4
INSTALLATION REQUIREMENTS .............................................................................................5
Tools and Parts ............................................................................................................................5
Location Requirements ..............................................................................................................6
Electrical Requirements ......................................................................................................... 7-9
HOW TO INSTALL ....................................................................................................................10
Unpacking the Air Conditioner .................................................................................................10
Preparing the Air Conditioner ............................................................................................10-11
Preparing the Window ..............................................................................................................12
Completing the Installation ......................................................................................................13
USING YOUR AIR CONDITIONER ...........................................................................................14
Starting the Air Conditioner ...............................................................................................14-18
Using the Remote Control ..................................................................................................18-19
Changing the Air Direction .......................................................................................................20
CARING FOR YOUR AIR CONDITIONER ................................................................................21
Cleaning the Air Filter ...............................................................................................................21
Cleaning the Front Panel ..........................................................................................................22
Customer Service .....................................................................................................................22
Normal Sounds of an Air Conditioner ......................................................................................23
TROUBLESHOOTING ..............................................................................................................24
LIMITED WARRANTY ...............................................................................................................25

1. Use this air conditioner only for its intended application as described in this
Use & Care Guide.
2. This air conditioner must be properly installed and use the correct wall
outlet that matches with the air conditioner’s power supply cord in
accordance with the Installation Section of this Use & Care Guide before
it is operated.
3. Never unplug the air conditioner by pulling on the power supply cord.
Always grip the plug firmly and pull straight out from the wall outlet.
4. Replace the power supply cord immediately if it becomes damaged in any
way. A new power supply cord must be purchased from the air conditioner
manufacturer and installed by a qualified technician. DO NOT use a power
supply cord that is cracked, split, cut, or damaged anywhere along its
length or either at the plug end or connector end.
5. Turn off the air conditioner and unplug it from the wall outlet before
performing any cleaning or maintenance.
6. Do not store or use combustible or flammable materials or liquids on
or near the air conditioner.
7. If the wall outlet configuration does not match the plug configuration
on the air conditioner, the wall outlet must be changed by a qualified
electrician.
PAGE 2 SAFETY INFORMATION
ENGLISH
THE INFORMATION IN THIS USE & CARE GUIDE MUST BE
FOLLOWED TO MINIMIZE THE RISK OF PERSONAL INJURY, FIRE,
ELECTRIC SHOCK OR OTHER UNSAFE CONDITIONS.
THE INSTRUCTIONS IN THIS USE & CARE GUIDE ARE NOT MEANT
TO INCLUDE EVERY POSSIBLE CONDITION OR SITUATION THAT
MAY OCCUR. USE CAUTION AND CARE WHEN INSTALLING, OPERATING
AND CLEANING THE AIR CONDITIONER.
WARNING
IMPORTANT SAFETY PRECAUTIONS

SAFETY INFORMATION PAGE 3
ENGLISH
8. This air conditioner contains R410a refrigerant and requires certified
technicians to use the proper equipment, tools and safety standards that
are approved for this refrigerant. Use only equipment certified for R410a
refrigerant. In addition, under federal law, all refrigerant must be properly
removed from the air conditioner prior to its disposal.
For responsible disposal of the product, please contact your local
municipality for additional recycling options in your area.
READ AND FOLLOW THE
SAFETY INSTRUCTIONS CAREFULLY.
SAVE THESE INSTRUCTIONS
IMPORTANT SAFETY PRECAUTIONS
State of California Proposition 65 Warnings:
WARNING: This product contains one or more chemicals known to the
State of California to cause cancer.
WARNING: This product contains one or more chemicals known to the
State of California to cause birth defects or other reproductive harm.

ENGLISH
OPERATIONAL SAFETY & WARNINGS
1. This air conditioner contains no consumer serviceable parts. If you have
problems or questions regarding the operation of your air conditioner
always call Haier Customer Service: 1-877-337-3639.
2. Be sure that the air conditioner is properly and securely installed in
the window according to the installation instructions included in this
Use & Care Guide.
3. DO NOT drill any holes in the base or sides of the air conditioner.
4. DO NOT place fingers or objects in the air discharge or air intake in the
front of the air conditioner.
5. DO NOT operate the air conditioner with a protective cover on the
outside section.
6. DO NOT block the air discharge or air intake areas on the front panel.
7. DO NOT block the side louvers on the outside of the air conditioner.
8. DO NOT place any objects either on the indoor or outdoor sections of
the air conditioner
9. Operate the air conditioner with the air filter installed.
10. Keep this Use & Care Guide, carton and packing material for future use
in removing, storing and reinstalling the air conditioner.
PAGE 4 SAFETY INFORMATION

ENGLISH
TOOLS AND PARTS
Read and follow the instructions provided with any tools listed here.
TOOLS NEEDED
PARTS SUPPLIED:
Check that all parts for your specific air conditioner are included in the parts package.
NOTE: If parts are missing, call Haier Customer Service: 1-877-337-3639.
Phillips head screwdriver
Scissors
Level
Tape measure
Drill and 1/8” bit
Pencil
Remote control 1
1
INSTALLATION REQUIREMENTS PAGE 5
ON/OFF
MODE
SPEED
TIMER
TEMP/TIME
TEMP/TIME
IMAGE PART
Top channel
1 1
Foam seal
1 1
Side bracket
2 2
Window lock
bracket
1 1
3/8" self-
tapping screws
3 4
1" wood screws
9 9
Side curtains
2 2
Side curtain
frames
2 2
8,000BTU
10,000BTU
12,000BTU
5,000BTU
6,000BTU

ENGLISH
PAGE 6 INSTALLATION REQUIREMENTS
IMPORTANT: evresbO all governing codes and ordinances. Check the location where the air
conditioner will be installed. Make sure you have everything necessary for correct
installation.
THE LOCATION SHOULD PROVIDE:
• A grounded electrical outlet within 6 ft. (183 cm) of where the power supply cord exits the air
c
HWE10XCR, HWE12XCR
onditioner, for models: ESA405R, ESA406R, ESA408R ,HWR05XCR, HWR06XCR,HWE08XCR
NOTE: oD not use an extension cord, plug adapter, surge protector or multi-outlet adapter.
•
Free movement of air in the room to be cooled.
•
A large enough window opening for the air conditioner. (See Fig.2)
•
The air conditioner must not be installed in a through-the-wall sleeve or in a wall. It can only be
installed in a double-hung wind
ow.
NOTE: The outside cabinet louvers and air discharge must not be obstructed by bushes, trees,
etc. Air must be able to pass freely through the cabinet louvers. (See Fig.1)
WINDOW INSTALLATION
Window opening measurements:
LOCATION REQUIREMENTS
WIDTH
LENGTH
WIDTH
A-WIDTH
B-HEIGHT
Fig. 2
CABINET LOUVERS
Fig. 1
AIR DISCHARGE
HWR05XCR HWR06XCR
HWR08XCR
HWE08XCR
HWR10XCR
HWE10XCR
HWR12XCR
HWE12XCR
A. Width
21-7/8" - 36" 24-1/2" - 36" 25" - 36-5/8" 26-1/8" - 37-3/4"
B. Height 13-3/8" 13-3/8" 14-9/16" 14-9/16"

ENGLISH
1. DO NOT cut or remove the grounding prong on the attached power supply cord. Doing so may
cause sparks or fire, and voids all warranties. For safety purposes the air conditioner must be
properly grounded.
2. To avoid a fire hazard or possible electric shock, DO NOT use an adapter plug, extension cord,
surge protectors, or multi-outlet adapters with the air conditioner.
3. The power supply cord is equipped with a 3-prong plug which mates with a standard 115 volt
wall outlet to minimize the possibility of electrical shock from this air conditioner.
4. The power supply cord includes a leakage current detection interrupter device (LCDI). A
RESET and TEST button are on the plug case. The device should be tested on a periodic
basis by pressing the TEST button and then the RESET button while it is plugged into the wall
outlet. If the TEST button does not trip or the RESET will not stay engaged, do not use the air
conditioner and contact a qualified service technician.
5. Have the wall outlet and circuit inspected by a qualified electrician to ensure that the wall outlet
is properly grounded.
6. If there is a 2-prong wall outlet present and not a 3-prong wall outlet, it is the responsibility of
the user to have it replaced with a properly grounded 3-prong outlet.
7. The air conditioner should always be plugged into a dedicated electrical outlet which has a
voltage rating that matches the serial label on the side of the air conditioner.
8. The electrical ratings for your air conditioner are listed on the Model/Serial Number label. The
Model/Serial Number label is located on the side of the air conditioner cabinet.
9. Specific electrical requirements are listed in the chart below. Follow the requirements for the
type of plug on the power supply cord.
POWER SUPPLY CORD
Wiring Requirements
•
115-Volt (103.5 min. to 126.5 max.)
•
15-Amp time-delay grounded fuse or circuit breaker
•
Use on single outlet circuit only.
ELECTRICAL SAFETY and WARNINGS
WARNING
INSTALLATION REQUIREMENTS PAGE 7
ELECTRICAL REQUIREMENTS

ENGLISH
PAGE 8 INSTALLATION REQUIREMENTS
REQUIRED GROUNDING METHOD (See Fig.3)
This air conditioner must be grounded. This air conditioner is equipped with
a power supply cord that has a 3 prong grounding plug. The power supply
cord must be plugged into a mating, grounded 3 prong outlet, and grounded
in accordance with all local codes and ordinances. If a mating outlet is not
available, it is the customer’s responsibility to contact a qualified electrician
and ensure that a properly grounded 3 prong outlet is installed.
POWER SUPPLY CORD (See Fig.4)
NOTE: Your air conditioner's plug may differ slightly in appearance from the one shown.
A. Reset button
B. Test button
This room air conditioner is equipped with an a leakage current detection interrupter (LCDI)
power supply cord required by UL. This power supply cord contains a current detection device.
If the power supply cord is crushed, this device will detect current leakage and power will be
disconnected from the air conditioner. If this power supply cord is damaged, it cannot be
repaired and must be replaced with a cord from the product manufacturer. If the power supply
cord is damaged call Haier Customer Service: 1-877-337-3639.
ELECTRICAL REQUIREMENTS cont.
RESET
TEST
A
B
Fig. 4
Fig. 3

ENGLISH
TO TEST YOUR POWER SUPPLY CORD:
1. Plug power supply cord into a mating, grounded 3 prong outlet.
(See Fig.5)
2. Press RESET (on some devices, a green light will turn on).
3. Press TEST (listen for click; Reset button will trip, and on some devices,
a green light will turn off).
4. Press and release RESET (listen for click; Reset button will latch, and on
some devices, a green light will turn on). The power supply cord is ready
for operation.
NOTE:
•
The RESET button must be pushed in completely for proper operation.
(See Fig.6)
•
The power supply cord must be replaced if it fails to trip when the test
button is pressed or fails to reset.
•
DO NOT turn the air conditioner on or off by unplugging the power
supply cord from the outlet. Always turn the air conditioner on or off at
the control panel or by using the remote control.
•
A damaged power supply cord must be replaced with a new power
supply cord obtained from the product manufacturer and installed my
a qualified service professional. It cannot be purchased at a retail store
and must not be repaired by the user.
If the power supply cord is damaged please call Haier Customer Service:
1-877-337-3639.
•
The power supply cord contains no user-serviceable parts.
• Opening the tamper-resistant case voids all manufacturer warranties.
• Electrical shock hazard
• Plug into a mating, grounded 3 prong
outlet.
• Do not remove the ground prong from the
power supply cord.
• Do not use a plug adapter, extension cord,
surge protector, or multi-outlet adapter
• Failure to follow these instructions can
result in injury, fire, or electrical shock.
WARNING
INSTALLATION REQUIREMENTS PAGE 9
ELECTRICAL REQUIREMENTS cont.
RESET
TEST
Fig. 5
RESET
TEST
Fig. 6

REMOVE PACKAGING MATERIALS
•
Remove packaging materials. Save the carton and the foam packaging for storing the unit when
not in use.
NOTE: There are NO internal packing materials inside the air conditioner to remove―Do Not
open the cabinet.
•
Handle the air conditioner gently.
•
Keep the air conditioner upright and level. Do not set the air conditioner on its side, front, back
or upside down.
•
The air conditioner must be standing upright for 2 hours prior to installation and operation.
INSTALL TOP CHANNEL
1. Place the top channel on the top of the air conditioner, lining up
the holes in the top channel with the holes in the top of the unit.
Make sure the channel is facing forward as indicated by the
illustrations. (See Fig.7 & 8)
2. Using 3/8" self-tapping screws, attach the top channel to the top
of the air conditioner. (See Fig.8)
Use three (3) 3/8" self-tapping screws for models:
HWR05XCR, HWR06XCR
Use four (4) 3/8" self-tapping screws for models:
HWE08XCR, HWE10XCR, HWE12XCR, HWR08XCR, HWR10XCR,
HWR12XCR
UNPACKING THE AIR CONDITIONER
PREPARING THE AIR CONDITIONER
ENGLISH
EXCESSIVE WEIGHT HAZARD
When moving or lifting the air conditioner, use two or more people.
Wear gloves when handling the air conditioner to protect against
possible sharp edges and metal fins.
WARNING
PAGE 10 HOW TO INSTALL
Fig. 7
Fig. 8
Top Channel
3/8" Screw
(Actual Size)
Front

ENGLISH
INSTALL SIDE CURTAINS
NOTE: Attach side curtains to the air conditioner before placing the unit in the window.
1. Place the tabbed side of the side curtain in
the track on the right-hand side of the air conditioner cabinet. (See Fig.9)
2. Slide the tabbed side of the side curtain down over
all 3 tracks until the curtain is aligned with the top and bottom
of the air conditioner cabinet. (See Fig.11)
3. Slide the side curtain frame over the top of the side curtain, then
into the channel on the top of the air conditioner and
into the track on the bottom of the air conditioner. (See Fig.12)
4. Slide the side curtain frame as close to the air
conditioner cabinet as necessary to lock the side
curtain to the frame. Gently press the frame until
it clicks. (See Fig.10 & Fig.12)
5. Repeat above steps for the left-hand side curtain
and frame. Make sure no gaps are left to ensure that
air does not escape into or out of the room.
HOW TO INSTALL PAGE 11
PREPARING THE AIR CONDITIONER cont.
TABBED SIDE OF
SIDE CURTAIN
LOCK EDGE SIDE
OF SIDE CURTAIN
Fig. 9 Fig. 10
Fig. 11
CLICK
Fig. 12

PREPARING THE WINDOW
ENGLISH
1. Measure the width of the window opening. (See Fig.13)
2. Mark the center line on the inside of the windowsill
with a pencil. (See Fig.14)
•
Do not block the air discharge or air intake areas on the front panel.
•
Do not block the louvers on the outside of the air conditioner.
3. Center the air conditioner in the window sill.
Make sure to place the unit so that it is resting on the windowsill
with a ¼" to ½" downward tilt towards the outside. Lower the
window sash behind the top channel to hold the unit in place.
(See Fig.15)
NOTE: The appearance of your model may differ from the one
shown.
4. Loosen the screw located on the lower-right hand corner of the
air conditioner.
5. Slide the side bracket over the screw. The side bracket should be
resting on the window sill. (See Fig.16)
6. Partially tighten the screw. Secure the unit before tightening completely.
7. Use 1/8" drill bit to drill a starter hole through the holes in the side
bracket.
8. Using two (2) 1" wood screws, attach the side bracket to the
window sill.
9. Repeat for side bracket installation on the left-hand side of the air
conditioner.
NOTES AND WARNINGS:
•
Be sure your air conditioner does not fall out of the window opening during installation
or removal.
PAGE 12 HOW TO INSTALL
Fig. 13
Fig. 14
Fig. 16
WIDTH
LENGTH
HEIGHT
WIDTH
WIDTH
CENTER
WIDTH OF
WINDOW OPENING
CENTER LINE
Top Channel
Lower Window Sash
Fig. 15

ENGLISH
COMPLETING THE INSTALLATION
ATTACH SIDE CURTAINS TO WINDOW
1. Pull the right-hand curtain and frame out until it fits flush to the side
of the window frame. (See Fig.17)
2. Use a 1/8” drill bit to drill a starter hole through the top hole in the
side curtain and into the window sash.
3. Insert one (1) 1" wood screws through the top hole of the right-
hand curtain and into the window sash. (See Fig.18)
4. Repeat for the left-hand curtain.
5. Use a 1/8" drill bit to drill a starter hole into the window sill using the
bottom hole in the side curtain as a guide.
6. Insert one (1) 1" wood screws through the bottom hole of
the right-hand curtain and into the window sill. (See Fig.19)
7. Repeat for the left-hand curtain.
FINAL INSTALLATION
1. Uncoil the included foam seal. (See Fig.20)
2. Insert the foam seal behind the top of the lower window sash
and against the glass of the upper window.
3. Place the window lock bracket as shown in the diagram using
a screwdriver. Use a 1/8" drill bit to drill a starter hole through the
hole in the window lock bracket and into the upper window. (See
Fig.21)
4. Attach the window lock bracket to the upper window with one (1)
1" wood screw to secure the unit in place.
5. Plug unit into a grounded 3 prong outlet.
6. Press RESET on the power supply cord on some devices.
A green light will come on. See “Electrical Requirements"
for full detail.
HOW TO INSTALL PAGE 13
Fig. 17
Fig. 18
Fig. 20
Fig. 21
Fig. 19

POWER
AUTO RESTART
CLEAN FILTER
TEMP/TIME
FAN
MODE SPEED TIMER
˚F/˚C
hr
HIGH
COOL
ENERGY
SAVE
MED
LOW SLEEP
OFF
ON
AUTO COOLDEHUM
FILTER
RESET
86
Operating your air conditioner properly helps you to obtain the best possible results.
This section explains how to operate this air conditioner.
STARTING THE AIR CONDITIONER
ENGLISH
IMPORTANT:
• When you turn off the air conditioner , either at the control panel or with the remote control,
wait at least 3 minutes before turning it back on. This prevents the compressor from
overloading. This 3 minute delay also applies when switching from cool mode to fan and
back.
Note: There is a built in 3 minute delay. You may notice the compressor might not start right
away. This was designed to protect the unit.
• Do not operate your air conditioner in the Cool mode when the outside temperature is below
61°F (16° C). The inside evaporator coil will freeze up, and the air conditioner will not operate
properly.
PAGE 14 USING YOUR AIR CONDITIONER
POWER
FILTER RESET
CLEAN FILTER
INDICATOR
MODE SPEED
TEMPERATURE / TIME
TIMER

1. Carefully remove the clear plastic film from the control panel.
2. Press POWER once to turn on the air conditioner.
NOTE: When the air conditioner is first plugged in, the LED display will show “88” for 3 seconds.
After the air conditioner is turned on for the first time, the display will show the
temperature 72 F and the fan is automatically set to Low speed and the Mode indicator will
show ENERGY SAVE.
NOTE: To switch the temperature display between Fahrenheit (F) and Celsius(C), the air
conditioner must be plugged in and turned on. On the control panel on the front of the
AC, press the UP and DOWN button at the same time and hold for 3 seconds. The change
cannot be done using the remote control.
3. Select Mode. Refer to “Mode.”
4. Select Speed. Refer to “Speed.”
5. Set Timer. Refer to “Temp/Time”
6. Reset the filter. Refer to “Filter Reset”
MODE
1. Press mode until you see the indicator light come on next to the desired setting.
2. Choose Fan, Cool, Energy Save, or Dehum.
FAN— Only the fan runs. Press SPEED to select High, Med or Low fan speed. The display shows
the current room temperature.
NOTE: In fan mode, the temperature cannot be set.
ENERGY SAVE— In this mode the fan runs only when cooling is needed. The fan will run for 3
minute after the compressor shuts off. The fan then cycles on for 2 minutes
at 10 minute intervals until the temperature in the room is above the set
temperature. The compressor then turns back on.
COOL— Cools the room. Press SPEED to select High,Med , Low or Auto Cool fan speed. Press
the TEMP/TIME up or down arrow button to adjust the temperature. The fan will run
continuously in cool mode.
DEHUM— Aids in removing humidity from the room. Dehum mode cannot be used to cool room.
NOTE: In Dehum mode, when the set temperature is close to ambient temperature, the
compressor may stop and the fan will run in low speed only.
ENGLISH
STARTING THE AIR CONDITIONER cont.
USING YOUR AIR CONDITIONER PAGE 15

STARTING THE AIR CONDITIONER cont.
SPEED
1. Press FAN SPEED until; you see the indicator light come on next to the
desired setting.
2. Choose High, Med, Low or Auto Cool
HIGH—For maximum cooling
MED—For normal cooling
LOW—For minimum cooling
AUTO COOL – Adjusts the fan speed automatically to provide ideal cooling
based on the room temperature.
TIMER OFF
To set the air conditioner to turn off between 1 hour and 24 hours (The air
conditioner must be ON to set):
1. Press TIMER button until Timer Off indicator light illuminates. The display
will show the remaining hours before the air conditioner will turn off.
2. Press the TEMP/TIME up or down arrow button to change the delay time
from 1 hour to 24 hours.
3. Timer Off indicator light will remain on. The display will show the left time to Timer Off.
TIMER ON
To set the air conditioner to turn on bwtween 1 and 24 hours:
1. Press TIMER until Timer On indicator light illuminates. The display will show the remaining
hours before the air conditioner will turn on.
2. Press the TEMP/TIME up or down arrow button to change the delay time from 1 hour to 24
hours.
3. Timer On indicator light will remain on. Unit will shut off and restart.
ENGLISH
PAGE 16 USING YOUR AIR CONDITIONER
POWER
AUTO RESTART
CLEAN FILTER
TEMP/TIME
FAN
MODE SPEED TIMER
˚F/˚C
hr
HIGH
COOL
ENERGY
SAVE
MED
LOW SLEEP
OFF
ON
AUTO COOLDEHUM
FILTER
RESET
86

ENGLISH
STARTING THE AIR CONDITIONER cont.
TO CLEAR TIMER PROGRAM:
NOTE: Air conditioner can be either on or off.
Press TIMER until Timer indicator light turns off.
TO VIEW OR CHANGE THE REMAINING TIME (IN HOURS):
TIMER OFF
1. Press the TEMP/TIME up or down arrow button to increase or decrease the time.
2. After 5 seconds, the display will show the remaining time to Timer OFF.
TIMER ON
1. Press the TEMP/TIME up or down arrow button to increase or decrease the time.
2. The display will show the remaining time to Timer ON.
NOTE: In TIMER and SLEEP mode, temperature cannot be adjusted.
SLEEP
1. Press the TIMER button to choose Sleep mode. The indicator light will turn on.
2. The temperature will increase by 2˚F 1 hour after the mode is chosen. The temperature then
increases another 2˚F after 1 hour. The unit will hold this temperature for 6 hours then stops.
3. To turn off Sleep mode, press the TIMER button until the indicator light is off.
TEMP/TIME
1. Press the TEMP/TIME up arrow button to raise the temperature. Each time you press the
TEMP/TIME up arrow button, the temperature will go up 1°F until it reaches 86°F (30°C).
2. Press the TEMP/TIME down arrow button to lower the temperature. Each time you press the
TEMP/TIME down arrow button, the temperature will go down 1°F until it reaches 61°F (16°C).
NOTE: After 5 seconds, under Fan mode, the display will show the current temperature. Under
Energy Save,Cool or Dehum mode, the display will show the set temperature.
USING YOUR AIR CONDITIONER PAGE 17

ENGLISH
FILTER RESET
This feature automatically notifies you that the air filter must be cleaned. The indicator light will
come on after 240 hours of operation. Clean the air filter (refer to Care and Cleaning), place it back
in the front panel, and press the Filter Reset button. The light will turn off.
NOTE: The raised dots are Braille for the visually impaired. (See Fig.22)
Remote control may differ in appearance from the image shown.
NOTE:
Remove and discard protective film prior to use. The remote control runs
on one CR2025 battery (included). Replace battery after 6 months of use,
or when the remote control starts to lose power. To change battery, first
Press ON/OFF to turn on the air conditioner.When you first press the ON/OFF
button, the air conditioner will operate in Energy Save mode, low fan speed and
temperature of 72°F. You can select any other mode to satisfy your needs.
Fig. 22
ON/OFF
MODE
SPEED
TIMER
TEMP/TIME
TEMP/TIME
remove screw on back panel of remote.
POWER
Mode
Press MODE to choose Fan, Energy Save, Cool or Dehum.
Speed
Press SPEED to choose High, Med, Low or Auto Cool.
TIMER
To set the air conditioner to turn off after a set amount between 1 hour and 24 hours (unit must
be ON):
1. Press TIMER. Timer OFF indicator light on the air conditioner control panel will illuminate.
2. Press the TEMP/TIME up or down arrow button to change the delay time from 1 hour to 24
hours.
3. Timer OFF indicator light on the air conditioner control panel will remain on.
To set the air conditioner to turn on between 1 hour and 24 hours:
1. Press TIMER. Timer On indicator light on the air conditioner control panel will illuminate.
2. Press the TEMP/TIME up or down arrow button to change the delay time from 1 hour to 24
hours.
3. Timer On indicator light on the air conditioner control panel will remain on.
PAGE 18 USING YOUR AIR CONDITIONER
STARTING THE AIR CONDITIONER cont.
USING THE REMOTE CONTROL

HWR05XCR
2-Way Air Flow: The air directional louvers let you control the direction of the airflow. The airflow
can be directed left to right.(See Fig.23)
HWR06XCR, HWE08XCR, HWE10XCR, HWE12XCR, HWR08XCR, HWR10XCR, HWR12XCR
4-Way Air Flow: The air directional louvers let you control the direction of the airflow. The airflow
CHANGING THE AIR DIRECTION
ENGLISH
PAGE 20 USING YOUR AIR CONDITIONER
Fig. 23
o
p
e
n
Fig. 24

ENGLISH
USING YOUR AIR CONDITIONER PAGE 21
CLEANING THE AIR FILTER
While your air conditioner is operating, it is normal to hear the following sounds:
The air filter is removable for easy cleaning. A clean air filter helps remove dust, lint, and particles
from the air for optimal cooling and operating efficiency. The Filter Reset light will turn on to
notify you that the air filter must be cleaned. The light goes on after the air conditioner has been
operating for 240 hours.
1. Turn off the air conditioner and unplug the power supply cord from the outlet.
2. Remove the air filter by opening the front panel and removing the air filter. Some models may
have a filter that slides out instead and does not require opening of the front panel. (See Fig.25
& Fig.26)
3. Use a vacuum cleaner with the hose attachment to clean the air filter. If the air filter is very
dirty, wash it in warm water with a mild detergent. Do not wash the air filter in a dishwasher or
clothes washer, or use any chemical cleaners. Do not use a clothes dryer or microwave oven to
dry it. Air-dry the air filter completely before placing it back in the unit.
4. Place the air filter back in the air conditioner.
Fig. 25
Fig. 26

IMPORTANT
DO NOT RETURN THIS PRODUCT TO THE STORE
If you have a problem with this product, please contact the
Haier Customer Satisfaction Center at 1-877-337-3639.
DATED PROOF OF PURCHASE, MODEL # AND SERIAL #
REQUIRED FOR WARRANTY SERVICE
CLEANING THE FRONT PANEL
PAGE 22 CARING FOR YOUR AIR CONDITIONER
ENGLISH
CUSTOMER
SERVICE
1-877-337-3639
5. Close the front panel.
6. Plug the power supply cord into the outlet, turn on the air conditioner and press the filter reset
button to turn off the indicator light.
NOTE: Do not operate the air conditioner without the filter in place.
1. Turn off the air conditioner and unplug the power supply cord from the outlet.
2. Clean the front panel with a soft cloth. Do not use chemical cleaners, especially spray cleaners,
sharp instruments, or flammable fluids. These products can damage the surface of your air
conditioner.
3. Air-dry the front panel completely.
4. Plug the power supply cord in the outlet and turn on the air conditioner.
In the event that the filter is damaged and needs replacing, call Haier Customer Service:
1-877-337-3639
CUSTOMER SERVICE

NORMAL SOUNDS OF AN AIR CONDITIONER
CARING FOR YOUR AIR CONDITIONER PAGE 23
can be directed up-down and left to right. (See Fig.24)
NORMAL SOUNDS
Your new air conditioner is designed to give you many years of dependable service. This section
tells you how to clean and care for your air conditioner properly.
SOUNDS REASON
Air movement Air rotating around the fan.
Window vibration Installation not correct. Refer to Install section
Pinging
Water droplets being thrown against the outside coil. This helps cool the
condenser coil.
You can reduce this noise by removing the subbase water plug. (See
Fig.27) Removing this plug will lower the Energy Efficiency of your unit.
NOTE: Do not drill hole in base pan.
High pitched hum The compressor turning on and off.
Clicking The thermostat turning on and off.
Gurgling Refrigerant moving through the inside coil.
Fig. 27

PAGE 24 TROUBLESHOOTING
TROUBLESHOOTING
POSSIBLE
PROBLEM
POSSIBLE CAUSE REMEDY
Air Conditioner
does not start or
operate
Power supply cord is not plugged
into an outlet.
Plug unit into a mating grounded outlet.
Power supply cord has tripped. Press and release RESET button on the power
supply cord.
Unit is turned off. Turn on unit using remote control or on
control panel.
A household fuse or circuit breaker
has blown.
Replace the fuse or reset the circuit breaker.
Remote control is
not working
Batteries are dead. Replace the batteries.
Batteries inserted wrong. Make sure batteries are inserted in the
correct position.
Room does not
feel cold enough
The room is too hot. Allow time for the room to cool down when
you turn on the unit.
The temperature control may not
be set correctly.
Adjust the temperature control on the
control panel or remote control.
Air flow is restricted. Make sure the air discharge area is not
blocked.
Room feels too
cold
Temperature set too low. Raise the set temperature.
Air conditioner
cycles on and off
too often
Air filter is dirty or restricted. Clean the air filter.
Air flow is restricted. Make sure the air discharge area is not
blocked.
Outside air temperature is below
61˚F.
Do not operate the unit when the outside
temperature is below 61˚F.
Outside temperature is very hot. Raise the FAN speed to the highest setting.
Water drips into
your house
Air conditioner is not properly
leveled.
Tilt unit slightly from the front to the back.
Refer to Installation section. DO NOT drill a
hole in the cabinet base.
Water drips
outside your
house
Hot, humid weather. This is normal during days with high humidity.
Water collects in
cabinet base
Humidity drains into cabinet base. This is normal during days with high humidity.
DO NOT drill a hole in the cabinet base.
Air conditioner is
freezing up; ice
forming on coil
Temperature outside is too low,
below 61˚F.
To defrost coil, set to FAN ONLY setting.

ONE YEAR LIMITED WARRANTY
This warranty covers all defects in workmanship
or material for the mechanical and electrical parts
(including labor costs) contained in this product for
a period of 12 months from the date of purchase.
For commercial or rental application, the warranty
is 90 days. You must keep and be able to provide
your original sales receipt as proof of the date of
purchase.
The sealed system and compressor (hermetic
compressor, condenser and evaporator) contained
in this product is for a period of 1 year from the
date of purchase. You must keep and be able to
provide your original sales receipt as proof of the
date of purchase.
WHO IS COVERED
The original retail purchaser of this product.
WHAT WILL BE DONE
Haier America will repair or replace any mechanical,
electrical part or the compressor, which proves
defective in normal household use for a period of
12 months.
HOW CAN YOU GET SERVICE
Contact your nearest manufacturer-authorized
Service Depot. For the name of the Service Depot
nearest you, contact Haier America at 1-877-337-
3639.
All service must be performed by a manufacturer-
authorized Service Depot.
THIS WARRANTY DOES NOT COVER
1. Damages from improper installation.
2. Damages in shipping.
3. Defects other than manufacturing.
4. Damages from misuse, abuse, accident,
alteration, lack of proper care and maintenance
or incorrect current or voltage.
5. Damage from other than household use.
6. Damages from service by other than an
authorized dealer or service center.
7. Decorative trims.
8. Labor, service, transportation and shipping
charges for the removal of defective parts and
installation of replacement parts beyond the
initial 12-month period.
9. Credit or refund for products over 30 days
past date of purchase, or for any loss or injury
caused by the product or defects to the product
including but not limited to incidental or
consequential damages.
10. Refurbished product purchased as/like new or
second-hand.
THIS LIMITED WARRANTY IS GIVEN IN LIEU
OF ALL OTHER WARRANTIES, EXPRESS OR
IMPLIED, INCLUDING THE WARRANTIES OF
MERCHANTABILITY AND FITNESS FOR A
PARTICULAR PURPOSE.
The remedy provided in this warranty is exclusive
and is granted in lieu of all other remedies.
This warranty does not cover incidental or
consequential damages. Some states do not
allow the exclusion of incidental or consequential
damages, so this limitation may not apply to you.
Some states do not allow limitations on how long
an implied warranty lasts, so this limitation may not
apply to you. This warranty gives you specic legal
rights and you may aldo have other rights which
vary from state to state.
This warranty covers units within the continental
United States, Canada and Puerto Rico.
Haier America,
Wayne, NJ 07470
LIMITED WARRANTY
LIMITED WARRANTY PAGE 25


TABLE DES MATIÈRES
ENREGISTREMENT DU PRODUIT
Brochez le reçu de caisse au guide. Il vous le faudra pour obtenir du service en vertu de la garantie.
RENSEIGNEMENTS SUR LA SÉCURITÉ ...................................................................................2
Consignes de sécurité importantes ...................................................................................... 2-3
Utilisation sécuritaire et avertissements ..................................................................................4
EXIGENCES RELATIVES À L'INSTALLATION .........................................................................5
Outils et pièces ...........................................................................................................................5
Exigences relatives à l'emplacement.........................................................................................6
Exigences en matière d'électricité ......................................................................................... 7-9
COMMENT INSTALLER LE CLIMATISEUR .............................................................................10
Déballage du climatiseur ..........................................................................................................10
Préparation du climatiseur .................................................................................................10-11
Préparation de la fenêtre ..........................................................................................................12
Achèvement de l'installation ....................................................................................................13
UTILISATION DE VOTRE CLIMATISEUR ...............................................................................14
Démarrage du climatiseur ..................................................................................................14-18
Utilisation de la télécommande .........................................................................................18-19
Changement du sens de circulation de l'air .............................................................................20
ENTRETIEN DE VOTRE CLIMATISEUR ..................................................................................21
Nettoyage du filtre à air ............................................................................................................21
Nettoyage du panneau avant ...................................................................................................22
Service à la clientèle .................................................................................................................22
Bruits normaux produits par un climatiseur ...........................................................................23
DÉPANNAGE ............................................................................................................................24
GARANTIE LIMITÉE .................................................................................................................25
Merci d'avoir acheté un produit Haier. Ce guide
convivial vous aidera à utiliser votre climatiseur
de façon optimale.
Rappelez-vous de prendre en note les numéros
de modèle et de série. Ces numéros figurent
sur une étiquette située sur le côté de l’appareil.
Numéro de modèle
Numéro de série
Date d'achat
FRANÇAIS

1. N'utiliser cet appareil qu'aux fins prévues, tel que décrit dans ce guide
d'utilisation et d'entretien.
2. Avant l'utilisation, ce climatiseur doit être correctement installé et branché
dans une prise murale appropriée correspondant au cordon d'alimentation
du climatiseur, conformément à la partie « Installation » de ce guide.
3. Ne jamais débrancher le climatiseur en tirant sur son cordon d'alimentation.
Toujours saisir la fiche fermement et la tirer en ligne droite pour la dégager
de la prise de courant.
4. Remplacer immédiatement le cordon d'alimentation électrique s'il présente
quelque dommage que ce soit. Un nouveau cordon d'alimentation doit être
acheté du fabricant du climatiseur, puis installé par un technicien qualifié.
NE PAS UTILISER un cordon si celui-ci, la fiche ou l'embout du connecteur
est fissuré, fendu ou endommagé.
5. Éteindre le climatiseur et le débrancher de la prise murale avant de procéder
à du nettoyage ou de l'entretien.
6. Ne pas entreposer ou utiliser de combustibles ou de matières inflammables
sur le climatiseur ou à proximité de celui-ci.
7. Si la prise murale n'est pas correctement configurée pour la fiche du
climatiseur, la prise doit être remplacée par un électricien qualifié.
PAGE 2 RENSEIGNEMENTS SUR LA SÉCURITÉ
L'INFORMATION FIGURANT DANS CE GUIDE D'UTILISATION
ETD'ENTRETIENDOIT ÊTRE SUIVIE À LA LETTRE POUR MINIMISER
LESRISQUESDE BLESSURE, D'INCENDIE, D'ÉLECTROCUTION OU DE TOUTE
AUTRE CONDITION DANGEREUSE.
LES DIRECTIVES FIGURANT CE GUIDE NE SAURAIENT ENGLOBER L'ENSEMBLE
DES CONDITIONS OU SITUATIONS POUVANT SURVENIR. AGIR AVEC
SOIN ETPR…CAUTION LORS DE L'INSTALLATION, DE L'UTILISATION ET
DUNETTOYAGE DU CLIMATISEUR.
AVERTISSEMENT
CONSIGNES DE SÉCURITÉ IMPORTANTES
FRANÇAIS

RENSEIGNEMENTS SUR LA SÉCURITÉ PAGE 3
8. Ce climatiseur contient un fluide frigorigène de type R410a. Par conséquent,
les électriciens devront être certifiés et utiliser l'équipement et les outils
appropriés, en plus de suivre les normes de sécurité appropriées à ce fluide
frigorigène. N'utiliser que l'équipement certifié pour les fluides frigorigènes
R410a. En plus, en vertu des lois fédérales, le climatiseur doit être vidé de
tout son liquide frigorigène avant d'être mis aux rebuts.
LISEZ ATTENTIVEMENT ET OBSERVEZ À LA LETTRE
LESCONSIGNES DE SÉCURITÉ.
CONSERVEZ CES INSTRUCTIONS
CONSIGNES DE SÉCURITÉ IMPORTANTES
FRANÇAIS

UTILISATION SÉCURITAIRE
ETAVERTISSEMENTS
1. L'appareil ne comporte aucune pièce pouvant être entretenue ou réparée.
En cas de problème, ou pour toute question relative au fonctionnement
duclimatiseur, toujours appeler le service à la clientèle de Haier :
1-877-337-3639.
2. S'assurer que le climatiseur est installé de façon sécuritaire et appropriée
dans sa fenêtre, et que ce soit fait conformément aux directives
d'installation figurant dans ce guide.
3. NE percer AUCUN trou dans la base ou les côtés du climatiseur.
4. NE PAS insérer les doigts ou des objets dans les grilles de sortie ou d'entrée
d'air à l'avant du climatiseur.
5. NE PAS faire fonctionner le climatiseur si sa partie ressortant à l'extérieur
est recouverte d'une bâche protectrice.
6. NE PAS bloquer les zones d'entrée ou de sortie d'air du panneau avant.
7. RIEN ne doit obstruer les grilles d'aération latérales du climatiseur.
8. NE placer AUCUN objet sur les parties du climatiseur à l'intérieur
ouàl'extérieur.
9. Ne pas faire fonctionner un climatiseur dont le filtre à air n'est pas installé.
10. Conserver ce guide d'utilisation et d'entretien, la boîte et les matériaux
d'emballage pour utilisation ultérieure, par exemple pour retirer,
entreposer et réinstaller le climatiseur.
PAGE 4 RENSEIGNEMENTS SUR LA SÉCURITÉ
FRANÇAIS

OUTILS ET PIÈCES
Lire et observer les instructions fournies avec chaque outil énuméré ci-dessous.
OUTILS REQUIS
PIÈCES FOURNIES :
Vérifier si toutes les pièces de votre modèle de climatiseur sont comprises dans le sac de pièces.
REMARQUE : En cas de pièce manquante, téléphoner au service à la clientèle de Haier : 1-877-337-3639.
IMAGE
PIÈ
CE
8,000BTU
10,000BTU
12,000BTU
Glissière
supérieure
1 1
Joint
d'étanchéité
enmousse
1 1
Ferrure latérale
2 2
Ferrure
deblocage
defenêtre
1 1
Vis à métaux
de3/8 po
3 4
Vis à bois
de1po
9 9
Panneaux
latéraux (2)
2 2
Supports
pourpanneaux
latéraux
2 2
Télécommande 1
1
EXIGENCES RELATIVES À L'INSTALLATION PAGE 5
Tournevis cruciforme
Ciseaux
Niveau
Ruban à mesurer
Perceuse sans fil et mèche
de 1/8 po
Crayon
FRANÇAIS
5,000BTU
6,000BTU
ON/OFF
MODE
SPEED
TIMER
TEMP/TIME
TEMP/TIME

PAGE 6 EXIGENCES RELATIVES À L'INSTALLATION
IMPORTANT: eS conformer à l'ensemble des codes et des ordonnances en vigueur. Inspecter
l'endroit où l'installation sera effectuée. S'assurer d'avoir en main tout le nécessaire
pour mener à bien l'installation.
RECOMMANDATIONS CONCERNANT L'ENDROIT CHOISI POUR FAIRE L'INSTALLATION :
• enU prise électrique mise à la terre située à moins de 183 cm (6 pi) de la sortie du cordon
d'alimentation
HWE10XCR, HWE12XCR, HWR08XCR, HWR10XCR, HWR12XCR
du climatiseur, pour les modèles: HWR05XCR, HWR06XCR,HWE08XCR,
REMARQUE : eN pas utiliser de rallonge électrique ou d'adaptateur, de limiteur de surtension
oud'adaptateur à prises multiples.
•
La libre circulation de l'air dans la pièce à climatiser.
• Une fenêtre assez grande pour le climatiseur (Voir fig.2)
• Le climatiseur ne doit être d'aucune façon encastré au mur. Il ne peut être installé que dans une
fenêtre à guillotine double.
REMARQUE : seL évents du meuble et la décharge d'air ne doivent pas être obstrués par les
buissons, les
arbres, etc. L'air doit être libre de passer librement par les évents du
meuble. (Voir fig.1)
INSTALLATION À LA FENÊTRE
Mesures de l'ouverture de fenêtre :
EXIGENCES RELATIVES À L’EMPLACEMENT
WIDTH
LENGTH
WIDTH
A-LARGEUR
B-HAUTEUR
Fig. 2
FRANÇAIS
PERSIENNES DU
CAISSON
Fig. 1
DÉCHARGE D'AIR
556 -914 mm 622 -914 mm 635 -930 mm 664 -959mm
340 mm 340 mm 370 mm 370 mm
A. Largeur
B. Hauteur
HWR05XCR HWR06XCR
HWR08XCR
HWE08XCR
HWR10XCR
HWE10XCR
HWR12XCR
HWE12XCR

1. NE PAS couper ou enlever la broche de mise à la terre de la fiche d'alimentation. Cela pourrait
provoquer des étincelles ou un incendie, et annulera toutes les garanties. Pour des raisons
desécurité, le climatiseur doit être correctement mis à la terre.
2. Pour éviter tout risque d'incendie ou d'électrocution, NE PAS utiliser d'adaptateur, de rallonge
électrique, de limiteur de surtension ou d'adaptateurs à prises multiples avec le climatiseur.
3. Le cordon d'alimentation est muni d'une fiche à trois broches qui s'emboite dans une prise
murale standard de 115 volts pour minimiser la possibilité d'électrocution avec ce climatiseur.
4. Le cordon d'alimentation comporte un interrupteur détecteur de courant de fuite (LCDI).
Des boutons de réinitialisation (RESET) et d'essai (TEST) se trouvent sur le boîtier de la fiche.
L'appareil devrait être testé périodiquement en appuyant sur TEST puis sur RESET pendant
qu'il est branché dans la prise murale. Si le bouton TEST ne se déclenche pas, ou si le bouton
RESET ne reste pas enfoncé, cesser d'utiliser le climatiseur et communiquer avec un technicien
en entretien et en réparation qualifié.
5. Faire inspecter la prise murale et le circuit par un électricien qualifié pour s'assurer de la mise
àla terre appropriée de la prise.
6. En présence d'une prise bipolaire (à 2 broches seulement) et non à tripolaire (à 3 broches),
ilincombe à l'utilisateur de faire remplacer la prise bipolaire par une prise tripolaire
correctement mise à la terre.
7. Le climatiseur devrait toujours être branché à une prise électrique dédiée, de tension nominale
équivalente à celle figurant sur l'étiquette se trouvant sur le côté du climatiseur.
8. Les caractéristiques électriques de votre climatiseur figurent sur l'étiquette du numéro
demodèle et de série. L’étiquette du numéro de modèle et de série se trouve soit sur le côté,
soit à l'arrière du caisson de votre appareil, ou encore derrière la grille avant.
9. Les exigences précises en matière d'électricité sont indiquées ci-dessous. Il importe de se
conformer aux exigences relatives au type de fiche du cordon d'alimentation.
CORDON D'ALIMENTATION
Exigences relatives au câblage électrique
•
115 volts (103,5 min. jusqu'à 126,5 max.)
• Fusible temporisé ou disjoncteur de 15 A
• N'utiliser l'appareil que sur des circuits à prise unique.
SÉCURITÉ ÉLECTRIQUE et AVERTISSEMENTS
AVERTISSEMENT
EXIGENCES RELATIVES À L'INSTALLATION PAGE 7
EXIGENCES EN MATIÈRE D'ÉLECTRICITÉ
FRANÇAIS

PAGE 8 EXIGENCES RELATIVES À L'INSTALLATION
MOYEN DE MISE À LA TERRE REQUIS (voir la figure 3)
Ce climatiseur doit être mis à la terre. Il comporte un cordon d'alimentation
muni d'une fiche à trois broches, dont une de mise à la terre. Le cordon
doit être branché à une prise d'accouplement tripolaire mise à la terre
conformément aux codes et aux ordonnances en vigueur. Si une prise
d'accouplement n'est pas disponible, il incombe au client qu'une prise
tripolairecorrectement mise à la terre soit installée par un électricien qualifié.
CORDON D'ALIMENTATION (voir la figure 4)
REMARQUE : L’apparence de votre climatiseur peut différer légèrement du modèle illustré.
A. Bouton de réinitialisation (RESET)
B. Bouton d'essai (Test)
Ce climatiseur est équipé d'un cordon d'alimentation muni d'un interrupteur détecteur
decourant de fuite (LCDI), conformément aux normes de l'Underwriter's Laboratory (UL).
Cecordon d'alimentation comporte également un dispositif de détection du courant. Si le
cordon est écrasé, ce dispositif détectera la fuite de courant électrique et coupera l'alimentation
au climatiseur. Si ce cordon d'alimentation est endommagé, il ne doit pas être réparé. Il doit
être remplacé par un cordon du fabricant. Dans un tel contexte, appeler le service à la clientèle
deHaier, au 1-877-337-3639.
EXIGENCES EN MATIÈRE D'ÉLECTRICITÉ (suite)
RESET
TEST
A
B
Fig. 4
Fig. 3
FRANÇAIS

POUR FAIRE L'ESSAI DE VOTRE CORDON D'ALIMENTATION :
1. Brancher le cordon d'alimentation à une prise tripolaire mise à la terre.
(voir figure 5)
2. Appuyez sur RESET (sur certains modèles, un voyant lumineux
verts'allumera).
3. Appuyer sur TEST (attendre le déclic; le bouton RESET se déclenchera,
et, sur certains modèles, un voyant lumineux vert s'éteindra).
4. Appuyer sur RESET, puis relâcher (attendre le déclic; le bouton RESET
REMARQUE :
•
Le bouton de réinitialisation doit être enfoncé pour un fonctionnement adéquat.
(voir figure 6)
•
Le cordon d'alimentation doit être remplacé si le déclenchement
nesefait pas lorsque le bouton de test est enfoncé ou s'il ne
seréinitialise pas.
•
NE PAS mettre en marche ou arrêter le climatiseur en débranchant/
rebranchant le cordon d'alimentation de la prise. Toujours mettre
en marche ou arrêter l'appareil via le panneau de commande
oulatélécommande.
•
Un cordon d'alimentation endommagé ne doit pas être réparé; il doit
être remplacé par un cordon neuf, obtenu auprès du fabricant du
produit, et installé par un professionnel de la réparation et de l'entretien qualifié.
Ces cordons doivent ni être achetés en magasin, ni être réparés par l'utilisateur.
Dans le cas d'un cordon endommagé, appeler le service à la clientèle de Haier,
au 1-877-337-3639.
•
Le cordon d'alimentation ne comporte aucune pièce pouvant être entretenue ou réparée.
•
Le fait d'ouvrir le boîtier inviolable annule toutes les garanties du fabricant.
• Risque d'électrocution.
• Brancher l'appareil à une fiche tripolaire
mise à la terre.
• Ne pas enlever la broche de mise à la terre
du cordon d'alimentation.
• Ne pas utiliser d'adaptateur, de rallonge
électrique de limiteur de surtension
oud'adaptateur à prises multiples.
• La non-observance de ces instructions
peut entraîner des blessures, un incendie
ou une électrocution.
AVERTISSEMENT
EXIGENCES RELATIVES À L'INSTALLATION PAGE 9
EXIGENCES EN MATIÈRE D'ÉLECTRICITÉ (suite)
RESET
TEST
Fig. 5
RESET
TEST
Fig. 6
FRANÇAIS
Produkspesifikasjoner
Merke: | Haier |
Kategori: | Air condition |
Modell: | HWR05XCR |
Trenger du hjelp?
Hvis du trenger hjelp med Haier HWR05XCR still et spørsmål nedenfor, og andre brukere vil svare deg
Air condition Haier Manualer
27 Februar 2025
27 Februar 2025
8 Februar 2025
22 Januar 2025
22 Januar 2025
22 Januar 2025
22 Januar 2025
22 Januar 2025
15 Januar 2025
15 Januar 2025
Air condition Manualer
- Air condition Thomson
- Air condition Amana
- Air condition Whirlpool
- Air condition NewAir
- Air condition LG
- Air condition Bosch
- Air condition BEKO
- Air condition Hisense
- Air condition Koldfront
- Air condition Arcelik
- Air condition Danby
- Air condition Gree
- Air condition TCL
- Air condition Hotpoint
- Air condition Cecotec
- Air condition Samsung
- Air condition Noveen
- Air condition Delonghi
- Air condition Comfee
- Air condition Kogan
- Air condition SereneLife
- Air condition Create
- Air condition Furrion
- Air condition Midea
- Air condition Sauber
- Air condition Candy
- Air condition Carson
- Air condition Orbegozo
- Air condition Panasonic
- Air condition Olimpia Splendid
- Air condition Vox
- Air condition Westinghouse
- Air condition Sencor
- Air condition Electroline
- Air condition Fujitsu
- Air condition Orava
- Air condition Mistral
- Air condition Khind
- Air condition CyberPower
- Air condition Frigidaire
- Air condition Dimplex
- Air condition Bimar
- Air condition Whynter
- Air condition GE
- Air condition Hitachi
- Air condition Hyundai
- Air condition VänEE
- Air condition Ausclimate
- Air condition Infiniton
- Air condition Ufesa
- Air condition Lavorwash
- Air condition Omega Altise
- Air condition Daikin
- Air condition Be Cool
- Air condition Blaupunkt
- Air condition Einhell
- Air condition Avidsen
- Air condition Mitsubishi
- Air condition Friedrich
- Air condition Tristar
- Air condition Dometic
- Air condition Eldom
- Air condition Elba
- Air condition Philco
- Air condition REMKO
- Air condition Vivax
- Air condition Black And Decker
- Air condition Ozito
- Air condition Toshiba
- Air condition Wilfa
- Air condition Heinner
- Air condition SEEGER
- Air condition Meireles
- Air condition IFB
- Air condition Profilo
- Air condition Middle Atlantic
- Air condition Duracraft
- Air condition Home Electric
- Air condition Milectric
- Air condition LERAN
- Air condition Perfect Aire
- Air condition Argoclima
- Air condition Svan
- Air condition ARCTIC WIND
- Air condition Trisa
- Air condition Daizuki
- Air condition Mayer
- Air condition HTW
- Air condition Be Quiet!
- Air condition Emerson
- Air condition Broan
- Air condition BOSFOR
- Air condition KDK
- Air condition Aconatic
- Air condition AireMax
- Air condition Profile
- Air condition Keystone
- Air condition Honeywell
- Air condition Theben
- Air condition Carrier
- Air condition Ravanson
- Air condition Yamazen
- Air condition ActronAir
- Air condition Orima
- Air condition Woods
- Air condition Aspes
- Air condition Soler & Palau
- Air condition Bavaria
- Air condition Dantherm
- Air condition Sôlt
- Air condition Daitsu
- Air condition Fuave
- Air condition Proklima
- Air condition Universal Blue
- Air condition Rinnai
- Air condition Symphony
- Air condition Kelvinator
- Air condition Premium
- Air condition Corona
- Air condition Krone
- Air condition Royal Sovereign
- Air condition Gutfels
- Air condition Duux
- Air condition GoldAir
- Air condition Heller
- Air condition Teco
- Air condition Magnavox
- Air condition SHE
- Air condition Cool-Space
- Air condition KuulAire
- Air condition BLUEPALM
- Air condition Essentiel B
- Air condition BISWIND
- Air condition Igenix
- Air condition Fuji Electric
- Air condition Sheffield
- Air condition General
- Air condition Hoffman
Nyeste Air condition Manualer
10 April 2025
10 April 2025
10 April 2025
10 April 2025
10 April 2025
9 April 2025
9 April 2025
9 April 2025
9 April 2025
9 April 2025