Hanseatic HGTI4582C10T7736ES Bruksanvisning
Hanseatic
Oppvaskmaskin
HGTI4582C10T7736ES
Les nedenfor 📖 manual på norsk for Hanseatic HGTI4582C10T7736ES (1 sider) i kategorien Oppvaskmaskin. Denne guiden var nyttig for 8 personer og ble vurdert med 4.9 stjerner i gjennomsnitt av 4.5 brukere
Side 1/1
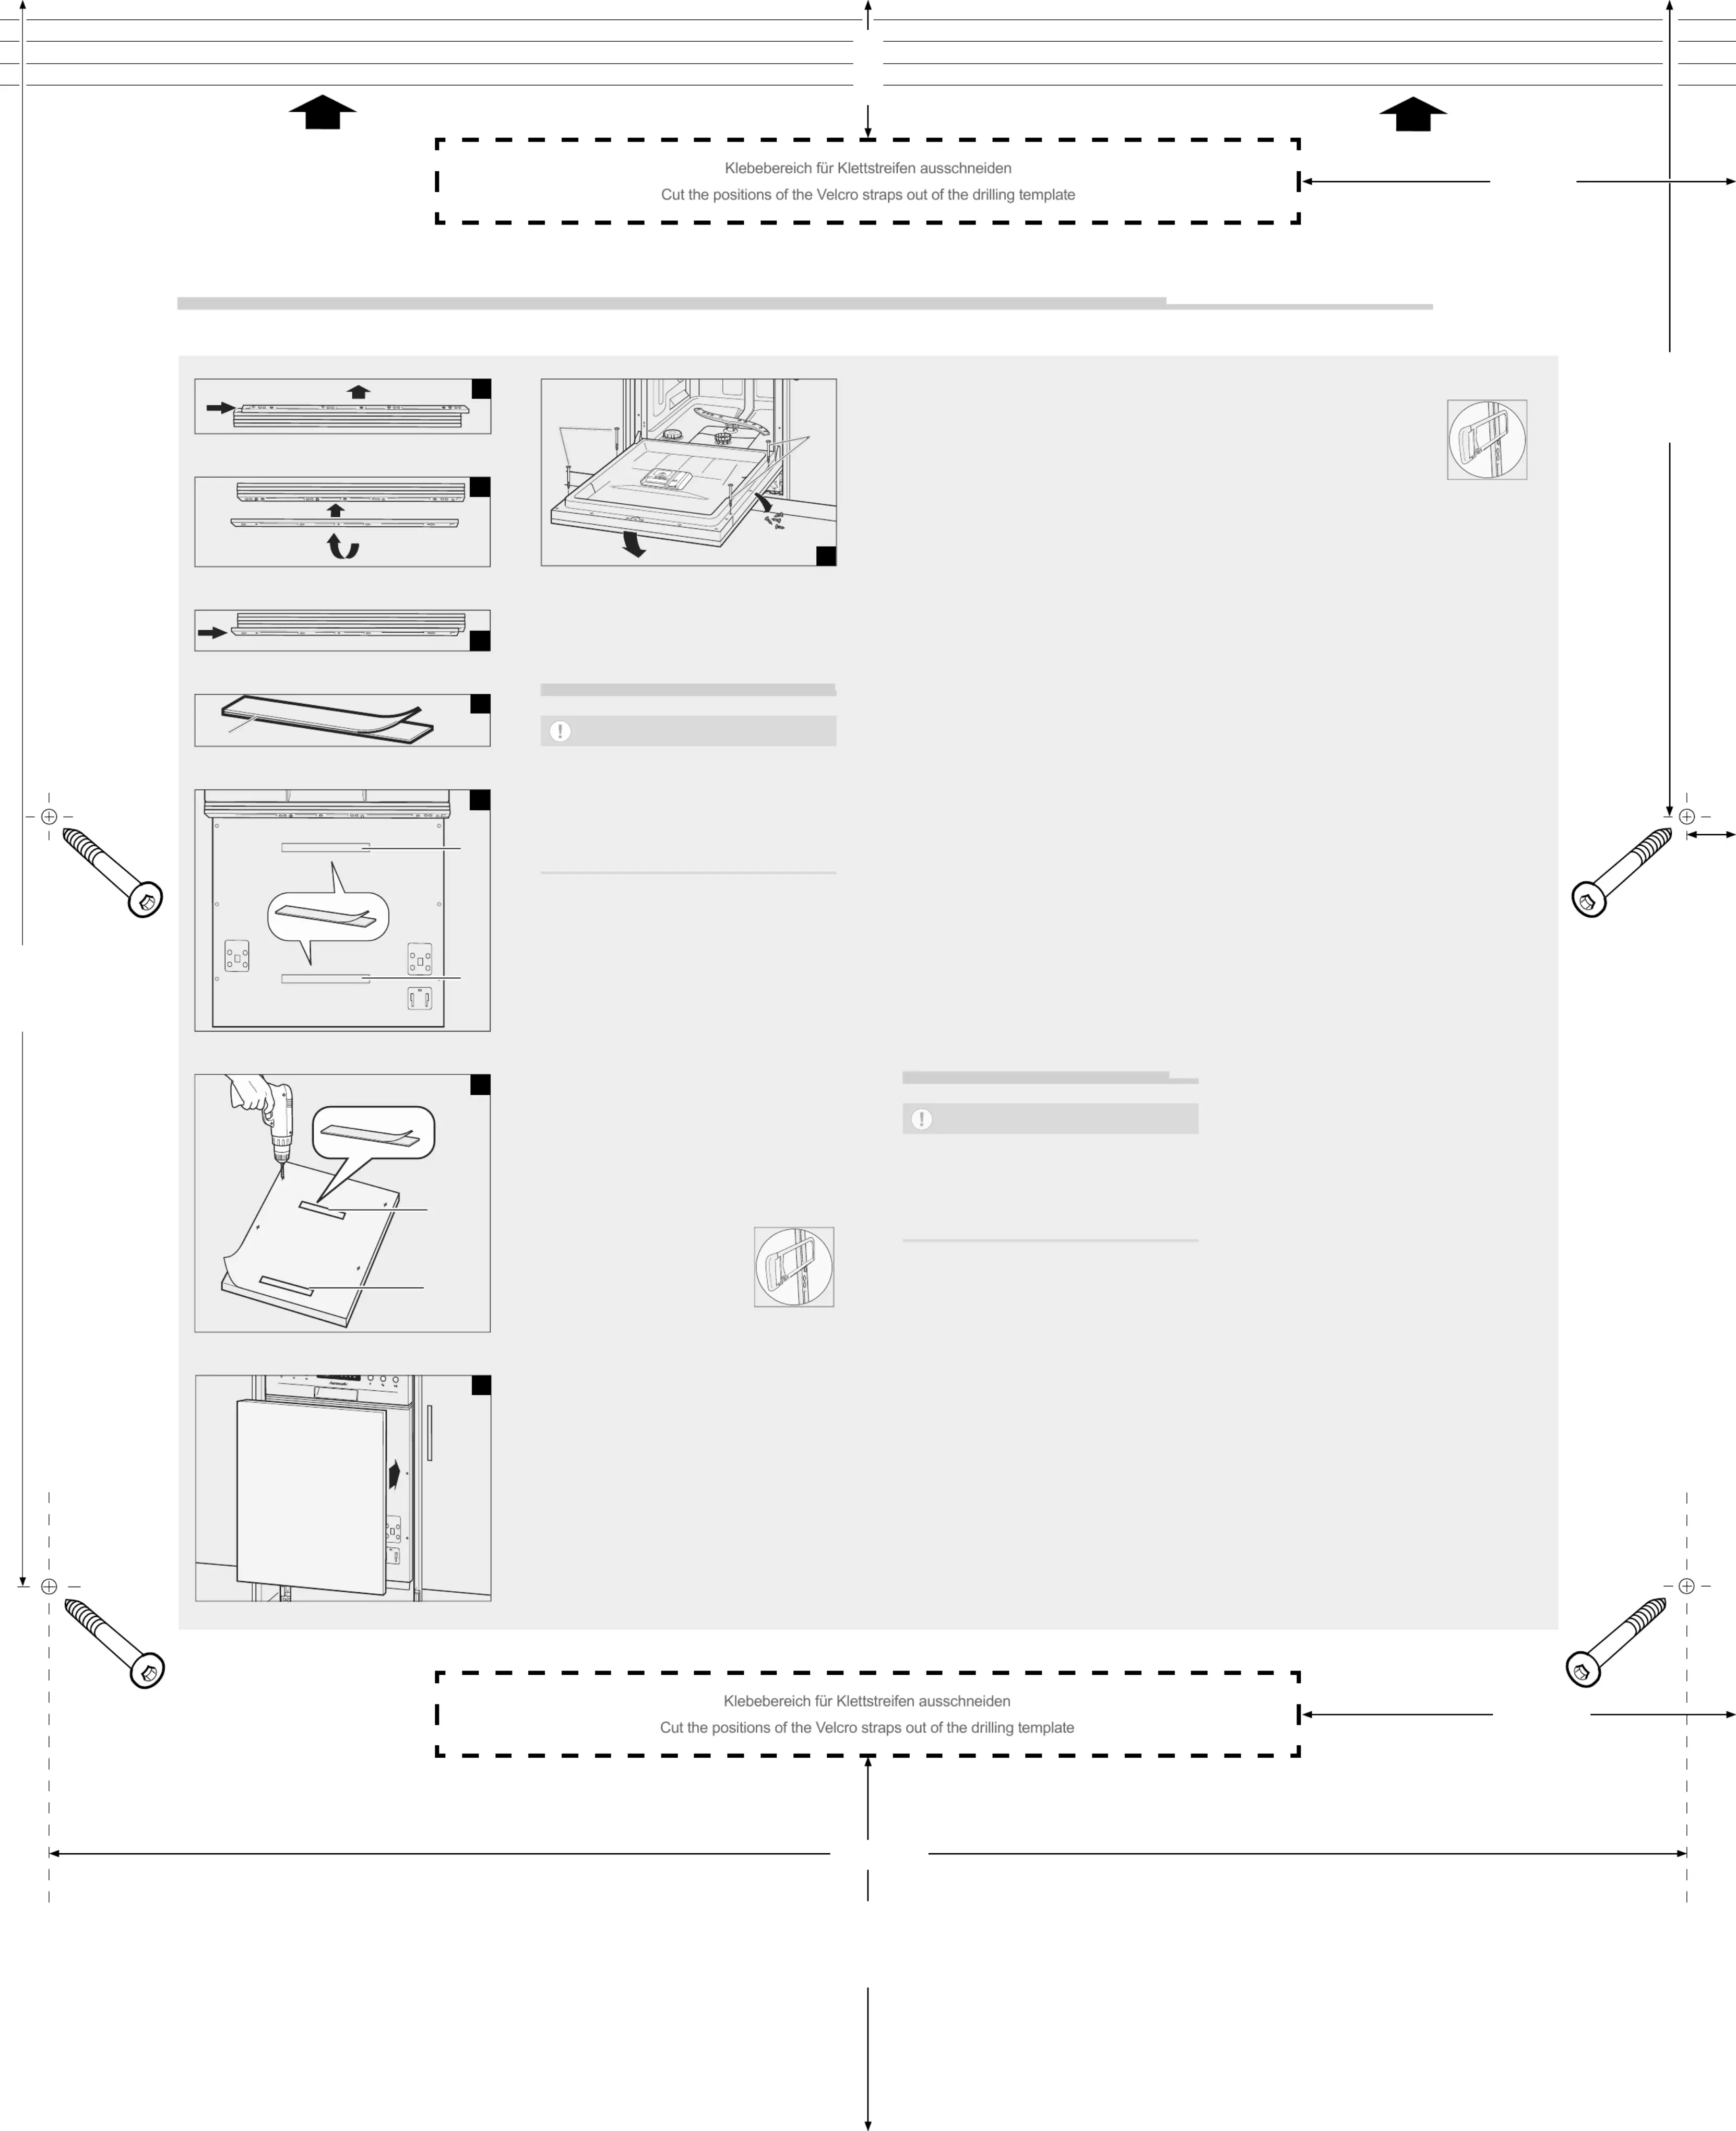
Bohrschablone für Geschirrspüler/Drilling template for dishwasher HGTI4582C10T7736ES
Möbelfrontplatte montieren
HINWEIS
Gefahr von Sachschäden!
Unsachgemäßer Umgang kann zu Beschä-
digungen am Gerät oder an der Möbel-
frontplatte führen.
■Das Gewicht der
Möbelfrontplatte darf
5kg nicht überschreiten!
An der Gerätetür können Sie eine zu Ihrer Kü-
chenfront passende Möbelfrontplatte montie-
ren.
1. Halten Sie die Möbelfrontplatte so an die
Geschirrspülertür, dass die untere Sei-
te der Möbelfrontplatte bündig mit den
nebenstehenden Küchenschränken ab-
schließt.
2. Messen Sie den Abstand zwischen der
Möbelfrontplatte und der Bedienblende
aus.
3. Einen Abstand zwischen 5 mm und 25 mm
können Sie durch die 5 mitgelieferten Zier-
leisten (39) ausgleichen. Entnehmen Sie
die benötigte Anzahl an Zierleisten aus
dem Block. Verschieben Sie dazu die
Zierleiste kräftig, aber ohne Werkzeug.
4. Wenn Sie nur 1 Zierleiste benötigen, sä-
gen Sie die vier herausra-
genden „Füßchen“ ab, klem-
men Sie die Zierleiste unter
die Bedienblende und fixie-
ren Sie sie mit den beiden
Senkkopfschrauben (44).
Machen Sie weiter mit Schritt 7.
5. Wenn Sie mehr als eine Zierleiste be-
nötigen, drehen Sie die untere Zierleiste
um und schieben Sie sie auf die übrigen.
So verschwinden die „Füßchen“ und die
Oberflächen sind plan.
6. Wenn Sie
–2 Zierleisten benötigen, fixieren Sie diese
mit den beiden Senkkopfschrauben (44).
–3 Zierleisten benötigen, fixieren Sie diese
mit den beiden Senkkopfschrauben (45).
–4 bis 5 Zierleisten benötigen, fixieren Sie
diese mit den beiden Senkkopfschrau-
ben (46).
4. If you only need one trim strip, saw off the
four feet that stick out, clamp
the trim strip under the control
panel and secure it using both
countersunk screws (44).
Continue with Step 7.
5. If you need more than one moulding, turn
the lower moulding and push it onto the
other mouldings. This hides the feet and
makes the surfaces flat.
6. If you
–need two mouldings, secure these using
both countersunk screws (44).
–need three mouldings, secure these
using both countersunk screws (45).
–need four to five mouldings, secure these
using both countersunk screws (46).
7. Pull apart the two pairs of hook-and-loop
straps (40).
8. Remove the protective film from the same
type of velcro strap.
9. With the protective film removed, affix the
hook-and-loop straps to the middle of the
recessed areas on the dishwasher door.
10. Cut the positions of the hook-and-loop
straps out of the drilling template.
11. Cut the number of mouldings used off the
drilling template.
12. Lay the enclosed drilling template on the
back of the front panel in such a way that
the drilling template and the front panel are
flush at the top.
13. Transfer the drill holes from the drilling
template to the front panel.
14. Drill the drill holes in the indicated posi-
tions using a (Ø 2 mm) drill bit.
15. Remove the protective films from the
other hook-and-loop straps and stick the
hook-and-loop straps to the front panel
using the drilling template.
Fix the front panel to the dishwasher door
using the hook-and-loop straps , hold(40)
it firmly, and open the door carefully.
16. Remove the 4 screws from the inside of
the door. Screw the front panel in place
at these positions using the 4 enclosed
screws (43).
The front panel is now mounted.
Bestell-Nr./Order no.: 14440547
2001-01064b_20240620
A
(39)
B
C
(40)
D
(40)
(40)
E
G
(43)
(43)
H
7. Ziehen Sie beide Klettbänderpaare (40)
auseinander.
8. Entfernen Sie jeweils vom gleichen Klett-
bandtyp die Schutzfolie.
9. Kleben Sie die Klettbänder mit der abge-
zogenen Schutzfolie mittig auf die einge-
lassenen Bereiche auf der Tür des Ge-
schirrspülers.
10. Schneiden Sie die Positionen der Klett-
bänder aus der Bohrschablone heraus.
11. Schneiden Sie die Anzahl der eingesetz-
ten Zierleisten von der Bohrschablone ab.
12. Legen Sie die mitgelieferte Bohrschablone
so auf die Rückseite der Möbelfrontplatte,
dass die Bohrschablone und die Möbel-
frontplatte oben bündig abschließen.
13. Übertragen Sie die Bohrlöcher von der
Bohrschablone auf die Möbelfrontplatte.
14. Bohren Sie die gekennzeichneten Posi-
tionen der Bohrlöcher mit einem Bohrer
(Ø 2 mm) vor.
15. Entfernen Sie die Schutzfolien der ande-
ren Klettbänder und kleben Sie die Klett-
bänder mithilfe der Bohrschablone auf
die Möbelfrontplatte.
Fixieren Sie die Möbelfrontplatte mithilfe
der Klettbänder (40) an der Tür des
Geschirrspülers, halten Sie sie fest, und
öffnen Sie vorsichtig die Gerätetür.
16. Entfernen Sie die 4 Schrauben an der In-
nenseite der Tür. Schrauben Sie die Mö-
belfrontplatte an diesen Positionen mithilfe
der beiliegenden 4 Schrauben (43) fest.
Die Möbelfrontplatte ist damit montiert.
Mounting the front panel
NOTICE
Possible damage to property!
Improper handling may result in damage
to the appliance itself or the front panel.
■The fron
t panel must not exceed a
weight of 5kg.
You can mount a front panel on the appliance
door which matches your kitchen.
1. Hold the front panel against the dish-
washer door such that the lower side of
the front panel is flush with the adjoining
kitchen cupboards.
2. Measure the distance between the front
panel and the control panel.
3. A gap of 5 mm to 25 mm can be offset
with the 5 mouldings supplied (39). Remo-
ve the required number of moulding from
the block. To do so, move the moulding
vigorously but without using tools.
(40)
(40)
F
oben / up here
oben / up here
402 mm
95 mm
110 mm
35 mm
12,5 mm
207 mm
(43)
(43)
(43)
(43)
110 mm
415 mm
Produkspesifikasjoner
| Merke: | Hanseatic |
| Kategori: | Oppvaskmaskin |
| Modell: | HGTI4582C10T7736ES |
Trenger du hjelp?
Hvis du trenger hjelp med Hanseatic HGTI4582C10T7736ES still et spørsmål nedenfor, og andre brukere vil svare deg
Oppvaskmaskin Hanseatic Manualer

7 September 2025

6 September 2025
6 September 2025

6 September 2025

6 September 2025
6 September 2025

6 September 2025
6 September 2025
6 September 2025
5 September 2025
Oppvaskmaskin Manualer
- Emerio
- Thor
- Kogan
- Telefunken
- Frilec
- AEG
- Oranier
- Samsung
- Continental Edison
- Kluge
- Bartscher
- Pando
- Summit
- Edgestar
- Rangemaster
Nyeste Oppvaskmaskin Manualer

23 Oktober 2025

21 Oktober 2025
21 Oktober 2025
21 Oktober 2025

21 Oktober 2025
21 Oktober 2025

20 Oktober 2025

20 Oktober 2025

20 Oktober 2025

19 Oktober 2025