Khyam Aerotech Nevada 4 Bruksanvisning
Les nedenfor 📖 manual på norsk for Khyam Aerotech Nevada 4 (5 sider) i kategorien Full. Denne guiden var nyttig for 25 personer og ble vurdert med 4.9 stjerner i gjennomsnitt av 13 brukere
Side 1/5

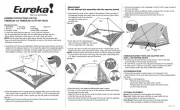
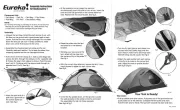
ERECTION INSTRUCTIONS
AEROTECH NEVADA 4
Before use
Please take time to read and understand the erection instructions. Failure to erect the tent
in accordance with the instructions may result in damage to both fabric
and pole systems such damage cannot be covered by the warranty.
Warning!!
Do not push tent pegs in by hand, all tent pegs should be driven home using
a wooden or rubber faced mallet or similar tool.
To ensure maximum possible waterproofing the main fly sheet seams have been taped. Should the
tape be damaged and peel away you can effect a repair by using seam sealer around the problem area.
Seam sealer is available from most camping retailers. Please test any seam sealer on a small inconspicuous
area of your tent prior to proceeding. We also recommend that seam sealer is applied to untaped seams to
prevent leakage.
It is important that you do not allow seam sealer to contaminate
the teeth of any zips as this will prevent the zip from functioning correctly.
If you do use seam sealer it is best applied when the tent is dry. Pick a dry warm day to carry
out any sealing and please allow 48 hours for the sealant to cure prior to re-packaging the tent.
Failure to allow the sealant to dry fully prior to packing the tent
up will stick the fabric together possibly causing irreparable damage.
Further advice on sealing can be found in the FAQ area of our website www.khyam.co.uk
During use
Tents containing a high proportion of synthetic materials are sometimes affected by condensation,
this should not be confused with leakage and can usually be cured by ensuring that
adequate ventilation is available by leaving doorways slightly unzipped wherever possible.
Do not pitch under trees, make use of natural wind breaks like hedges or walls, face the tent door away
from the prevailing wind.
Use two hands when opening and closing zips, this will help prevent premature zip failure.
read and understand the fire precautions information attached to the inside of the tent.
Care of your tent warning!!
Tent fabrics can be weakened by prolonged exposure to sunlight, under
normal holiday use your tent will give you long service but
erection for extended periods in strong sunlight will cause deterioration.
If you are likely to use your tent for prolonged periods it would
be wise to use a site which is a shaded as possible. Application of a proofer with UV protection is
also strongly recommend if use in strong sunlight is envisaged.
Tents are best stored opened out, if this is not possible air fully and ensure it is
totally dry before packing it away at the end of your holiday.
Store your tent in a well ventilated dry place.Look after your tent and it will look after you.
Have any damage to your tent repaired at the first opportunity.
Zips should be treated with care to prevent premature failure and the tent should be
kept clean and dry after use.
Insurance
We highly recommend that your tent be insured against theft and storm or accidental damage. Storm
or accidental damage is not covered by the warranty.
Check your equipment before going away with your tent. Ensure that you are familiar
with the pitching of the tent and that all parts are present.
You should familiarise yourself with the tent, including any limitations
that it may have for your particular use.
Tents are portable structures which under most circumstances will provide comfortable shelter
against the elements. There are however extremes of weather for which allowances should be made.
do not blame the tent !
PAGE 1
www.khyam.co.uk
Produkspesifikasjoner
| Merke: | Khyam |
| Kategori: | Full |
| Modell: | Aerotech Nevada 4 |
Trenger du hjelp?
Hvis du trenger hjelp med Khyam Aerotech Nevada 4 still et spørsmål nedenfor, og andre brukere vil svare deg
Full Khyam Manualer

23 Januar 2025

23 Januar 2025

23 Januar 2025

23 Januar 2025

23 Januar 2025

23 Januar 2025

23 Januar 2025

23 Januar 2025

23 Januar 2025

23 Januar 2025
Full Manualer
- Brunner
- Wechsel
- MSR
- Black Diamond
- Outwell
- Outdoor Connection
- De Waard
- Mx Onda
- Gazebo Penguin
- Eureka
- Vango
- Platypus
- Gerjak
- Hilleberg
- Sojag
Nyeste Full Manualer
19 Oktober 2025
19 Oktober 2025
19 Oktober 2025
19 Oktober 2025
19 Oktober 2025
19 Oktober 2025
19 Oktober 2025
19 Oktober 2025
19 Oktober 2025

19 Oktober 2025