Reolink Keen Bruksanvisning
Reolink
Sikkerhetskamera
Keen
Les nedenfor 📖 manual på norsk for Reolink Keen (14 sider) i kategorien Sikkerhetskamera. Denne guiden var nyttig for 18 personer og ble vurdert med 5.0 stjerner i gjennomsnitt av 9.5 brukere
Side 1/14
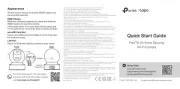
Reolink Solar Panel
Operational Instruction
EN/DE/FR/IT/ES
Aug 2021
QSG5_D
58.03.005.0001
Technical Support
If you need help, please contact Reolink before returning your product. Most questions can be
answered through our online support center at https://support.reolink.com
Technische Unterstützung
Wenn Sie Hilfe brauchen, kontaktieren Sie bitte Reolink Support Team zuerst, bevor Sie Ihre
Bestellung zurücksenden. Meiste Fragen oder Probleme können von unserem Online Support
Center beantwortet und gelöst werden https://support.reolink.com
Support technique
Si vous avez besoin d’aide, veuillez contacter Reolink avant de retourner votre produit. La
plupart des questions peuvent être répondues via notre centre de support en ligne à l'adresse
https://support.reolink.com
Supporto Tecnico
Se avete bisogno di aiuto, le chiediamo gentilmente di contattare Reolink prima di restituire il
prodotto. La maggior parte delle domande può essere risolta tramite il nostro centro di
assistenza online all'indirizzo https://support.reolink.com
Soporte técnico
Si necesita ayuda, comuníquese con Reolink antes de devolver su producto. La mayoría de las
preguntas se pueden responder a través de nuestro centro de soporte en línea en
https://support.reolink.com
REOLINK INNOVATION LIMITED
FLAT/RM 705 7/F FA YUEN COMMERCIAL BUILDING 75-77 FA YUEN STREET MONG KOK KL
HONG KONG
@ReolinkTech https://reolink.com
Hoferstasse 9B, 71636 Ludwigsburg, Germany
prodsg@libelleconsulting.com
Product Ident GmbH
89 Princess Street, Manchester, M1 4HT, UK
info@apex-ce.com
APEX CE SPECIALISTS LIMITED
REP
EU
REP
UK
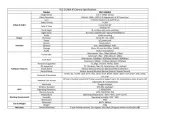
Produkspesifikasjoner
| Merke: | Reolink |
| Kategori: | Sikkerhetskamera |
| Modell: | Keen |
Trenger du hjelp?
Hvis du trenger hjelp med Reolink Keen still et spørsmål nedenfor, og andre brukere vil svare deg
Sikkerhetskamera Reolink Manualer
7 September 2025
6 September 2025
6 September 2025

6 September 2025
6 September 2025
6 September 2025
6 September 2025
5 September 2025
5 September 2025

5 September 2025
Sikkerhetskamera Manualer
- Swann
- Creative
- Sony
- Vaddio
- AViPAS
- Monacor
- Boss
- Konyks
- Philips
- M-e
- Bolin Technology
- Honeywell
- Metra
- InfiRay
- Pelco
Nyeste Sikkerhetskamera Manualer
20 Oktober 2025
20 Oktober 2025

20 Oktober 2025
19 Oktober 2025

18 Oktober 2025

18 Oktober 2025

17 Oktober 2025

17 Oktober 2025

17 Oktober 2025

17 Oktober 2025