SoundTube CM62-EZ-II Bruksanvisning
Les nedenfor 📖 manual på norsk for SoundTube CM62-EZ-II (5 sider) i kategorien Høyttaler. Denne guiden var nyttig for 24 personer og ble vurdert med 4.5 stjerner i gjennomsnitt av 12.5 brukere
Side 1/5
© 2004 SoundTube Entertainment, Inc. All rights reserved. REV 07.27.04
Warning
Do not spec or install speaker near support beam, ventilation
duct or other structure that may interfere with speaker function
or dispersion.
Warning
SoundTube speakers must be installed by a professional audio
installer/contractor. For safety and for optimum audio performance,
installer must follow all directions issued by SoundTube Entertainment.
1.435.647.9555
|
800.647.TUBE
|
www.soundtube.com
70.7 Volt Transformer Taps (dB) 100 Volt Transformer Taps (dB) 25 Volt Transformer Taps (dB)
20W=103, 10W=100, 5W=97, 2.5W=94, 1.25W=91 20W=103, 10W=100, 5W=97, 2.5W=94 2.5W=94, 1.25W=91, .63W=88, .32 W=85, .16W=82
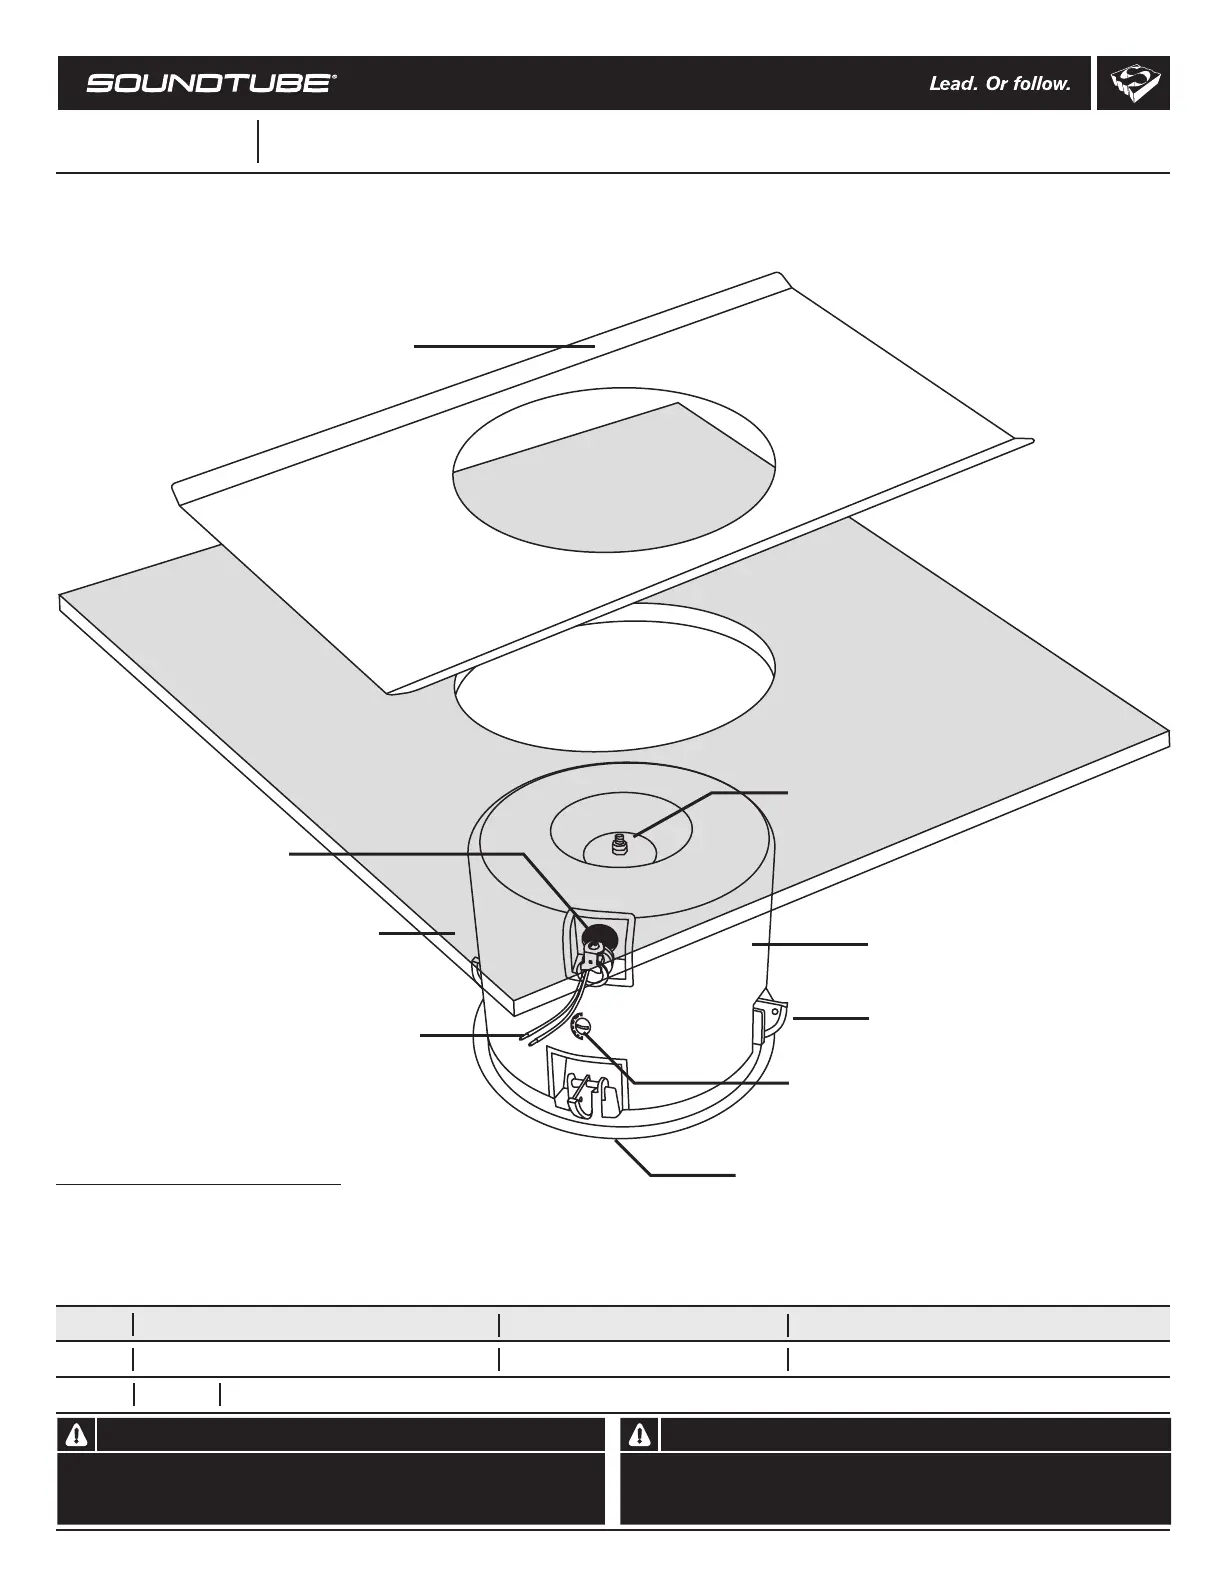
CM-EZ-II
Transformer Taps Settings
Install Instructions
Voice Coil
8 Ohm=106 dB
Box contents
1 Speaker
1 Flexible conduit clamp
1 Tile bridge
(shipped separate)
CM-EZ-IICM-E
CM-E
Z-II
Z-II
CM-EZ-II
Snap cam
Grille bezel
Sheetrock/tile
Signal wires
Tap switch
20 W, 10 W, 5 W, 2.5 W, 1.25 W, voice coil/8 Ohm direc
t
Blind-mount
backcan
Safety cable stud
Flexible conduit clamp
Tile bridge
Produkspesifikasjoner
| Merke: | SoundTube |
| Kategori: | Høyttaler |
| Modell: | CM62-EZ-II |
Trenger du hjelp?
Hvis du trenger hjelp med SoundTube CM62-EZ-II still et spørsmål nedenfor, og andre brukere vil svare deg
Høyttaler SoundTube Manualer

21 Februar 2025

29 Januar 2025

29 Januar 2025

29 Januar 2025

29 Januar 2025

10 Januar 2025

10 Januar 2025

10 Januar 2025

10 Januar 2025

10 Januar 2025
Høyttaler Manualer
- Klark Teknik
- Hama
- X JUMP
- Cambridge
- GoGEN
- Ashly
- LD Systems
- PSB
- Rebeltec
- Champion
- Pro-Ject
- Kanto
- Power Dynamics
- Bowers Wilkins
- ESX
Nyeste Høyttaler Manualer

23 Oktober 2025
21 Oktober 2025
21 Oktober 2025

20 Oktober 2025
20 Oktober 2025
20 Oktober 2025
20 Oktober 2025
20 Oktober 2025
20 Oktober 2025
20 Oktober 2025