Toa BS-678B Bruksanvisning
Les nedenfor 📖 manual på norsk for Toa BS-678B (4 sider) i kategorien Høyttaler. Denne guiden var nyttig for 9 personer og ble vurdert med 4.7 stjerner i gjennomsnitt av 5 brukere
Side 1/4
Indicates a potentially hazardous situation which, if
mishandled, could result in moderate or minor personal
injury, and/or property damage.
CAUTION
Indicates a potentially hazardous situation which, if
mishandled, could result in death or serious personal
injury.
WARNING
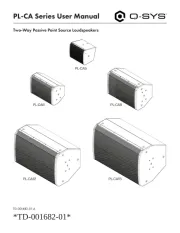
INSTALLATION MANUAL
WALL MOUNT SPEAKERS
BS-678 BS-678T
BS-678B BS-678BT
Thank you for purchasing TOA's Wall Mount Speaker.
Please carefully follow the instructions in this manual to ensure long, trouble-free use of your equipment.
• Before installation or use, be sure to carefully read all the instructions in this section for correct and safe operation.
• Be sure to follow all the precautionary instructions in this section, which contain important warnings and/or cautions regarding safety.
• After reading, keep this manual handy for future reference.
1. SAFETY PRECAUTIONS
• BS-678 series, of which cabinet is made of wood, can be installed in a vertical or horizontal orientation.
• Either concealed in-wall wiring or open wiring can be used for speaker cable connection.
• The speaker structure that permits direct wall-mounting with screws prevents the speaker from falling easily even if an outward force
is applied to.
• The input impedance can be easily changed by changing the tap position of the transformer.
• Two built-in 6-inch double cone speaker units deliver high quality sound.
• The push-in type input connector makes cable connections easy and allows bridge wiring.
• BS-678T and BS-678BT have a built-in attenuator and can be connected to a 2-wire or 3-wire system.
2. FEATURES
• To avoid electric shocks, be sure to switch off the amplifier's
power when connecting speakers.
• Do not operate the unit for an extended period of time with the
sound distorting. This is an indication of a malfunction, which
in turn can cause heat to generate and result in a fire.
• Do not stand or sit on, nor hang down from the unit as this may
cause it to fall down or drop, resulting in personal injury and/or
property damage.
• Install the unit only in a location that can structurally support
the weight of the unit and the mounting bracket. Doing
otherwise may result in the unit falling down and causing
personal injury and/or property damage.
• Do not use other methods than specified to mount the bracket.
Extreme force is applied to the unit and the unit could fall off,
possibly resulting in personal injuries.
• Tighten each nut and bolt securely. Ensure that the bracket
has no loose joints after installation to prevent accidents that
could result in personal injury.
Produkspesifikasjoner
| Merke: | Toa |
| Kategori: | Høyttaler |
| Modell: | BS-678B |
| Vekt: | 1700 g |
| Bredde: | 250 mm |
| Dybde: | 110 mm |
| Høyde: | 190 mm |
| Tilkoblingsteknologi: | Koblet med ledninger (ikke trådløs) |
| Antall per pakke: | 1 stykker |
| Anbefalt bruk: | Intercom-system |
| Høyttalerplassering: | Vegg.monterbar |
| Forsterker: | Nei |
| Produktfarge: | Sort |
| Kroppsmateriale: | Polyvinyl chloride (PVC), Steel, Wood |
| Lyd-utgang kanaler: | - kanaler |
| RMS-rangert strøm/utgangseffekt: | 6 W |
| Frekvensrekkevidde: | 150 - 20000 Hz |
| Sensitivitet/følsomhet: | 94 dB |
| Driverdiameter: | 160 mm |
Trenger du hjelp?
Hvis du trenger hjelp med Toa BS-678B still et spørsmål nedenfor, og andre brukere vil svare deg
Høyttaler Toa Manualer

6 Oktober 2025

5 Oktober 2025

5 Oktober 2025
5 Oktober 2025

5 Oktober 2025

4 Oktober 2025
4 Oktober 2025

4 Oktober 2025

4 Oktober 2025

4 Oktober 2025
Høyttaler Manualer
- Belkin
- Anchor Audio
- Ibiza Sound
- Trust
- Memphis Audio
- Metronic
- Majority
- Genesis
- Induction Dynamics
- Audio-Technica
- Pure Acoustics
- Ultimate Ears
- VIETA PRO
- REL Acoustics
- Behringer
Nyeste Høyttaler Manualer

23 Oktober 2025
21 Oktober 2025
21 Oktober 2025

20 Oktober 2025
20 Oktober 2025
20 Oktober 2025
20 Oktober 2025
20 Oktober 2025
20 Oktober 2025
20 Oktober 2025