Tripp Lite POS500 Bruksanvisning
Les nedenfor 📖 manual på norsk for Tripp Lite POS500 (16 sider) i kategorien uforstyrret strømtilførsel (UPS). Denne guiden var nyttig for 11 personer og ble vurdert med 4.4 stjerner i gjennomsnitt av 6 brukere
Side 1/16

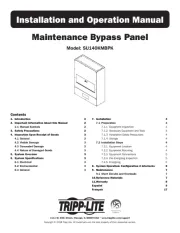
Owner’s Manual
WARRANTY
REGISTRATION:
register online today for a chance
to win a FREE Tripp Lite product—
www.tripplite.com/warranty
POS (Point-of-Sale) Series
UPS Systems
120V AC Input
Not suitable for mobile applications
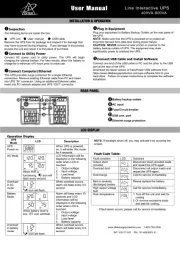
Important Safety Instructions
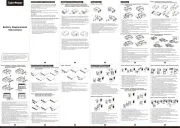
Quick Installation
Storage and Service
Warranty Registration
Basic Operation
Español
1111 W. 35th Street • Chicago, IL 60609 USA
(773) 869-1234 • www.tripplite.com
Copyright © 2007 Tripp Lite. All rights reserved.
Français
2
2
3
4
5
6
12
Optional Installation
3
200711180 93-2716 POS OM.qxd 12/13/2007 1:50 PM Page 1
Produkspesifikasjoner
| Merke: | Tripp Lite |
| Kategori: | uforstyrret strømtilførsel (UPS) |
| Modell: | POS500 |
| Vekt: | 3700 g |
| LED-indikatorer: | Ja |
| Pakkevekt: | 4800 g |
| Antall USB 2.0-porter: | 1 |
| Sertifisering: | UL1778, CSA, NOM, FCC Part 15 Category B, FCC Part 68, ROHS |
| Utgangseffekt: | 300 W |
| Dimensjoner (B x D x H): | 90.9 x 284.5 x 166.5 mm |
| Batteriladetid: | 10 timer |
| Kabellengde: | 1.8 m |
| Produktfarge: | Sort |
| Driftstemperatur (T-T): | 0 - 40 °C |
| Oppbevaringstemperaturomåde (Celsius): | -15 - 50 °C |
| Formfaktor: | Tower |
| Relativ luftfuktighet under drift (H-H): | 0 - 95 |
| Oppdateringsresponstid: | 4 ms |
| Kompatibel med Mac: | Ja |
| Innput-forbindelsestype: | 5-15P |
| Pakningsstørrelse (BxDxH): | 180.1 x 159.9 x 240 mm |
| Hørbare alarmer: | Ja |
| Nominell innputspenning: | 120 V |
| Nominell outputspenning: | 120 V |
| Strømstøt energivurdering: | 480 J |
| Output strømkapasitet (VA): | 0.5 kVA |
| Normal backuptid ved halv belastning: | 16 min |
| Normal backuptid ved full belastning: | 5 min |
| Hot-swap-batterier: | Ja |
| Output-forbindelser: | 6 x 5-15R |
Trenger du hjelp?
Hvis du trenger hjelp med Tripp Lite POS500 still et spørsmål nedenfor, og andre brukere vil svare deg
uforstyrret strømtilførsel (UPS) Tripp Lite Manualer
18 August 2025
18 August 2025
18 August 2025
18 August 2025
18 August 2025
18 August 2025
18 August 2025
18 August 2025
18 August 2025
18 August 2025
uforstyrret strømtilførsel (UPS) Manualer
- Sven
- IOGEAR
- Qoltec
- Apc
- Salicru
- LC-Power
- Furman
- Block
- CyberPower
- Ditek
- Emerson
- ATen
- Jung
- Green Cell
- Minuteman
Nyeste uforstyrret strømtilførsel (UPS) Manualer
16 Oktober 2025
16 Oktober 2025
6 Oktober 2025
5 Oktober 2025
5 Oktober 2025
2 Oktober 2025
1 Oktober 2025

1 Oktober 2025

1 Oktober 2025
1 Oktober 2025