Whirlpool OMR58CU1B Bruksanvisning
Les nedenfor 📖 manual på norsk for Whirlpool OMR58CU1B (40 sider) i kategorien Stekeovn. Denne guiden var nyttig for 28 personer og ble vurdert med 5.0 stjerner i gjennomsnitt av 14.5 brukere
Side 1/40
1
EN
Owner’s Manual
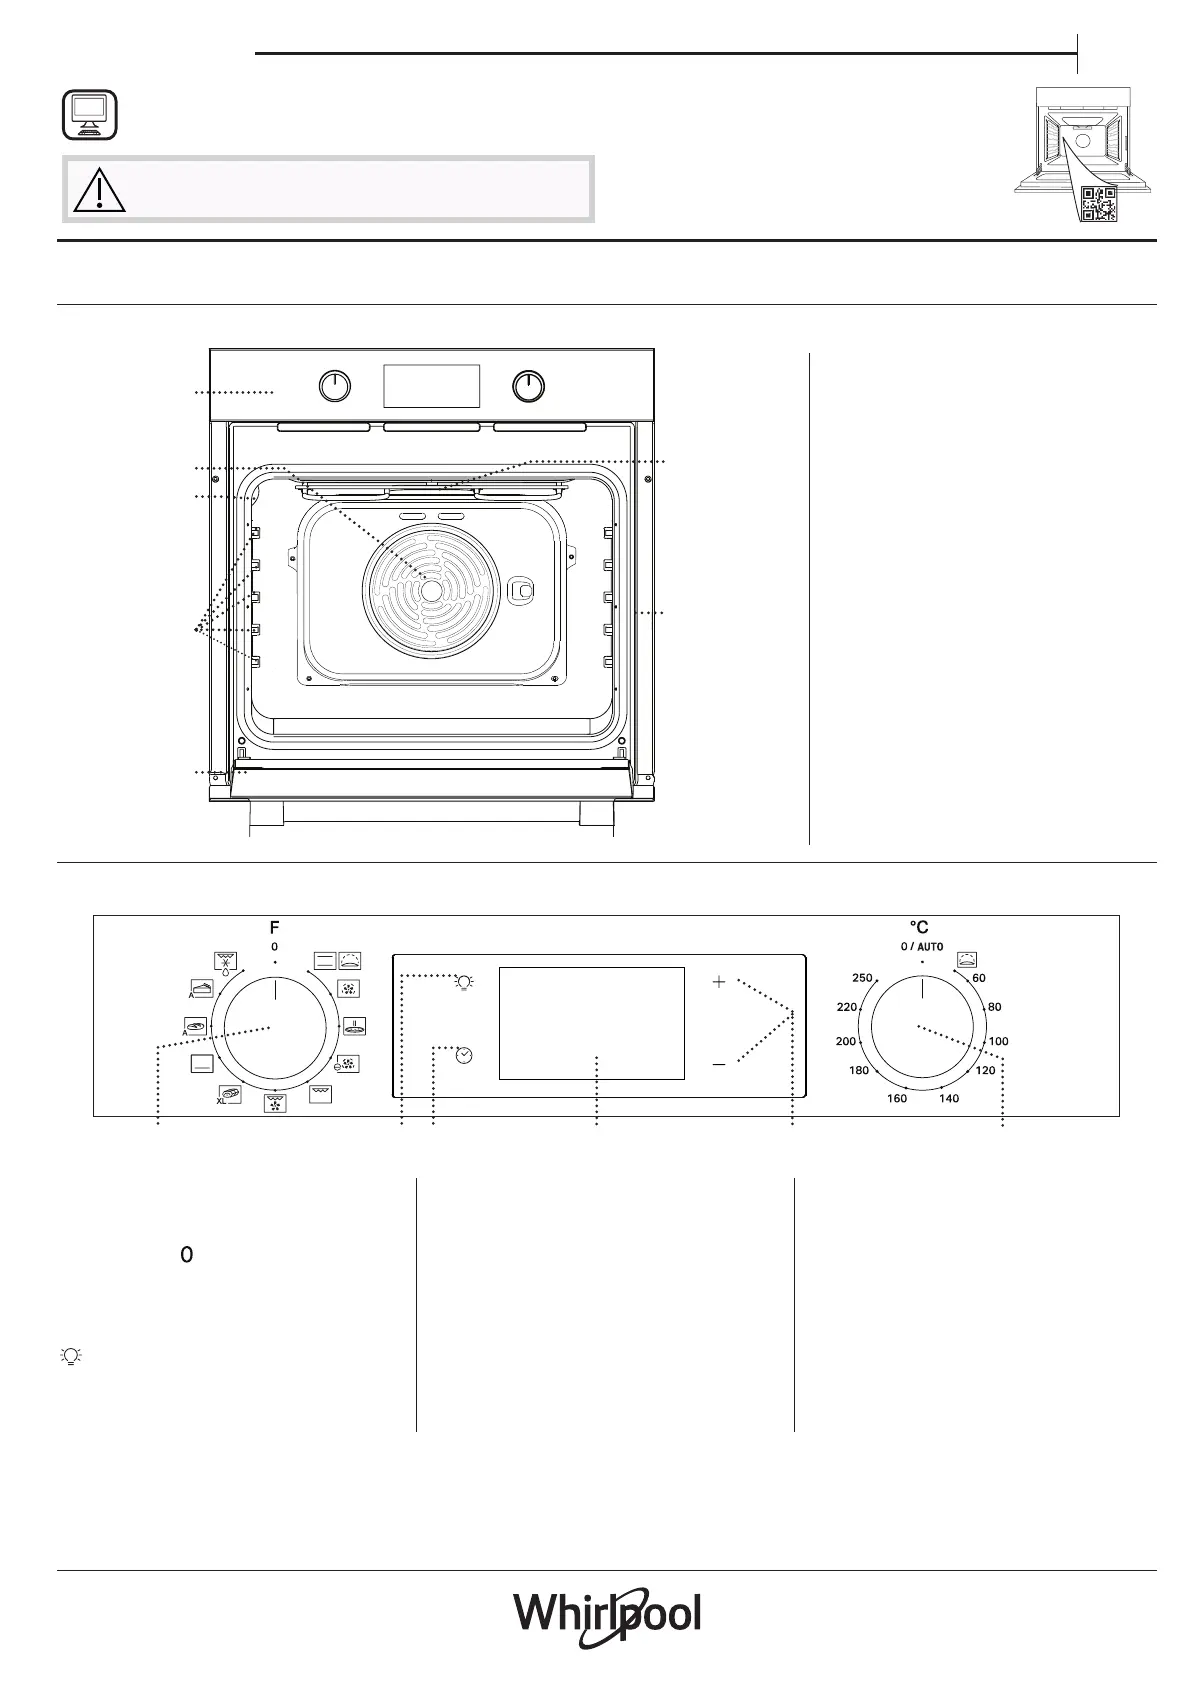
1. SELECTION KNOB
For switching the oven on by
selecting a function.
Turn to the position to switch
the oven off.
2. LIGHT
With the oven switched on, press
to turn the oven compartment
lamp on or off.
3. SETTING THE TIME
For accessing the cooking time
settings, delayed start and timer.
For displaying the time when the
oven is off.
4. DISPLAY
5. ADJUSTMENT BUTTONS
For changing the cooking time
settings.
6. THERMOSTAT KNOB
Turn to select the temperature you
require when activating manual
functions.
1 3
2
4 5
6
1. Control panel
2. Fan and circular heating
element (not visible)
3. Lamp
4. Shelf guides
(the level is indicated on the wall
of the cooking compartment)
5. Door
6. Top heating element/grill
7. Identification plate
(do not remove)
1
2
3
4
5
7
6
THANK YOU FOR BUYING A WHIRLPOOL PRODUCT
In order to receive a more complete assistance, please
register your product on www . whirlpool . eu/ register
PLEASE SCAN THE QR CODE ON
YOUR APPLIANCE IN ORDER TO
REACH MORE INFORMATION
Before using the appliance carefully read the Safety
Instruction.
PRODUCT DESCRIPTION
CONTROL PANEL DESCRIPTION
Please note: Type of knob may vary from model type. If the knobs are push-activated, push down on the center of the knob
to release it from seating.
2
ACCESSORIES
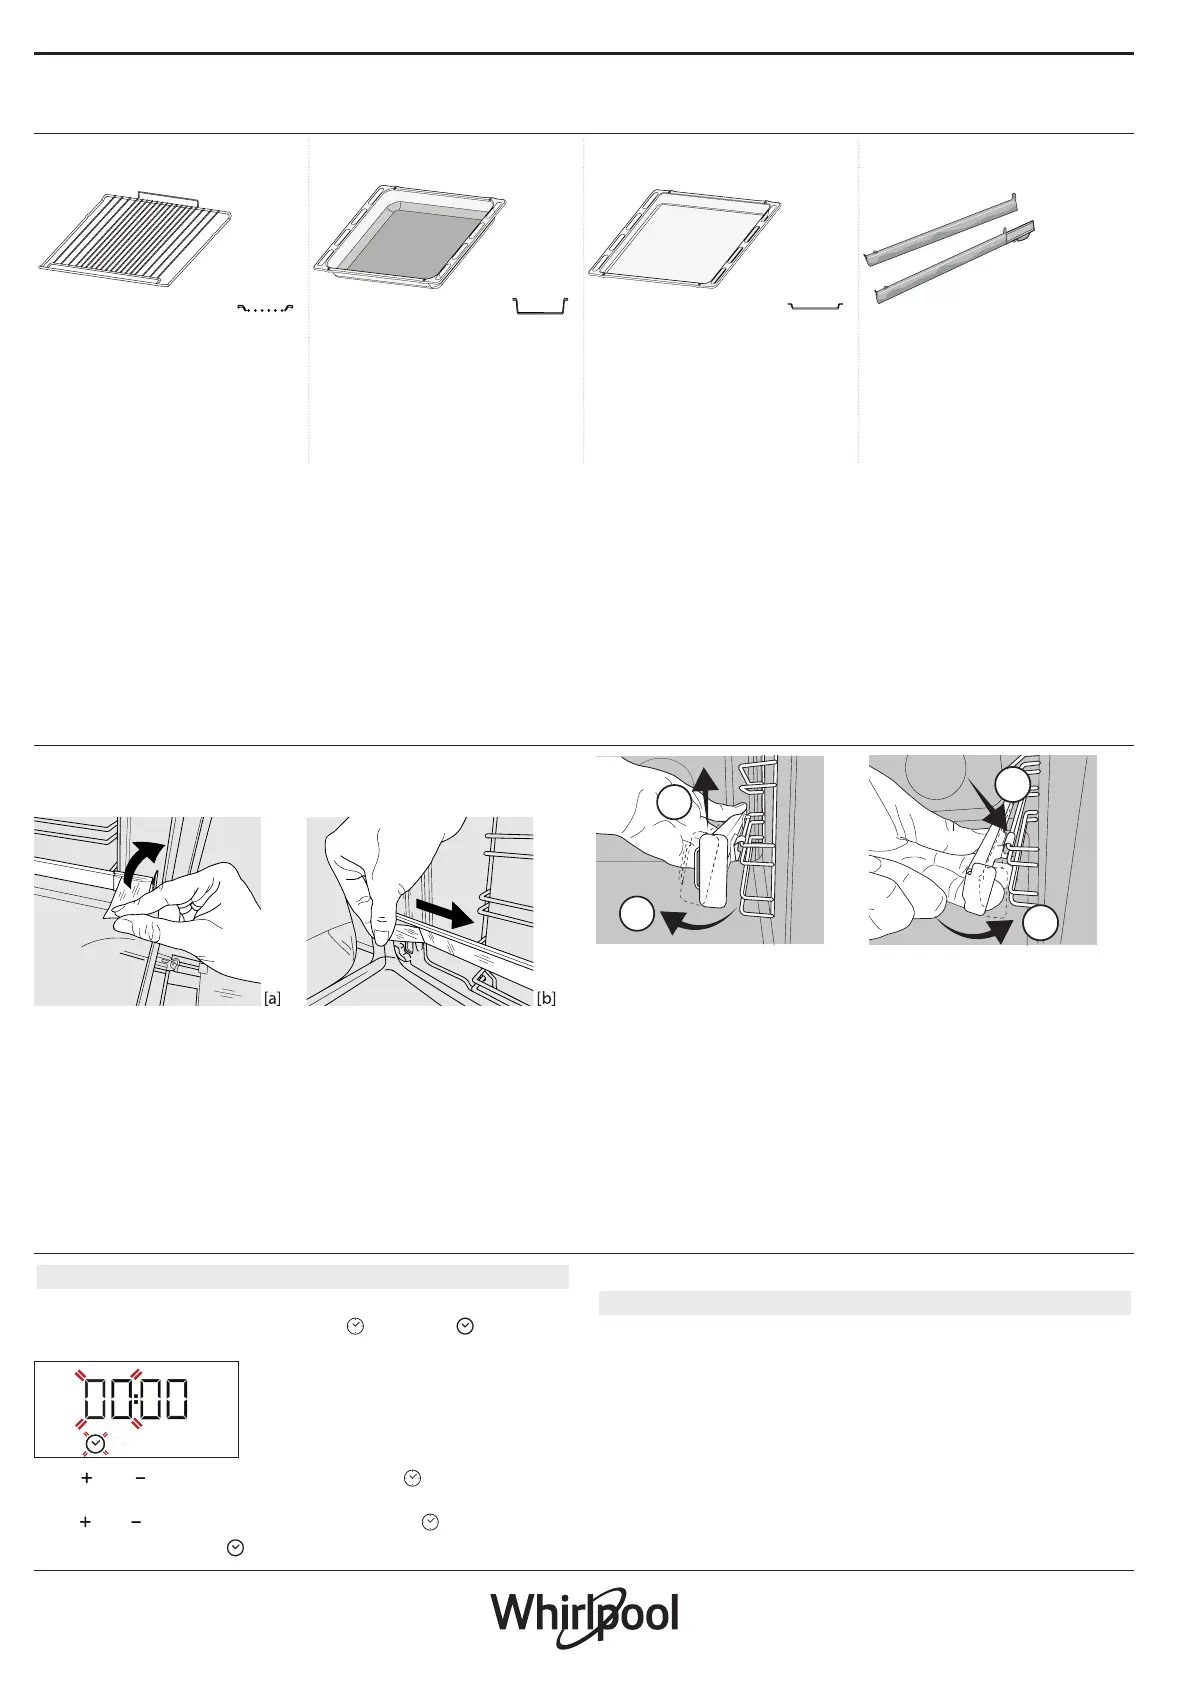
WIRE SHELF DRIP TRAY * BAKING TRAY * SLIDING RUNNERS *
Use to cook food or as a
support for pans, cake tins
and other ovenproof items of
cookware.
Use as an oven tray
for cooking meat, sh,
vegetables, focaccia, etc. or
position underneath the wire
shelf to collect cooking juices.
Use for cooking all bread and
pastry products, but also for
roasts, sh en papillotte, etc.
To facilitate inserting or
removing accessories.
* Available only on certain models
The number and the type of accessories may vary depending on which model is purchased.
Other accessories can be purchased separately from the After-sales Service.
INSERTING THE WIRE SHELF AND OTHER
ACCESSORIES
Insert the wire shelf onto the level you require by
holding it tilted slightly upwards and resting the
raised rear side (pointing upwards) down first.
Then slide it horizontally along the runners as far as
possible.
• Other accessories, like the baking tray, are to be
inserted horizontally, letting them slide on the runners.
SLIDING RUNNERS AND SHELF GUIDES
Before using the oven remove the protective tape
[a] and then remove the protective foil [b] from the
sliding runners.
REMOVING THE SLIDING RUNNERS [c]
Pull the lower part of the sliding runner to uncouple
the lower hooks (1) and pull the the sliding runners
upwards, removing them from the upper hooks (2).
REFITTING THE SLIDING RUNNERS [d]
Hook the upper hooks on the shelf guides (1) then
press the lower part of the sliding runners against the
shelf guides, until the lower hooks are clicking (2).
1
2
1
2
[c] [d]
REMOVING AND REFITTING THE SHELF GUIDES
1. To remove the shelf guides, firmly grip the external
part of the guide, and pull it towards you to extract
the support and the two internal pins from the
lodging.
2. To reposition the shelf guides, position them near
the cavity and initially insert the two pins into their
lodgings. Next, position the external part near its
lodging, insert the support, and firmly press towards
the wall of the cavity to make sure the shelf guide is
properly secured.
FIRST TIME USE
1. SETTING THE TIME
You will need to set the time when you switch on the
appliance for the rst time: Press
until the icon and
the two digits for the hour start ashing on the display.
Use
or to set the hour and press to conrm.
The two digits for the minutes will start ashing.
Use or to set the minutes and press to conrm.
Please note: When the icon is ashing, for example following
lengthy power outages, you will need to reset the time.
2. HEAT THE OVEN
A new oven may release odours that have been left
behind during manufacturing: this is completely
normal. Before starting to cook food, we therefore
recommend heating the oven with it empty in
order to remove any possible odours. Remove any
protective cardboard or transparent film from the
oven and remove any accessories from inside it.
Heat the oven to 250 °C for about one hour.
The oven must be empty during this time.
Please note: It is advisable to air the room after using the
appliance for the first time.

4
temperature and function used. In any case, the product
should be considered to be o when the pointer on the
selection knob is at
.
4. PROGRAMMING COOKING
You will need to select a function before you can start
programming cooking.
DURATION
Keep pressing until the icon and “00:00” start
flashing on the display.
Use or to set the cooking time you require, then
press
to confirm.
Activate the function by turning the thermostat knob
to the temperature you require: an audible signal will
sound and the display will indicate that cooking is
complete.
Please note: To cancel the cooking time you have set, keep
pressing
until the icon starts ashing on the display,
then use
to reset the cooking time to “00:00”. This cooking
time includes a preheating phase.
PROGRAMMING THE END COOKING TIME/
DELAYED START
After a cooking duration has been set, starting the
function can be delayed by programming its end
time: press
until the icon and the current time
start flashing on the display.
Use or to set the time you want cooking to end
and press
to confirm.
Activate the function by turning the thermostat knob
to the temperature you require: the function will
remain paused until it starts automatically in time
calculated based on selected cooking end time.
Please note: To cancel the setting, switch the oven off by
turning the selection knob
.
Delay to start functionality is not available for Grill
and Turbo Grill functions.
END OF COOKING
An audible signal will sound and the display will
indicate that the function has finished.
Turn the selection knob to select a different function
or to
to switch the oven off.
Please note: If the timer is active, the display will show “END”
alternately with the remaining time.
5. SETTING THE TIMER
This option does not interrupt or program cooking
but allows you to use the display as a timer, either
during while a function is active or when the oven is
off.
Keep pressing
until the and “00:00” icon and
“00:00” start flashing on the display.
Use or to set the time you require and press
to confirm.
An audible signal will sound once the timer has
finished counting down the selected time.
Please note: To cancel the timer, keep pressing until the
icon starts ashing, then use to reset the time to “00:00”.
8
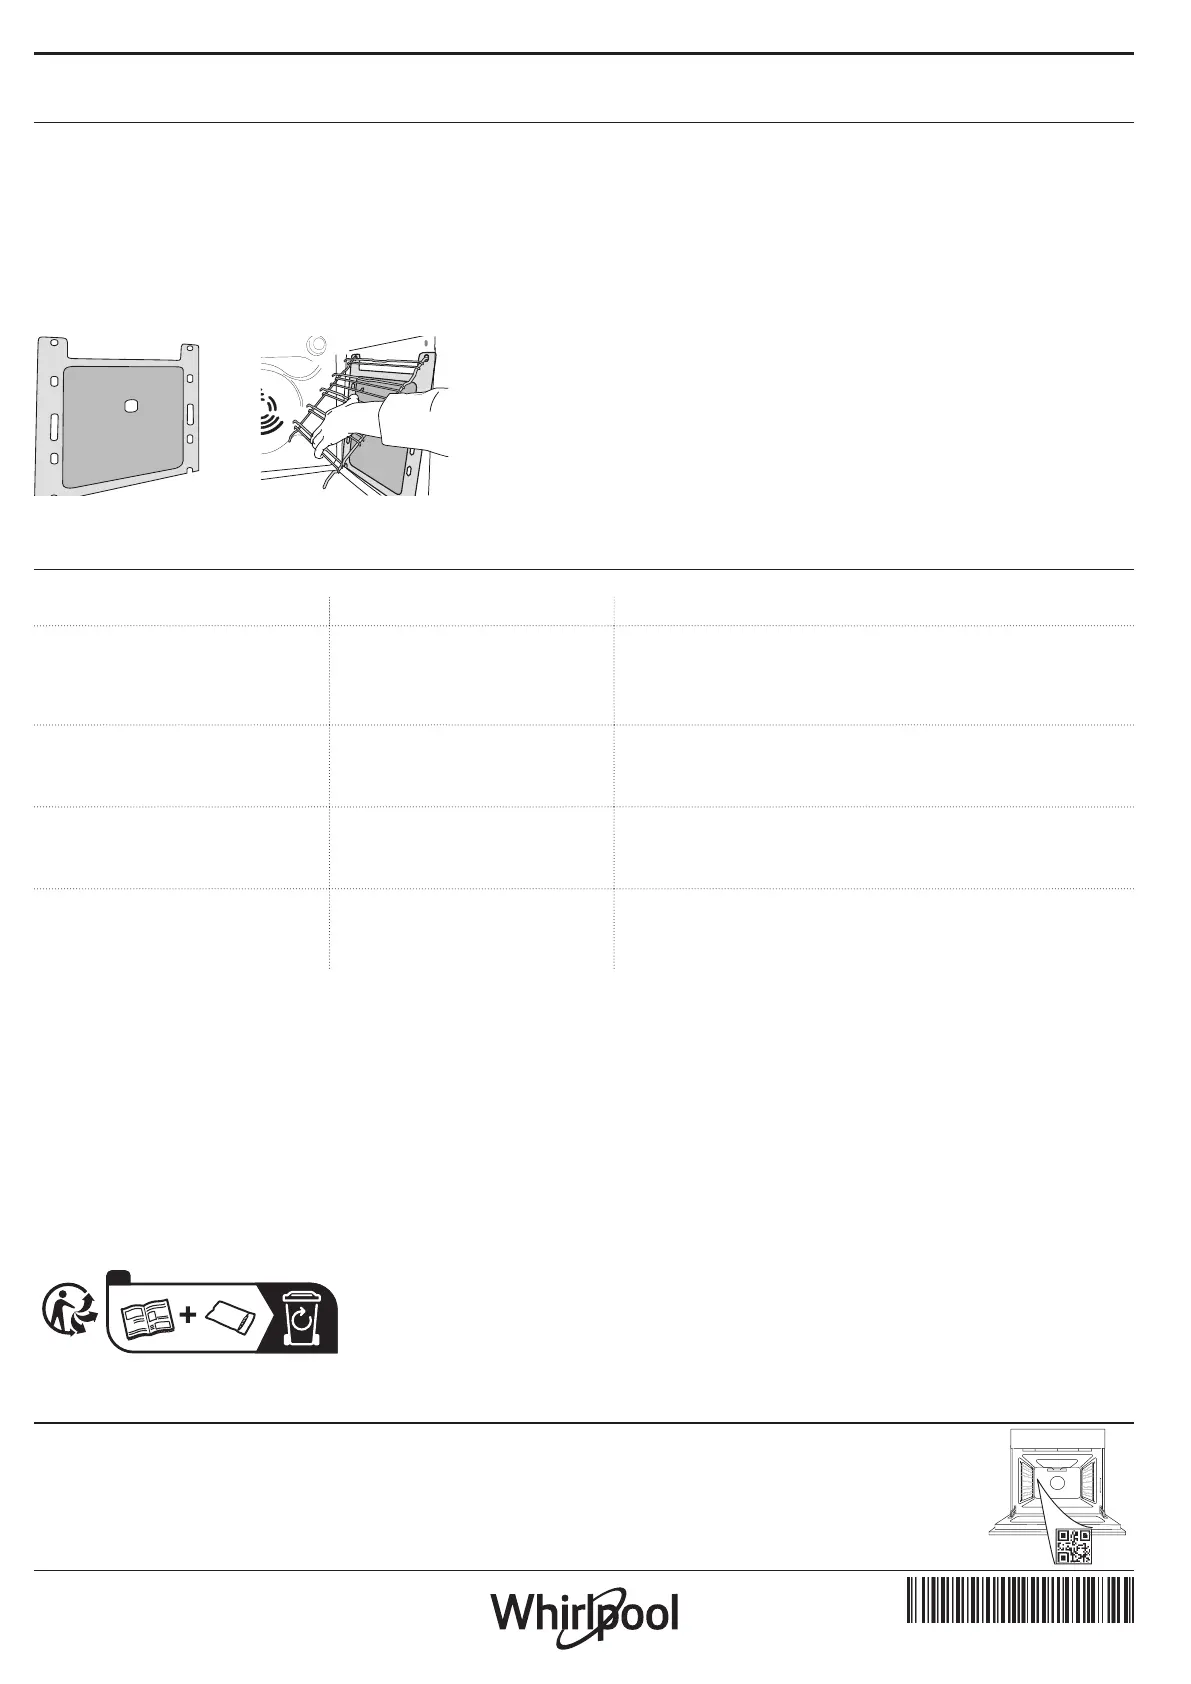
NETTOYER LES PANNEAUX CATALYTIQUES
Ce four est équipé d'un revêtement catalytique qui
facilite le nettoyante du compartiment de cuisson
grâce à son enduit auto-nettoyant qui est hautement
poreux et capable d'absorber la graisse et la saleté.
Ces panneaux sont ajustés sur les supports de grille:
Lorsque vous replacez et réinstallez les supports
de grille, assurez-vous que les crochets du haut
sont insérés dans les trous correspondants sur les
panneaux.
Pour profiter au maximum des propriétés auto-
nettoyantes des panneaux catalytiques, nous vous
conseillons de chauffer le four à 200 °C pendant
environ une heure en utilisant la fonction « Chaleur
pulsée ». Le four doit être vide durant cette opération.
Laissez ensuite le four refroidir avant d'enlever les
résidus d'aliments qui restent avec une éponge non
abrasive.
Veuillez noter: Les produits de nettoyage corrosifs ou
abrasifs, les brosses dures, les tampons à récurer, ou les
aérosols pour four pourraient endommager la surface
catalytique et lui faire perdre ses propriétés auto-nettoyantes.
Veuillez contacter notre Service Après-vente si vous avez
besoin de panneaux de remplacement.
DÉPANNAGE
Problème Cause possible Solution
Le four ne fonctionne pas.
Coupure de courant.
Débranchez de l'alimentation
principale.
Assurez-vous qu'il n'y a pas de panne de courant et que
le four est bien branché.
Éteignez puis rallumez le four pour voir si le problème
persiste.
L’écran affiche la lettre « F »
suivi d’un numéro ou d'une
lettre.
Défaillance du four.
Prenez en note le numéro qui suit la lettre « F » et
contactez le Service Après-vente le plus près.
L’écran affiche le message
«Hot» et la fonction ne
démarre pas.
Température trop élevée.
Laissez le four refroidir avant d’activer la fonction.
Sélectionnez une fonction diérente.
L'écran indique un texte
difficile à lire et semble
cassé.
Une autre langue est
paramétrée.
Contactez votre Centre de service après-vente le plus proche.
400011708315
* Disponible sur certains modèles seulement
Vous trouverez les politiques, la documentation standard et des informations supplémentaires sur le produit:
• En utilisant le QR Code dans votre appareil
• En visitant notre site Internet docs . whirlpool . eu
• Vous pouvez également contacter notre service après-vente (voir numéro de téléphone dans le livret de garantie).
Lorsque vous contactez notre Service après-vente, veuillez indiquer les codes gurant sur la plaque signalétique de
l’appareil.
FR
5
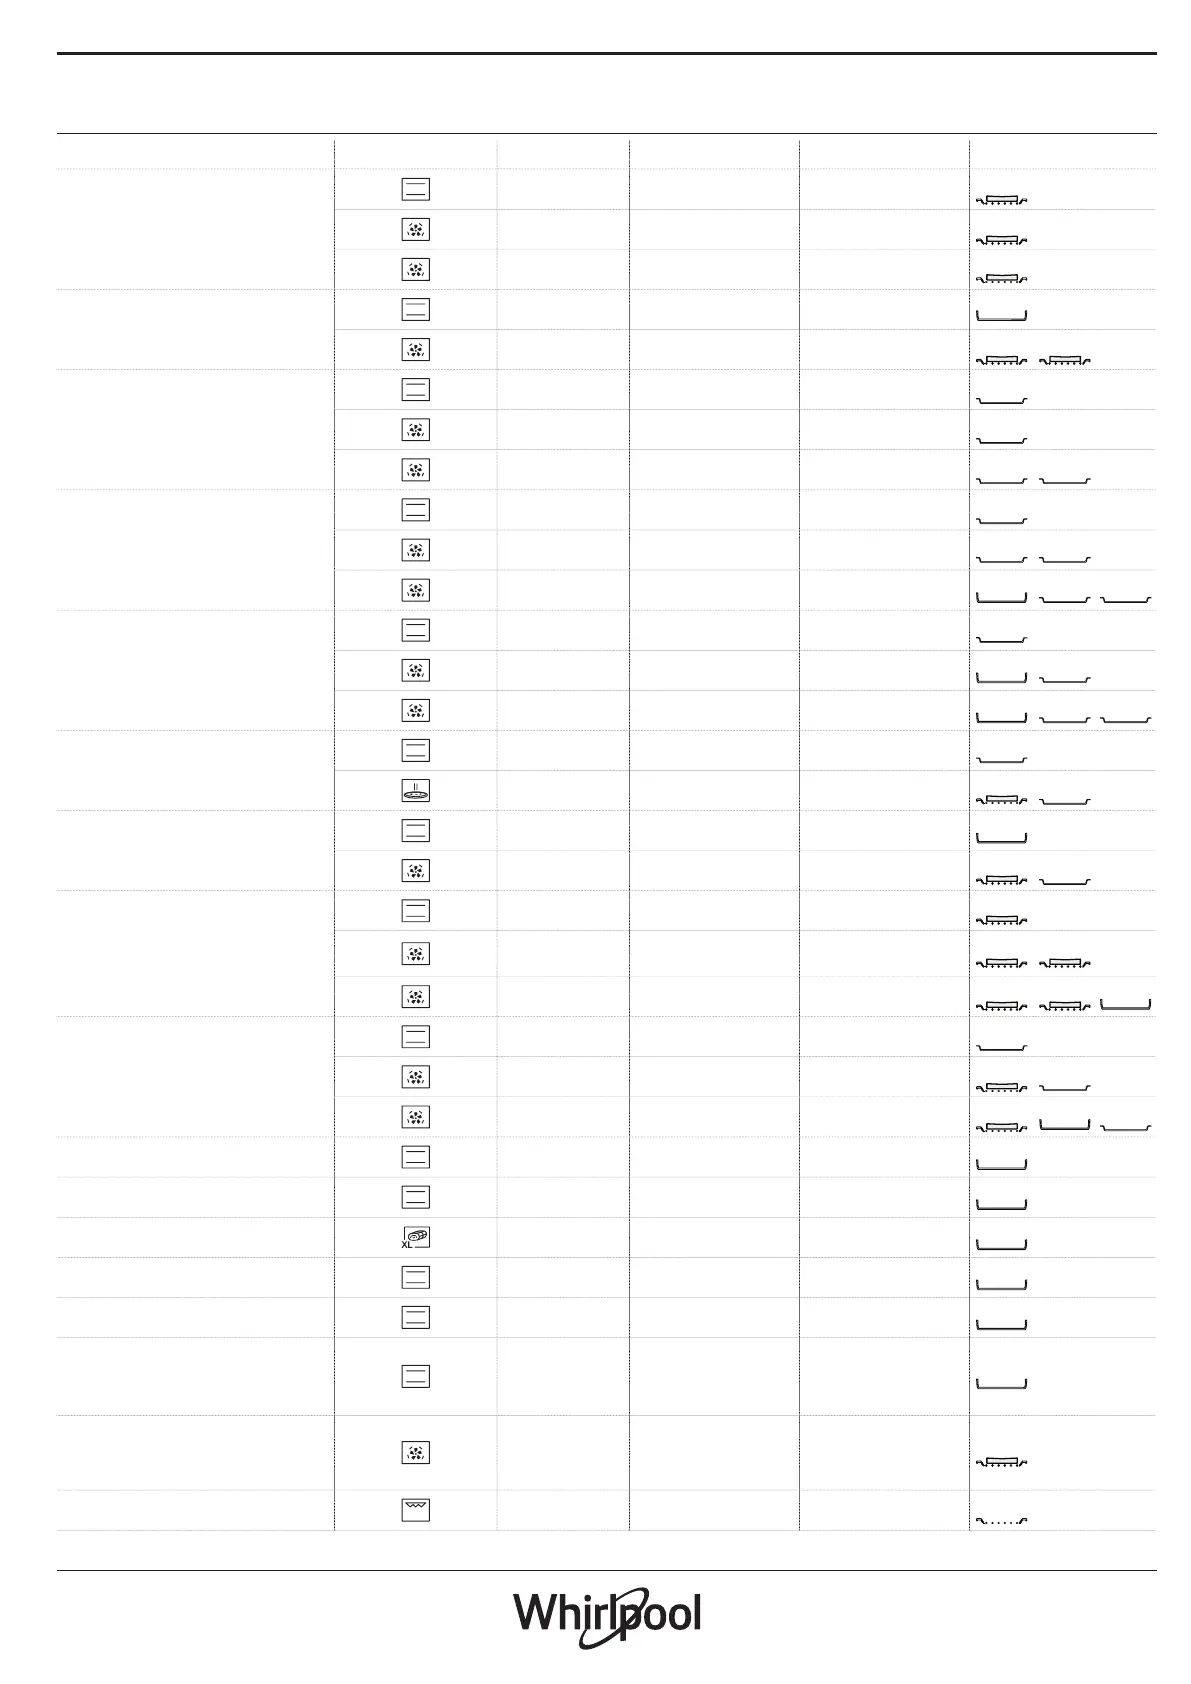
PRZEPIS FUNKCJA NAGRZEWANIE TEMPERATURA (°C) CZAS TRWANIA (Min) POZIOM I AKCESORIA
Ciasta drożdżowe
Tak 170 30–50
3
Tak 160 30–50
2
Tak 160 40–60
4
Ciasto z nadzieniem
(sernik, strudel, ciasto owocowe)
Tak 160 - 200 35 - 90
2
Tak 160 - 200 40 - 90
4
2
Kruche ciasteczka/Rogaliki
Tak 160 25–35
3
Tak 160 25–35
3
Tak 150 35–45
4
2
Choux buns (Ptysie)
Tak 180 - 210 30 - 40
3
Tak 180 - 200 35–45
4
2
Tak 180 - 200 35–45
5
3 1
Bezy
Tak 90 150 - 200
3
Tak 90 140 - 200
4
2
Tak 90 140 - 200
5
3 1
Pizza/Focaccia
Tak 190–250 15–50
1 / 2
Tak 190–250 20–50
4
2
Mrożona pizza
Tak 250 10 - 20
3
Tak 230-250 10 - 25
4
2
Słone ciasta
(tarta warzywna, quiche)
Tak 180 - 200 40 - 55
3
Tak 180 - 200 45–60
4
2
Tak 180 - 200 45–60
5
3 1
Vols-au-vent / chrupiące
paszteciki
Tak 190–200 20–30
3
Tak 180 - 190 20 - 40
4
2
Tak 180 - 190 20 - 40
5
3 1
Lasagne / zapiekany makaron /
cannelloni / zapiekanki
Tak 190–200 45–65
2
Jagnięcina/cielęcina/wołowina/
wieprzowina 1 kg
Tak 190–200 80 –110
3
Kotlety wieprzowe z chrupiącą
skórką 2 kg
Tak 180 - 190 110 - 150
3
Kurczak/królik/kaczka 1 kg
Tak 200–230 50–100
2
Indyk/gęś 3 kg
- 190–200 100 - 160
2
Ryba pieczona/ potrawy
pieczone en papillote (w
papierze)
(let, w całości)
Tak 170 - 190 30–45
2
Nadziewane warzywa
(pomidory, cukinie, bakłażany)
Tak 180 - 200 50 - 70
3
Tosty
5' 250 2–6
5
TABELA PIECZENIA

1
RO
Manual de utilizare
1. BUTONUL DE SELECTARE
Pentru pornirea cuptorului prin
selectarea unei funcţii.
Rotiţi în poziţia pentru a opri
cuptorul.
2. LUMINĂ
Cu cuptorul pornit, apăsaţi
pentru a aprinde sau stinge becul
din interiorul cuptorului.
3. SETAREA OREI
Pentru accesarea setărilor duratei
de preparare, pornirii temporizate
şi a temporizatorului.
Pentru afişarea orei când cuptorul
este oprit.
4. AFIŞAJ
5. BUTOANE DE REGLARE
Pentru modificarea setărilor
duratei de preparare.
6. BUTONUL TERMOSTATULUI
Rotiţi pentru a selecta temperatura
dorită la activarea funcţiilor
manuale.
1 3
2
4 5
6
1. Panou de comandă
2. Ventilator şi rezistenţă
circulară (nu sunt vizibile)
3. Bec
4. Ghidaje pentru grătar
(nivelul este indicat pe peretele
compartimentului pentru
preparare)
5. Uşă
6. Rezistenţă superioară/grill
7. Plăcuţă cu date de identificare
(a nu se demonta)
1
2
3
4
5
7
6
VĂ MULŢUMIM CĂ AŢI ACHIZIŢIONAT UN PRODUS
WHIRLPOOL
Pentru a benecia de servicii complete de
asistenţă, vă rugăm să vă înregistraţi produsul pe
www . whirlpool . eu/ register
SCANAŢI CODUL QR DE PE
APARATUL DUMNEAVOASTRĂ
PENTRU A OBŢINE MAI MULTE
INFORMAŢII
Înainte de a utiliza aparatul, citiţi cu atenţie
instrucţiunile privind siguranţa.
DESCRIEREA PRODUSULUI
DESCRIEREA PANOULUI DE COMANDĂ
Vă rugăm să reţineţi următoarele: Tipul de selector poate varia în funcţie de model. Dacă selectoarele trebuie apăsate pentru a
activate, apăsaţi pe centrul selectorului pentru a-l elibera din locaş.

4
Vă rugăm să reţineţi următoarele: Durata de timp după care
pictograma se dezactivează variază deoarece depinde de o
serie de factori precum temperatura ambientală şi funcţia
utilizată. În orice caz, se poate considera că aparatul este
dezactivat atunci când indicatorul de pe butonul de selectare
se aă în dreptul simbolului
.
4. PROGRAMAREA PREPARĂRII
Va trebui să selectaţi o funcţie înainte de a putea să
porniţi programarea preparării.
DURATĂ
Apăsaţi în mod repetat pe până când pictograma
şi cifrele „00:00” încep să clipească pe afişaj.
Utilizaţi sau pentru a seta durata de preparare
dorită, apoi apăsaţi pe
pentru a confirma.
Activaţi funcţia rotind butonul termostatului la
temperatura dorită: se va emite un semnal sonor,
iar pe afişaj va fi indicată finalizarea procesului de
preparare.
Vă rugăm să reţineţi următoarele: Pentru a anula durata de
preparare setată, apăsaţi în mod repetat pe
până când
pictograma
începe să clipească pe aşaj, apoi utilizaţi
pentru a reseta durata de preparare la „00:00”. Durata de
preparare cuprinde o etapă de preîncălzire.
PROGRAMAREA OREI DE FINALIZARE A
PREPARĂRII/
PORNIRII TEMPORIZATE
După setarea unei durate de preparare, pornirea
funcţiei poate fi temporizată prin programarea orei
de finalizare a preparării: Apăsaţi pe
până când
pictograma
şi ora curentă încep să clipească pe
afişaj.
Utilizaţi sau pentru a seta ora dorită pentru
finalizarea duratei de preparare şi apăsaţi pe
pentru a confirma.
Activaţi funcţia rotind butonul termostatului la
temperatura dorită: funcţia va rămâne întreruptă până
când porneşte automat la ora calculată în funcţie de
ora de finalizare selectată a preparării.
Vă rugăm să reţineţi următoarele: Pentru a anula setarea,
opriţi cuptorul rotind butonul de selectare
.
Întârzierea de pornire a funcţionalităţii nu este
disponibilă pentru funcţiile Grill şi Turbo Grill.
FINALIZAREA PREPARĂRII
Se va emite un semnal sonor, iar pe afişaj va fi indicată
finalizarea funcţiei.
Rotiţi butonul de selectare pentru a selecta o funcţie
diferită sau
pentru a opri cuptorul.
Vă rugăm să reţineţi următoarele: Dacă temporizatorul este
activ, aşajul va prezenta mesajul „END” alternativ cu durata
de timp rămasă.
5. SETAREA TEMPORIZATORULUI
Această opţiune nu întrerupe sau programează
prepararea, dar vă permite să utilizaţi afişajul pe post
de temporizator atât în timp ce o funcţie este activă,
cât şi atunci când cuptorul este oprit.
Apăsaţi în mod repetat pe
până când pictograma
„00:00” şi cifrele „00:00” încep să clipească pe
afişaj.
Utilizaţi sau pentru a seta ora şi apăsaţi pe
pentru a confirma.
Se va emite un semnal sonor odată ce temporizatorul
a finalizat numărătoarea inversă a duratei de timp
selectate.
Vă rugăm să reţineţi următoarele: Pentru a anula
temporizatorul, apăsaţi în mod repetat pe
până când
pictograma
începe să clipească, apoi utilizaţi pentru a
reseta ora la „00:00”.
Produkspesifikasjoner
| Merke: | Whirlpool |
| Kategori: | Stekeovn |
| Modell: | OMR58CU1B |
Trenger du hjelp?
Hvis du trenger hjelp med Whirlpool OMR58CU1B still et spørsmål nedenfor, og andre brukere vil svare deg
Stekeovn Whirlpool Manualer

26 Mars 2025

26 Februar 2025

26 Februar 2025

26 Februar 2025

20 Februar 2025

7 Februar 2025

7 Februar 2025

7 Februar 2025

7 Februar 2025

6 Februar 2025
Stekeovn Manualer
- Ariston Thermo
- Profilo
- Bosch
- Supra
- Superior
- Element
- Berg
- Witt
- Arcelik
- Royal Catering
- Pelgrim
- Kernau
- Goldbrunn
- Cramer
- La Cornue
Nyeste Stekeovn Manualer

10 April 2025

10 April 2025

9 April 2025

9 April 2025

9 April 2025

9 April 2025

9 April 2025

9 April 2025

9 April 2025
