Whirlpool WGD6720RR Bruksanvisning
Whirlpool
Tørketrommel
WGD6720RR
Les nedenfor 📖 manual på norsk for Whirlpool WGD6720RR (2 sider) i kategorien Tørketrommel. Denne guiden var nyttig for 26 personer og ble vurdert med 4.7 stjerner i gjennomsnitt av 13.5 brukere
Side 1/2
W11708007B
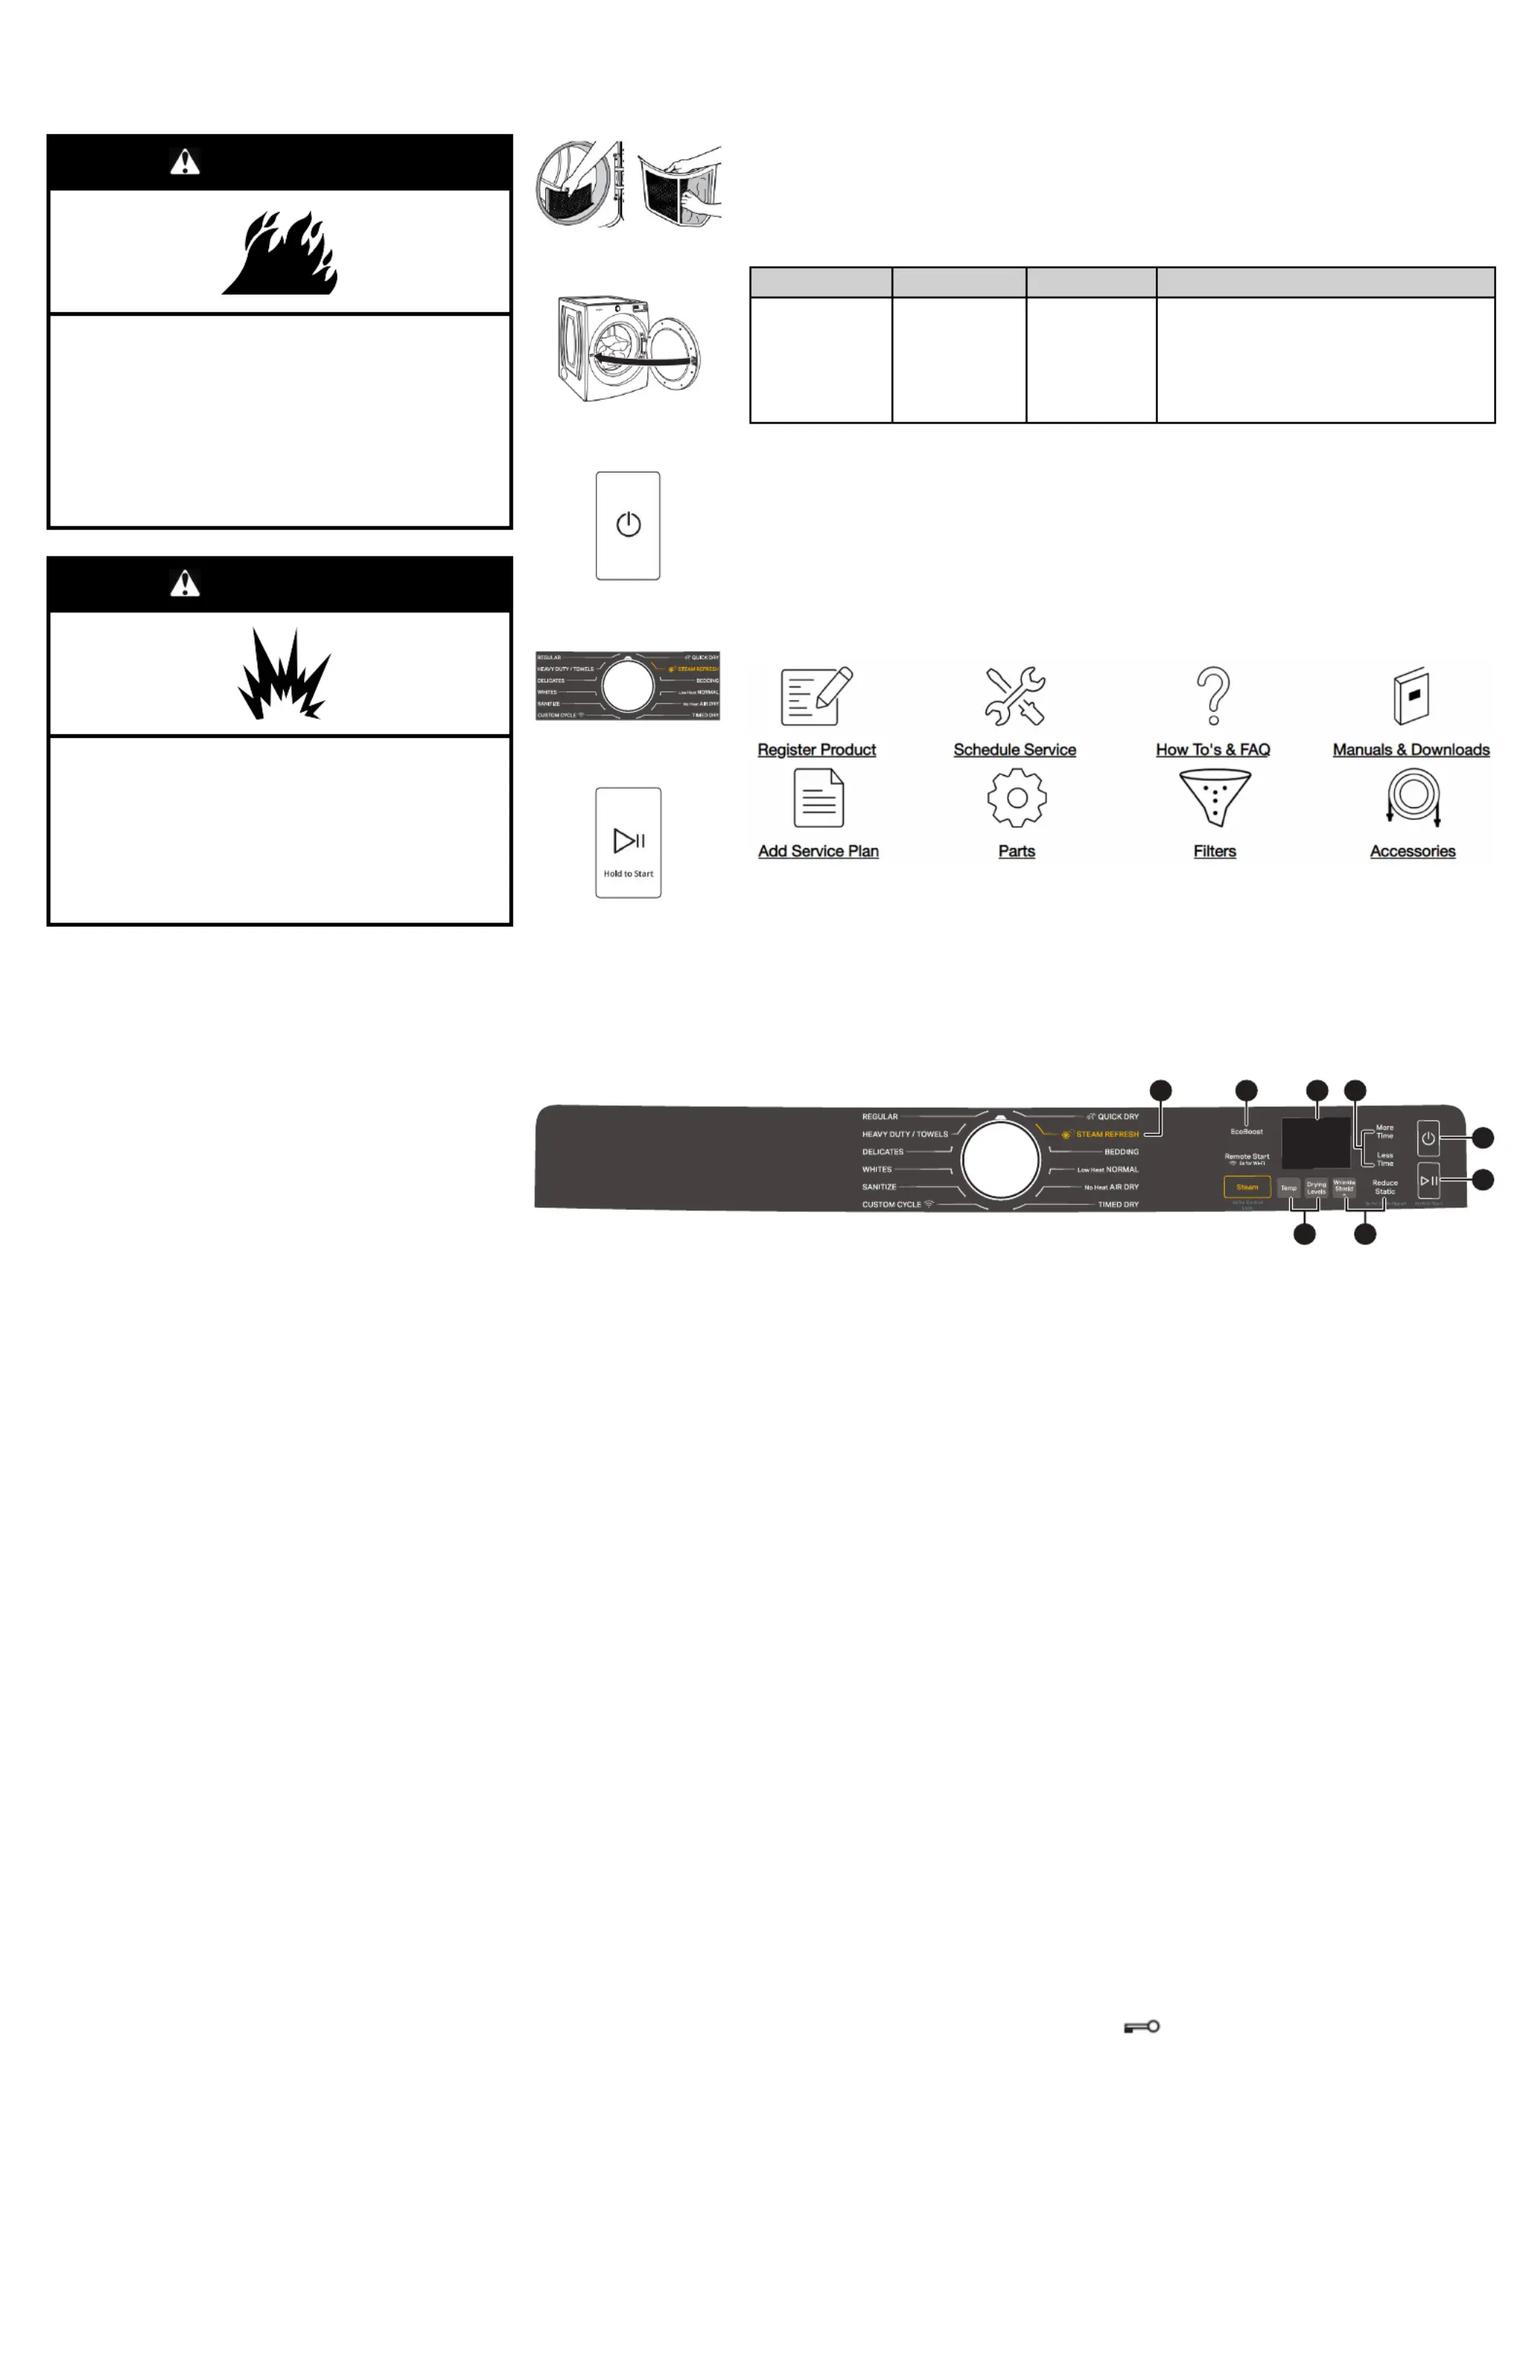
DRYER QUICK START GUIDE
OPERATING INSTRUCTIONS
WARNING
Fire Hazard
No washer can completely remove oil.
Do not dry anything that has ever had any type of oil
on it (including cooking oils).
Items containing foam, rubber, or plastic must be
dried on a clothesline or by using an Air Cycle.
Failure to follow these instructions can result in
death or fire.
WARNING
Explosion Hazard
Keep flammable materials and vapors, such as
gasoline, away from dryer.
Do not dry anything that has ever had anything
flammable on it (even after washing).
Failure to follow these instructions can result in
death, explosion, or fire.
WARNING: To reduce the risk of fire, electric shock, or injury to
persons, read the IMPORTANT SAFETY INSTRUCTIONS, located
in your appliance s’ Owner s’ Manual, before operating this appliance.
Button Descriptions
1. POWER/CANCEL
Touch to turn the dryer on and off. Touch to stop/cancel a cycle at
any time.
2. START/PAUSE
Step 1. Clean Lint
Screen
Step 2. Load Clothes;
then Close Door
Step 3.
Power On/Cancel
Step 4. Select Cycle
and Settings
Step 5.
Press Start/Pause
Cycle Guide
This dryer has a unique user interface to help you select the best cycle you need for your load. The controls
layout guides you to the optimal cycle in two easy steps: First determine what items are in the load that you
are trying to dry. Use that to guide your selection. Then determine how you want the dryer to dry them and
select the appropriate selection. Modifiers are preset for the items being dried, but can be changed if desired.
To get the most energy savings and enhanced fabric care from your dryer, use the Automatic cycles. These
cycles measure the drying air temperature and moisture levels to turn the dryer off once the load reaches the
selected dryness level. Dryer performance and results may vary with service voltage less than 240.
Items to Dry: Cycle: Dryness Level: Description:
Baby clothes,
Blankets, Cotton
undergarments,
Colored napkins
Regular
Bulky Items
Whites
Sheets
Colors
Normal Automatic Sensor cycle stops when dryness
level is reached.
See online “Cycle Guide” for details.
NOTE: These clothes dryer’s Government energy certifications were based on the Low Heat Normal Cycle,
EcoBoost Defaulted ON, Highest Temperature and Normal Dryness Level. The as-shipped defaults of Low
Heat Normal, EcoBoost ON, Medium Temperature and Wrinkle Shield Off were used. Cycles that are
available for post-sale download may use more energy than the Low Heat Normal cycle, upon which the
energy use rating of this dryer is based upon.
Online Ordering Information
For detailed installation instruction and maintenance information, winter storage, and transportation tips,
please see the Owner’s Manual included with your machine.
For information on any of the following items, a full cycle guide, warranty, detailed product dimensions, or for
complete instructions for use and installation, please visit , or in Canadawww.whirlpool.com/owners
www.whirlpool.ca/owners. This may save you the cost of a service call.
However, if you need to contact us, use the information listed below for the appropriate region.
United States:
1–866–698–2538
Whirlpool Brand Home Appliances
Customer eXperience Center
553 Benson Road
Benton Harbor, MI 49022–2692
Canada:
1–800–807–6777
Whirlpool Brand Home Appliances
Customer eXperience Centre
200–6750 Century Ave.
Mississauga, Ontario L5N 0B7
IMPORTANT: Retain this guide for future use.
3 4
2
1
3
4
54
Not all features, cycles, and options are available on all models. Appearance may vary.
NOTE: The control panel features a sensitive surface that responds to a light touch of your finger. To ensure your selections are registered,
touch the control panel with your finger tip, not your fingernail. When selecting a setting or option, simply touch its name.
Reduce Static (on some models)
Touch to add this option to selected Automatic Cycles. The dryer
will automatically tumble, pause, and introduce a small amount of
moisture into the load to help reduce static. This option adds
approximately 3 minutes to cycle the total time.
Control Lock
Use lock this option to the controls of dryer the and avoid an
accidental unintended change in cycle options or preferences
during a drying cycle. Touch and hold Control Lock or Damp Dry
Signal (depending on the model) for 3 seconds to lock or unlock the
controls of the dryer. During this time, the LED Display will count
down “3-2-1.” Once the the controls are locked, LED Display will
display “Loc.”
NOTE: The Control Lock function may be enabled when recovering
from o a power failure. T unlock the control, touch and hold Control
Lock or Damp Dry Signal (depending on the model) for at least
3 seconds.
EcoBoost™™ Option
The EcoBoost™ option will default on only for the Regular/Normal
cycle and is
only available on cycle. that This option allows you to
increase your energy savings heat by using a slightly lower level.
The EcoBoost™ option will increase drying times by approximately
40 which be on minutes, will reflected the LED display. If optimal
time is desired, touch ECOBOOST to turn off this option.
5. LED DISPLAY
When select you a cycle, its default settings will light up and the
estimated time Cycles) remaining (for Automatic will vary
depending on selections or actual time remaining for Timed Dry
cycles (for Manual Cycles) will be displayed.
CYCLE STATUS
The Cycle Status indicators show the progress of a cycle. Not all
indicators are available on all models.
Sensing
The Sensing indicator will light periodically during Sensor Cycles to
indicate that the moisture sensor on the dryer is operating. This
indicator will not light during Timed Cycles or options such as
Wrinkle Shield™ Option.
WiFi Connect
Touch and hold WiFi Connect for 3 seconds during the initial
connection of dryer the to your home Wi-Fi network. If the dryer is in
a Smart Delay, touch WiFi Connect to override the delay and begin
a dry cycle immediately.
Remote Enabled
Press the Remote Enable button any time you want to use the WiFi
app. Pressing the button locks out the LCD screen and you will be
prompted with a message about the dryer waiting for input from the
app. To exit this mode, press the Remote Enable button again.
Wet
The load is still wet and/or the cycle just started.
Damp
This indicator shows that the load is partially dried and items that
you may wish to hang up or iron while still damp may be removed.
Cool Down
The dryer has finished drying with heat and is now tumbling the
load without heat to cool it down and reduce wrinkling.
Check Vent
The Check Vent indicator is a feature available for Automatic
Cycles only. This indicator will show the status of airflow through
the dryer and the dryer vent system for the dryer’s life. During the
sensing phase at the beginning of the cycle, the Check Vent light
will come on if a blocked vent or low airflow issue is detected. This
light will stay on for the entire cycle. Should the Check Vent light
illuminate, refer to the online “Troubleshooting” section for potential
solutions to the issue.
The light will be cleared upon completion of the cycle, touching
Power, or opening the door. The Check Vent light will continue to
illuminate during the cycle unless the root cause is resolved.
NOTE: The dryer will continue to operate even while the indicator is
lit, but poor airflow can impact dry times and overall performance.
See “Check Your Vent System for Good Airflow” in the Owner’s
Manual.
NOTE: If there are other error issues during a cycle, the Check Vent
indicator will not light up. See the online “Troubleshooting” section.
End
This will indicate that the selected cycle has ended and the load
may be removed from the dryer. If Wrinkle Shield Option has™
been selected, the dryer may continue to tumble the load, even if
“End” is displayed.
Control
Lock
This will illuminate once the controls are locked.
T ouch and hold until LED counts down “3-2-1” and the dryer starts;
then let go to start a cycle, or touch once while a cycle is in process
to pause it.
3. MODIFIERS
Use
to select available modifiers for your dryer . Not all cycles and
options are available on all models. See the online “Cycle Guide” for
details.
Temp
When
using T imed Dry/Quick Cycle, you may select a dry
temperature based on the type of load you are drying. Use the
warmest setting that is acceptable for the garments in the load.
Follow garment label instructions.
NOTE:
Automatic Cycles will give you up to 4 temperatures to adjust,
depending on the selections that have been made.
Drying Levels
Y
ou may adjust the Dryness on Automatic Cycles (except for the
Sanitize cycle), if desired.
NOTE: Dryness is for use with Automatic Cycles only.
More
Time/Less Time
T
ouch
More T ime or Less T ime with T imed Dry/Quick Dry Cycles to
increase or decrease the length of the cycle.
4. OPTIONS
Use
to select available options for your dryer . Not all cycles and
options are available on all models.
Wrinkle Shield
™™ Option
If
you will be unable to remove a load immediately , touch
Wrinkle
Shield
™ to add up to 150 minutes of periodic tumbling to help
reduce
wrinkling. Y ou may select the “+ Steam” setting (on some models
only) to add a short steam cycle after 60 minutes to help smooth out
wrinkles.
NOTE: If you open the dryer door prior to the end of the
Wrinkle Shield ™ option, the dryer will pause.
Steam Refresh (steam models only)
This
cycle is best for reducing wrinkles and odors from dry items.
Cycle time will increase, depending on number of items. This is an
independent cycle that cannot be combined with any other cycle.
Cycle Signal
Use
this to turn the signal indicating the end of a drying cycle to low ,
medium, high, or off. The volume you select here will also be applied
to the Damp Dry Signal.
NOTE: Y
ou may also turn of f the tones that sound when a feature,
setting, or option is touched. T ouch and hold Cycle Signal for about
3 seconds to turn sounds to low , medium, high, or off.
Damp
Dry Signal
T
ouch
to select the Damp Dry Signal on or off. When selected, a
series of beeps will sound when the load is damp, but not completely
dry
. This will allow you to take clothes out of the load that do not need
to dry completely . The Damp Dry Signal is selected as a default for
the Bulky Items cycles, as a reminder to manually reposition bulky
l
oads midway through the cycle. This option is not available for all
cycles. See the online “Cycle Guide” for details.
Produkspesifikasjoner
| Merke: | Whirlpool |
| Kategori: | Tørketrommel |
| Modell: | WGD6720RR |
Trenger du hjelp?
Hvis du trenger hjelp med Whirlpool WGD6720RR still et spørsmål nedenfor, og andre brukere vil svare deg
Tørketrommel Whirlpool Manualer

9 April 2025

5 April 2025

4 April 2025

2 April 2025

2 April 2025

31 Mars 2025

30 Mars 2025

29 Mars 2025

28 Mars 2025

26 Mars 2025
Tørketrommel Manualer
- Baumatic
- Essentiel B
- Haier
- Blaupunkt
- Gorenje
- Lamona
- Arcelik
- Yamazen
- AYA
- Gaggenau
- Winia
- Panasonic
- Castor
- BEKO
- Sangiorgio
Nyeste Tørketrommel Manualer

10 April 2025

7 April 2025

7 April 2025

6 April 2025

31 Mars 2025

30 Mars 2025

28 Mars 2025

27 Mars 2025

27 Mars 2025

22 Mars 2025