Craftsman CMHT77633 Bruksanvisning
Les nedenfor 📖 manual på norsk for Craftsman CMHT77633 (10 sider) i kategorien Detektor. Denne guiden var nyttig for 9 personer og ble vurdert med 4.3 stjerner i gjennomsnitt av 5 brukere
Side 1/10

1
2
3
4
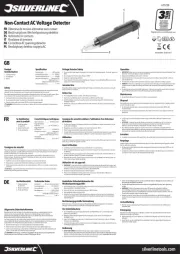
HOLD SENSOR FLAT AGAINST SURFACE. PRESS AND HOLD ACTIVATION BUTTON. WHEN RED LIGHT GOES OFF, UNIT IS CALIBRATED.
MANTENGA EL SENSOR PLANO CONTRA LA SUPERFICIE. MANTENGA PRESIONADO EL BOTÓN DE ACTIVACIÓN. CUANDO SE APAGA LA LUZ ROJA,
LA UNIDAD ESTÁ CALIBRADA.
TENEZ LE CAPTEUR À PLAT CONTRE LA SURFACE. APPUYEZ SUR LE BOUTON D'ACTIVATION ET MAINTENEZ-LE ENFONCÉ. LE VOYANT ROUGE
S'ÉTEINT LORSQUE L'APPAREIL EST ÉTALONNÉ.
MANTENHA A FACE DO SENSOR CONTRA A SUPERFÍCIE. PRESSIONE E MANTENHA O BOTÃO DE ATIVAÇÃO QUANDO A UNIDADE ESTIVER
CALIBRADA, A LUZ VERMELHA SE APAGARÁ.
KEEP PRESSING THE BUTTON AND SLOWLY SLIDE TOOL ACROSS SURFACE.
MANTENGA EL BOTÓN PRESIONADO Y LENTAMENTE DESLICE LA HERRAMIENTA POR LA SUPERFICIE.
MAINTENEZ LE BOUTON ENFONCÉ ET FAITES LENTEMENT GLISSER L'OUTIL SUR LA SURFACE.
CONTINUE PRESSIONANDO O BOTÃO E DESLIZE A FERRAMENTA LENTAMENTE PELA SUPERFÍCIE.
WHEN THE EDGE OF A STUD IS DETECTED, THE RED LED WILL GO ON AND AUDIBLE TONE WILL START. MARK THIS LOCATION.
CUANDO SE DETECTA EL BORDE DE UN PERNO, EL LED ROJO SE ENCENDERÁ Y SE ESCUCHARÁ UN TONO. MARQUE ESTA UBICACIÓN.
LORSQUE LE BORD D'UN GOUJON EST DÉTECTÉ, LE VOYANT DEL ROUGE S'ALLUME ET L'APPAREIL ÉMET UN SON. MARQUEZ CET
EMPLACEMENT.
QUANDO A BORDA DE UM PARAFUSO FOR DETECTADA, A LUZ VERMELHA SE ACENDERÁ E UM TOQUE AUDÍVEL INICIARÁ. MARQUE ESTE
LOCAL.
REPEAT STEPS 1-3 FROM THE OTHER SIDE OF THE STUD. THE CENTER POINT BETWEEN YOUR 2 EDGE MARKINGS WOULD BE THE APPROXIMATE
STUD CENTER.
REPITA LOS PASOS 1-3 DESDE EL OTRO LADO DEL PERNO. EL PUNTO CENTRAL ENTRE SUS 2 MARCAS DE BORDES DEBE SER EL CENTRO
APROXIMADO DEL PERNO.
RÉPÉTEZ LES ÉTAPES 1 À 3 EN PARTANT DE L'AUTRE CÔTÉ DU GOUJON. LE CENTRE ENTRE LES 2 EMPLACEMENTS QUE VOUS AVEZ MARQUÉS
DEVRAIT CORRESPONDRE APPROXIMATIVEMENT AU CENTRE DU GOUJON.
REPITA AS ETAPAS 1-3 DO OUTRO LADO DO PARAFUSO. O PONTO CENTRAL ENTRE SUAS 2 MARCAÇÕES DE BORDA SERÁ O CENTRO
APROXIMADO DO PARAFUSO.
WEAR SAFETY GOGGLES.
USE GAFAS PROTECTORAS.
PORTER DES LUNETTES DE SÉCURITÉ.
UTILIZE ÓCULOS DE PROTEÇÃO.
REQUIRES A 9 VOLT BATTERY. NOT INCLUDED.
REQUIRE UNA BATERIA DE 9 VOLTIOS. NO ES INCLUIDA.
FONCTIONNE AVEC PILE DE 9 VOLTS. NON INCLUSE.
REQUERE UMA BATERIA DE 9 VOLTS. NÃO INCLUSO.
WARNING / ADVERTENCIA /
AVERTISSEMENT/ ATENÇÃO
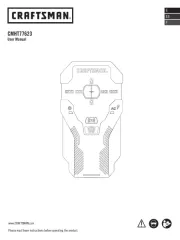
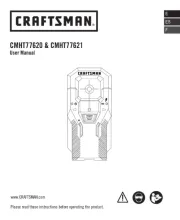
Stud Sensor
Sensor De Parales
Capteur De Poteaux
Sensor de vigas
77-075
WWW.CRAFTSMAN.COM
©2018 STANLEY TOOLS
701 E. JOPPA ROAD
TOWSON, MARYLAND 21286
U.S. & CANADA ONLY
É.-U. ET CANADA SEULEMENT
SOLAMENTE PARA PROPÓSITO DE ARGENTINA:
IMPORTADO POR: BLACK & DECKER ARGENTINA S.A.
PACHECO TRADE CENTER
COLECTORA ESTE DE RUTA PANAMERICANA
KM. 32.0 EL TALAR DE PACHECO
PARTIDO DE TIGRE
BUENOS AIRES (B1618FBQ)
REPÚBLICA DE ARGENTINA
NO. DE IMPORTADOR: 1146/66
TEL. (011) 4726-4400
IMPORTED BY/IMPORTADO POR:
BLACK & DECKER DO BRASIL LTDA.
ROD. BR 050, S/N° - KM 167
DIST. INDUSTRIAL II
UBERABA – MG – CEP: 38064-750
CNPJ: 53.296.273/0001-91
INSC. EST.: 701.948.711.00-98
S.A.C.: 0800-703-4644
MAQUINAS Y HERRAMIENTAS
BLACK & DECKER CHILE S.A.
AVDA. EDUARDO FREI M. #6001 EDIFICIO 67
CONCHALI- SANTIAGO
CHILE
IMPORTADO POR: BLACK & DECKER DEL PERÚ S.A.
AV. ENRIQUE MEIGGS N° 227
PQUE. INTERN. DE INDUSTRIA Y COMERCIO - CALLAO
TELF. DIRECTO (511) 614-4242
RUC: 20266596805
SOLAMENTE PARA PROPÓSITO DE MÉXICO:
IMPORTADO POR: BLACK AND DECKER S.A. DE C.V.
AVENIDA ANTONIO DOVALI JAIME
# 70 TORRE B PISO 9
COLONIA SANTA FÉ
DELEGACIÓN ALVARO OBREGÓN
MÉXICO D.F. 01210
TEL. (52) 555-326-7100
R.F.C.: BDE810626-1W7
MADE IN CHINA
HECHO EN CHINA
FABRIQUÉ EN CHINE
FABRICADO EM CHINA
79003104
CONT. 1 PCS./PZAS
1
2
3
4
Produkspesifikasjoner
| Merke: | Craftsman |
| Kategori: | Detektor |
| Modell: | CMHT77633 |
Trenger du hjelp?
Hvis du trenger hjelp med Craftsman CMHT77633 still et spørsmål nedenfor, og andre brukere vil svare deg
Detektor Craftsman Manualer

8 September 2025
8 September 2025

7 September 2025
7 September 2025
Detektor Manualer
- Velleman
- Ferguson
- Sauter
- ORNO
- Optex
- IFM
- Laserliner
- Noyafa
- Techno Line
- Fluke
- Bearware
- Hikvision
- Voltcraft
- Steinberg
- Skyscan
Nyeste Detektor Manualer

16 Oktober 2025
15 Oktober 2025
15 Oktober 2025

6 Oktober 2025

30 September 2025

28 September 2025
28 September 2025

26 September 2025
26 September 2025
23 September 2025