Fluval A101 Bruksanvisning
Les nedenfor 📖 manual på norsk for Fluval A101 (2 sider) i kategorien Pomp. Denne guiden var nyttig for 38 personer og ble vurdert med 4.7 stjerner i gjennomsnitt av 19.5 brukere
Side 1/2
TROUBLE SHOOTING TIPS
If the air pump fails to produce air, check the following:
1. Ensure that the air pump is plugged in.
2. Ensure that there are no blockages in the airline tubing and that all valves allow air passage.
If no air is produced by the accessories in the aquarium, remove the airline tubing from
the pump and ensure that air is being produced.
3. If the air pump produces no output, the most common problem encountered with any
air pump is a ripped or weakened diaphragm.
RECYCLING
This product bears the selective sorting symbol for waste electrical and
electronic equipment (WEEE). This means that this product must be
handled pursuant to EU Directive 2012/19/EU in order to be recycled
or dismantled to minimize its impact on the environment. Check with
your local Environmental Agency for possible disposal instructions
or take to an official council registered refuse collection point.
Electronic products not included in the selective sorting process
are potentially dangerous for the environment and human health due to the presence
of hazardous substances.
FOR AUTHORIZED WARRANTY SERVICE
For Authorized Warranty Service please return (well packaged and by registered post) to the
address below enclosing dated receipt and reason for return. If you have any queries or
comments about the operation of this product, please let us try to help you before you return
the product to your retailer. Most queries can be handled promptly with a phone call.
When you call (or write), please have all relevant information such as model number, age of
product, details of aquarium set-up, as well as the nature of the problem.
CANADA: Consumer Repair, Rolf C. Hagen Inc.,
20500 Trans Canada Hwy, Baie-D’Urfé (Quebec) H9X 0A2
Canada only: 1-800-554-2436 between 9:00 a.m. and 4:30 p.m.
Eastern Standard Time. Ask for Customer Service.
U.S.A.: Rolf C. Hagen (U.S.A.) Corp., 305 Forbes Blvd, Mansfield, MA 02048
U.S.A only: 1-800-724-2436 between 9:00 a.m. and 4:00 p.m.
Eastern Standard Time. Ask for Customer Service.
UK: Rolf C. Hagen (UK) Ltd, Customer Service Department,
California Drive, Whitwood Ind Est., Castleford, West Yorkshire WF10 5QH
U.K. only: Helpline Number 01977 521015. Between 9:00 a.m. and 5:00 p.m., Monday to
Thursday and 9:00 a.m. and 4:00 p.m. on Friday (excluding Bank Holidays).
CONGRATULATIONS Thank you for purchasing the Fluval A Series Air Pump. For
a complete understanding of the air pump’s operation and capabilities, please read
and follow these instructions.
IMPORTANT SAFETY INSTRUCTIONS
WARNING - To guard against injury, basic safety precautions should
be observed, including the following:
1.
READ AND FOLLOW ALL SAFETY
INSTRUCTIONS
and all important notices on the appliance
before using. Failure to do so may result in damage to the unit.
2. DANGER - To avoid possible electric shock, special care should be
taken since water is employed in the use of aquarium equipment.
For each of the following situations, do not attempt repairs yourself,
return the appliance to an authorized service facility for service or
discard the appliance.
A. DO NOT immerse in water. If the appliance falls into the water,
DO NOT reach for it! First unplug it and then retrieve it. If electrical
components of the appliance get wet, unplug the appliance immediately.
(Non-immersible equipment only)
B. Carefully examine the appliance after installation. It should not be
plugged in if there is water on parts not intended to be wet. If the
appliance shows any sign of abnormal water leakage or if RCD (or GFCI –
Ground Fault Current Interrupter) switches off, disconnect the power
supply cord from the mains.
C. Do not operate any appliance if it has a damaged cord or plug, or if it is
malfunctioning or if it is dropped or damaged in any manner. The power
cord of this appliance cannot be replaced: if the cord is damaged,
the appliance should be discarded. Never cut the cord.
D. WARNING: To prevent possible electric shock resulting from water
back-siphoning, pump should be located higher than water level.
To avoid the possibility of the appliance plug or receptacle getting
wet, position aquarium stand and tank to one side of a wall
mounted receptacle to prevent water from
dripping onto the receptacle or plug. A “drip
loop” (ill. A) should be arranged by the user
for each cord connecting an aquarium appliance
to a receptacle. A “drip loop” is that part of
the cord below the level of the receptacle, or
the connector if an extension cord is used,
to prevent water travelling along the cord and
coming in contact with the receptacle. If the plug
or receptacle does get wet, DON’T unplug the cord. Disconnect the
fuse or circuit breaker that supplies power to the appliance, then
unplug and examine for presence of water in the receptacle.
It is recommended to always use a Check Valve in the airline
between the air pump and the aquarium.
3. WARNING: This appliance is not intended for use by persons
(including children) with reduced physical, sensory or mental
capabilities, or lack of experience and knowledge, unless they have
been given supervision or instruction concerning use of the
appliance by a person responsible for their safety. Children should
be supervised to ensure that they do not play with the appliance.
4. To avoid injury, do not touch moving parts.
5. WARNING: Unplug or switch off all appliances in the aquarium or pond
before carrying out maintenance.
6. Do not use an appliance for other than intended use. The use of
attachments not recommended or sold by the appliance manufacturer
may cause an unsafe condition.
ENGLISH
ill. A
7. For Indoor, household use only. This appliance is not a
submersible appliance. Do not install or store the appliance where it
will be exposed to weather or to temperatures below freezing.
8. This is an aquarium air pump. Do not use this air pump for other than
its intended use (i.e.: do not use in swimming pools, bathrooms, etc.).
The use of attachments not recommended or sold by the appliance
manufacturer may cause an unsafe condition.
• Do not use this air pump in swimming pools or other situations
where people are immersed.
• Do not use this air pump with inflammable or drinkable liquids.
9. Make sure an appliance mounted on a tank is securely installed
before operating it.
10. Read and observe all the important notices on the appliance.
11. If an extension cord is necessary, a cord with a proper rating should
be used. A cord rated for less amperes or watts than the appliance
rating may overheat. Care should be taken to arrange the cord so that
it will not be tripped over or pulled.
12. (For North America only) This appliance has a polarized plug (one
blade is wider than the other). As a safety feature, this plug will fit
in a polarized outlet only one way. If the plug does not fit fully into
the outlet, reverse the plug. If the plug will still not fit fully into the
outlet, contact a qualified electrician to inspect the outlet and make
the needed alterations. Never use with an extension cord unless the
plug can be fully inserted. Do not attempt to defeat this safety feature.
SAVE THESE INSTRUCTIONS
INSTALLATION:
Important: When installing an Air Pump it is highly
recommended to always use a Check Valve (sold separately)
with the airline tubing between the air pump and the
aquarium (ill. B, C & D). The Check Valve will help prevent
water from siphoning out of the aquarium through the airline
tubing and into the pump in the event of a power failure, or when
removing filters and other air-driven accessories from the aquarium.
To avoid damage from accidentally spilled water, do not place the
air pump directly below the aquarium (ill. B).
The air pump should be installed by following either of the
3 recommended methods:
1. Place the air pump on a surface lower than the water level
of the aquarium (ill. B).
2. Place the air pump on a surface higher than the water
level. The surface should be at least 12 inches (30 cm)
higher than the water level of the aquarium, but not be
positioned directly above the aquarium. The surface
should have a raised edge to prevent the air pump from
sliding off (ill. C).
3. Wall mounting: Using the tab or eyelet, nail or screw the air
pump to hang vertically on a wall (ill. D).
Once the air pump has been installed, do the following:
1. Attach one end of the airline tubing (item #A1141, sold
separately) to the air outlet(s) on air pump.
2. Attach the other end of the airline tubing to filter(s), air stone(s), ornament(s) or any other
air-driven aquarium accessory. Ensure that the airline tubing has no restrictions or kinks.
3. Plug air pump into outlet. Be sure to allow for a “drip loop” (ill. B, C & D).
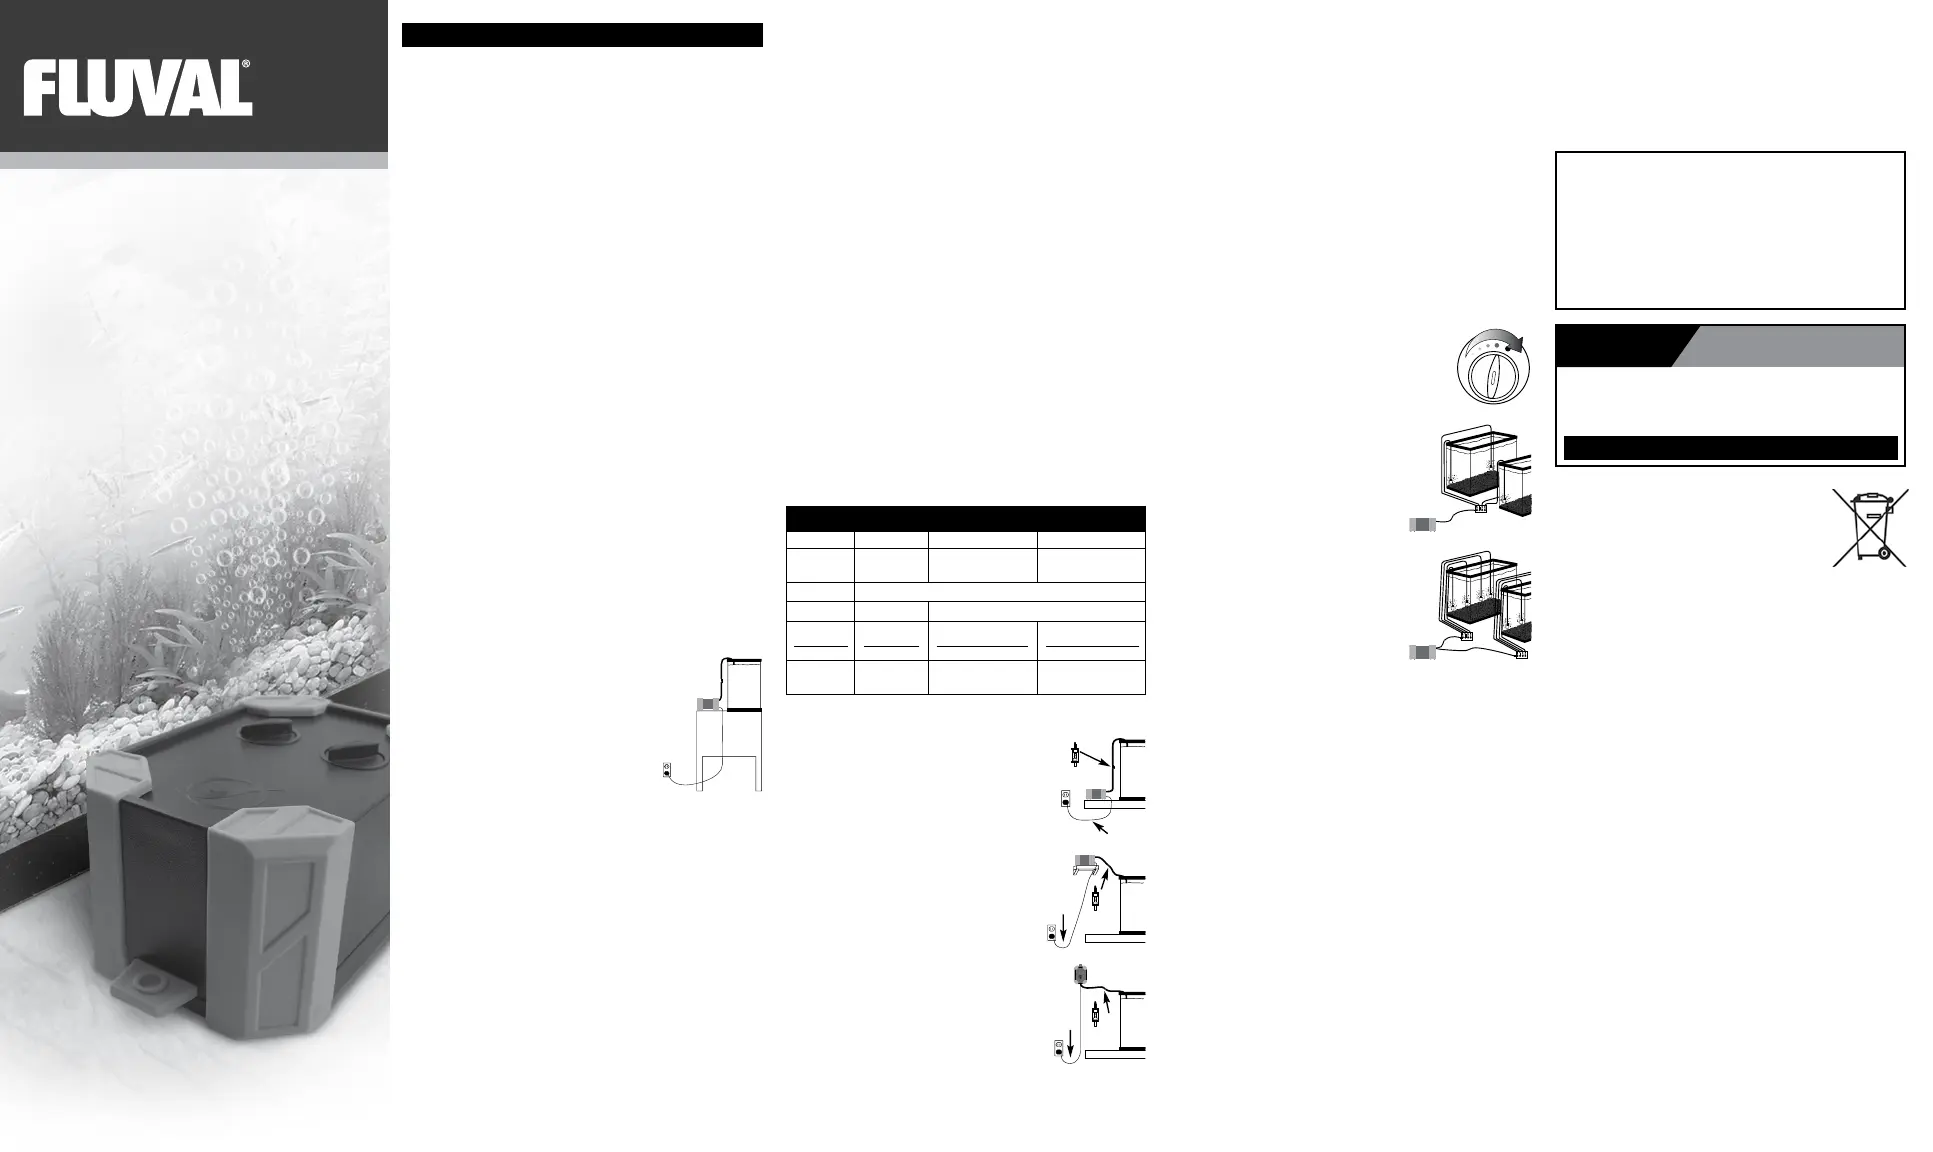
PUMP SPECIFICATIONS
Item #
A851 A853 A854
Max. Flow
Rate
90-110 LPH 180-220 LPH 330-370 LPH
Max. depth
6.5 ft / 2 m
Air Outlets
1 2- independently controlled
Wattage
120V/60Hz
220-240V/50Hz
2W
2.8W
3W
3.8W
4W
4W
Volume
10-50 US Gal
/ 38-190 L
45-80 US Gal
/ 170-300 L
90-160 US Gal
/ 190-600 L
INSTALLATION TIPS
• The pump should be placed in a location which is dry and relatively free from dust. Do not
place the air pump on carpet, as fibers might collect on pump and clog free-flowing air
from entering pump. This will decrease the air output, cause overheating and reduce the
service life of the pump.
• Air control valves (sold separately) with multiple outlets may also be used
to power additional apparatus in the aquarium. When using multiple air valves, it is
recommended to have one more outlet than required by the accessories; this will be used
to bleed over production of air due to back pressure build-up. Please refer to
BACK PRESSURE section for more information about back pressure.
• Air Pumps can be used to operate a variety of aquarium accessories such as air stones,
corner filters, under gravel filters, and ornaments. Follow installation instructions for
your particular aquarium accessory product.
CAUTION: Care must be taken during installation to ensure that water cannot siphon out
of the aquarium through the airline tubing and damage the air pump. To prevent back-
siphoning when removing the filter, air stone, ornament or any other air-driven aquarium
accessory from the aquarium, do the following:
1. Install a Check Valve (sold separately).
2. Leave pump running while you disconnect tubing from pump. Disconnect airline tubing
and immediately remove it and the accessory from the aquarium.
AIR FLOW ADJUSTMENT
The Fluval A Series Air Pump incorporates a single flow control knob
to control air output on item A851 and 2 flow control knobs on
items A853 and A854. Turning the knob clockwise increases the air
flow and counter-clockwise reduces the air flow. Proper air flow control
reduces harmful back pressure and lengthens the service life of the pump.
In order to achieve correct air flow, a balance between the valve setting
and the pump output is necessary. The ideal setting is obtained
by minimum back pressure or non restriction of flow of air.
Air control valves (sold separately) (ill. F) with
multiple outlets may also be used to power additional
apparatus in the aquarium. To reduce back pressure always
ensure that there is an unused outlet to bleed off excess
pressure if necessary. For more information please refer to
section on Back Pressure.
Once the adjustments are complete, slowly open the last
valve to the point where no loss of air output is noticed from
the items controlled by the other valves. To achieve and
maintain an equal balance of air pressure to the accessories
in the aquarium, further adjustments of the air valve may
be required depending on the items powered by the air pump.
Note: If the first valve on the air control assembly is fully
opened, air volume to the remaining outlets will be reduced.
BACK PRESSURE
Back pressure is the build-up of pressure on the
diaphragm due to restricted air flow. This occurs when excess air is produced by the air
pump, or when the air channels are inadvertently blocked (refer to MAINTENANCE section
for Air Stone, Airline Tubing and Ornament for more details). Back pressure over time
resulting from clogged air stones or other air system blockages and restrictions will cause
the diaphragm to expand or rupture. An expanded diaphragm leads to a loss of air volume
while a rupture results in the total loss of air.
MAINTENANCE
REMOVING THE PUMP
Important: Whenever the air pump must be shut off and removed from the aeration system,
always remove the airline tubing from the air outlet(s) before the pump is unplugged.
This will prevent water from siphoning back into the pump. If the airline tubing cannot be removed
before unplugging the power cord, raise the pump above the water level.
AIR STONE, AIRLINE TUBING AND ORNAMENT
• This pump requires no regular internal maintenance during its life.
• The rest of the air system should be periodically checked and cleaned.
• Airline tubing should be carefully inspected whenever standard aquarium maintenance
is performed. Adjust, or if required, replace all sections which are pinched, kinked, or
otherwise damaged.
• All attached air-driven aquarium ornaments should be regularly maintained. Algae growth
should be removed from moving parts and ornaments should be kept as clean as possible.
Internal airline tubing should be cleaned.
• Air stones should be kept clean and free of debris or algae build-up. The ideal situation is to
replace them every month, alternating with an extra set which has been dried over that period
and cleaned before being placed in the aquarium. Two complete sets of air stones
alternately changed each month will extend the life of the air stones and help keep back
pressure to a minimum. Clogged air stones and air-driven aquarium ornaments will lead
to low air pressure output and also reduce the life of the diaphragms.
EXTERNAL APPEARANCE
Remove dust and grime with a soft, damp cloth. Do not immerse pump in water. Do not use
detergents.
Check valve
ill. B
ill. C
Drip loop
Drip loop
Check
valve
ill. D
Drip loop
Check
valve
+
-
Check valve
ill. B
ill. C
Drip loop
Drip loop
Check
valve
ill. D
Drip loop
Check
valve
+
-
Check valve
ill. B
ill. C
Drip loop
Drip loop
Check
valve
ill. D
Drip loop
Check
valve
+
-
BONUS
+
1
YEAR
LIMITED TIME OFFER!
Register this product online within 30 days of purchase
and Fluval will extend your current warranty at no charge. The extended warranty is
subject to provisions outlined within the standard Fluval warranty. Complete details
and registration available at:
EXTENDED
WARRANTY
FluvalAquatics.com/warranty
2 YEAR WARRANTY
The Fluval Air Pump is guaranteed for defective parts and workmanship for a period
of 2 years from the date of purchase. This guarantee is valid with proof of purchase
only. The guarantee is limited to repair or replacement only and does not cover
consequential loss, loss or damage to livestock and personal property or damage
to animate or inanimate objects, irrespective of the cause thereof. This guarantee
is valid only under normal operating conditions for which the unit is intended. It
excludes any damage caused by unreasonable use, negligence, improper installation,
tampering, abuse or commercial use. The warranty does not cover wear and tear,
breakage of glass or parts which have not been adequately or correctly maintained.
THIS DOES NOT AFFECT YOUR STATUTORY RIGHTS.
A SERIES AIR PUMP
POMPE À AIR DE
SÉRIE A
Instruction Manual
Mode d’emploi
ill. E
+
-
ill. F
ill. F
item A851
items A853
and A854
ill. F
ill. F
item A851
items A853
and A854
Produkspesifikasjoner
| Merke: | Fluval |
| Kategori: | Pomp |
| Modell: | A101 |
Trenger du hjelp?
Hvis du trenger hjelp med Fluval A101 still et spørsmål nedenfor, og andre brukere vil svare deg
Pomp Fluval Manualer

27 Desember 2024

27 Desember 2024

27 Desember 2024

16 Oktober 2024

16 Oktober 2024
Pomp Manualer
- Sicce
- Topeak
- Hazet
- Heissner
- OSIP
- Little Giant
- Anova
- Sanibroyeur
- Franklin Electric
- Danfoss
- Pedrollo
- Panduit
- Lezyne
- Maruyama
- Astralpool
Nyeste Pomp Manualer

5 April 2025

2 April 2025

1 April 2025

1 April 2025

1 April 2025

1 April 2025

1 April 2025

1 April 2025

1 April 2025

1 April 2025