GE UX12B30PSS Bruksanvisning
Les nedenfor 📖 manual på norsk for GE UX12B30PSS (2 sider) i kategorien Komfyr. Denne guiden var nyttig for 14 personer og ble vurdert med 4.6 stjerner i gjennomsnitt av 7.5 brukere
Side 1/2

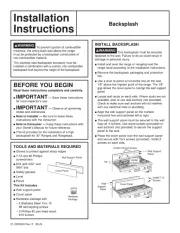
Backsplash
WARNING
To prevent ignition of combustible
materials, the entire back wall above the range
must be protected by a backsplash constructed of
non-combustible material.
This stainless steel backsplash accessory must be
installed in combination with a custom, non-combustible
backsplash built beyond the height of the backsplash.
BEFORE YOU BEGIN
Read these instructions completely and carefully.
Ŷ IMPORTANT — Save these instructions
for local inspector’s use.
Ŷ IMPORTANT — Observe all governing
codes and ordinances.
Ŷ Note to Installer — Be sure to leave these
instructions with the consumer.
Ŷ Note to Consumer — Keep these instructions with
your Owner’s Manual for future reference.
Ŷ This kit provides for the installation of a high
backsplash for 30” Ranges and Rangetops.
Installation
Instructions
31-2003324 Rev. 0 09-24
TOOLS AND MATERIALS REQUIRED
Ŷ*ORYHVWRSURWHFWDJDLQVWVKDUSHGJHV
Ŷ7DQG3KLOOLSV
screwdrivers
Ŷ'ULOOZLWK´DQG
´ELWV
Ŷ6DIHW\JODVVHV
Ŷ/HYHO
Ŷ3HQFLO
This Kit Includes
Ŷ:DOOVXSSRUWSDQHO
Ŷ&RYHUSDQHO
Ŷ+DUGZDUHSDFNDJHZLWK
±6WDLQOHVV6WHHO7RU[
VHOIWDSSLQJVFUHZV
±3KLOOLSVSDQKHDGZRRG
VFUHZV
INSTALL BACKSPLASH
WARNING
This backsplash must be securely
fastened to the wall. Failure to do so could result in
damage or personal injury.
Ŷ,QVWDOODQGOHYHOWKHUDQJHRUUDQJHWRSDQGWKH
range hood according to the installation instructions.
Ŷ5HPRYHWKHEDFNVSODVKSDFNDJLQJDQGSURWHFWLYH
film.
Ŷ
Use a level to pencil a horizontal line on the wall,
´DERYHWKHKLJKHVWSRLQWRIWKHUDQJH
7KH´
gap allows the cover panel to overlap the wall support
panel.
Ŷ/RFDWHZDOOVWXGVRQHDFKVLGH:KHUHVWXGVDUHQRW
available, plan to use wall anchors (not provided).
&KHFNWRPDNHVXUHZDOODQFKRUVZLOOQRWLQWHUIHUH
with any electrical lines or plumbing.
Ŷ$OLJQWKHZDOOVXSSRUWSDQHORQWKHPDUNHG
horizontal line and centered left to right.
Ŷ7KHZDOOVXSSRUWSDQHOPXVWEHVHFXUHGWRWKHZDOO
near all 4 corners. Use wood screws (provided) or
wall anchors (not provided) to secure the support
panel to the wall.
Ŷ3ODFHWKHFRYHUSDQHORYHUWKHZDOOVXSSRUWSDQHO
DQGVHFXUHZLWK7RU[VFUHZVSURYLGHG,QVWDOO
screws on each side.
:DOO6XSSRUW3DQHO
&RYHU3DQHO
+DUGZDUH
3DFNDJH
,QVWDOO:RRG6FUHZV
,QVWDOO7
Screws
:DOO
Support
3DQHO
:DOO6XSSRUW
3DQHO
&RYHU3DQHO
&HQWHU
$UURZV
´
Produkspesifikasjoner
| Merke: | GE |
| Kategori: | Komfyr |
| Modell: | UX12B30PSS |
Trenger du hjelp?
Hvis du trenger hjelp med GE UX12B30PSS still et spørsmål nedenfor, og andre brukere vil svare deg
Komfyr GE Manualer
15 August 2025

3 August 2025
3 August 2025
Komfyr Manualer
- Concept
- Indesit
- Rowi
- Cata
- Avantco
- Samsung
- Caple
- Royal Catering
- Jotul
- Spring USA
- Philco
- Vollrath
- Euro Appliances
- Frigidaire
- Oranier
Nyeste Komfyr Manualer
23 Oktober 2025
21 Oktober 2025
21 Oktober 2025
21 Oktober 2025
21 Oktober 2025

21 Oktober 2025

21 Oktober 2025
21 Oktober 2025

20 Oktober 2025
20 Oktober 2025