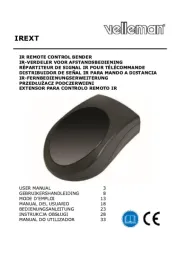
Geemarc TV-Photo 100 Bruksanvisning
Geemarc
Fjernkontroll
TV-Photo 100
Les nedenfor 📖 manual på norsk for Geemarc TV-Photo 100 (2 sider) i kategorien Fjernkontroll. Denne guiden var nyttig for 29 personer og ble vurdert med 3.9 stjerner i gjennomsnitt av 15 brukere
Side 1/2

TV-photo 100
The TV-Photo 100 is powered
by two AAA 1.5 volt (Alkaline)
non-rechargeable batteries.
These are not provided.
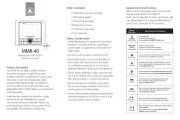
Fitting the Batteries
1.Totthebatteries,carefully
pushdownandslideopenthe
battery cover.
2. Insert two AAA 1.5 volt
Downloading the
Application
TheTV-photo100requiresthe
correctsoftwaretofunctionwith
yourTV.Youwillneedaccess
to either a desktop PC or laptop
withInternetaccesssothatyou
can download an application
thatallowsyoutondand
downloadthecorrectsoftware
to the TV-photo 100. It is not
possibletouseTV-photo100
withoutthissoftware.
1. Download the Geemarc
applicationtoyourcomputer.
2.Theapplicationuploads
softwaretotheTV-photo100.
3.Oncethesoftwareis
uploaded,youcanusethe
TV-photo100withyourTV.
1.Gotoourwebsite
www.geemarc.com
2. At the search bar (at top
ofthepage)typein«TV-
photo100» then press enter.
3.OntheTV-photo100page,
gotothe«productles
»sectionandclickon«
softwareTV-photo100»to
download the application to
yourcomputer.
4. Once the application has
downloaded,installandopen
it with WINRAR or WINZIP.
WinRAR and WinZIP are
compressedleformats
thatuselessdata.Ifyour
computerdoesnotread
thisleformat,youcan
downloadafreereaderat
these two addresses :
www.winrar.com
& www.winzip.com
5. Open the Geemarc
software:
«Geemarc.exe»
(NOTE: A more recent
version of the software
maybe available). Follow
the on-screen prompts
and install the application.
6.Selectyourlanguageand
press OK.
7. Press next.
8. Choose INSTALL and
authorisetheinstallation
oftheapplicationonyour
computer.
9. Select Finish.
Uploading the Correct
Software to the
TV-photo 100
NOTE: To proceed to the
nextstep,thebatteriesmust
bettedtotheTV-photo100.
Open Geemarc application
installed on your computer.
Ifyouaregivenanoptionto
downloadanupdateforthe
application,pleaseaccept.
ATTENTION:
Turn o sound devices (such
as microphones and speakers)
connected to your computer, or
unplug them before uploading
the software to the remote.
Do not listen to audio / visual
media ( e.g. music, games,
videos ) on the computer at the
same time as programming the
remote control. Set the volume
level on your computer to at
least 80%. You can adjust the
volume level on your computer
by going to settings >
System > Sound > Master
Volume.
1. Remove the battery cover
fromtheTV-photo100.
With the USB/3.5mm cable
provided,carefullyplugthe
USBendofthecableintothe
USB socket (located inside
the battery compartment).
3.TheapplicationwillneedthebrandandmodelofyourTV.You
canndthisinformationonalabelonthebackoftheTV,inthe
UserGuideoftheTVoronthepackaging.
Iftheapplicationdoesn’thaveyourTVmodel,trychoosingasimilar
modelfromthesamebrand(sometimesTVsetmanufacturersuse
thesameremotecontrolforarangeofmodels).
Youcanalsoemail:
unetec@uneteconline.com withthebrandandmodelofyourTV.
Itwillbeaddedtotheapplications’database,orasimilarmodelthat
usesthesameremotewillbesuggested.
4.Under«Device»,selectTV,DTT,DVD,SATdependingonwhether
youwanttousetheTV=photo100withaTVorotherdevicesuch
as a satellite set top box receiver (SAT), DVD player (DVD), or
terrestrialsettopbox(DTT).Tosimplifyyoursearch,typethebrand
andmodelofyourTVinthe«brand»and«model»elds.
5. Press and hold the [V+] and
[V-]keysoftheremotecontrol
for3secondsuntiltheLED
lightunderthe powerbutton
ashes.
6.Ontheapplication,click
totransferthe
programmingsoftwaretothe
TV-photo 100.
7. Disconnect the USB/3.5mm
JackcablefromtheTV-photo
100.YoucannowusetheTV-
photo100withyourTV.
How to use DEVICE and
MEMORY modes
The TV-photo 100 has two
modes: DEVICE and photo
MEMORY.
-InDEVICEmode,youcanuse
the TV-photo 100 in a similar
way to the remote control
suppliedwithyourTV.For
example,toselectchannel1on
theTV-photo100,pressthe«1»
photomemorybutton.
-InphotoMEMORYmode,you
canusethephotobuttonsto
selectvariouschannelsthatyou
have programmed into the TV-
photo 100 (see programming
yourpicturememory).For
How to Switch Between
Photo MEMORY and
DEVICE modes :
- Press and hold the
buttonfor3secondsand
release it as soon as the
LEDlightunderthe
buttonlightsup.Youwill
then see the LED light
underthe powerbutton
lightsuptoshowthatyour
remote is now in DEVICE
mode.
Note: If the application says
the software was successfully
transferred but the LED on
the remote continues to ash,
2.Plugthe3.5mmJackendof
thecableintoyourcomputers
audio/headphoneoutput.
Fitting the USB/3.5mm
Jack cable
HowtoswitchfromDEVICE
modetoPhotoMEMORY
mode :
- Press and hold the
buttonfor3secondsand
release it as soon as the
lightunderthepower
example,youcanprogram
photomemorybutton«5»
so that pressing it selects
channel 13.
it means the transfer failed.
Repeat step 6. if this happens.
Further options : Check the
output headset level in order to
be sure it is not too low. Restart
your computer in order the
software nishes installing.
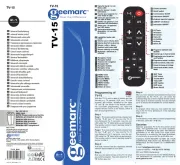
Power
LED
LED
Mute
TVsoundvolume
increase
TVsoundvolume
decrease
Photo memory
buttonsto
aid channel
identication
«Exit»key
formenu
navigation
Menu
«AudioVisual»
Change
connection
sourcesforTV
Validatebutton
to navigate
throughthe
menus
«Program»
Directional
keysformenu
navigation /
channel change
USB
Socket
Batteries
Howtoswitchfrom
PhotoMEMORYmodeto
DEVICE mode :
(Alkaline) batteries into the
batteryholder,observingthe
correct -/+ battery polarities.
Note:incorrectttingofthe
batteries may damage the
unit.
3. Slide the battery cover back
over the battery compartment
to close it.
LED
En
Pleasenote:sincethisuser
guidewasprinted,some
changes may have been made
to how the TV-photo 100 is
programmed.Adownloadof
themostrecentversionofthe
userguideisavailablefrom:
www.geemarc.com
Parts Supplied
The packaging contains the
followingparts:
• 1 TV-Photo 100 remote
control
• 1 mini USB/3.5mm Jack
cable
• 1userguide
• 10 plasic key covers
Produkspesifikasjoner
| Merke: | Geemarc |
| Kategori: | Fjernkontroll |
| Modell: | TV-Photo 100 |
Trenger du hjelp?
Hvis du trenger hjelp med Geemarc TV-Photo 100 still et spørsmål nedenfor, og andre brukere vil svare deg
Fjernkontroll Geemarc Manualer
10 Februar 2025

15 Januar 2025
Fjernkontroll Manualer
- Spektrum
- Harman Kardon
- H-Tronic
- Furman
- Toa
- Cisco
- Panasonic
- Bang Olufsen
- Metronic
- Insignia
- Schwaiger
- DS18
- EQ-3
- Reely
- Ardes
Nyeste Fjernkontroll Manualer
20 Oktober 2025
19 Oktober 2025
19 Oktober 2025
18 Oktober 2025
17 Oktober 2025
16 Oktober 2025
16 Oktober 2025
15 Oktober 2025
13 Oktober 2025

10 Oktober 2025