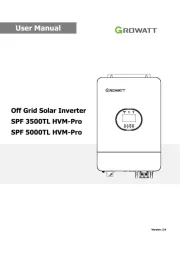
Growatt WIT 28-55K-HU-US L2 Bruksanvisning
Growatt
Ikke kategorisert
WIT 28-55K-HU-US L2
Les nedenfor 📖 manual på norsk for Growatt WIT 28-55K-HU-US L2 (2 sider) i kategorien Ikke kategorisert. Denne guiden var nyttig for 21 personer og ble vurdert med 4.8 stjerner i gjennomsnitt av 11 brukere
Side 1/2

1. The content of this document is continually reviewed and amended, where necessary. Growatt reserves the right to make changes to the
material at any time and without notice. Unless otherwise agreed, this document is for quick installation guidance only. All information and
suggestions in this document do not constitute a warranty of any kind, express or implied. Growatt reserves all rights for final explanation.
2. This document is for quick installation guidance only. For details, please refer to the User Manual.
3. Machine damage caused by failure to follow the instructions is not covered under any warranty.
1. The Load Breaker and the Pass Breaker should be interlocked.
2. When determining the installation position of the inverter, please consider the position of the batteries and the distribution panel.
2. For export limitation, you are advised to connect an energy meter and current transformers to the inverter.
When drilling holes, avoid the
water pipes and power cables
buried under the ground.
1
2
3
4
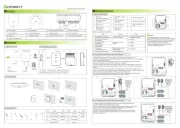
3.3.1 Assembling the PV connectors
1
2
3
4
5
Ensure that the cable cannot be pulled out from the
terminal after crimping.
Pull the PV cables back to check that they are connected
securely.
Ensure secure connection
by tightening the locking
nut.
Positive metal connector
Negative metal connector
Make sure the cable polarity is correct.
Battery BOX
Quick Installation Manual
Ensure that the ground point on
the enclosure base has been
reliably connected to the on-site
ground busbar.
1
Once the cable connections
are complete, check if the
cable feed-through pipes
and cables are secured in
place, and finally lock the
AC junction box cover.
5
Note:
2.
Installation
System overview
2.1 Installation requirements
2.2 Floor-mounted installation
2
3.1 Grounding
3.2 GRID and LOAD side cable connection
Note:
Note:
3.3 DC connection
3
Note:
Note:
Unit: inch
4 i
n
Φ0.47 in
2
.7
6 i
n
4 i
n
Unit: inch
Unit: inch
WIT 28-55K-HU-US L2 Quick Guide
1.
Overview
(13) Battery terminal (14) BMS power supply port
(15) GRID terminal
(16) LOAD terminal
(1) Front panel
(2) OLED display screen
(3) Battery status indicator
(4) Push button
(9) Communication port
(5) System indicator
(6) BMS communication port
(7) Parallel communication port
(8) Monitor communication port
(10) DC switch
(11) PV terminal (12) Network communication port
2
3
4
5
55.0
KW
Output Power
1
15
16
17
(17) Base
Please prepare the cables listed below before electrical connections.
1. Make sure all switches are
OFF before connecting the
cables. For personal safety, do
not operate when power-on.
2. If the diameter of the cable
does not match the terminal,
please contact our after-sales
personnel.
3. The current carrying capacity
of cables should comply with
locally applicable regulations.
3.
Connecting cables
No.
Cable
Type
Recommended
specifications
1
Grounding cable
A multiple-core copper cable (yellow and
green)
1AWG
2
Grid cable
A multi-core copper cable
2/0AWG-400kcmil
3
Load cable
A multi-core copper cable
3AWG-400kcmil
4
PV input cable
Photovoltaic cable
12AWG-10AWG
5
Battery power supply cable
A single-core copper cable (red and black)
1AWG
6
BMS power supply cable
A multi-core copper cable
20 AWG-14AWG
7
Other communication cable
RS485
/
Note:
0.31-0.39 in
Positive metal contact
Negative metal contact
0.31-0.39 in
6
7
8
13
14
9
10 11
12
40 in
40 in
40 in
4
0 i
n
15.73 in
22.62 in
PV
PCS
AC
Breaker
Phone
Meter
T
Grid
BAT
Primary Load
Load
Breaker
Load
Secondary Load
Bypass
Breaker
Grid
Produkspesifikasjoner
| Merke: | Growatt |
| Kategori: | Ikke kategorisert |
| Modell: | WIT 28-55K-HU-US L2 |
Trenger du hjelp?
Hvis du trenger hjelp med Growatt WIT 28-55K-HU-US L2 still et spørsmål nedenfor, og andre brukere vil svare deg
Ikke kategorisert Growatt Manualer

6 September 2025
6 September 2025

6 September 2025

6 September 2025
6 September 2025
6 September 2025
5 September 2025
5 September 2025
5 September 2025
5 September 2025
Ikke kategorisert Manualer
- Valcom
- Y-brush
- Proline
- Digi-Pas
- Genius
- ZTE
- Xigmatek
- Babymoov
- FireAngel
- Yato
- Zaahn
- Pentatech
- Balay
- IKEA
- Wallas
Nyeste Ikke kategorisert Manualer

23 Oktober 2025

23 Oktober 2025

23 Oktober 2025

23 Oktober 2025

23 Oktober 2025

23 Oktober 2025

23 Oktober 2025

23 Oktober 2025

23 Oktober 2025

23 Oktober 2025