Hinkley Lighting Graham 38893BK Bruksanvisning
Hinkley Lighting
Lettelse
Graham 38893BK
Les nedenfor 📖 manual på norsk for Hinkley Lighting Graham 38893BK (2 sider) i kategorien Lettelse. Denne guiden var nyttig for 23 personer og ble vurdert med 3.8 stjerner i gjennomsnitt av 12 brukere
Side 1/2
English Spanish
French
H
I
N
K
L
E
Y
ici zecnemmoc erehtrats empezar aquí
Drawing 3 - Fixture Mounting
Drawing 1 - Fixture Assembly
Drawing 2 - Strap Detail
D
E
C
SAFETY WARNING: READ WIRING AND GROUNDING INSTRUCTIONS
(I.S. 18) AND ANY ADDITIONAL DIRECTIONS. TURN POWER SUPPLY
OFF DURING INSTALLATION. IF NEW WIRING IS REQUIRED,
CONSULT A QUALIFIED ELECTRICIAN OR LOCAL AUTHORITIES FOR
CODE REQUIREMENTS.
ADVERTENCIA DE SEGURIDAD: LEA LAS INSTRUCCIONES DE CABLEADO Y
CONEXIÓN A TIERRA (I.S. 18) Y CUALQUIER INSTRUCCIONES ADICIONALES.
APAGUE LA FUENTE DE ALIMENTACIÓN DURANTE LA INSTALACIÓN. SI SE
REQUIERE CABLEADO NUEVO, CONSULTE A UN ELECTRICISTA CALIFICADO OA
AUTORIDADES LOCALES PARA LOS REQUISITOS DEL CÓDIGO.
AVERTISSEMENT DE SÉCURITÉ: LISEZ LES INSTRUCTIONS DE CÂBLAGE ET DE
MISE À LA TERRE (I.S.18) ET TOUTES DIRECTIONS SUPPLÉMENTAIRES. COUPER
L'ALIMENTATION ÉLECTRIQUE PENDANT L'INSTALLATION. SI UN NOUVEAU
CÂBLAGE EST NÉCESSAIRE, CONSULTEZ UN ÉLECTRICIEN QUALIFIÉ OU LES
AUTORITÉS LOCALES POUR LES EXIGENCES DU CODE.
.
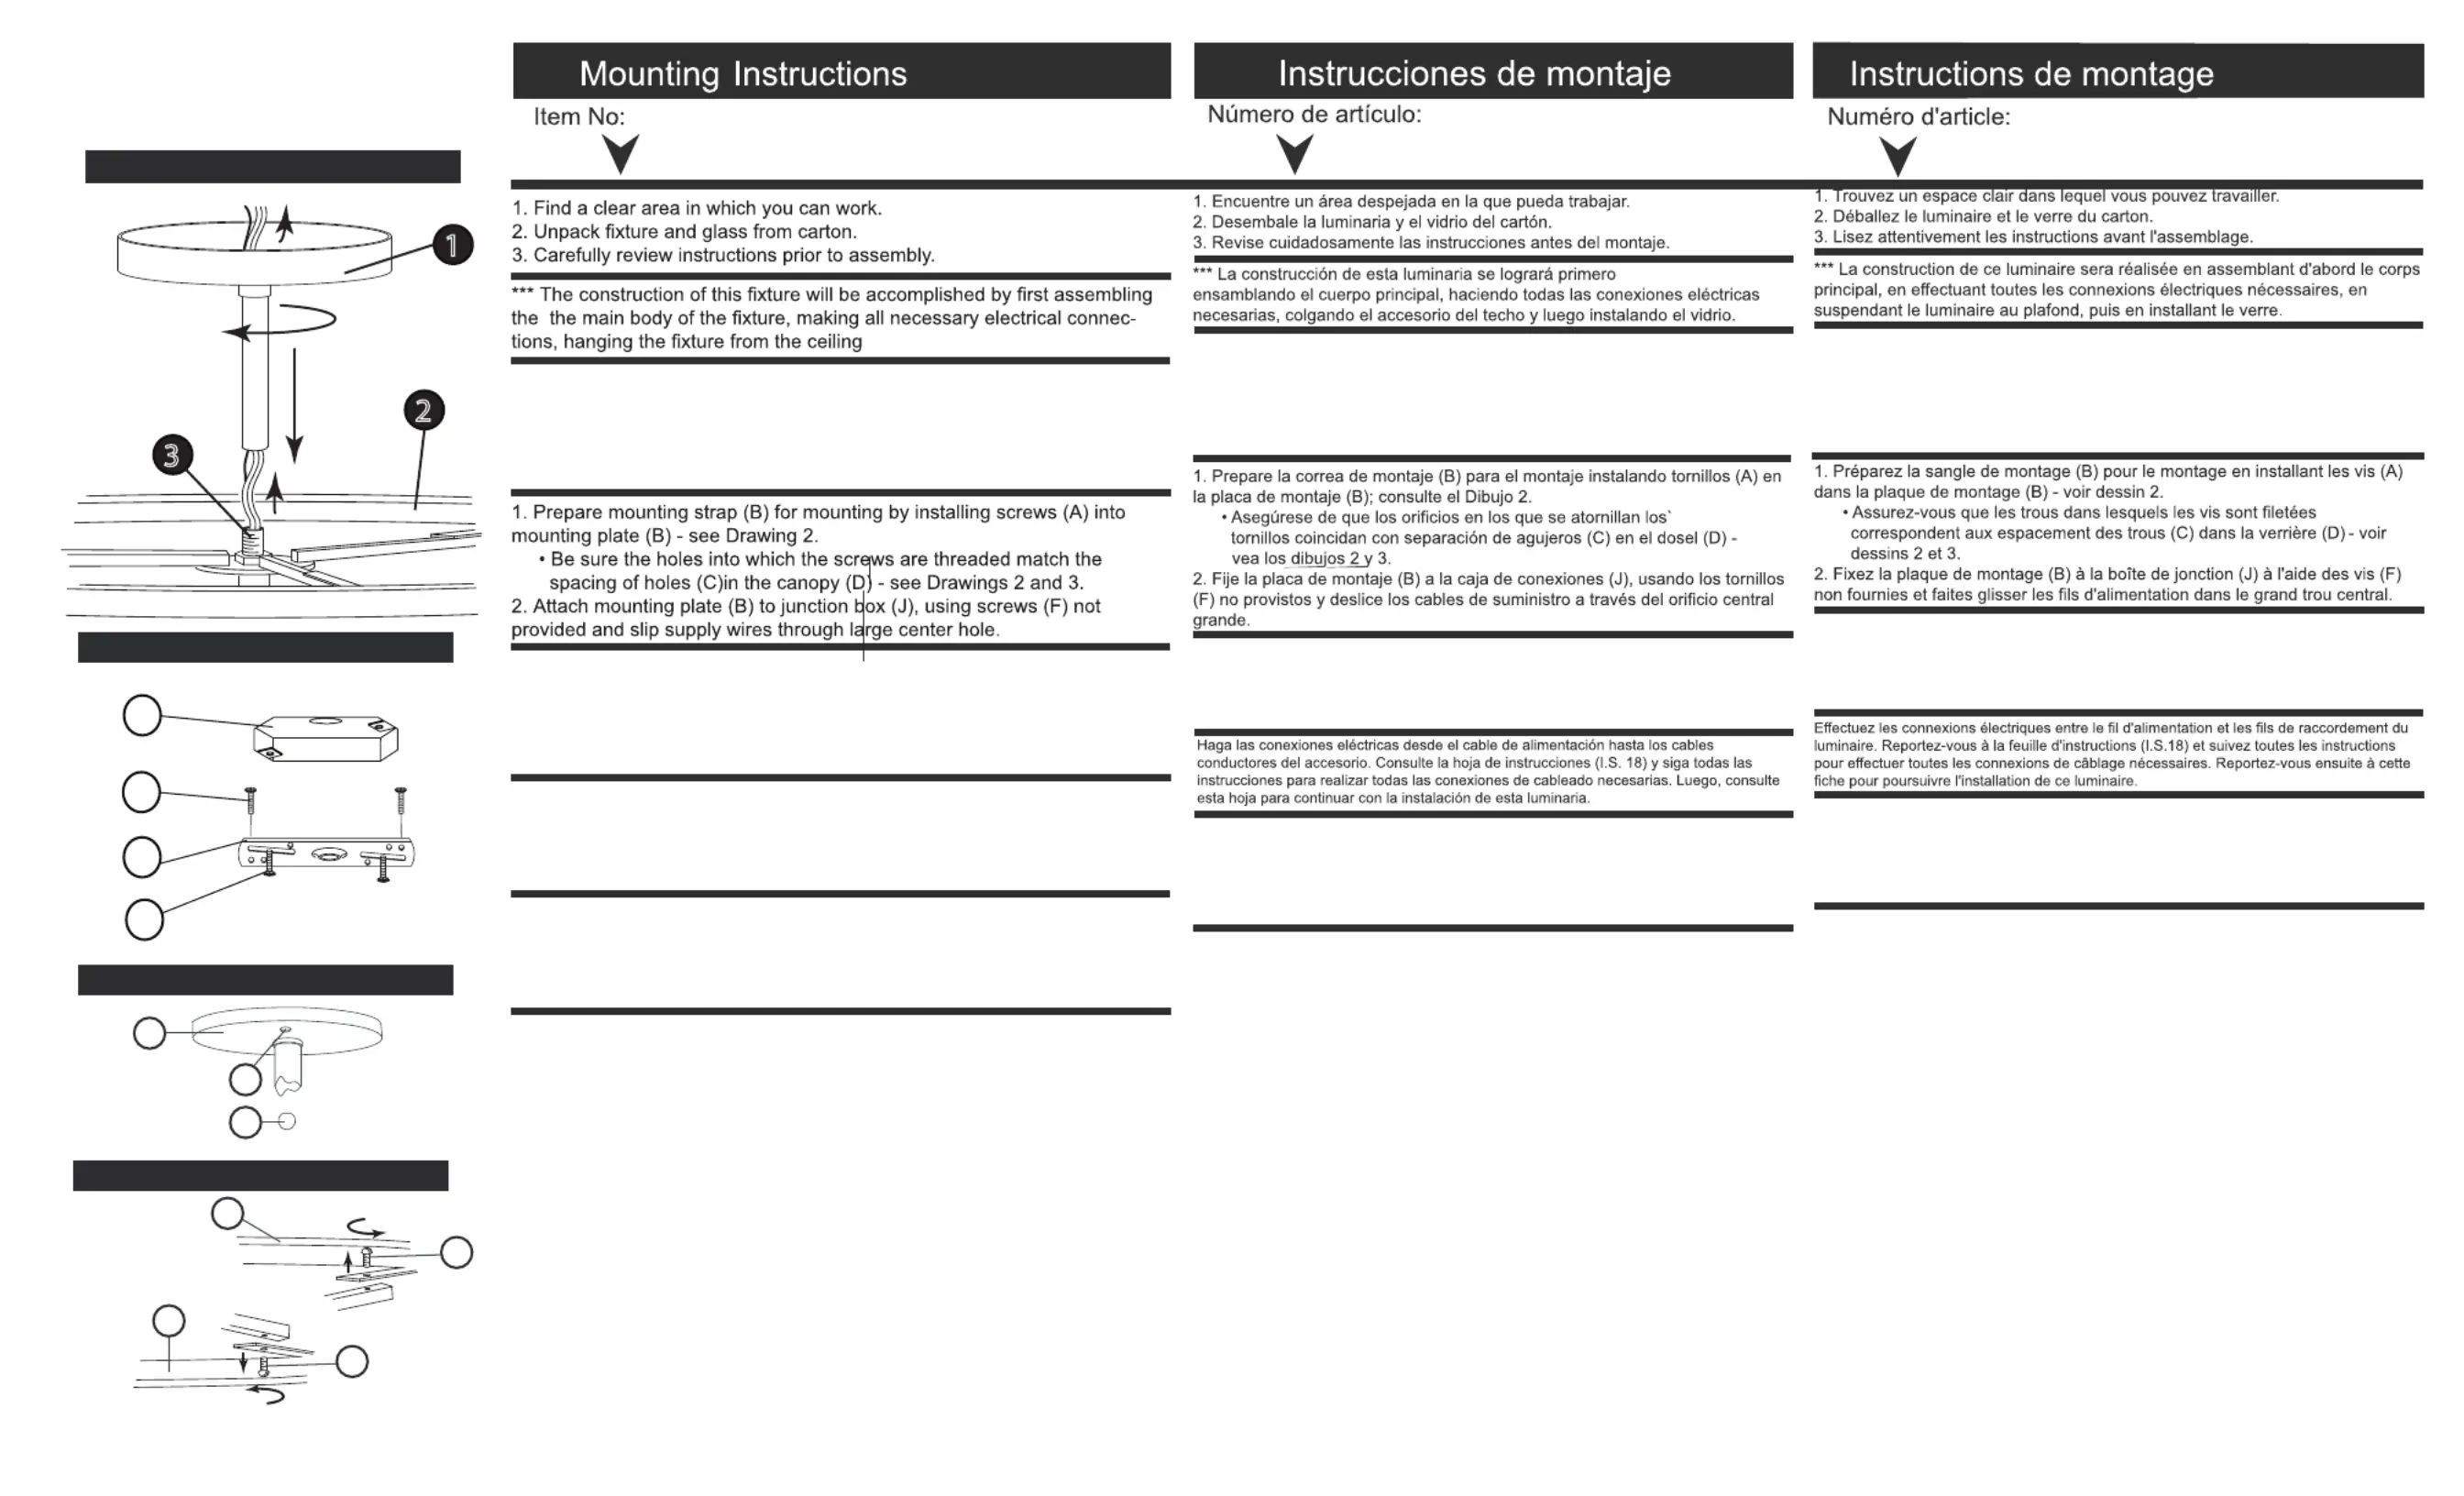
1. First it is necessary to attach the top stem and canopy (1) to the fixture
body (2). This is accomplished by threading the fixture wire through the
center stem attached to the canopy. Then threading the stem onto the
threaded tube (3) on the top of the fixture body. Fixture is now ready for
installation - see Drawing 1.
1. Primero es necesario unir el vástago superior y el dosel (1) al cuerpo
del accesorio (2). Esto se logra pasando el cable del accesorio a través
del vástago central unido al dosel. Luego, enrosque el vástago en el
tubo roscado (3) en la parte superior del cuerpo del accesorio. El
dispositivo p1-ya está listo para la instalación; consulte el dibujo 1.
1. Il faut d'abord fixer la tige supérieure et la canopée (1) au corps de
l'appareil (2). Ceci est accompli en enfilant le fil du luminaire à travers la
tige centrale attachée à la verrière. Puis visser la tige sur le tube fileté (3)
sur le dessus du corps de l'appareil. L'appareil est maintenant prêt pour
l'installation - voir le dessin 1.
38893 / 38894 38893 / 38894
38893 / 38894
1
2
3
HINKLEY ley.com 33000 Pin Oak Parkway, Avon Lake, OH 44012 800.446.5539 / 440.653.5500 hink
Shade Removal:
1. If a shade needs cleaning or replaced, and must be removed, there are
three screws (S) holding each shade to the fixture body- see Drawing 4.
2.The inner shade (I) screws are located under the shade bracket, the
outer shade (O) screws are located o n the top of the shade bracket.
Drawing 4 - Shade Removal
S
S
O
I
Eliminación de sombras:
1. Si una persiana necesita limpieza o reemplazo, y debe quitarse,
hay tres tornillos (S) que sujetan cada persiana al cuerpo del
accesorio; vea el dibujo 4.
2. Los tornillos de la pantalla interior (I) están ubicados debajo del
soporte de la pantalla, los tornillos de la pantalla exterior (O) están
ubicados en la parte superior del soporte de la pantalla.
Suppression de l'ombre:
1. Si un store doit être nettoyé ou remplacé, et doit être retiré, il y a
trois vis (S) retenant chaque store au corps du luminaire - voir
dessin 4.
2. Les vis du store intérieur (I) sont situées sous le support du store,
les vis du store extérieur (O) sont situées sur le dessus du support
du store.
1. Cuelgue la luminaria deslizando la marquesina (D) sobre los
tornillos (A) y manténgala en posición; consulte los dibujos 2 y 3.
2. Enrosque las perillas de bola (E) en el extremo de los tornillos (A)
y apriete para asegurar la luminaria al techo.
1. Hang the fixture by slipping canopy (D) over screws (A) and hold in
position - see Drawings 2 and 3.
2. Thread ball knobs (E) onto end of screws (A) and tighten to secure
fixture to ceiling.
1. Accrochez le luminaire en faisant glisser la verrière (D) sur les vis
(A) et maintenez-le en place - voir les schémas 2 et 3.
2. Vissez les boutons à bille (E) sur l'extrémité des vis (A) et serrez
pour fixer le luminaire au plafond.
Make electrical connections from supply wire to fixture lead wires.
Refer to instruction sheet and follow all instructions to make (I.S. 18)
all necessary wiring connections. Then refer back to this sheet to
complete installation of this fixture.
J
F
A
B
Produkspesifikasjoner
| Merke: | Hinkley Lighting |
| Kategori: | Lettelse |
| Modell: | Graham 38893BK |
Trenger du hjelp?
Hvis du trenger hjelp med Hinkley Lighting Graham 38893BK still et spørsmål nedenfor, og andre brukere vil svare deg
Lettelse Hinkley Lighting Manualer

5 Januar 2025

5 Januar 2025

5 Januar 2025

5 Januar 2025

5 Januar 2025

5 Januar 2025

5 Januar 2025

5 Januar 2025

5 Januar 2025

5 Januar 2025
Lettelse Manualer
- Lutec
- Tesy
- AFX
- Behringer
- Dainolite
- Cineo
- Aputure
- Milwaukee
- Godox
- Peerless-AV
- DeWalt
- Quoizel
- Lowel
- Hama
- Martin
Nyeste Lettelse Manualer

9 April 2025

9 April 2025

8 April 2025

8 April 2025

8 April 2025

7 April 2025

6 April 2025

6 April 2025

6 April 2025

6 April 2025