Hinkley Lighting Hampton 3200AN-LED Bruksanvisning
Hinkley Lighting
Lettelse
Hampton 3200AN-LED
Les nedenfor 📖 manual på norsk for Hinkley Lighting Hampton 3200AN-LED (2 sider) i kategorien Lettelse. Denne guiden var nyttig for 26 personer og ble vurdert med 4.6 stjerner i gjennomsnitt av 13.5 brukere
Side 1/2
Assembly Instructions
Family: Hampton | Item No. 3200 LED
Start Here
R 08.29.17
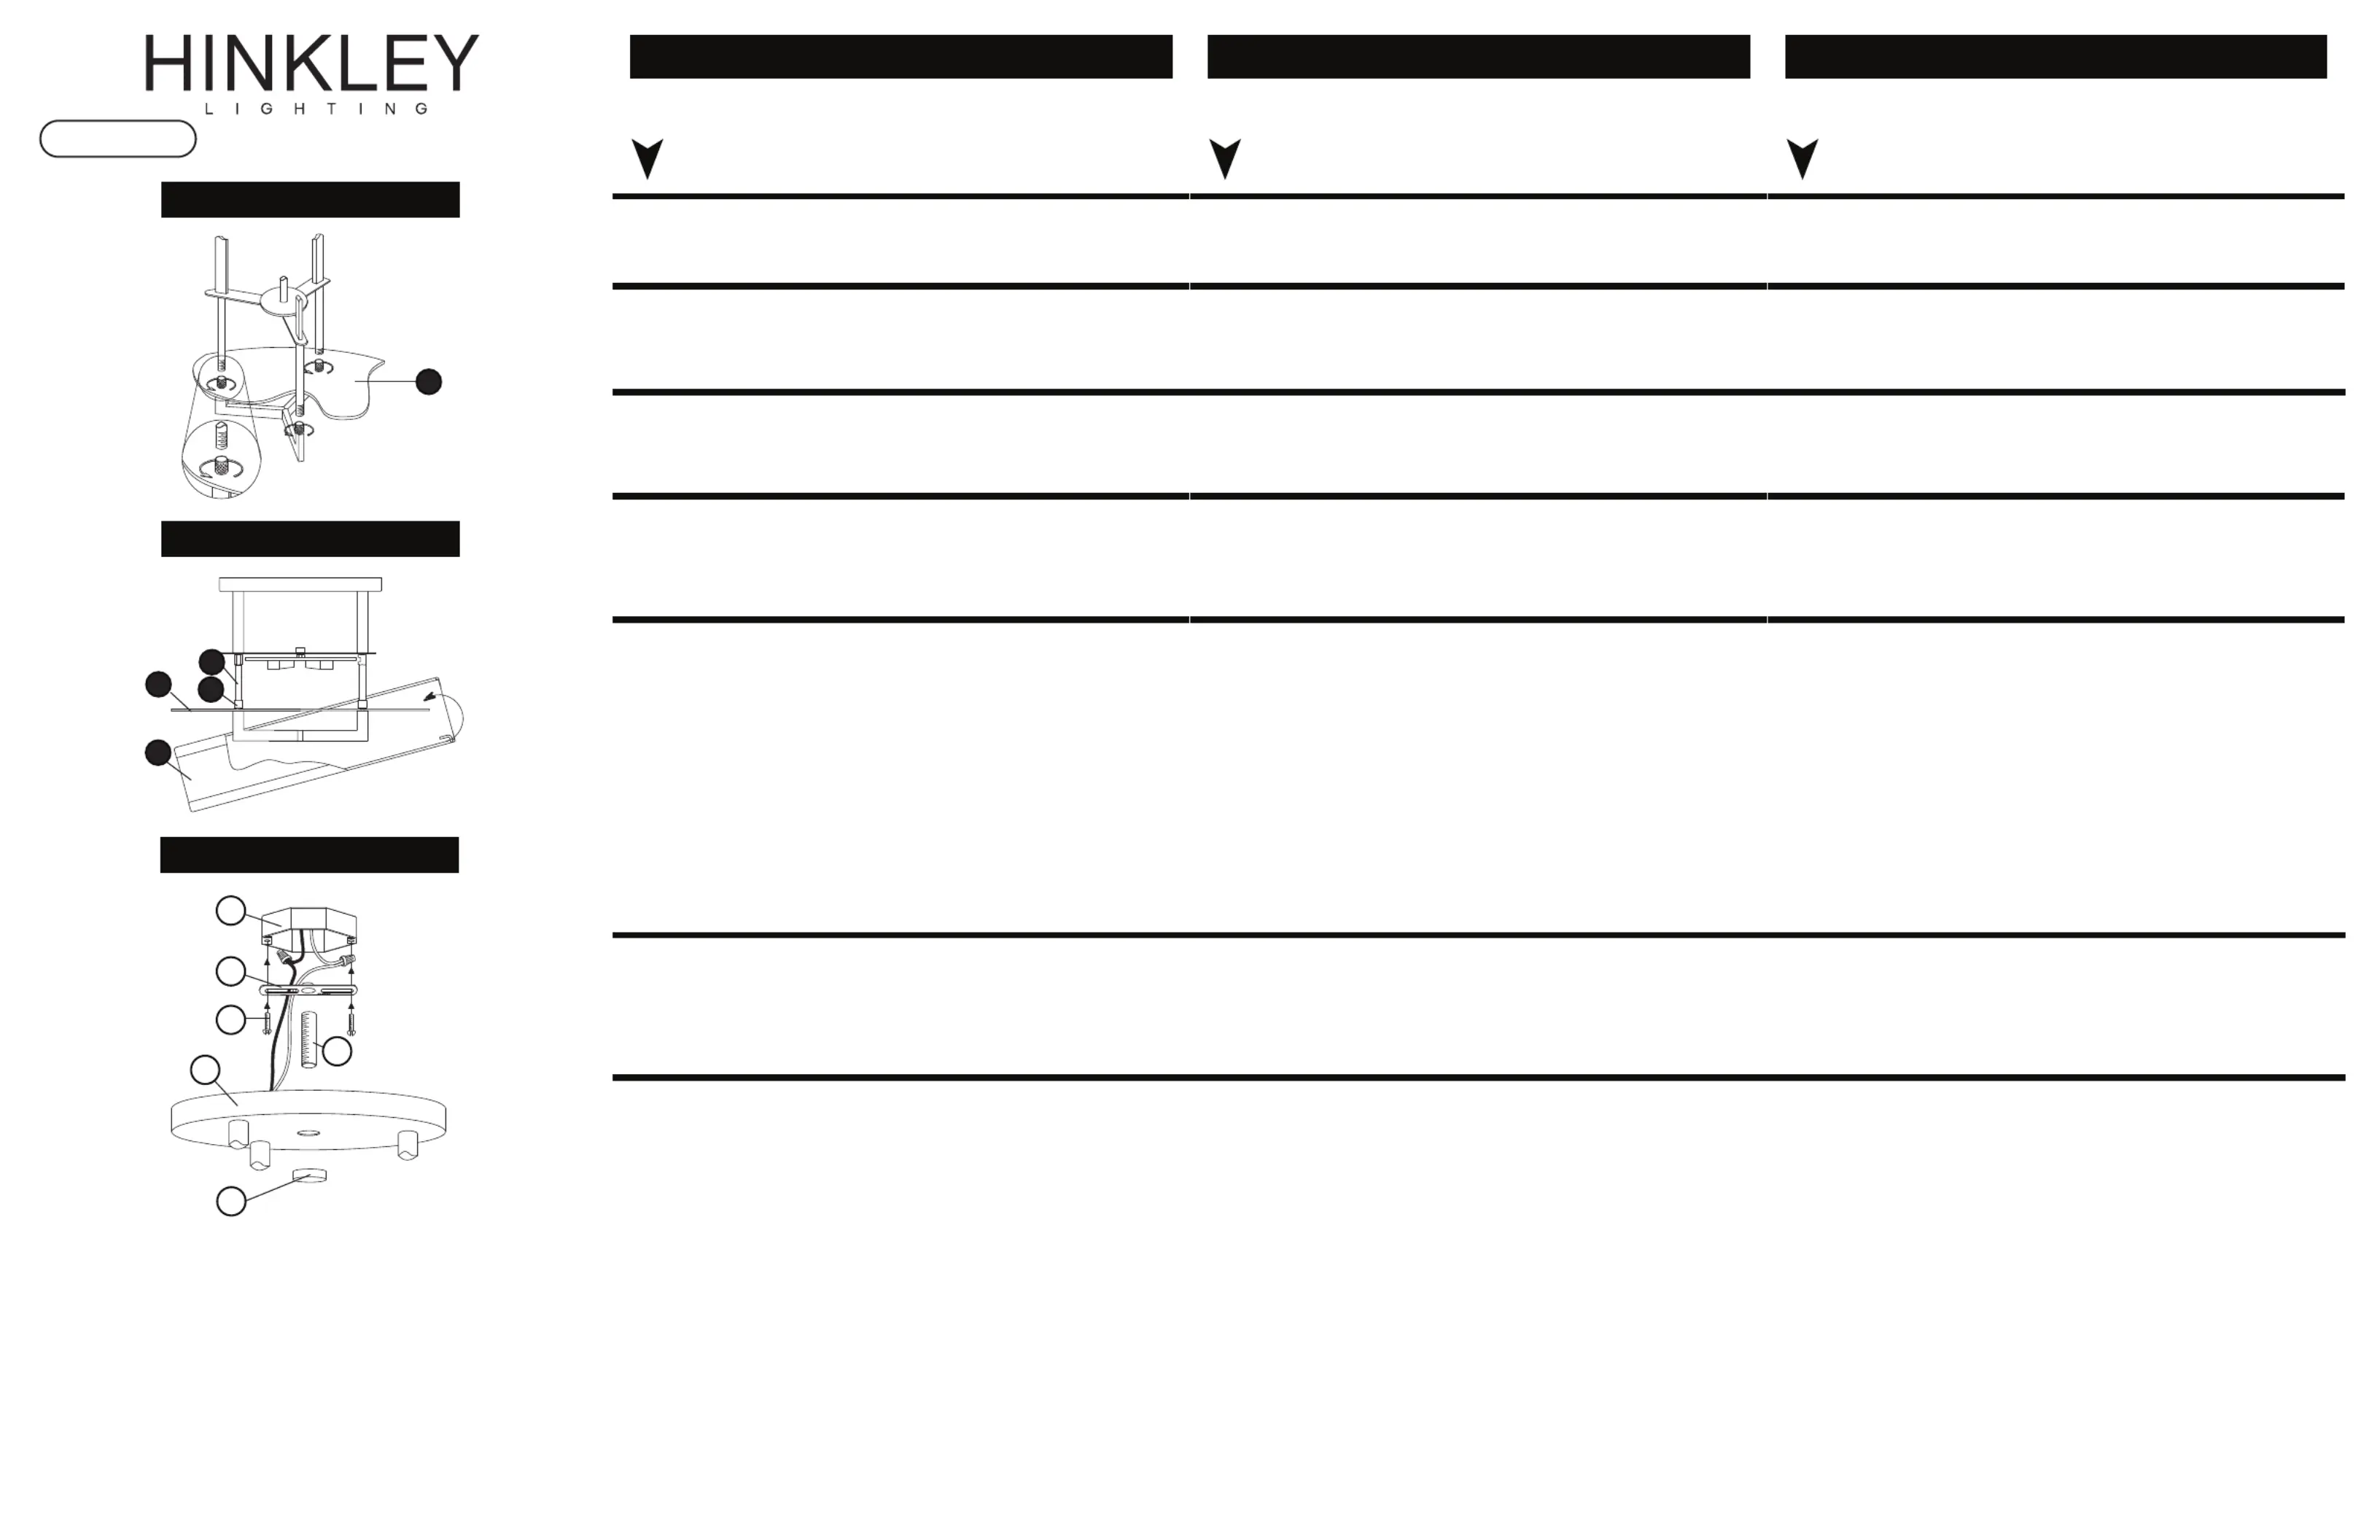
Drawing 1 - Fixtu
Drawing 2 - Fixture Assembly
Drawing 3 - Mounting Instructions
re Assembly
A
1
2
1
B
C
4
3
F
E
D
T24 JA8-2016
English
1. Find a clear area in which you can work.
2. Unpack fixture and glass from carton.
3. Carefully review instructions prior to assembly.
*** The construction of this fixture will be accomplished by first
assembling the main body structure, installing the mounting hardware to
the junction box, mounting the fixture to the ceiling and then installing
the shade.
Fixture Assembly
1. Attach acrylic lens assembly (1) by threading coupler (2) onto end of lower
upright stems (3) - see Drawings 1 and 2.
Installing Mounting Hardware
1. Fasten mounting strap (B) to outlet box (A) with the original box screws (C)
- see Drawing 3.
2. Thread nipple (D) into mounting strap (B) approximately 3/8”.
Wiring Instructions
SAFETY WARNING: READ WIRING AND GROUNDING
INSTRUCTIONS (I.S. 18) AND ANY ADDITIONAL DIRECTIONS.
TURN POWER SUPPLY OFF DURING INSTALLATION. IF NEW
WIRING IS REQUIRED, CONSULT A QUALIFIED ELECTRICIAN
OR LOCAL AUTHORITIES FOR CODE REQUIREMENTS.
Final Assembly
1. Slip canopy (E) over nipple (D) and up against ceiling - see Drawing 3.
2. Thread decorative finial (F) onto end of nipple (D).
3. Slip shade (4) onto acrylic assembly (1) - see Drawing 2.
H I N K L E Y L I G H T I N G 33000 Pin Oak Parkway Avon Lake, OH 44012 800.446.5539 / 440.653.5555 hinkleylighting.com
Instrucciones de montaje
Familia: Hampton | ít. 3200 LED
Empieza aqui
Spanish
1. Encuentre un área clara en la que pueda trabajar.
2. Desempaque el embalaje y el vidrio del cartón.
3. Revise cuidadosamente las instrucciones antes de ensamblarlas.
*** La construcción de esta instalación se realizará montando primero la
estructura del cuerpo principal, instalando el hardware de montaje en la
caja de conexiones, montando la fijación al techo y luego instalando la
cortina.
Montaje de la fijación
1. Fije el conjunto de lente acrílica (1) enroscando el acoplador (2) en el
extremo de los vástagos verticales inferiores (3) - vea los Dibujos 1 y 2.
Instalación del hardware de montaje
1. Fije la correa de montaje (B) a la caja de salida (A) con los tornillos de la
caja original (C) - vea Dibujo 3.
2. Pase el pasador (D) en la correa de montaje (B) aproximadamente 3/8 ".
Instrucciones de cableado
ADVERTENCIA DE SEGURIDAD: LEA LAS INSTRUCCIONES DE
ENCENDIDO Y CONEXIÓN A TIERRA (I.S. 18) Y CUALQUIER
DIRECCIÓN ADICIONAL. DESCONECTE LA FUENTE DE
ALIMENTACIÓN DURANTE LA INSTALACIÓN. SI SE
REQUIERE NUEVO CABLEADO, CONSULTE A UN
ELECTRICISTA CALIFICADO O AUTORIDADES LOCALES
PARA REQUISITOS DE CÓDIGO.
Montaje final
1. Deslizar el dosel (E) sobre el pezón (D) y hacia arriba contra el techo - vea
Dibujo 3.
2. Enrosque la fibra decorativa (F) en el extremo de la boquilla (D).
3. Deslice la sombra (4) sobre el conjunto acrílico (1) - vea el dibujo 2.
Instructions de montage
Famille: Hampton | Article 3200 LED
Commencer ici
French
1. Trouvez une zone claire dans laquelle vous pouvez travailler.
2. Déballez le vêtement et le verre dans le carton.
3. Examinez attentivement les instructions avant le montage.
*** La construction de ce travail sera réalisée en assemblant d'abord la
structure du corps principal, en installant le matériel de montage dans la
boîte de jonction, en fixant le plafond et en installant l'ombre.
Ensemble de fixation
1. Fixez l'ensemble de lentille acrylique (1) en enfilant le coupleur (2) sur
l'extrémité des tiges verticales inférieures (3) - voir les dessins 1 et 2.
Installation du matériel de montage
1. Fixez la sangle de montage (B) à la boîte de sortie (A) avec les vis de boîte
d'origine (C) - voir Dessin 3.
2. Enfiler le tétine (D) dans la sangle de montage (B) d'environ 3/8 ".
Instructions de câblage
SÉCURITÉ AVERTISSEMENT: LIRE LES INSTRUCTIONS DE
CÂBLAGE ET DE MISE À LA TERRE (I.S. 18) ET TOUTES LES
DIRECTIVES SUPPLÉMENTAIRES. MISE EN PLACE DE
L'ALIMENTATION DURANT L'INSTALLATION. SI NOUVEAU
CÂBLAGE EST NÉCESSAIRE, CONSULTER UN ÉLECTRICIEN
QUALIFIÉ OU DES AUTORITÉS LOCALES POUR LES
EXIGENCES DE CODE.
L'assemblage final
1. Glisser le capot (E) sur le tétine (D) et le contre le plafond - voir Dessin 3.
2. Enfiler la fiancée décorative (F) sur l'extrémité du tétine (D).
3. Desserrer l'ombre (4) sur l'assemblage acrylique (1) - voir Dessin 2.
Make electrical connections from supply wire to fixture lead wires. Refer to
instruction sheet (I.S. 18) and follow all instructions to make all necessary
wiring connections. Then refer back to this page to continue installation of
this fixture.
Realice las conexiones eléctricas desde el cable de alimentación hasta los
conductores de los accesorios. Consulte la hoja de instrucciones (I.S. 18) y
siga todas las instrucciones para realizar todas las conexiones de
cableado necesarias. A continuación, consulte esta página para continuar
la instalación de este dispositivo.
Effectuez des connexions électriques du fil d'alimentation aux fils conduc-
teurs de l'appareil. Reportez-vous à la fiche d'instructions (I.S. 18) et
suivez toutes les instructions pour effectuer toutes les connexions de
câblage nécessaires. Reportez-vous à cette page pour continuer l'installa-
tion de cet appareil.
Produkspesifikasjoner
| Merke: | Hinkley Lighting |
| Kategori: | Lettelse |
| Modell: | Hampton 3200AN-LED |
Trenger du hjelp?
Hvis du trenger hjelp med Hinkley Lighting Hampton 3200AN-LED still et spørsmål nedenfor, og andre brukere vil svare deg
Lettelse Hinkley Lighting Manualer

5 Januar 2025

5 Januar 2025

5 Januar 2025

5 Januar 2025

5 Januar 2025

5 Januar 2025

5 Januar 2025

5 Januar 2025

5 Januar 2025

5 Januar 2025
Lettelse Manualer
- Dainolite
- Nordlux
- Underwater Kinetics
- GlobalTronics
- Lutec
- Ring
- Canarm
- Portman
- GLP
- COLBOR
- Rollei
- Bresser
- GoGEN
- Varaluz
- Trust
Nyeste Lettelse Manualer

9 April 2025

9 April 2025

8 April 2025

8 April 2025

8 April 2025

7 April 2025

6 April 2025

6 April 2025

6 April 2025

6 April 2025