Intermatic ET9100 Bruksanvisning
Intermatic
Ikke kategorisert
ET9100
Les nedenfor 📖 manual på norsk for Intermatic ET9100 (2 sider) i kategorien Ikke kategorisert. Denne guiden var nyttig for 24 personer og ble vurdert med 3.8 stjerner i gjennomsnitt av 12.5 brukere
Side 1/2
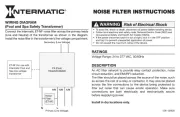
ET9100 Door Assembly
Door Assembly Replacement Instructions
MODEL ET9100
• Turnpoweroffatmainpanelbeforeservicingthisswitchortheequipmentitcontrols.
• Morethanonedisconnectswitchmayberequiredtode-energizetheequipmentbeforeservicing.
WARNING
Beforeremovingthedoorassemblycableconnections,backuptheET90000scheduleprogramsontoaUSBdevice.Failureto
dosowillresultinprogramloss.Ifprogramsarelost,refertotheET90000ElectronicTimeInstallationandProgrammingGuide
forprogramminginstructions.
NOTICE
Risk of Fire or Electric Shock
Follow this procedure to replace the ET90000 Time Switch door assembly.
1. Make sure power to the ET90000 Time Switch is de-activated.
2. Open the time switch enclosure cabinet door.
3. Remove the screws on the deadfront and remove the deadfront from the enclosure.
Set aside the deadfront and screws for reuse.
4. Remove the screw that secures the time switch door assembly and open the door assembly.
Set aside the screws for re-use.
Figure 1. Removing the deadfront.
Deadfront Screws
Deadfront
Produkspesifikasjoner
| Merke: | Intermatic |
| Kategori: | Ikke kategorisert |
| Modell: | ET9100 |
Trenger du hjelp?
Hvis du trenger hjelp med Intermatic ET9100 still et spørsmål nedenfor, og andre brukere vil svare deg
Ikke kategorisert Intermatic Manualer

9 September 2025
25 August 2025

24 August 2025
24 August 2025
4 August 2025

8 April 2025

8 April 2025

8 April 2025

8 April 2025

8 April 2025
Ikke kategorisert Manualer
- Lescha
- Blizzard
- Sekonic
- Grunkel
- JOBY
- Analog Way
- Broan
- Lazer
- Bluesound
- EnOcean
- Tenda
- ProfiCook
- Karma
- SLV
- Nevir
Nyeste Ikke kategorisert Manualer

23 Oktober 2025

23 Oktober 2025

23 Oktober 2025

23 Oktober 2025

23 Oktober 2025

23 Oktober 2025

23 Oktober 2025

23 Oktober 2025

23 Oktober 2025

23 Oktober 2025