Intex Spa inflatable bench Bruksanvisning
Intex
Ikke kategorisert
Spa inflatable bench
Les nedenfor 📖 manual på norsk for Intex Spa inflatable bench (11 sider) i kategorien Ikke kategorisert. Denne guiden var nyttig for 9 personer og ble vurdert med 4.8 stjerner i gjennomsnitt av 5 brukere
Side 1/11
271
SAVE THESE INSTRUCTIONS
READ AND FOLLOW ALL INSTRUCTIONS BEFORE USING THIS PRODUCT
INTEX
®
OWNER'S MANUAL
SPA INFLATABLE BENCH
• Assemblyanddisassemblybyadultsonly.Thisproductisnotatoy.
• Thisisnotaflotationdevice.
• Notastep–Neverallowanyonetostandorjumpontheproduct.
• Neverdiveintoabodyofwaterfromthisproduct.
• Donotfillwithwater.
• TobeusedonlyasabenchwithIntexSpa.Donotuseforanyotherpurpose.
• Followtheassemblyinstructionsandensurethebenchflapissecuredunderthespatub.
• Maximumloadcapacity:440Lbs(200kg).
• Whenexposedtosuncheckproductforhotsurfacesbeforeuse.
• Donotexposethespabenchunderdirectsunshine.
FAILURE TO FOLLOW THESE WARNINGS MAY RESULT IN SERIOUS INJURY, PARALYSIS OR DEATH.
WARNING
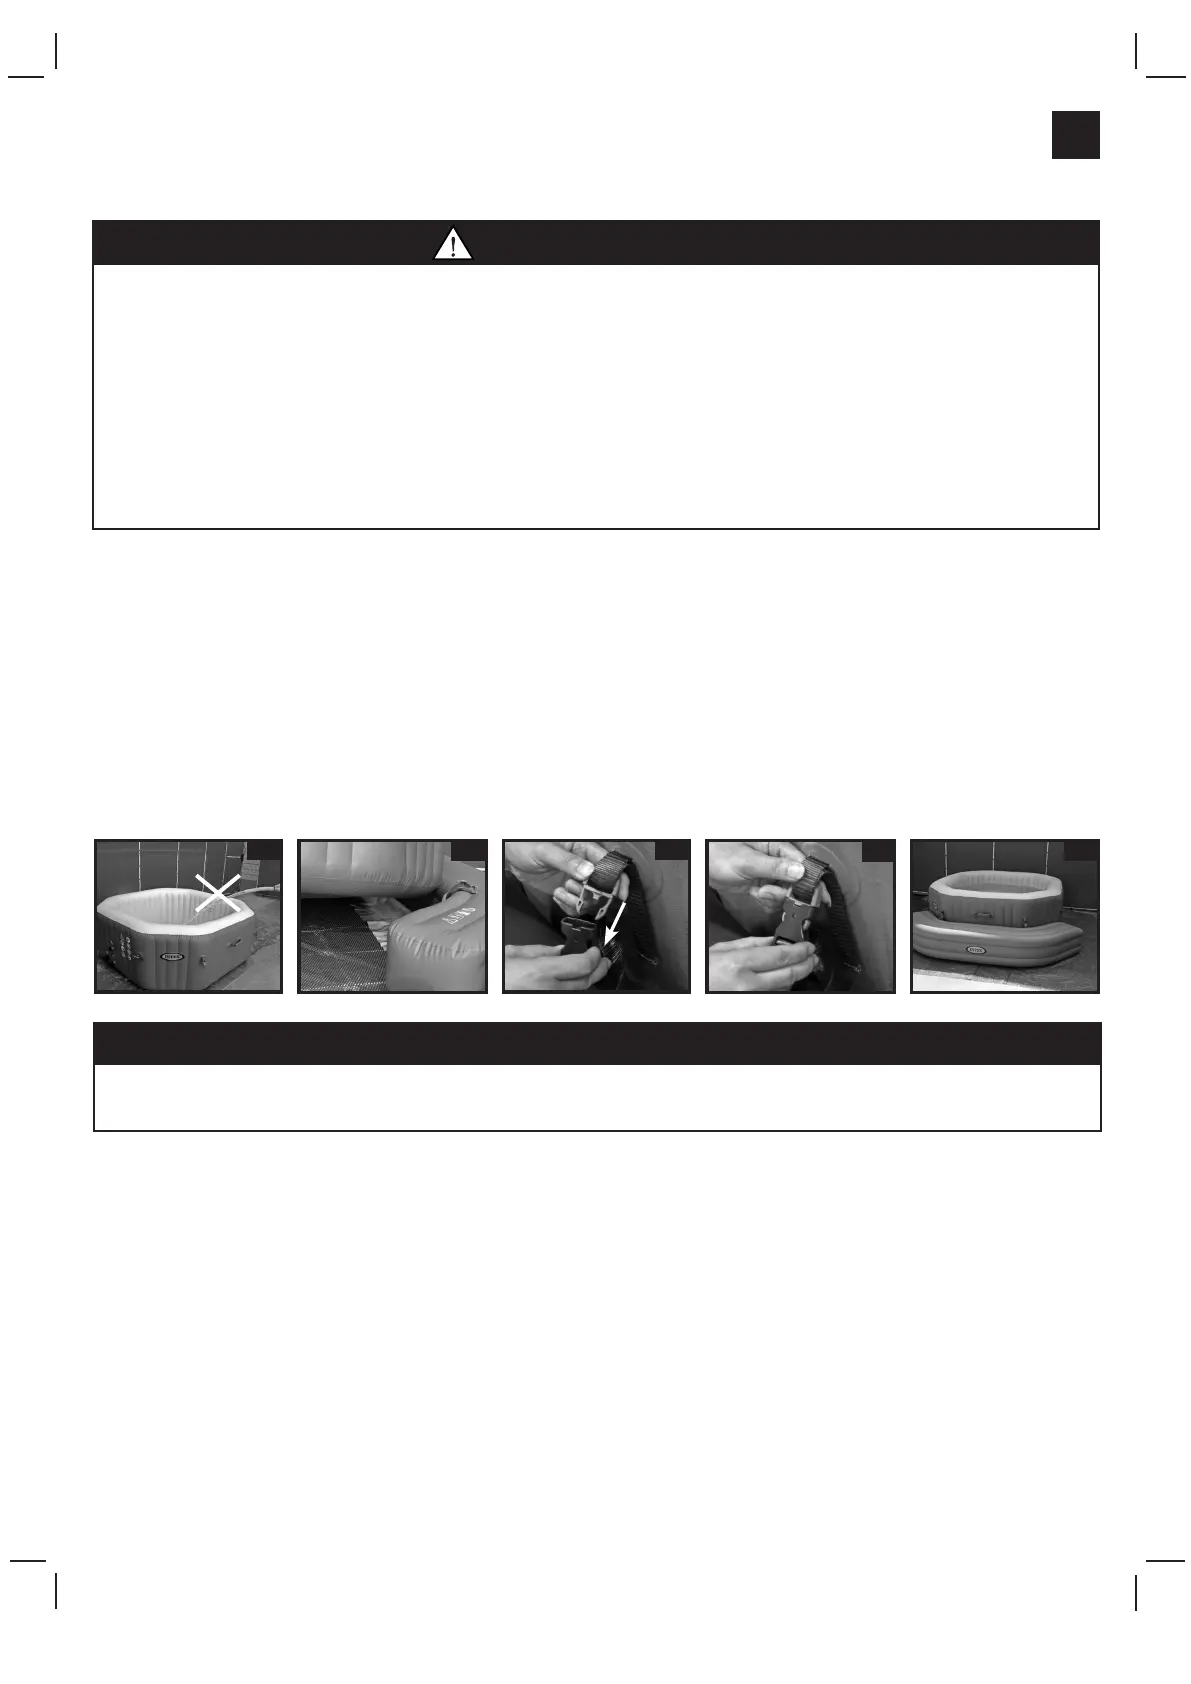
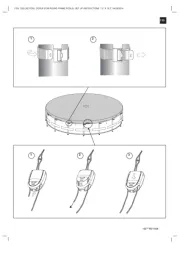
SETUP INSTRUCTIONS
1.
Forcorrectinstallationofthebenchtothespatub,ensurethespatubisemptyofwaterfirst.SeeFig1.
2.
Unscrewtheairvalvecap,inserttheinflationhoseintotheairvalveandinflatethebenchtodesiredfirmness.Donotover
inflateorusehighpressureaircompressortoinflate.Ensuretheairvalvecapissecurelyclosedafterinflation.
3.
Placetheinflatedbenchontheselectedareaandmakesurethespatubissittingoverthebenchflap.Ensurethebench
flapisbetweenthespatubandtheinsulationgroundcloth.SeeFig2.
4.
Thebenchhastwostrapsandeachstrapendingsplitsintoamaleandfemalebuckle.Movethebencharoundsothat
eachstraponthebenchisalignedwithastrapontheexternalspawall.
NOTE:
Oncethespatubisfilledwithwaterthe
spabenchortubcannotbemoved!
5.
Buckleoneendofthebenchstraptothespawallstrapbuckle,andpullthestraptight.SeeFig3.1&3.2.Repeatwiththe
otherbenchstrap.
6.
Startfillingthespatubwithwater.Periodicallycheckthebenchisrestingagainstthespawallwhilefillingwithwater.See
Fig4.
NOTE:
Drawingsforillustrationpurposeonly.Actualproductmayvary.Nottoscale.
ATTACHING THE SPA COVER TO THE BENCH
1.
Whenthespaisnoinuse,placethespacoveroverthespatub,andsecuretwoofthespacoverstrapstothebench
straps.Fastentheremainingspacoverbucklestotherespectivebucklesonthespawall.
2.
Ensurethebucklesaresecurelyfastenedandlocked.
3.
Pullthebuckledstrapstight.
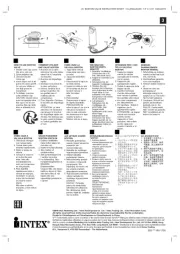
MAINTENANCE AND STORAGE INSTRUCTIONS
1.
Forcleaninguseonlymildsoapysolutionandwater.Donotuseanychemicals.
2.
Opentheairvalvecap,pushthesteminandturn90degreerighttosecureitinthedownposition.
3.
Oncethedeflationiscompleted,pushthesteminandturn90degreelefttoreturnittotheinflationposition.Replacethe
capback.
4.
Cleanandairdrythoroughlybeforefolding.
5.
Laythebenchflat,foldlooselyandavoidsharpbends,cornersandcreaseswhichcandamagethebench.
6.
Theoriginalpackagingcanbeusedforstorage.Storeinadry,coolstoragelocation.
7.
Incaseofrepairs,useonlycommonPVCrepairglueandpatches.
(271)SPAINFLATABLEBENCHENGLISH7.5”X10.3”05/17/2016
271-***-R0-1705
1
2
3.1
3.2
4
IMPORTANT
Wheninstallingthebench,ifthespatubhasbeensetupandfilledwithwater,youmustdrainoutthewaterfirst.The
waterpressurewillexpandthespatubwalloutward,makingtheinstallationdifficult.
Produkspesifikasjoner
| Merke: | Intex |
| Kategori: | Ikke kategorisert |
| Modell: | Spa inflatable bench |
Trenger du hjelp?
Hvis du trenger hjelp med Intex Spa inflatable bench still et spørsmål nedenfor, og andre brukere vil svare deg
Ikke kategorisert Intex Manualer
9 Oktober 2025

9 Oktober 2025
8 Oktober 2025

8 Oktober 2025
8 Oktober 2025
8 Oktober 2025
8 Oktober 2025
8 Oktober 2025
8 Oktober 2025
8 Oktober 2025
Ikke kategorisert Manualer
- GRAUGEAR
- Gaggia
- Hoshizaki
- Desview
- Asrock
- Atlas
- Black Box
- Rommer
- Geuther
- Ergobaby
- Go-eCharger
- Husqvarna
- EGO
- Panduit
- Ledlenser
Nyeste Ikke kategorisert Manualer

23 Oktober 2025

23 Oktober 2025

23 Oktober 2025

23 Oktober 2025

23 Oktober 2025

23 Oktober 2025

23 Oktober 2025

23 Oktober 2025

23 Oktober 2025

23 Oktober 2025