JBL Performance Specialist SS88IWSBB Bruksanvisning
JBL
Ikke kategorisert
Performance Specialist SS88IWSBB
Les nedenfor 📖 manual på norsk for JBL Performance Specialist SS88IWSBB (4 sider) i kategorien Ikke kategorisert. Denne guiden var nyttig for 31 personer og ble vurdert med 3.5 stjerner i gjennomsnitt av 16 brukere
Side 1/4
THANK YOU FOR
CHOOSING JBL
F
or more than 60 years, JBL has
been involved in every aspect of
m
usic and film recording and
r
eproduction, from live perform-
ances to monitoring the recordings
y
ou play in your home, car or
o
ffice.
W
e’re confident that the JBL
speaker and back box you have
chosen will provide every note of
e
njoyment that you expect – and
that when you think about pur-
c
hasing additional audio equip-
m
ent for your home, car or office,
you will once again choose JBL.
Please take a moment to register
your product on our Web site at
www.jbl.com. It enables us to keep
you posted on our latest advance-
ments, and helps us to better
understand our customers and
build products that meet their
needs and expectations.
JBL Consumer Products
INCLUDED
SS88IWSBB
(1) SS88IWSBB back box
(shown installed between
16" on-center wall studs)
(4) L-brackets
(8) #10 32 x 1" screws
(L-brackets to back box)
(8) #10 split washers
(L-brackets to back box)
(8) #10 flat washers
(L-brackets to back box)
(8) #8 x 3/4" wood screws
(L-brackets to wall studs)
(2) wood centering bars
(4) #10 32 x 1-1/2" flat-head screws
(centering bars to back box)
NOTE: The back box is shipped with the
two centering bars attached to it using
the four flat-head screws.
SPEAKER
PLACEMENT
I
t is best to establish the locations
for the speakers in advance, to
a
void having to correct errors
a
fter installation has already
begun. Refer to these guidelines,
a
nd also see the owner’s guide for
t
he SS88IWS subwoofer for more
information.
It is generally recommended that
you install your SS88IWS in-wall
s
ubwoofer along the same wall
as the front loudspeakers. The
S
S88IWS subwoofer is not video-
s
hielded and should not be placed
n
ear a video display. Installing the
SS88IWS near a corner will tend
t
o maximize low-frequency output.
Be cautious when installing in a
corner, to avoid a “boomy” sound.
A
lso take into consideration any
unusual features of the room, such
a
s an alcove, which may tend to
c
reate a localized node that may
affect bass response in that area
o
f the room.
It is generally recommended that
t
he speaker be installed so that the
bottom of the speaker is approxi-
m
ately 12" from the floor. Note that
i
nstalling the speaker within the
SS88IWSBB back box as shown in
the illustration to the left will
achieve the recommended height.
This is to help with the low-fre-
quency loading (bass reinforce-
ment). This also helps hide the
speaker in a less visible place.
Remember that these are just
guidelines. Since every listening
room is different, JBL strongly rec-
ommends experimenting with the
positioning of your subwoofer prior
to cutting the wall to obtain the
most pleasing results in your room.
One technique that can help you
find the ideal subwoofer location
is to temporarily borrow a stand-
alone subwoofer and place it near
the main listening location. Then
move around the room and deter-
mine where you hear the most
pleasing bass performance. This
would then be the ideal location
for the subwoofer.
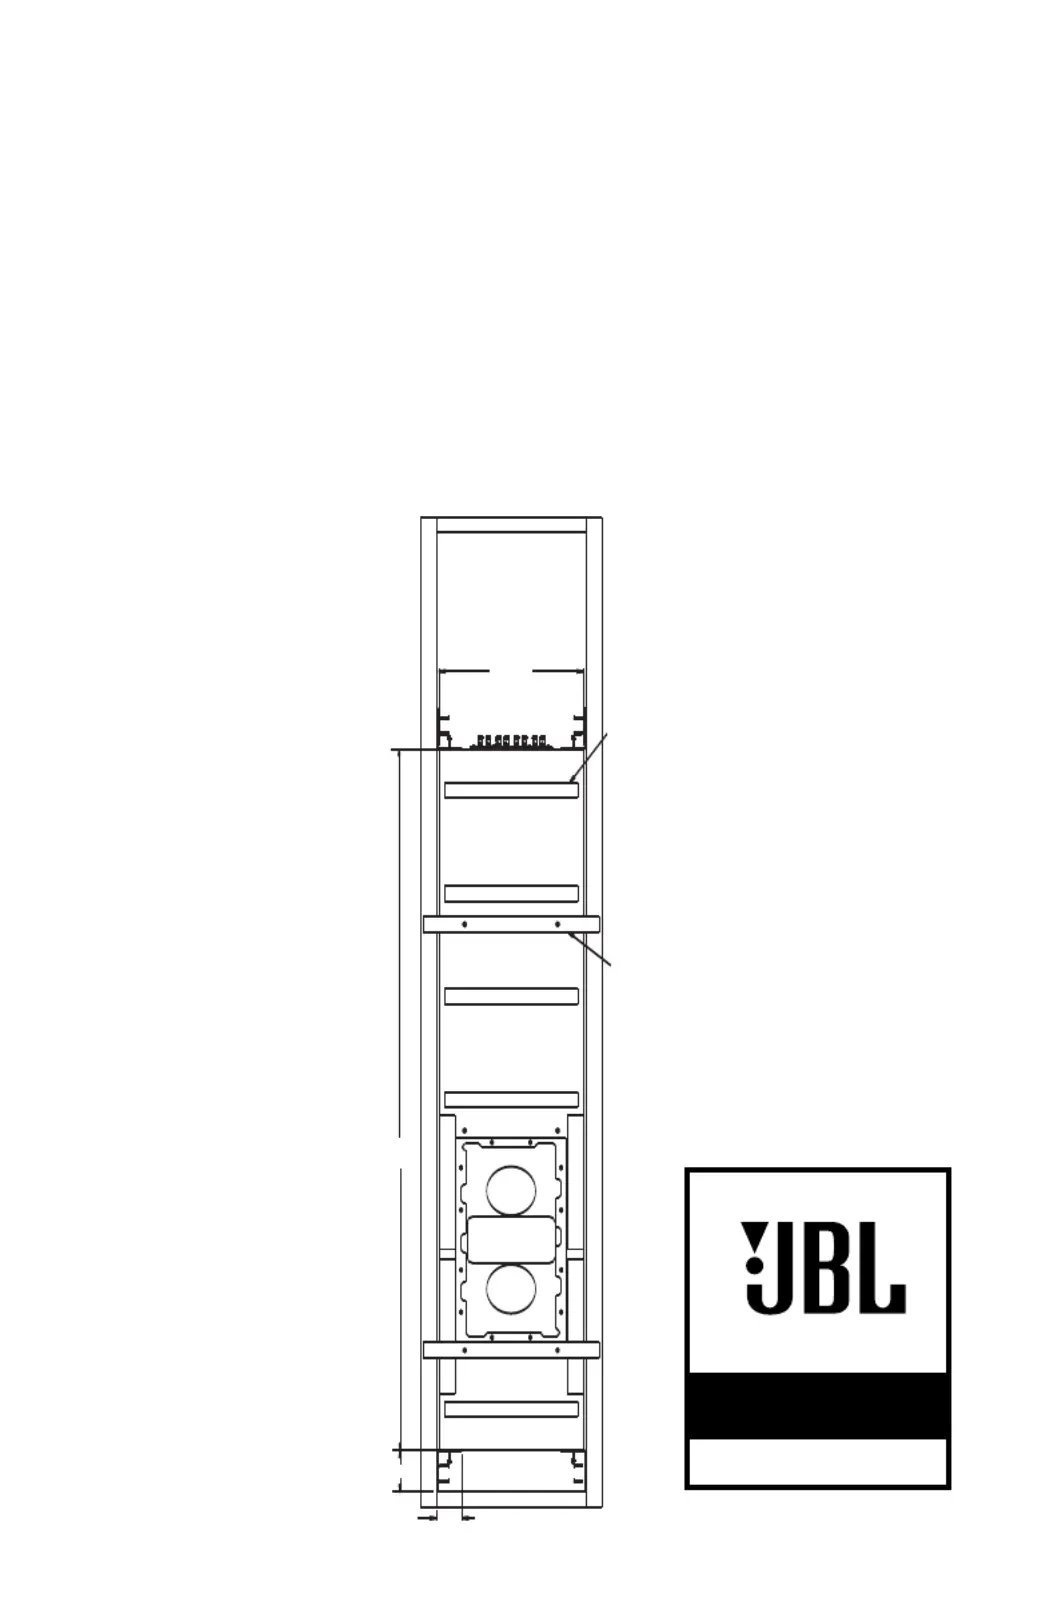
SS88IWSBB
PERFORMANCE
™
SPECIALIST
OWNER’S GUIDE
®
DAMPING
PADS
CENTERING
BARS
68.00
CABINET
4.00
2.49
14.00
CABINET
Produkspesifikasjoner
| Merke: | JBL |
| Kategori: | Ikke kategorisert |
| Modell: | Performance Specialist SS88IWSBB |
Trenger du hjelp?
Hvis du trenger hjelp med JBL Performance Specialist SS88IWSBB still et spørsmål nedenfor, og andre brukere vil svare deg
Ikke kategorisert JBL Manualer
29 August 2025
3 August 2025

14 Februar 2025

2 Februar 2025

10 Januar 2025

8 Januar 2025

6 Januar 2025

1 Januar 2025

1 Januar 2025

1 Januar 2025
Ikke kategorisert Manualer
- Uniross
- X-Lite
- Gra-Vue
- Babybjörn
- Majority
- Trisa
- Soundskins
- Icy Box
- Western Digital
- Crock-Pot
- Rapoo
- ZZ-2
- Klipsch
- Tempmate
- Beaba
Nyeste Ikke kategorisert Manualer

23 Oktober 2025

23 Oktober 2025

23 Oktober 2025

23 Oktober 2025

23 Oktober 2025

23 Oktober 2025

23 Oktober 2025

23 Oktober 2025

23 Oktober 2025

23 Oktober 2025