Klein Tools MM5000N Bruksanvisning
Klein Tools
Multimeter
MM5000N
Les nedenfor 📖 manual på norsk for Klein Tools MM5000N (8 sider) i kategorien Multimeter. Denne guiden var nyttig for 13 personer og ble vurdert med 4.6 stjerner i gjennomsnitt av 7 brukere
Side 1/8
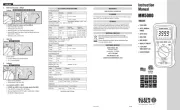
ENGLISH
Instruction
Manual
ENGLISH
MM5000
• TRUERMS
• AUTO/MANUAL
RANGE
• AUTOHOLD
• MAX/MIN
• BARGRAPH
• BACKLITDISPLAY
• 3-3/4DIGIT
4000COUNTLCD
• LEADSTORAGE
4007036
ELECTRICALSPECIfICATIONS
DCVoltageMeasurement
Range Resolution Accuracy
400.0mV 0.1mV
± (0.3% + 5 digits)
4V ~ 400V 1mV ~ 0.1V
1000V 1V ± (0.8% + 10 digits)
OverloadProtection: 1000V InputImpedance(Nominal): >10MΩ, <100pF
InputImpedance(LOWZ): >3kΩ, <200pF, up to 600V RMS
ACVoltageMeasurement
Range Resolution
Accuracy
40Hz ~ 400Hz
Accuracy
400Hz ~ 2kHz
400mV 0.1mV
± (0.75% + 5 digits)
± (2.5% +10 digits)
4V ~ 400V 1mV ~ 0.1V ± (2.0% +8 digits)
1000V 1V ± (0.75% + 8 digits) ± (2.0% +8 digits)*
OverloadProtection: 1000V RMS InputImpedance(Nominal): >10MΩ, <100pF
InputImpedance(LOWZ): >3kΩ, <200pF, up to 600V RMS
frequencyRange: 40 to 2kHz Response: True RMS
*Accuracy for 400Hz ~ 1kHz range only.
DCCurrentMeasurement
Range Resolution Accuracy
400.0µA 0.1µA
± (1.0% + 5 digits)
2000µA 1µA
OverloadProtection: 600V RMS
ACCurrentMeasurement
Range Resolution Accuracy
400.0µA 0.1µA
± (1.5% + 5 digits)
2000µA 1µA
OverloadProtection: 600V RMS
frequency: 40Hz to 2kHz Response: True RMS
ResistanceMeasurement
Range Resolution Accuracy
400Ω
˜
4MΩ 0.1Ω
˜
1kΩ ± (1.0% + 5 digits)
40MΩ 0.01MΩ ± (1.5% + 10 digits)
OverloadProtection: 600V RMS
DiodeTest
OverloadProtection Range TestCurrent OpenCircuitVoltage
600V RMS 4.0V DC Appx. 0.25mA
<
1.8V DC (typ.)
ContinuityTest
OverloadProtection OpenCircuitVoltage Threshold(Appx.)
600V RMS Appx. 0.44V Appx. < 40Ω
Specicationssubjecttochange.
WARRANTY
www.kleintools.com/warranty
CLEANING
Turn instrument off and disconnect test leads. Clean the instrument by using a
damp cloth. Do not use abrasive cleaners or solvents.
STORAGE
Remove the batteries when instrument is not in use for a prolonged period
of time. Do not expose to high temperatures or humidity. After a period of
storage in extreme conditions exceeding the limits mentioned in the General
Specifications section, allow the instrument to return to normal operating
conditions before using it.
DISPOSAL/RECYCLE
Do not place equipment and its accessories in the trash.
Items must be properly disposed of in accordance with local
regulations
.
Prior to disposal of this product, please contact Klein Tools
for proper disposal options.
CUSTOMERSERVICE
KLEINTOOLS,INC.
450 Bond Street
Lincolnshire, IL 60069
1-877-775-5346
www.kleintools.com
customerservice@kleintools.com
Rev 04/14 B 139749
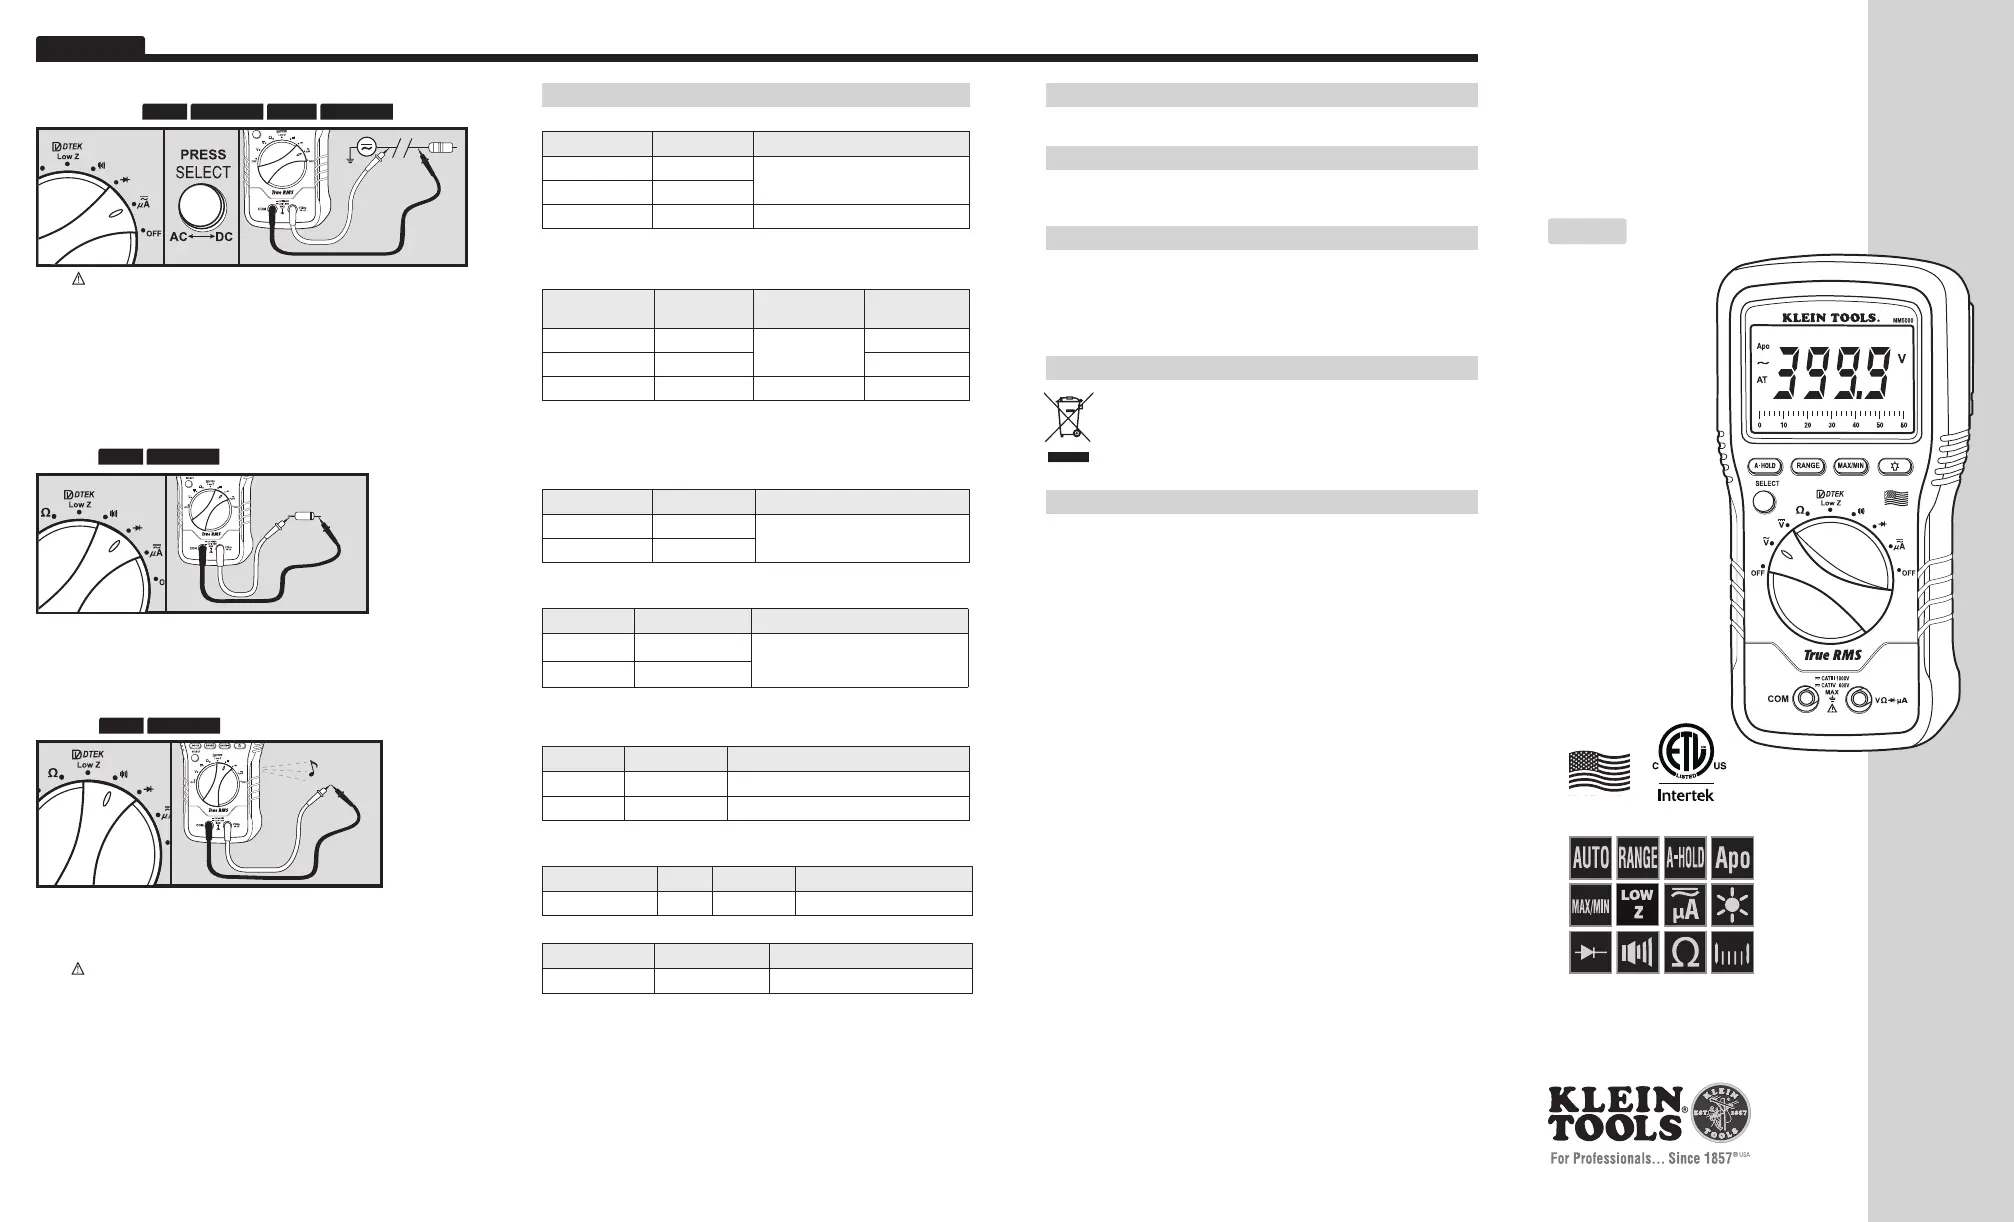
7. LowImpedance(LOWZ):<600V
DONOTuse(LOWZ)modeatvoltagesgreaterthan600V.
• Press SELECT to choose AC or DC Voltage.
• Use Low Impedance (LOW Z) mode to reduce ghost voltages.
• See AC/DC Voltage instructions.
6. Continuity
Features:
HOLD
MAX/MIN
• Display shows resistance.
• Buzzer sounds if less than 40Ω.
5. DiodeTest
Features:
HOLD
MAX/MIN
Display shows:
• Forward voltage drop if forward biased.
• “O.L” if reverse biased.
4. AC/DCCurrent(small):<2000µA
Features:
HOLD
AUTOHOLD
RANGE
MAX/MIN
DONOTattempttomeasuremorethan400mA.
• Attach RED lead to “µA” input.
• Break circuit to be measured.
• Attach RED lead to "µA" input, BLACK lead to COM.
• Connect RED lead to one side of break and BLACK lead to the
other (meter in series).
• Select AC or DC current source.
Dwg Name: MM5000-139749ART Dwg No: 139749
ECO No: 016671 Pkg Dwg Ref: 1650 Rev: B
Color Reference: CEN-PACK-003-A
MM5000-139749-Instructions.indd 1-4 5/5/14 10:14 AM
Produkspesifikasjoner
| Merke: | Klein Tools |
| Kategori: | Multimeter |
| Modell: | MM5000N |
Trenger du hjelp?
Hvis du trenger hjelp med Klein Tools MM5000N still et spørsmål nedenfor, og andre brukere vil svare deg
Multimeter Klein Tools Manualer
3 August 2025

29 Desember 2024

29 Desember 2024
Multimeter Manualer
- Metra
- Uni-T
- Chauvin Arnoux
- Trotec
- Sauermann
- Milwaukee
- Testboy
- Testec
- Fluke
- Kyoritsu
- Alecto
- Qian
- Extech
- PCE Instruments
- Rigol
Nyeste Multimeter Manualer

21 Oktober 2025
16 Oktober 2025
15 Oktober 2025
15 Oktober 2025
15 Oktober 2025

15 Oktober 2025
15 Oktober 2025
14 Oktober 2025
14 Oktober 2025

7 Oktober 2025