Kogan KATRCM24MPA Bruksanvisning

Kogan Videokamera KATRCM24MPA

Les nedenfor 📖 manual på norsk for Kogan KATRCM24MPA (12 sider) i kategorien Videokamera. Denne guiden var nyttig for 24 personer og ble vurdert med 4.5 stjerner i gjennomsnitt av 2 brukere

Side 1/12
Pl
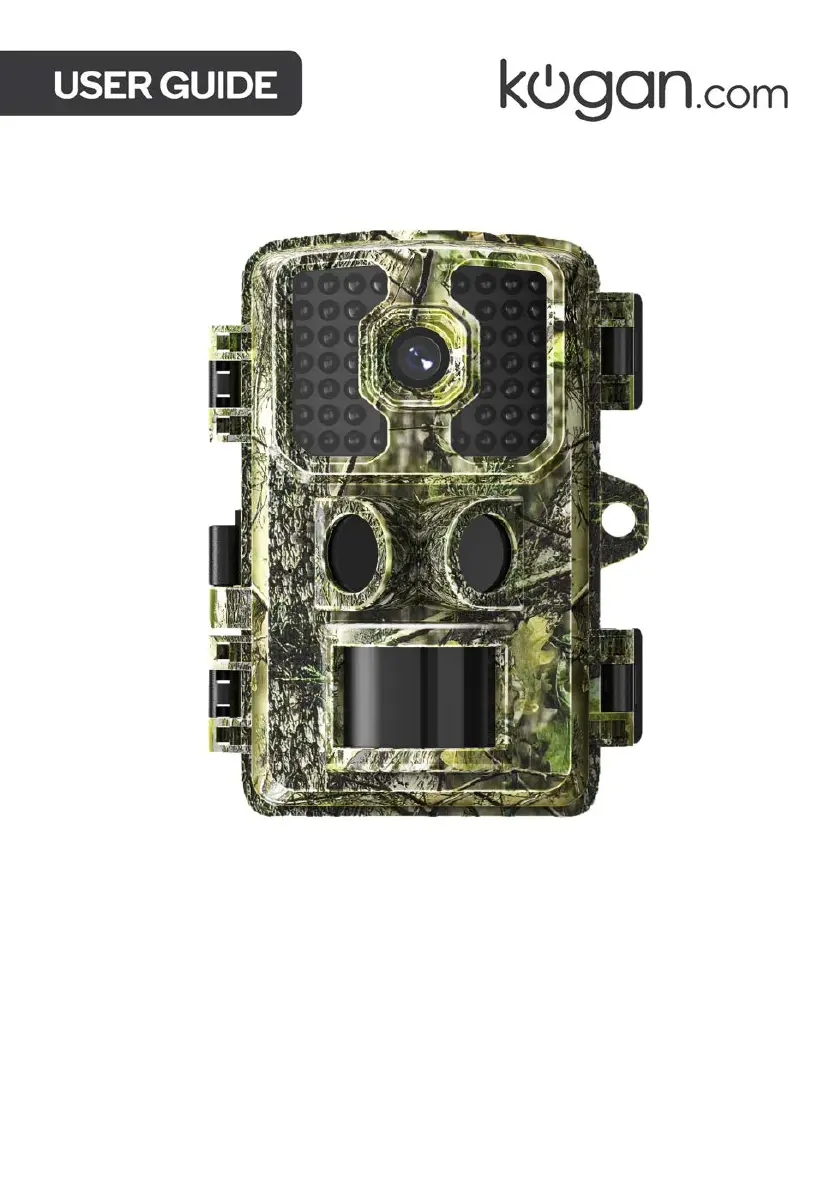
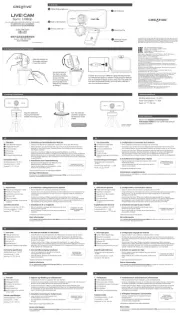
24MP TRAIL AND WILDLIFE
CAMERA
KATRCM24MPA
Camera
Mounting Strap
User Guide
COMPONENTS
OVERVIEW
Lens
Infrared Lamp
PIR Sensor
PIR Sensor
Latch
Lock Hole
Strap Mounting
Holes
Description:
1. The camera provides the following equipment connection: USB interface, TF card
slot, external DC power socket. Three-way power/mode switch to select:
OFF/TEST/ON;
2. LED indicator: red indicates PIR monitoring: The white light flashes once and the
red light means to capture a picture or camera. In ON mode, the indicator does
not blink.
Display
Speaker
Controls
Battery
Compartment
Battery
Compartment Cover
Batteries
1. Remove the battery compartment cover.
2. Install 8 AA batteries paying close attention to the orientation of the polarity
symbols (+/-).
3. Replace the battery compartment cover.
Note: Do not mix different kinds of batteries (e.g., alkaline, lithium, rechargeable).
Never combine old and new batteries.
When the batteries are running low, “Battery Low” will be shown on the display.
If the camera is not to be used for an extended period, remove the batteries to avoid
possible leakage damage.
In addition, the camera can be powered using an external DC 5V/2A solar powered
power supply (not supplied).
Inserting a microSD Card
To use the camera effectively, it is essential to install a microSD card since the camera
lacks built-in memory. The microSD card should have a capacity of up to 32GB and a class
10 rating.
Prior to insertion into the microSD card slot, verify that the card's capacity does not exceed
the recommended limit and that it has been tested for compatibility. This ensures smooth
operation and enables the camera will store captured data efficiently.
Setting the Camera
Slide the mode switch from OFF to TEST position to activate the camera and view the user
setup screen.
In TEST mode, the camera will operate similarly to a normal digital camera. You can
capture a picture or video and enter the menu to set parameters.
OPERATION
Controls
M
Press to open the settings menu.
When in the setting menu, press to exit the menu.
E
Press in the photo/video state to enter playback mode.
Press in the video file to play the video. In the main menu press to confirm
the settings.
Press in the photo/video state to enable photos/videos.
In playback mode, press this key to exit the video mode.
Press to move to the left in the menu interface
Enter the video mode.
Move up in the menu mode and turn the page in the playback mode.
When setting parameters in the menu, press to move to the right.
Enter the photo mode.
Move down in the menu mode and turn the page in the playback mode.
OFF/TEST/ON switch
OFF: Turns the camera off.
TEST: Test each function of the camera.
ON: Place the camera in Auto Recording Mode. After 5 seconds the camera will enter
standby automatically. When PIR detects objects moving in front of it, it will
automatically capture photos/video.
Super Password
In the event you forget your password, enter the factory password “pass” to unlock the
camera.
USB
With the camera switched off or while in test mode, you can connect the camera to your
computer to manage the saved photo/videos (USB cable not supplied).
The pictures and videos of the camera are stored in the folder \DCIM\100MEDIA in the SD
card. The file names for images will be “imag000X1.jpgand videos will be “imag000X.avi”.
The SD cards can be placed in card readers and inserted into the computer to browse the
files in the USB disk.
Auto Recording Mode
In this mode and the camera will start when prey or other objects enter the PIR sensing
area, both PIRS are triggered at the same time and immediately start taking photos or
recording videos.
The PIR in the middle mainly detects the left and right viewing angles and the viewing
angle distance is 45º, within 10 meters.
The Angle of view of the PIR below is 90º and the distance is within 15 meters.
If the prey strolls away from the PIR sensor, the camera will be powered off and put into
standby mode.
Positioning the Camera
It is recommended that you position the camera 1 - 2 metres above the ground.
For best results, face the camera north or south and remove branches near the front of
the camera.
Note: To avoid potential false triggers, do not point the camera at a heat source (e.g., the
sun) or near a branch trunk.
Settings
Mode Setting
Capture
Video
Capture+
Video
Choose to take a picture or video. In
Capture+Video mode, the camera will first
capture picture and then record video.
Languages
Enter
11 (Optional)
Photo pixel
24MP
16MP
12MP
8MP
5MP
2MP
1.3MP
Select the required image resolution (1.3MP ~24
MP). Higher resolution will have better quality
but occupy more space. It will take a long time
to write larger files into SD card, which will
slightly reduce the shutter speed.
Video
resolution
1080FHD
720P
WVGA
VGA
1920x1080
1280 x720
800 x 480
640 x 480
Selects video resolution (pixels
1920x1080 per frame). Higher
resolution 1280x720 will provide
better video quality, but the files
created will occupy more space.
The length of
the video
10 seconds - 3
minutes
AVI format video can be played back on most
video players.
Operate
interval
5 seconds - 30
minutes
Select the shortest time interval for the camera
to wait and the PIR sensor will be triggered as
soon as prey appears. At selected intervals, the
camera will not capture pictures or video, which
prevents the SD card from storing too many
redundant pictures.
Date/Time
Enter
Select the date/time and press ENTER to set
the date.
Time Stamp
Off
On
If you want to have a date/time watermark on
each image, you can select a time watermark.
Select "Off" and there will be no watermark on
the picture.
Timer
Off
On
If you want the camera to operate only certain
hours of the day, you can choose "on"
Password Set
Off
On
Set a password to protect the camera from
unauthorized users
Serial ID Set
Off
On
Select "On" to assign a serial number to your
camera. You can use 4-digit combinations to
record pictures from a location.
Record Audio
Off
On
The default setting is on, when on, the camera
can record, otherwise, only silent video
Format
Cancel
OK
When formatting an SD card, all files will be
deleted. If your SD card has been used on other
devices, formatting is strongly recommended.
Economy mode
Off
On
With economy mode on, the IR Brightness will
be reduced to save power.
DC6V-2A port
/
The solar panel power supply port (DC 6V-2A).
The wildlife camera does not support direct
charging from an adapter, but it can charge the
battery, replace the dry battery, or utilize a solar
panel to obtain power supply.
Default setting
Cancel
OK
Restore the factory settings.
Version
Enter
View camera version.

Produkspesifikasjoner

Merke: Kogan
Kategori: Videokamera
Modell: KATRCM24MPA

Trenger du hjelp?

Hvis du trenger hjelp med Kogan KATRCM24MPA still et spørsmål nedenfor, og andre brukere vil svare deg


Videokamera Kogan Manualer

Videokamera Manualer

Nyeste Videokamera Manualer