Livarno Lux IAN 410820 Bruksanvisning

Les nedenfor 📖 manual på norsk for Livarno Lux IAN 410820 (111 sider) i kategorien Ikke kategorisert. Denne guiden var nyttig for 27 personer og ble vurdert med 4.5 stjerner i gjennomsnitt av 2 brukere

Side 1/111
IAN 411276_2110
L
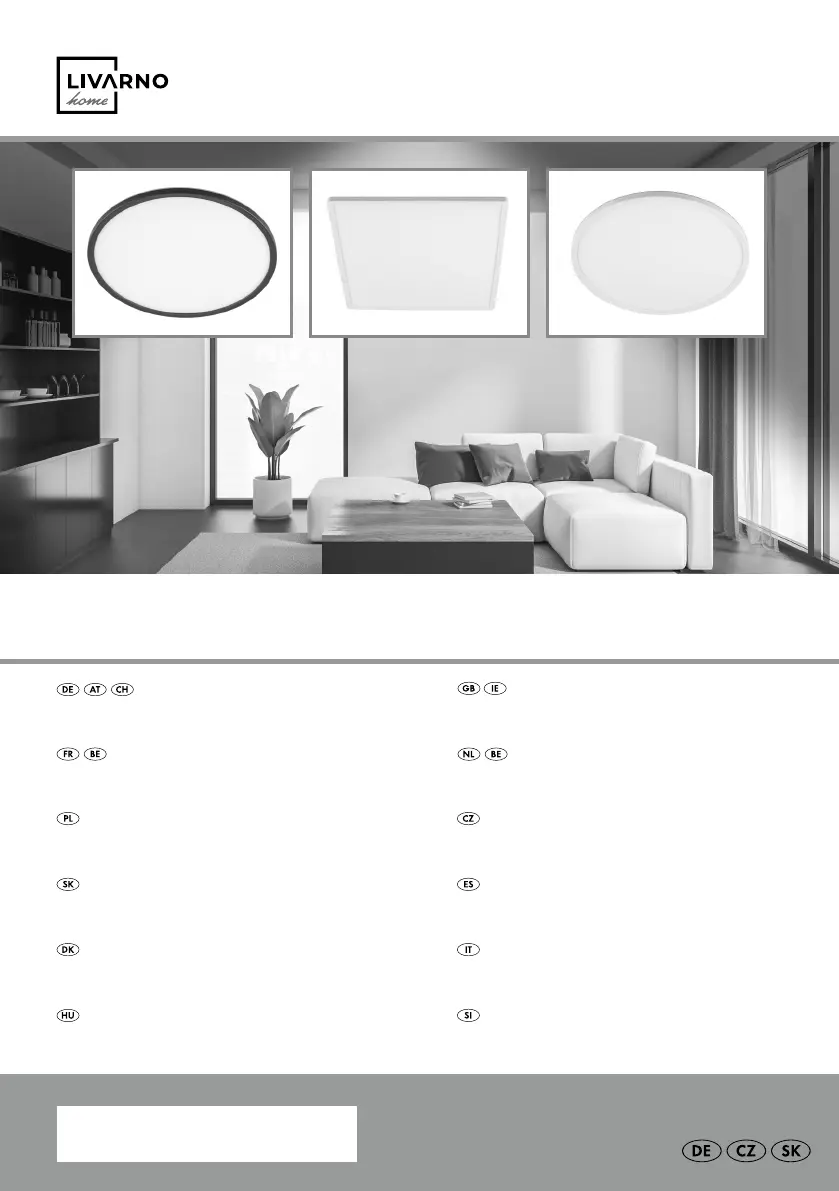
ED-DECKENLEUCHTE/LED CEILING LIGHT/
P
LAFONNIER À LED
LED-DECKENLEUCHTE
Montage-, Bedienungs- und Sicherheitshinweise
LED CEILING LIGHT
Assembly, operating and safety instructions
LED-PLAFONDLAMP
Montage-, bedienings- en veiligheidsinstructies
PLAFONNIER À LED
Instructions de montage, d‘utilisation et consignes de sécurité
STROPNÍ LED SVÍTIDLO
Pokyny k montáži, obsluze a bezpečnostní pokyny
LAMPA SUFITOWA LED
Wskazówki montażu, obsługi i bezpieczeństwa
LÁMPARA LED DE TECHO
Instrucciones de montaje, de uso y de seguridad
STROPNÉ LED SVIETIDLO
Pokyny pre montáž, obsluhu a bezpečnostné pokyny
LED LOFTSLAMPE
Monterings-, betjenings- og sikkerhedshenvisninger
STROPNA LED-SVETILKA
Navodila za montažo, uporabo in varnostna navodila
MENNYEZETI LED LÁMPA
Szerelési, használati és biztonsági tudnivalók
LAMPADA LED DA SOFFITTO
Istruzioni di montaggio, d’uso e di sicurezza
Klappen Sie vor dem Lesen die beiden Seiten mit den Abbildungen aus und machen Sie sich anschließend mit
allen Funktionen des Gerätes vertraut.
Before reading, unfold both pages containing illustrations and familiarise yourself with all functions of the device.
Avant de lire le mode d‘emploi, ouvrez les deux pages contenant les illustrations et familiarisez-vous ensuite avec
toutes les fonctions de l‘appareil.
Vouw vóór het lezen de beide pagina‘s met de afbeeldingen open en maak u vertrouwd met alle functies van het
apparaat.
Przed przeczytaniem proszę rozłożyć obie strony z ilustracjami, a następnie proszę zapoznać się z wszystkimi
funkcjami urządzenia.
Před čtením si odklopte obě dvě strany s obrázky a potom se seznamte se všemi funkcemi přístroje.
Pred čítaním si odklopte obidve strany s obrázkami a potom sa oboznámte so všetkými funkciami prístroja.
Antes de empezar a leer abra las dos páginas que contienen las imágenes y, en seguida, familiarícese con todas
las funciones del dispositivo.
Før du læser, vend begge sidene med billeder frem og bliv bekendt med alle apparatets funktioner.
Prima di leggere aprire le due pagine con le immagini e prendere confidenza con le diverse funzioni dell’apparecchio.
Olvasás előtt kattintson az ábrákat tartalmazó mindkét oldalra és végezetül ismerje meg a készülék mindegyik funkcióját.
Pred branjem obe strani s slikami odprite navzven in se nato seznanite z vsemi funkcijami naprave.
DE/AT/CH Montage-, Bedienungs- und Sicherheitshinweise Seite 5
GB/IE Assembly, operating and safety instructions Page 13
FR/BE Instructions de montage, d‘utilisation et consignes de sécurité Page 21
NL/BE Montage-, bedienings- en veiligheidsinstructies Pagina 31
PL Wskazówki montażu, obsługi i bezpieczeństwa Strona 39
CZ Pokyny k montáži, obsluze a bezpečnostní pokyny Strana 49
SK Pokyny pre montáž, obsluhu a bezpečnostné pokyny Strana 57
ES Instrucciones de montaje, de uso y de seguridad Página 65
DK Monterings-, betjenings- og sikkerhedshenvisninger Side 73
IT Istruzioni di montaggio, d’uso e di sicurezza Pagina 81
HU Szerelési, használati és biztonsági tudnivalók Oldal 91
SI Navodila za montažo, uporabo in varnostna navodila Stran 101
F
A
3
2
4
B
9
7
6
5
8
1
C
7
5
1
9
6
D
5
7
6 1
E
5
1
1
14163606L/14163605L
F
A
3
2
4
B
9
7
6
5
8 1
C
7
5
1
9
6
D
5
7
6 1
E
5
1
1
14163706L
5 DE/AT/CH
Inhaltsverzeichnis
Legende der verwendeten Piktogramme ........................................................... Seite 6
Einleitung ......................................................................................................................................... Seite 7
Bestimmungsgemäße Verwendung ....................................................................................................Seite 7
Lieferumfang ........................................................................................................................................ Seite 7
Teilebeschreibung ...............................................................................................................................Seite 7
Technische Daten ................................................................................................................................Seite 7
Sicherheit ......................................................................................................................................... Seite 8
Sicherheitshinweise .............................................................................................................................Seite 8
Sicherheitshinweise für Batterien/Akkus ............................................................................................ Seite 9
Vorbereitung ................................................................................................................................Seite 10
Benötigtes Werkzeug und Material ...................................................................................................Seite 10
Vor der Installation .................................................................................................................Seite 10
Inbetriebnahme ......................................................................................................................... Seite 10
Leuchte montieren ...............................................................................................................................Seite 10
Batterie einsetzen/auswechseln (Fernbedienung) ............................................................................ Seite 11
Leuchteffekte mit Hilfe der Fernbedienung steuern ...........................................................................Seite 11
Wartung und Reinigung .....................................................................................................Seite 11
Entsorgung .....................................................................................................................................Seite 11
Garantie und Service ............................................................................................................Seite 12
Garantie ..............................................................................................................................................Seite 12
Serviceadresse ....................................................................................................................................Seite 12
Konformitätserklärung .........................................................................................................................Seite 12
Hersteller ..............................................................................................................................................Seite 12
V3.0
6 DE/AT/CH
Legende der verwendeten Piktogramme
Bedienungsanleitung lesen! LED-Lebensdauer in Stunden
Diese Leuchte ist ausschließlich für den
Betrieb im Innenbereich, in trockenen
und geschlossenen Räumen geeignet.
Warnung! Stromschlaggefahr!
Lebens- und Unfallgefahr für
Kleinkinder und Kinder!
Vorsicht! Verbrennungsgefahr durch
heiße Oberflächen!
Wechselspannung
(Strom- und Spannungsart)
Diese Leuchte ist nicht geeignet für
externe Dimmer und elektronische
Schalter.
Hertz (Frequenz) Explosionsgefahr!
Watt (Wirkleistung) Schutzhandschuhe tragen!
Volt So verhalten Sie sich richtig
Schutzklasse II
b
a
Entsorgen Sie Verpackung und Gerät
umweltgerecht!
Warn- und Sicherheitshinweise
beachten!
Umweltschäden durch falsche
Entsorgung der Batterien/Akkus!
LED LED
Die Lichtquelle dieses Produkts ist nicht
austauschbar.
Die Verpackung besteht aus
100 % recyceltem Papier.
Ra
Farbwiedergabeindex
Diese Leuchte besitzt den Schutzgrad
„IP20“ und ist ausschließlich für den
Einsatz im Innenbereich von privaten
Haushalten vorgesehen.
Lumen Lichttemperatur in Kelvin
20
PAP
Wellpappe
04
LDPE
Polyethylen (geringe Dichte)
Außer Reichweite von Kindern
aufbewahren!
Legende der verwendeten Piktogramme Einleitung
7 DE/AT/CH
LED-Deckenleuchte
Einleitung
Wir beglückwünschen Sie zum Kauf Ihres
neuen Gerätes. Sie haben sich damit für
ein hochwertiges Produkt entschieden.
Bitte lesen Sie diese Bedienungsanleitung vollständig
und sorgfältig durch. Klappen Sie die Seite mit den
Abbildungen aus. Diese Anleitung gehört zu diesem
Produkt und enthält wichtige Hinweise zur Inbetrieb-
nahme und Handhabung. Beachten Sie immer alle
S
icherheitshinweise. Prüfen Sie vor der Inbetriebnahme
,
ob die korrekte Spannung vorhanden ist und ob alle
Teile richtig montiert sind. Sollten Sie Fragen haben
oder unsicher in Bezug auf die Handhabung des
Gerätes sein, setzen Sie sich bitte mit Ihrem Händler
oder der Servicestelle in Verbindung. Bewahren Sie
diese Anleitung bitte sorgfältig auf und geben Sie
sie ggf. an Dritte weiter.
Bestimmungsgemäße
Verwendung
Diese Leuchte ist ausschließlich für den
Betrieb im Innenbereich, in trockenen und
geschlossenen Räumen geeignet.
Dieses Gerät ist nur für den Einsatz in privaten Haus-
halten vorgesehen. Dieses Produkt ist vorgesehen für
den normalen Betrieb.
Lieferumfang
Kontrollieren Sie unmittelbar nach dem Auspacken
immer den Lieferumfang auf Vollständigkeit sowie
den einwandfreien Zustand des Gerätes.
1 LED Deckenleuchte (14163606L/14163605L/
14163706L)
1 Fernbedienung
3 Dübel
3 Schrauben
2 Schutzschläuche
1 Batterie CR2025 (Lithium)
1 Montage- und Bedienungsanleitung
Teilebeschreibung
1
Bodenplatte
2
Schraube
3
Dübel
4
Schutzschlauch
5
Leuchtenschirm
6
schraublose Klemme
7
Sicherungshaken
8
Öse
9
Netzanschlusskabel (extern)
10
Fernbedienung
11
Batteriefach
12
Isolierstreifen
13
Batterie (3 V CR2025)
Technische Daten
Leuchte:
Modellnummer: 14163606L/14163605L/
14163706L
Betriebsspannung: 230–240 V∼, 50 Hz
Nennleistung: max. 22 W
Schutzklasse: II/
Schutzart: IP20
LED-Modul:
Leuchtmittel: LED-Modul
Nennleistung: 22 W
Fernbedienung:
Batterie: 1 x 3 V CR2025
Dieses Produkt enthält eine Lichtquelle der Energie-
effizienzklasse ”E”.
Legende der verwendeten Piktogramme Einleitung
8 DE/AT/CH
SicherheitSicherheit
Sicherheit
Sicherheitshinweise
Bei Schäden, die durch Nichtbeachtung dieser
Bedienungsanleitung verursacht werden, erlischt
der Garantieanspruch! Für Folgeschäden wird keine
Haftung übernommen! Bei Sach- oder Personen-
schäden, die durch unsachgemäße Handhabung oder
Nichtbeachtung der Sicherheitshinweise verursacht
werden, wird keine Haftung übernommen!
LEBENS-
UND UNFALLGEFAHR FÜR
KLEINKINDER UND KINDER!
Lassen Sie Kinder niemals unbeaufsichtigt mit d
em
Verpackungsmaterial. Es besteht Erstickungsge-
fahr durch Verpackungsmaterial. Kinder unter-
schätzen häufig die Gefahren.
Lassen Sie die Leuchte oder Verpackungsmate-
rial nicht achtlos liegen. Plastikfolien/-tüten,
Kunststoffteile etc. könnten für Kinder zu einem
gefährlichen Spielzeug werden. Halten Sie
Kinder stets vom Produkt fern.
Dieses Gerät kann von Kindern ab 8 Jahren und
darüber, sowie von Personen mit verringerten
physischen, sensorischen oder mentalen Fähig-
keiten oder Mangel an Erfahrung und Wissen
benutzt werden, wenn sie beaufsichtigt oder
bezüglich des sicheren Gebrauchs des Gerätes
unterwiesen wurden und die daraus resultierenden
Gefahren verstehen. Kinder dürfen nicht mit dem
Gerät spielen. Reinigung und Benutzerwartung
dürfen nicht von Kindern ohne Beaufsichtigung
durchgeführt werden.
Vermeiden Sie Lebensgefahr
durch elektrischen Schlag
Lassen Sie die Elektroinstallation durch einen
ausgebildeten Elektriker oder eine für Elektroin-
stallationen eingewiesene Person durchführen.
Überprüfen Sie vor jedem Netzanschluss die
Leuchte und das Netzanschlusskabel auf etwai
ge
Beschädigungen. Benutzen Sie Ihre Leuchte
niemals, wenn Sie irgendwelche Beschädigungen
feststellen.
Beschädigte Netzkabel bedeuten Lebensgefahr
durch elektrischen Schlag. Wenden Sie sich bei
Beschädigungen, Reparaturen oder anderen
Problemen an der Leuchte an die Servicestelle
oder eine Elektrofachkraft.
Entfernen Sie vor der Montage die Sicherung
oder schalten Sie den Leitungsschutzschalter
im Sicherungskasten aus (0-Stellung).
Vergewissern Sie sich vor der Montage, dass
die
vorhandene Netzspannung mit der benötigten
Betriebsspannung der Leuchte übereinstimmt
(siehe „Technische Daten“).
Vermeiden Sie unbedingt die Berührung der
Leuchte mit Wasser oder anderen Flüssigkeiten.
Öffnen Sie niemals eines der elektrischen Betriebs-
mittel oder stecken irgendwelche Gegenstände
in dieselben. Derartige Eingriffe bedeuten Lebens-
gefahr durch elektrischen Schlag.
Die Leuchte nicht auf feuchtem oder leitendem
Untergrund installieren!
Vermeiden Sie Brand- und
Verletzungsgefahr
Überprüfen Sie die Leuchte unmittelbar nach
dem
Auspacken auf Beschädigungen. Setzen Sie s
ich
in diesem Fall für Ersatz mit der Servicestelle in
Verbindung.
VORSICHT! VERBRENNUNGS-
GEFAHR DURCH HEISSE
OBERFLÄCHEN!
Stellen Sie sicher, dass die Leuchte ausgeschal-
tet und abgekühlt ist, bevor Sie diese berühren,
um Verbrennungen zu vermeiden. Leuchtmittel
entwickeln im Bereich des Lampenkopfes eine
starke Hitze.
Die Lichtquelle dieser Leuchte ist nicht ersetzbar;
wenn die Lichtquelle das Ende ihrer Lebens-
dauer erreicht hat, ist die gesamte Leuchte zu
ersetzen.
Diese Leuchte ist nicht geeignet für
externe Dimmer und elektronische
Schalter.
Nicht direkt in die Lichtquelle (Leuchtmittel,
LED etc.) hineinschauen.
Nicht mit optischen Instrumenten in die
Lichtquelle schauen (z. B. Lupe).
9 DE/AT/CH
SicherheitSicherheit
So verhalten Sie sich richtig
Montieren Sie die Leuchte so, dass sie vor
Feuchtigkeit und Verschmutzung geschützt ist.
Bereiten Sie die Montage sorgfältig vor und
nehmen Sie sich ausreichend Zeit. Legen Sie
alle Einzelteile und zusätzlich benötigtes Werk-
zeug oder Material vorher übersichtlich und
griffbereit zurecht.
Seien Sie stets aufmerksam! Achten Sie immer
darauf was Sie tun und gehen Sie stets mit
Vernunft vor. Montieren Sie die Leuchte in
keinem Fall, wenn Sie unkonzentriert sind oder
sich unwohl fühlen.
Sicherheitshinweise für
Batterien/Akkus
BATTERIEN AUSSERHALB DER
REICHWEITE VON KINDERN
AUFBEWAHREN!
Das Verschlucken kann chemische Verbrennungen
,
Perforation von Weichteilgewebe und den Tod
verursachen. Schwere Verbrennungen können
innerhalb von 2 Stunden nach dem Verschlu
cken
auftreten. Sofort einen Arzt aufsuchen.
LEBENSGEFAHR!
Halten Sie Batterien/Akkus außer Reichweite
von Kindern. Suchen Sie im Falle eines Ver-
schluckens sofort einen Arzt auf!
Verschlucken kann zu Verbrennungen, Perforation
von Weichgewebe und Tod führen. Schwere Ver-
brennungen können innerhalb von 2 Stunden
nach dem Verschlucken auftreten.
EXPLOSIONSGEFAHR!
Laden Sie nicht aufladbare Batterien niemals
wieder auf. Schließen Sie Batterien/Akkus nicht
kurz und/oder öffnen Sie diese nicht. Überhit-
zung, Brandgefahr oder Platzen können die
Folge sein.
Werfen Sie Batterien/Akkus niemals in Feuer
oder Wasser.
Setzen Sie Batterien/Akkus keiner mechanischen
Belastung aus.
Risiko des Auslaufens von Batterien/Akkus
Vermeiden Sie extreme Bedingungen und Tem-
peraturen, die auf Batterien/Akkus einwirken
können z. B. auf Heizkörpern/direkte Sonnen-
einstrahlung.
Wenn Batterien/Akkus ausgelaufen sind, ver-
meiden Sie den Kontakt von Haut, Augen und
Schleimhäuten mit den Chemikalien! Spülen
Sie die betroffenen Stellen sofort mit klarem
Wasser und suchen Sie einen Arzt auf!
SCHUTZHANDSCHUHE
TRAGEN!
Ausgelaufene oder beschädigte Batterien/
Akkus können bei Berührung mit der Haut Ver-
ätzungen verursachen. Tragen Sie deshalb in
diesem Fall geeignete Schutzhandschuhe.
Im Falle eines Auslaufens der Batterien/Akkus
entfernen Sie diese sofort aus dem Produkt, um
Beschädigungen zu vermeiden.
Verwenden Sie nur Batterien/Akkus des gleichen
Typs. Mischen Sie nicht alte Batterien/Akkus
mit neuen!
Entfernen Sie die Batterien/Akkus, wenn das
Produkt längere Zeit nicht verwendet wird.
Risiko der Beschädigung des Produkts
Verwenden Sie ausschließlich den angegebenen
Batterietyp/Akkutyp!
Setzen Sie Batterien/Akkus gemäß der Polaritäts-
kennzeichnung (+) und (-) an Batterie/Akku und
des Produkts ein.
Reinigen Sie Kontakte an Batterie/Akku und im
Batteriefach vor dem Einlegen mit einem troc
kenen,
fusselfreien Tuch oder Wattestäbchen!
Entfernen Sie erschöpfte Batterien/Akkus
umgehend aus dem Produkt.
10 DE/AT/CH
Inbetriebnahme/Wartung und Reinigung/Entsorgung
Vorbereitung
Benötigtes Werkzeug
und Material
Die genannten Werkzeuge und Materialien sind nicht
im Lieferumfang enthalten. Es handelt sich hierbei
um unverbindliche Angaben und Werte zur Orien-
tierung. Die Beschaffenheit des Materials richtet sich
nach den individuellen Gegebenheiten vor Ort.
- Bleistift/Markierwerkzeug
- 2-poliger Spannungsprüfer
- Schraubendreher
- Bohrmaschine
- Bohrer (ca. Ø 6 mm)
- Seitenschneider
- Leiter
- Hammer
Vor der Installation
Wichtig: Der elektrische Anschluss muss durch
einen ausgebildeten Elektriker oder eine für Elektro-
installationen eingewiesene Person erfolgen.
Diese muss Kenntnis über die Eigenschaften der
Leuchte und Anschlussbestimmungen haben.
Machen Sie sich vor der Installation mit allen
Anweisungen und Abbildungen in dieser An-
leitung sowie mit der Leuchte selbst vertraut.
Stellen Sie vor der Installation sicher, dass an
der Leitung, an der die Leuchte angeschlossen
werden soll, keine Spannung vorliegt. Entfernen
Sie hierfür die Sicherung oder schalten Sie den
Leitungsschutzschalter im Sicherungskasten aus
(0-Stellung).
Überprüfen Sie die Spannungsfreiheit mittels
2-poligem Spannungsprüfer.
Inbetriebnahme
Leuchte montieren
Lösen Sie die Bodenplatte
1
durch Drehen ge-
gen den Uhrzeigersinn vom Leuchtenschirm
5
.
Lösen Sie die beiden schraublosen Klemmen
6
und den Sicherungshaken
7
aus der Boden-
platte
1
.
Halten Sie die Bodenplatte
1
gegen die Decke
und markieren Sie die Bohrlöcher mit Hilfe der in
der Bodenplatte
1
für die Schrauben
2
vor-
gesehenen Löcher.
Bohren Sie die Löcher (Ø 6 mm, ca. 40 mm tief).
Stellen Sie sicher, dass Sie die Zuleitung nicht
beschädigen.
Stecken Sie die Dübel
3
in die Bohrlöcher.
Nehmen Sie, falls notwendig, einen Hammer
zur Hilfe.
Führen Sie das Netzanschlusskabel (extern)
9
durch die mittlere Öffnung der Bodenplatte
1
(siehe Abb. A).
Hinweis: Achten Sie darauf, dass Sie das
Netzanschlusskabel nicht zu weit durch die
Öffnung schieben, da sonst die Bodenplatte
1
nicht mehr auf den Leuchtenschirm
5
passt.
Befestigen Sie die Bodenplatte
1
mittels der
Schrauben an der Decke (siehe Abb. A).
Ziehen Sie die Schutzschläuche
4
über die
Kabel L und N des Netzanschlusskabels (extern)
9
. Achten Sie darauf, dass Sie die einzelnen
Leiter des Netzanschlusskabels (extern)
9
je-
weils richtig anschließen: stromführende Leiter,
schwarz oder braun = Symbol L, Neutralleiter,
blau = Symbol N.
Hinweis: Diese Leuchte hat Schutzklasse
,
der Schutzleiter wird nicht angschlossen.
Setzen Sie nun die schraublosen Klemmen
6
und den Sicherheitshaken
7
an den dafür vor-
gesehenen Stellen in der Bodenplatte
1
ein
(siehe Abb. B–D).
Befestigen Sie nun den Leuchtenschirm
5
durch
Drehen im Uhrzeigersinn an der Bodenplatte
1
(siehe Abb. E).
Hinweis: Die Pfeile auf der Bodenplatte
1
und
auf dem Leuchtenschirm
5
müssen einander
gegenüber liegen (siehe Abb. H).
Setzen Sie die Sicherung wieder ein oder
schalten Sie den Leitungsschutzschalter am
Sicherungskasten ein (I-Stellung).
Vorbereitung/Vor der Installation/Inbetriebnahme
11 DE/AT/CH
Inbetriebnahme/Wartung und Reinigung/Entsorgung
Batterie einsetzen/
auswechseln (Fernbedienung)
(siehe Abb. G)
Hinweis: Ziehen Sie vor dem ersten Gebrauch den
Isolierstreifen
12
aus dem Batteriefach
11
.
Wenn die Reichweite der Fernbedienung
10
nach-
lässt, müssen Sie die Batterie
13
auswechseln.
Drücken Sie den Entriegelungshebel nach innen
und ziehen Sie das Batteriefach
11
heraus.
Entnehmen Sie ggf. die verbrauchte Batterie
13
.
Setzen Sie eine neue Batterie
13
in das Batterie-
fach
11
ein. Verwenden Sie nur Batterien
13
wie
im Kapitel „Technische Daten“ beschrieben.
Hinweis: Achten Sie dabei auf die korrekte
Polarität. Diese wird auf der Fernbedienung
10
angezeigt.
Schieben Sie das Batteriefach
11
wieder in
die Fernbedienung
10
.
Leuchteffekte mit Hilfe der
Fernbedienung steuern
Hinweis: Der Sender der Fernbedienung
10
befindet
sich auf der entgegengesetzten Seite des Batterie-
fachs
11
. Sorgen Sie dafür, dass sich zwischen
Sender und Empfänger keine Hindernisse befinden.
ON/OFF = Leuchte EIN-/AUS schalten
Leuchtmittel = Warmweiß/Neutralweiß/
Kaltweiß
Sonne = Warmweiß
Schneeflocke = Kaltweiß
Sonne nicht
ausgefüllt = Helligkeit reduzieren
Sonne
ausgefüllt = Helligkeit erhöhen
10 % = Lichtstärke 10 %
50 % = Lichtstärke 50 %
100 % = Lichtstärke 100 %
Mond = Nachtlichtfunktion
30 min
30 Min = Timerfunktion (30 Min.)
D1
D1 = Speicherplatz für individuelle
Farbprogramme
Hinweis: Um das Farbprogramm auf der Taste D1
zu speichern, gehen Sie wie folgt vor:
Stellen Sie die Leuchte wie gewünscht ein.
Halten Sie die Taste D1 gedrückt.
Hinweis: Wenn der Speichervorgang ab-
geschlossen ist, blinkt die Leuchte einmal auf.
Wartung und Reinigung
STROMSCHLAGGEFAHR!
Trennen Sie zur Reinigung die Leuchte zuerst vom
Stromnetz. Entfernen Sie hierfür die Sicherung oder
schalten Sie den Leitungsschutzschalter im Siche-
rungskasten aus (0-Stellung).
STROMSCHLAGGEFAHR!
Aus Gründen der elektrischen Sicherheit darf die
Leuchte niemals mit Wasser oder anderen Flüssig-
keiten gereinigt oder gar in Wasser getaucht werden.
VORSICHT! VERBRENNUNGSGEFAHR
DURCH HEISSE OBERFLÄCHEN!
Lassen Sie die Leuchte vollständig abkühlen.
Benutzen Sie keine Lösungsmittel, Benzin o. Ä.
Die Leuchte würde hierbei Schaden nehmen.
Verwenden Sie zur Reinigung nur ein trockenes,
fusselfreies Tuch.
Setzen Sie die Sicherung wieder ein oder
schalten Sie den Leitungsschutzschalter am
Sicherungskasten ein (I-Stellung).
Entsorgung
Die Verpackung besteht aus umweltfreundlichen
Materialien, die Sie über die örtlichen Recycling-
stellen entsorgen können.
b
a
Beachten Sie die Kennzeichnung der
Verpackungsmaterialien bei der Abfall -
trennung, diese sind gekennzeichnet mit
Vorbereitung/Vor der Installation/Inbetriebnahme
12 DE/AT/CH
Entsorgung/Garantie und Service
Abkürzungen (a) und Nummern (b) mit
folgender Bedeutung: 1–7: Kunststoffe/
20–22: Papier und Pappe/80–98: Ver-
bundstoffe.
Das Produkt und die Verpackungsmateri-
alien sind recycelbar, entsorgen Sie diese
getrennt für eine bessere Abfallbehandlung.
Das Triman-Logo gilt nur für Frankreich.
Werfen Sie Ihr Produkt, wenn es ausge -
dient hat, im Interesse des Umweltschut-
zes nicht in den Hausmüll, sondern führen
Sie es einer fachgerechten Entsorgung
zu. Über Sammelstellen und deren Öff-
nungszeiten können Sie sich bei Ihrer
zuständigen Verwaltung informieren.
Defekte oder verbrauchte Batterien/Akkus müssen
gemäß Richtlinie 2006/66/EG und deren Ände-
rungen recycelt werden. Geben Sie Batterien/Akkus
und/oder das Produkt über die angebotenen Sam-
meleinrichtungen zurück.
Umweltschäden durch falsche
Entsorgung der Batterien/Akkus!
Batterien/Akkus dürfen nicht über den Hausmüll
entsorgt werden. Sie können giftige Schwermetalle
enthalten und unterliegen der Sondermüllbehand-
lung. Die chemischen Symbole der Schwermetalle
sind wie folgt: Cd = Cadmium, Hg = Quecksilber,
Pb = Blei. Geben Sie deshalb verbrauchte Batterien/
Akkus bei einer kommunalen Sammelstelle ab.
Garantie und Service
Garantie
Sie erhalten zum Zeitpunkt des Kaufs auf dieses
Gerät 36 Monate Garantie. Das Gerät wurde sorg-
fältig produziert und einer genauen Qualitätskontrolle
unterzogen. Innerhalb der Garantiezeit beheben
wir kostenlos alle Material- oder Herstellerfehler.
Sollten sich dennoch während der Garantiezeit
Mängel herausstellen, senden Sie das Gerät bitte
an die aufgeführte Service-Adresse unter Angabe
folgender Modellnummer: 14163606L/14163605L/
14163706L.
Von der Garantie ausgeschlossen sind Schäden
durch nicht sachgemäße Handhabung, Nichtbe-
achtung der Bedienungsanleitung oder Eingriff durch
nicht autorisierte Personen sowie Verschleißteile (wie
z. B. Leuchtmittel). Durch die Garantieleistung wird
die Garantiezeit weder verlängert noch erneuert.
Serviceadresse
Briloner Leuchten GmbH & Co. KG
Im Kissen 2
59929 Brilon
DEUTSCHLAND
Tel.: +49 29 61/97 12–800
Fax: +49 29 61/97 12–199
E-Mail: kundenservice@briloner.com
www.briloner.com
Kostenlose Servicenummer:
Tel.: 00800/27456637
IAN 411276_2110
Bitte halten Sie für alle Anfragen den Kassenbon
und die Artikelnummer (IAN 411276_2110) als
Nachweis für den Kauf bereit.
Konformitätserklärung
Dieses Produkt erfüllt die Anforderungen der gel-
tenden europäischen und nationalen Richtlinien.
Die Konformität wurde nachgewiesen. Entsprechende
Erklärungen und Unterlagen sind beim Hersteller
hinterlegt.
Hersteller
Briloner Leuchten GmbH & Co. KG
Im Kissen 2
59929 Brilon
DEUTSCHLAND
Table of contents
13 GB/IE
Entsorgung/Garantie und Service Table of contents
List of pictograms used ........................................................................................................ Page 14
Introduction ................................................................................................................................... Page 15
Intended use ........................................................................................................................................ Page 15
Scope of delivery ................................................................................................................................Page 15
Parts description ..................................................................................................................................Page 15
Technical data ..................................................................................................................................... Page 15
Safety .................................................................................................................................................Page 16
Safety information ............................................................................................................................... Page 16
Safety instructions for batteries/rechargeable batteries ...................................................................Page 17
Preparation ...................................................................................................................................Page 17
Required tools and material ...............................................................................................................Page 17
Prior to installation .................................................................................................................Page 18
Initial use .........................................................................................................................................Page 18
Mounting the light ............................................................................................................................... Page 18
Inserting/replacing batteries (remote control) ..................................................................................Page 18
Controlling light effects with the remote control ................................................................................ Page 18
Maintenance and cleaning ............................................................................................... Page 19
Disposal ............................................................................................................................................Page 19
Warranty and service ...........................................................................................................Page 20
Warranty declaration .........................................................................................................................Page 20
Service address ................................................................................................................................... Page 20
Declaration of conformity ...................................................................................................................Page 20
Manufacturer .......................................................................................................................................Page 20
15 GB/IE
List of pictograms used Introduction
LED ceiling light
Introduction
Congratulations on your new product.
You have selected a high quality product.
Please be sure to carefully read the com-
plete operating instructions. Fold out the page with
the illustrations. These instructions are part of the
product and contain important information on setup
and handling. Always follow all safety instructions.
Before using this product for the first time verify the
correct voltage and that all parts are properly installed.
Should you have any questions or you are unsure
about operating the product, please contact the
dealer or service centre. Please keep these instructions
in a safe place and pass them on third parties as
applicable.
Intended use
This light is only suitable for indoor use,
in dry and enclosed rooms.
This product is intended for private household use
only. This product is intended for normal operation.
Scope of delivery
Check immediately after unpacking that the parts are
complete and that the product is in proper condition.
1 LED ceiling light (14163606L/14163605L/
14163706L)
 Remote control
3 Wall plugs
3 Screws
2 Protective tubes
1 Battery CR2025 (Lithium)
1 Set of assembly instructions and instructions for use
Parts description
1
Base plate
2
Screw
3
Wall plug
4
Protective tube
5
Lampshade
6
Screwless clamp
7
Locking hook
8
Eye
9
Mains connection cable (external)
10
Remote control
11
Battery compartment
12
Insulating strip
13
Battery (3 V CR2025)
Technical data
Light:
Model no.: 14163606L/14163605L/
14163706L
Operating voltage: 230–240 V∼, 50 Hz
Rated power: max. 22 W
Protection class: II/
Protection type: IP20
LED-Modul:
Illuminant: LED-Modul
Rated power: 22 W
Remote control:
Battery: 1 x 3 V CR2025
This product contains an illuminant from energy
efficiency category ”E”.
16 GB/IE
Safety
Safety
Safety information
Damage due to failure to comply with these operating
instructions will invalidate the guarantee! We assume
no liability for consequential damage! We assume
no liability for material damage or personal injury
due to improper handling or failure to comply with
the safety instructions!
DANGER TO
LIFE AND RISK OF ACCIDENTS
FOR INFANTS AND CHILDREN!
Never leave children unsupervised with the
packaging materials. The packaging material
poses a suffocation hazard. Children frequently
underestimate the dangers.
Do not leave the light or packaging material ly-
ing unattended. Plastic film or bags, Styrofoam
etc. can turn into dangerous toys for children.
Please always keep the product out of the reach
of children.
This device may be used by children aged
8 years and up, as well as by persons with re-
duced physical, sensory or mental capacities,
or lacking experience and/or knowledge, so
long as they are supervised or instructed in
the safe use of the device and understand the
associated risks. Do not allow children to play
with the device. Cleaning and user maintenance
must not be performed by children without
supervision.
Avoid the risk of fatal injury
from electric shock
Ensure that a qualified electrician, or a person
trained to carry out electrical installations, per-
forms the electrical installation.
Always check the light, power supply, and mains
cable for damage before plugging it in. Never
use the light if it shows any signs of damage.
A damaged mains cable indicates a life-threat-
ening danger due to electric shock. In the event
of damage, repairs or other problems with the
light please contact the service centre or a
qualified electrician.
Prior to installation, remove the fuse or switch
off the circuit breaker (0 setting) in the fuse box.
Prior to installation, verify that the mains voltage
on site corresponds with the operating voltage
required for the light (see “Technical data“).
Ensure that the light does not come into contact
with water or other liquids under any circum-
stances.
Never open any of the components of the elec-
trical equipment or insert any objects into the
same components. This will pose a risk of fatal
injury from electric shock.
Do not install the light on a wet or conductive
substrate!
Prevent fire and
injury hazards
Check the light for damage immediately after
unpacking. In this case, contact the service centre
for a replacement.
CAUTION! RISK OF BURNS
DUE TO HOT SURFACES!
Ensure that the light has been switched off and
has cooled before touching it, to avoid burn in-
juries. Lamps develop a lot of heat in the area
of the lamp head.
The light source in this product is not replaceable.
The entire light must be replaced if the light
source reaches the end of its service life.
This lamp is not suitable for external
dimmer and electronic switches.
Do not look directly into the light source
(light bulb, LED etc.).
Do not use optical instruments to look at the
light source (e.g. magnifying glass).
Safe working
Mount the light so that it is protected from
moisture and dirt.
Carefully prepare the installation and allow
sufficient time. Organise all parts and any
Safety/Preparation
17 GB/IE
Safety Safety/Preparation
necessary additional tools or materials before
starting so they are easy to reach.
Always be attentive when working! Always pay
attention to what you are doing and act with
common sense. Never install the light if you are
having difficulty concentrating or do not feel well.
Safety instructions for
batteries/rechargeable
batteries
KEEP BATTERIES OUT OF THE
REACH OF CHILDREN!
Swallowing batteries can cause chemical burns,
perforation of soft tissue, and death. Severe
burns may occur within 2 hours of swallowing
batteries. Seek immediate medical attention.
DANGER TO LIFE!
Keep batteries/rechargeable batteries out of
reach of children. If accidentally swallowed seek
immediate medical attention.
Swallowing may lead to burns, perforation of
soft tissue, and death. Severe burns can occur
within 2 hours of ingestion.
DANGER OF EXPLOSION!
Never recharge non-rechargeable batteries. Do
not short-circuit batteries/rechargeable batteries
a
nd/or open them. Overheating, fire or burstin
g
can be the result.
Never throw batteries/rechargeable batteries
into fire or water.
Do not exert mechanical loads to batteries/
rechargeable batteries.
Risk of leakage of batteries/rechargeable
batteries
Avoid extreme environmental conditions and
temperatures, which could affect batteries/
rechargeable batteries, e.g. radiators/direct
sunlight.
If batteries/rechargeable batteries have leaked,
avoid contact with skin, eyes and mucous mem-
branes with the chemicals! Flush immediately
the affected areas with fresh water and seek
medical attention!
WEAR PROTECTIVE GLOVES!
Leaked or damaged batteries/rechargeable
batteries can cause burns on contact with the
skin. Wear suitable protective gloves at all times
if such an event occurs.
In the event of a leakage of batteries/recharge-
able batteries, immediately remove them from
the product to prevent damage.
Only use the same type of batteries/recharge-
able batteries. Do not mix used and new batter-
ies/rechargeable batteries.
Remove batteries/rechargeable batteries if the
product will not be used for a longer period.
Risk of damage of the product
Only use the specified type of battery/recharge-
able battery!
Insert batteries/rechargeable batteries accord-
ing to polarity marks (+) and (-) on the battery/
rechargeable battery and the product.
Use a dry lint-free cloth or cotton swab to clean
the contacts on the battery/rechargeable battery
and in the battery compartment before inserting!
Remove exhausted batteries/rechargeable
batteries from the product immediately.
Preparation
Required tools and material
The tools and materials specified are not included.
This information and these values are non-binding
and are only provided as a reference. The nature
of the material is determined by the individual local
conditions.
- Pencil/making tool
- 2-pole voltage tester
- Screwdriver
- Electric drill
- Drill bit (approx. Ø 6 mm)
- Side cutting pliers
- Ladder
- Hammer
18 GB/IE
Initial use/Maintenance and cleaning/DisposalPrior to installation/Initial use
Prior to installation
Important: The electrical connection must be
established by a qualified electrician or a person
trained to perform electrical installations.
This person must be familiar with the properties of
the light and the connection regulations.
Familiarise yourself with all the instructions and
diagrams in this manual, as well as with the
light itself, before you install it.
Before installation ensure that the circuit, to which
the light will be connected, is not energised. To
do so, remove the fuse or switch off the circuit
breaker in the fuse box (0 position).
Use a 2-pole voltage tester to verify cables are
not live.
Initial use
Mounting the light
Remove the base plate
1
from the lampshade
5
by turning it anticlockwise.
Remove both screwless clamps
6
and the
locking hooks
7
from the base plate
1
.
Hold the base plate
1
against the ceiling and
mark the drill holes using the holes in the base
plate
1
intended for the screws
2
.
Drill the holes (Ø 6 mm, approx 40 mm deep).
Be sure not to damage the power cable.
Insert the wall plugs
3
into the drilled holes.
If necessary, tap in with a hammer.
Feed the mains connection cable (external)
9
through the opening in the centre of the base
plate
1
(see Fig. A).
Note: Make sure that you do not push the
mains connection cable too far through the
opening, as the base plate
1
will then no
longer fit on the lampshade
5
.
Attach the base plate
1
to the ceiling using
the screws (see Fig. A).
Pull the protective tubes
4
over cables L and N
of the mains connection cable (external)
9
. Be
sure to correctly connect the individual conduc-
tors of the mains connection cable (external)
9
:
live conductor, black or brown = symbol L,
neutral conductor, blue = symbol N.
Note: This light has protection class
; the
earth wire should not be connected.
Now insert the screwless clamps
6
and the
locking hooks
7
into their intended positions
on the base plate
1
(see Fig. B–D).
Now attach the lampshade
5
by screwing it
clockwise onto the base plate
1
(see Fig. E).
Note: The arrows on the base plate
1
and
on the lampshade
5
must be opposite one
another (see Fig. H).
Replace the fuse or switch on the circuit breaker
(I setting) in the fuse box.
Inserting/replacing batteries
(remote control) (see Fig. G)
Note: Before first use, pull the insulating strip
12
out
of the battery compartment
11
.
If the range of the remote control
10
reduces, the
battery
13
needs to be replaced.
Push in the release lever and pull out the battery
compartment
11
.
If necessary, remove the old battery
13
.
Insert a new battery
13
in the battery compart-
ment
11
. Only use batteries
13
specified in
the chapter “Technical data”.
Note: Be sure to insert the batteries with the
correct polarity. This is indicated on the remote
control
10
.
Slide the battery compartment
11
back into the
remote control
10
.
Controlling light effects with
the remote control
Note: The transmitter for the remote control
10
is
located on the opposite side of the battery compart-
ment
11
. Ensure there are no obstacles between the
transmitter and the receiver.
ON/OFF = Switch light ON/OFF
Illuminant = Cold white/neutral white/
warm white
19 GB/IE
Initial use/Maintenance and cleaning/Disposal
Sun = Warm white
Snowflake = Cold white
Sun, not filled in = Reduce brightness
Sun, filled in = Increase brightness
10 % = Light intensity 10 %
50 % = Light intensity 50 %
100 % = Light intensity 100 %
Moon = Nightlight function
30 min
30 Min = Timer function (30 min.)
D1
D1 = Memory slot for custom
colour programme
Note: To save the colour programme on the
button D1, proceed as follows:
Configure the lamp to your preferences.
Press and hold the D1 button.
Note: The lamp will flash once when
programming is complete.
Maintenance and cleaning
RISK OF ELECTRIC SHOCK!
Disconnect the light from the mains circuit before
cleaning. To do so, remove the fuse or switch off
the circuit breaker in the fuse box (0 position).
RISK OF ELECTRIC SHOCK!
For electrical safety, never clean the light with water
or other fluids, or immerse it in water.
CAUTION! RISK OF BURNS DUE TO
HOT SURFACES!
Allow the lamp to cool down completely.
Do not use solvents, petrol, etc. Otherwise the
lamp will be damaged.
Only clean with a dry, lint-free cloth.
Replace the fuse or switch on the circuit breaker
(Position I) inside the fuse box.
Disposal
The packaging is made entirely of recyclable mate-
rials, which you may dispose of at local recycling
facilities.
b
a
Observe the marking of the packaging
materials for waste separation, which
are marked with abbreviations (a) and
numbers (b) with following meaning:
1–7: plastics/20–22: paper and fibre-
board/80–98: composite materials.
The product and packaging materials are
recyclable, dispose of it separately for
better waste treatment. The Triman logo
is valid in France only.
To help protect the environment, please
dispose of the product properly when it
has reached the end of its useful life and
not in the household waste. Information
on collection points and their opening
hours can be obtained from your local
authority.
Faulty or used batteries/rechargeable batteries
must be recycled in accordance with Directive
2006/66/EC and its amendments. Please return
the batteries/rechargeable batteries and/or the
product to the available collection points.
Environmental damage through
incorrect disposal of the batter-
ies/rechargeable batteries!
Batteries/rechargeable batteries may not be dis-
posed of with the usual domestic waste. They may
contain toxic heavy metals and are subject to haz-
ardous waste treatment rules and regulations. The
chemical symbols for heavy metals are as follows:
Cd = cadmium, Hg = mercury, Pb = lead. That is why
you should dispose of used batteries/rechargeable
batteries at a local collection point.
Prior to installation/Initial use
21 FR/BE
Warranty and service Table des matières
Légende des pictogrammes utilisés .......................................................................... Page 22
Introduction ................................................................................................................................... Page 23
Utilisation conforme ............................................................................................................................Page 23
Contenu de la livraison .......................................................................................................................Page 23
Descriptif des pièces ...........................................................................................................................Page 23
Caractéristiques techniques ................................................................................................................Page 23
Sécurité .............................................................................................................................................Page 24
Indications de sécurité ........................................................................................................................Page 24
Consignes de sécurité relatives aux piles/aux piles rechargeables ................................................Page 25
Préparation ...................................................................................................................................Page 26
Outils et matériel nécessaires ............................................................................................................. Page 26
Avant l‘installation ..................................................................................................................Page 26
Mise en service ...........................................................................................................................Page 26
Montage de la lampe .........................................................................................................................Page 26
Mettre en place/remplacer la pile (télécommande) ........................................................................Page 26
Contrôler les effets de lumière avec la télécommande .....................................................................Page 27
Entretien et nettoyage..........................................................................................................Page 27
Mise au rebut ............................................................................................................................... Page 27
Garantie et service après-vente ..................................................................................Page 28
Garantie ..............................................................................................................................................Page 28
Adresse du service après-vente .......................................................................................................... Page 29
Déclaration de conformité .................................................................................................................. Page 29
Fabricant ..............................................................................................................................................Page 29
22 FR/BE
Légende des pictogrammes utilisés
Lire le mode d‘emploi ! Durée de vie des LED en heures
Cette lampe est exclusivement conçue
pour un usage intérieur, dans des
locaux secs et fermés.
Avertissement ! Risque d‘electrocution !
Danger de mort et d'accident pour les
enfants en bas âge et les enfants !
Attention ! Risque de brûlures du fait
des surfaces brûlantes !
Tension alternative
(type de courant et de tension)
Cette lampe n'est pas adaptée aux
variateurs externes et aux interrupteurs
électroniques.
Hertz (fréquence) Risque d’explosion!
Watt (puissance active) Porter des gants de protection!
Volt Conduite à tenir
Classe de protection II
b
a
Mettez l’emballage et l’appareil
au rebut dans le respect de
l'environnement !
Respectez les avertissements et les
consignes de sécurité !
Pollution de l’environnement par la
mise au rebut incorrecte des piles/
piles rechargeables !
LED LED
La source lumineuse de ce produit n’est
pas remplaçable.
L'emballage est exclusivement
composé de papier recyclé.
Ra
Indice de restitution des couleurs
Ce luminaire est pourvu de l'indice de
pr
otection «IP 20» et est exclusiveme
nt
conçu pour un usage domestique en
intérieur.
Lumen Température de lumière en Kelvin
20
PAP
Carton ondulé
04
LDPE
Polyéthylène (faible densité)
À conserver hors de portée des enfants !
Introduction
23 FR/BE
Légende des pictogrammes utilisés Introduction
Plafonnier à LED
Introduction
Félicitations pour l‘achat de votre nouvel
appareil. Vous avez opté pour un produit
de grande qualité. Veuillez lire ce mode
d‘emploi intégralement et attentivement. Ouvrez la
page contenant les illustrations. Le présent mode
d‘emploi fait partie de ce produit et contient des
instructions essentielles pour sa mise en service et sa
manipulation. Respectez toujours toutes les consignes
de sécurité. Avant la mise en service, vérifiez si la
tension est correcte et si toutes les pièces sont cor-
rectement montées. Si vous avez des questions ou
des doutes concernant la manipulation de l‘appareil,
veuillez contacter votre revendeur ou le service
après-vente. Veuillez conserver soigneusement ce
mode d‘emploi et remettez-le aux autres utilisateurs.
Utilisation conforme
Cette lampe est exclusivement conçue
pour un usage intérieur, dans des locaux
secs et fermés.
Ce produit est uniquement destiné à un usage domes-
tique et privé. Ce produit est prévu pour un fonction-
nement normal.
Contenu de la livraison
Contrôlez toujours immédiatement après le débal-
lage du produit que le contenu de la livraison est
complet et que l’appareil se trouve en parfait état.
1 plafonnier à LED (14163606L/14163605L/
14163706L)
1 télécommande
3 chevilles
3 vis
2 gaines de protection
1 pile CR2025 (Lithium)
1 notice de montage et d‘utilisation
Descriptif des pièces
1
Plaque de fond
2
Vis
3
Cheville
4
Gaine de protection
5
Abat-jour
6
Borne sans vis
7
Crochet de sécurité
8
Œillet
9
Câble d’alimentation électrique (externe)
10
Télécommande
11
Compartiment à pile
12
Bande isolante
13
Pile (3 V CR2025)
Caractéristiques techniques
Luminaire :
Numéro de modèle : 14163606L/14163605L/
14163706L
Tension de service: 230–240 V∼, 50 Hz
Puissance nominale: max. 22W
Classe de protection: II/
Indice de protection: IP20
Module LED:
Ampoule: module LED
Puissance nominale: 22W
Télécommande:
Pile : 1 x 3 V CR2025
Ce produit contient une source lumineuse présentant
la classe d’efficacité énergétique «E».
24 FR/BE
Sécurité
Sécurité
Indications de sécurité
Les droits de recours en garantie sont annulés en cas
de dommages résultant du non-respect du présent
mode d’emploi ! Le fabricant décline toute respon-
sabilité pour les dommages indirects ! De même, toute
responsabilité est déclinée pour les dommages matériels
ou corporels causés par une manipulation incorrecte
ou par le non-respect des consignes de sécurité !
DANGER DE MORT ET RISQUE
D‘ACCIDENT POUR LES EN-
FANTS EN BAS ÂGE ET LES ENFANTS !
Ne laissez jamais les enfants manipuler sans
surveillance les matériaux d’emballage. Il existe
un risque d’étouffement avec les matériaux
d’emballage. Les enfants sous-estiment souvent
les dangers.
Ne laissez pas le luminaire ou le matériel
d’emballage sans surveillance. Les films et les
sachets en plastique, les éléments en plastique,
etc. peuvent devenir des jouets dangereux dans
les mains des enfants. Tenez toujours les enfants
à distance du produit.
Cet appareil peut être utilisé par des enfants
de 8 ans et plus, ainsi que par des personnes
avec des capacités physiques, psychiques ou
sensorielles réduites ou manquant d’expérience
ou de connaissance s’ils sont surveillés ou s’ils
ont été informés de l’utilisation de l’appareil de
manière sûre et comprennent les risques liés à
son utilisation. Les enfants ne doivent pas jouer
avec l’appareil. Le nettoyage et l’entretien ne
doivent pas être effectués par des enfants lais-
sés sans surveillance.
Prévention de risques
mortels par électrocution
L‘installation électrique doit être effectuée par
un électricien ou par une personne dûment
formée à cet effet.
Avant chaque raccordement au secteur, contrôlez
le bon état de la lampe et du câble
d‘alimentation. N‘utilisez jamais la lampe si v
ous
constatez le moindre dommage.
Des câbles secteur endommagés impliquent un
danger de mort par électrocution. En cas d’en-
dommagements, de réparations ou d’autres
problèmes, veuillez contacter le S.A.V. ou un
électricien.
Avant le montage, retirez le fusible ou coupez
le disjoncteur de la boîte à fusibles (position 0).
Avant le montage, vérifiez que la tension secteur
corresponde à la tension de service requise de
la lampe (voir «Caractéristiques techniques»).
Évitez impérativement tout contact de la lampe
avec de l‘eau ou d‘autres liquides.
N‘ouvrez jamais les composants électriques,
et n‘insérez jamais d‘objets quelconques dans
ceux-ci. De telles interventions impliquent un
danger de mort par électrocution.
N‘installez jamais la lampe sur un support
humide ou conducteur de courant!
Prévention de risque
d‘incendies et de blessures
Vérifiez l‘état de la lampe immédiatement après
le déballage. Si vous constatez des dommages,
veuillez contacter le service après-vente pour pro-
céder au remplacement de la pièce défectueuse.
ATTENTION! RISQUE DE BRÛ-
LURES À CAUSE DES SURFACES
TRÈS CHAUDES !
Afin d‘éviter toute brûlure, vérifiez que la lampe
soit éteinte et suffisamment froide avant de la
manipuler. L‘ampoule dégage une forte chaleur
au niveau du logement de la lampe.
La source lumineuse de cet éclairage ne peut
pas pas être remplacée ; lorsque que la source
lumineuse arrive en fin de vie, l’ensemble de
l’éclairage doit être remplacé.
Cette lampe n‘est pas adaptée aux
variateurs externes et aux interrup-
teurs électroniques.
Ne jamais regarder directement la source
lumineuse (ampoule, LED etc.).
Ne pas regarder dans la source lumineuse avec
un instrument optique (par ex. loupe).
Sécurité
25 FR/BE
Sécurité Sécurité
Pour travailler en toute sécurité
Montez la lampe de telle sorte qu‘elle soit
protégée de l‘humidité et des salissures.
Soigneusement préparer le montage et l‘effectuer
sans précipitation. Préparez toutes les pièces
détachées et l‘outillage ou le matériel requis et
posez-les à portée de main.
Soyez toujours vigilant ! Faites toujours attention
à ce que vous faites et agissez raisonnablement.
N‘effectuez jamais le montage de la lampe si
vous
n‘êtes pas concentré ou si vous vous sentez mal.
Consignes de sécurité
relatives aux piles/aux
piles rechargeables
CONSERVER LES PILES HORS
DE PORTÉE DES ENFANTS!
L’ingestion des piles peut provoquer des brûlures
chimiques, une perforation du tissu mou et entraî-
ner la mort. Des brûlures graves peuvent survenir
dans les 2 heures suivant l’ingestion. Consulter
immédiatement un médecin.
DANGER DE MORT!
Rangez les piles/piles rechargeables hors de
la portée des enfants. En cas d’ingestion, consul-
tez immédiatement un médecin !
Une ingestion peut entraîner des brûlures, une
perforation des tissus mous et la mort. Des
brûlures graves peuvent apparaitre dans les
2 heures suivant l‘ingestion.
RISQUE D‘EXPLOSION !
Ne rechargez jamais des piles non rechargeabl
es.
Ne court-circuitez pas les piles/piles rechar-
geables et/ou ne les ouvrez pas ! Autrement,
vous risquez de provoquer une surchauffe, un
incendie ou une explosion.
Ne jetez jamais des piles/piles rechargeables
au feu ou dans l’eau.
Ne pas soumettre les piles/piles rechargeables
à une charge mécanique.
Risque de fuite des piles/piles
rechargeables
Évitez d’exposer les piles/piles rechargeables à
des conditions et températures extrêmes suscep-
tibles de les endommager, par ex. sur des radia-
teurs/exposition directe aux rayons du soleil.
Lorsque les piles/piles rechargeables fuient, évi-
tez tout contact du produit chimique avec la
peau, les yeux ou les muqueuses! Rincez les
zones touchées à l‘eau claire et consultez im-
médiatement un médecin !
PORTER DES GANTS
DE PROTECTION!
Les piles/piles rechargeables endommagées
ou sujettes à des fuites peuvent provoquer des
brûlures au contact de la peau. Vous devez d
onc
porter des gants adéquats pour les manipuler.
En cas de fuite des piles/piles rechargeables,
retirez-les aussitôt du produit pour éviter tout
endommagement.
U
tilisez uniquement des piles/piles recharge
ables
du même type. Ne mélangez pas des piles/piles
rechargeables usées et neuves !
Retirez les piles/piles rechargeables, si vous
ne comptez pas utiliser le produit pendant une
période prolongée.
Risque d‘endommagement du produit
Exclusivement utiliser le type de pile/pile
rechargeable spécifié.
Insérez les piles/piles rechargeables conformé-
ment à l‘indication de polarité (+) et (-) indiquée
sur la pile/pile rechargeable et sur le produit.
Avant l‘insertion de la pile, nettoyez les contacts
de la pile/de la pile rechargeable ainsi que
ceux présents dans le compartiment à piles en
vous servant d‘un chiffon sec et non pelucheux
ou d‘un coton-tige!
Retirez immédiatement les piles/piles rechar-
geables usées du produit.
26 FR/BE
Préparation/Avant l‘installation/Mise en service
Préparation
Outils et matériel nécessaires
Les outils et matériels indiqués ne sont pas compris
dans le contenu de la livraison. Il s‘agit là de données
et de valeurs indicatives vous permettant de vous
orienter. Les caractéristiques du matériel dépendent
des conditions spécifiques sur place.
- Crayon/outil marqueur
- Détecteur de tension à 2 pôles
- Tournevis
- Perceuse
- Foret (env. Ø 6 mm)
- Pince coupante diagonale
- Escabeau
- Marteau
Avant l‘installation
Important : l‘installation électrique doit être
effectuée par un électricien ou par une personne
dûment formée à cet effet.
Celle-ci doit connaître les caractéristiques des lampes
et des conditions de raccordement.
Avant l‘installation, familiarisez-vous avec l‘en-
semble des instructions et des illustrations du pré-
sent mode d‘emploi et avec la lampe elle-même.
Avant l‘installation, vérifiez l‘absence de tension
au niveau du câble auquel doit être raccordé la
lampe. Pour ce faire, retirez le fusible ou coupez
le disjoncteur de la boîte à fusible (position 0).
Vérifiez l‘absence de tension à l‘aide d‘un
détecteur de tension à 2 pôles.
Mise en service
Montage de la lampe
Détachez la plaque de fond
1
de l’abat-jour
5
en tournant dans le sens anti-horaire.
Détachez les deux bornes sans vis
6
et le cro-
chet de sécurité
7
de la plaque de fond
1
.
Maintenez la plaque de fond
1
au plafond,
et marquez les trous de perçage à l’aide des
trous prévus pour les vis
2
sur la plaque de
fond
1
.
Percez les trous (Ø 6 mm, env. 40 mm de profon-
deur). Assurez-vous de ne pas endommager la
ligne d’alimentation.
Enfoncez les chevilles
3
dans les trous de per-
çage. Au besoin, aidez-vous d’un marteau.
Introduisez le câble d’alimentation électrique
(externe)
9
dans l’ouverture centrale de la
plaque de fond
1
(voir Fig. A).
Remarque : Veillez à ne pas glisser trop loin l
e
câble d’alimentation électrique dans l’ouverture,
car sinon la plaque de fond
1
ne s’ajusterait
plus sur l’abat-jour
5
.
Fixez la plaque de fond
1
au plafond à l’aide
des vis (voir Fig. A).
Glis
sez les gaines de protection
4
sur les câb
les
L et N du câble d’alimentation électrique (ext
erne)
9
. Veillez à ce que les fils du câble d’alimen-
tation électrique (externe)
9
aient leur raccord
respectif: fil conducteur, noir ou brun = symb
ole L,
fil neutre, bleu = symbole N.
Remarque : Ce luminaire est de classe de
protection
, le conducteur de protection n’est
pas raccordé.
Placez maintenant les bornes sans vis
6
et le
crochet de sécurité
7
au niveau des emplace-
ments prévus pour cela dans la plaque de fond
1
(voir Fig. B–D).
Fixez maintenant l’abat-jour
5
à la plaque
de fond
1
en le faisant tourner dans le sens
horaire (voir Fig. E).
Remarque: Les flèches sur la plaque de fond
1
et sur l’abat-jour
5
doivent être l’une en
face de l’autre (voir Fig. H).
Remettez le fusible en place ou enclenchez le
disjoncteur dans la boîte à fusibles (position I).
Mettre en place/remplacer la
pile (télécommande) (voir Fig. G
)
Remarque : Avant la première utilisation, retirez
la bande isolante
12
du compartiment à pile
11
.
Lorsque la portée de la télécommande
10
diminue,
vous devez changer la pile
13
.
Mise en service/Entretien et nettoyage/Mise au rebut
28 FR/BE
Garantie et service après-venteMise au rebut/Garantie et service après-vente
suivante : 1–7 : plastiques/20–22 :
papiers et cartons/80–98 : matériaux
composite.
Le produit et les matériaux d’emballage
sont recyclables, mettez-les au rebut sé-
parément pour un meilleur traitement des
déchets. Le logo Triman n’est valable qu
’en
France.
Afin de contribuer à la protection de l’en-
vironnement, veuillez ne pas jeter votre
p
roduit usagé dans les ordures ménagèr
es,
mais éliminez-le de manière appropriée.
Pour obtenir des renseignements concer-
nant les points de collecte et leurs horaires
d’ouverture, vous pouvez contacter votre
municipalité.
Les piles/piles rechargeables défectueuses ou
usagées doivent être recyclées conformément à la
directive 2006/66/CE et ses modifications. Les piles
et/ou piles rechargeables et/ou le produit doivent
être retournés dans les centres de collecte proposés.
Pollution de l’environnement
par la mise au rebut incorrecte
des piles/piles rechargeables !
Les piles/piles rechargeables ne doivent pas être
mises au rebut avec les ordures ménagères. Elles
peuvent contenir des métaux lourds toxiques et doivent
être considérées comme des déchets spéciaux. Les
symboles chimiques des métaux lourds sont les sui-
vants : Cd = cadmium, Hg = mercure, Pb = plomb.
Pour cette raison, veuillez toujours déposer les piles/
piles rechargeables usagées dans les conteneurs de
recyclage communaux.
Garantie et service après-vente
Garantie
Article L217-16 du Code de la consommation
Lorsque l‘acheteur demande au vendeur, pendant
le cours de la garantie commerciale qui lui a été
consentie lors de l‘acquisition ou de la réparation
d‘un bien meuble, une remise en état couverte par la
garantie, toute période d‘immobilisation d‘au moins
sept jours vient s‘ajouter à la durée de la garantie
qui restait à courir. Cette période court à compter
de la demande d‘intervention de l‘acheteur ou de
la mise à disposition pour réparation du bien en
cause, si cette mise à disposition est postérieure à
la demande d‘intervention.
Indépendamment de la garantie commerciale sous-
crite, le vendeur reste tenu des défauts de conformité
du bien et des vices rédhibitoires dans les conditions
prévues aux articles L217-4 à L217-13 du Code de
la consommation et aux articles 1641 à 1648 et
2232 du Code Civil.
Article L217-4 du Code de la consommation
Le vendeur livre un bien conforme au contrat et
répond des défauts de conformité existant lors de
la délivrance.
Il répond également des défauts de conformité ré-
sultant de l‘emballage, des instructions de montage
ou de l‘installation lorsque celle-ci a été mise à sa
charge par le contrat ou a été réalisée sous sa res-
ponsabilité.
Article L217-5 du Code de la consommation
Le bien est conforme au contrat :
S´il est propre à l‘usage habituellement attendu
d‘un bien semblable et, le cas échéant :
- s‘il correspond à la description donnée par le
vendeur et posséder les qualités que celui-ci a
présentées à l‘acheteur sous forme d‘échantil-
lon ou de modèle ;
- s‘il présente les qualités qu‘un acheteur peut lé-
gitimement attendre eu égard aux déclarations
publiques faites par le vendeur, par le produc-
teur ou par son représentant, notamment dans
la publicité ou l‘étiquetage ;
Ou s‘il présente les caractéristiques définies d‘un
commun accord par les parties ou être propre
à tout usage spécial recherché par l‘acheteur,
porté à la connaissance du vendeur et que ce
dernier a accepté.
29 FR/BE
Garantie et service après-vente
Article L217-12 du Code de la consommation
L‘action résultant du défaut de conformité se prescrit
par deux ans à compter de la délivrance du bien.
Article 1641 du Code civil
Le vendeur est tenu de la garantie à raison des
défauts cachés de la chose vendue qui la rendent
impropre à l‘usage auquel on la destine, ou qui
diminuent tellement cet usage que l‘acheteur ne
l‘aurait pas acquise, ou n‘en aurait donné qu‘un
moindre prix, s‘il les avait connus.
Article 1648 1er alinéa du Code civil
L‘action résultant des vices rédhibitoires doit être
intentée par l‘acquéreur dans un délai de deux ans
à compter de la découverte du vice.
Les pièces détachées indispensables à l’utilisation
du produit sont disponibles pendant la durée de la
garantie du produit.
Vous bénéficiez d’une garantie de 36 mois à partir
de la date d’achat de l’appareil. Cet appareil a été
fabriqué avec soin et soumis à un contrôle qualité
minutieux. Pendant la durée de la garantie, nous
réparons gratuitement tous les défauts de matériaux
ou de fabrication. Si toutefois vous constatez des
défauts pendant la période de garantie, veuillez
envoyer l‘appareil à l‘adresse S.A.V. indiquée en
mentionnant le numéro de modèle suivant:
14163606L/14163605L/14163706L.
La garantie exclut les dommages dus à une mani-
pulation incorrecte, au non-respect des instructions
du mode d’emploi ou à une intervention par une
personne non autorisée, ainsi que les pièces d’usure
(par ex, ampoule). La durée de garantie n’est aucu-
nement prolongée ou renouvelée par une prestation
de garantie.
Adresse du service après-vente
Briloner Leuchten GmbH & Co. KG
Im Kissen 2
59929 Brilon
ALLEMAGNE
Tél. : +49 29 61/97 12–800
Fax : +49 29 61/97 12–199
E-Mail : kundenservice@briloner.com
www.briloner.com
Numero de service gratuit :
Tél. : 00800/27456637
IAN 411276_2110
Veuillez conserver le ticket de caisse et la référence
de l’article (IAN 411276_2110) à titre de preuves
d’achat pour toute demande.
Déclaration de conformité
Ce produit remplit les critères des réglementations
européennes et nationales La conformité a été attes-
tée. Les déclarations et documents correspondants
sont en possession du fabricant.
Fabricant
Briloner Leuchten GmbH & Co. KG
Im Kissen 2
59929 Brilon
ALLEMAGNE
Mise au rebut/Garantie et service après-vente
31 NL/BE
Inhoudsopgave
Legenda van de gebruikte pictogrammen ..................................................... Pagina 32
Inleiding ....................................................................................................................................... Pagina 33
Correct gebruik ............................................................................................................................... Pagina 33
Omvang van de levering ................................................................................................................ Pagina 33
Beschrijving van de onderdelen ..................................................................................................... Pagina 33
Technische gegevens ...................................................................................................................... Pagina 33
Veiligheid .................................................................................................................................... Pagina 34
Veiligheidsinstructies ....................................................................................................................... Pagina 34
Veiligheidsinstructies voor batterijen/accu‘s ................................................................................. Pagina 35
Voorbereiding ........................................................................................................................ Pagina 35
Benodigd gereedschap en materiaal ............................................................................................ Pagina 35
Voor de installatie ............................................................................................................... Pagina 36
Ingebruikname ...................................................................................................................... Pagina 36
Lamp monteren ................................................................................................................................ Pagina 36
Batterij plaatsen/vervangen (afstandsbediening) ........................................................................ Pagina 36
Lichteffecten met behulp van de afstandsbediening aansturen ................................................... Pagina 37
Onderhoud en reiniging ................................................................................................. Pagina 37
Afvoer ............................................................................................................................................ Pagina 37
Garantie en service ............................................................................................................ Pagina 38
Garantie .......................................................................................................................................... Pagina 38
Serviceadres .................................................................................................................................... Pagina 38
Conformiteitsverklaring ................................................................................................................... Pagina 38
Fabrikant .......................................................................................................................................... Pagina 38
32 NL/BE
Legenda van de gebruikte pictogrammen
Lees de gebruiksaanwijzing! Led-levensduur in uren
Deze lamp is uitsluitend bedoeld
voor gebruik binnenshuis, in droge
en gesloten ruimten.
Waarschuwing! Gevaar voor
elektrische schokken!
Levensgevaar en kans op ongevallen
voor kleuters en kinderen!
Voorzichtig! Kans op brandwonden
door hete oppervlakken!
Wisselspanning
(stroom- en spanningstype)
Deze lamp is niet geschikt voor
externe dimmers en elektronische
schakelaars.
Hertz (frequentie) Explosiegevaar!
Watt (werkelijk vermogen) Veiligheidshandschoenen dragen!
Volt Zo handelt u correct
Beschermingsklasse II
b
a
Verpakking en apparaat op
milieuvriendelijke wijze afvoeren!
Waarschuwings- en veiligheidsinstructies
in acht nemen!
Milieuschade door foutieve verwijde-
ring van de batterijen/accu‘s!
LED LED
De lichtbron van dit product is niet
vervangbaar.
De verpakking bestaat uit 100 %
gerecycled papier.
Ra
Kleurweergave-index
Deze lamp bezit beschermingsklasse
'I
P20' en is uitsluitend bestemd voor g
e-
bruik binnenshuis in privé-huishoudens.
Lumen Lichttemperatuur in Kelvin
20
PAP
Golfkarton
04
LDPE
Polyethyleen (geringe dichtheid)
Buiten het bereik van kinderen bewaren!
Inleiding
33 NL/BE
Legenda van de gebruikte pictogrammen Inleiding
LED-plafondlamp
Inleiding
Hartelijk gefeliciteerd met de koop van
uw nieuwe product. U hebt voor een
hoogwaardig product gekozen. Lees deze
gebruiksaanwijzing volledig en zorgvuldig door.
Vouw de pagina met de afbeeldingen open. Deze
gebruiksaanwijzing hoort bij dit product en bevat
belangrijke aanwijzingen voor de ingebruikname
en de bediening. Neem altijd de veiligheidsinstruc-
ties in acht. Controleer vóór de ingebruikname of
de juiste spanning beschikbaar is en of alle onder-
delen correct gemonteerd zijn. Wanneer u vragen
hebt of onzeker bent in verband met de bediening
van het apparaat, kunt u contact opnemen met uw
leverancier of met het servicepunt. Bewaar deze
handleiding op een veilige plaats en geef hem evt.
aan derden door.
Correct gebruik
Deze lamp is uitsluitend bedoeld voor ge-
bruik binnenshuis, in droge en gesloten
ruimten.
Dit product is bestemd voor het gebruik in privé-
huishoudens. Dit product is bestemd voor normaal
gebruik.
Omvang van de levering
Controleer de levering altijd direct na het uitpakken
o
p volledigheid en de optimale staat van het product.
1 LED-plafondlamp (14163606L/14163605L/
14163706L)
1 afstandsbediening
3 pluggen
3 schroeven
2 isolatiekousen
1 batterij CR2025 (lithium)
1 montage- en bedieningshandleiding
Beschrijving van de onderdelen
1
Grondplaat
2
Schroef
3
Plug
4
Isolatiekous
5
Lampenkap
6
Schroefloze klem
7
Borghaak
8
Oogje
9
Stroomkabel (extern)
10
Afstandsbediening
11
Batterijvak
12
Isolatiestrip
13
Batterij (3 V CR2025)
Technische gegevens
Lamp:
Modelnummer: 14163606L/14163605L/
14163706L
Bedrijfsspanning: 230–240 V∼, 50 Hz
Nominaal vermogen: max. 22 W
Beschermingsklasse: II/
Beschermingstype: IP20
Led-module:
Verlichtingsmiddel: led-module
Nominaal vermogen: 22 W
Afstandsbediening:
Batterij: 1 x 3 V CR2025
Dit product bevat een lichtbron met energie-efficiën-
tieklasse ‘E’.
34 NL/BE
Veiligheid
Veiligheid
Veiligheidsinstructies
Bij beschadigingen die worden veroorzaakt door
het niet in acht nemen van deze gebruiksaanwijzing
vervalt de garantie! Wij zijn niet aansprakelijk voor
gevolgschade! Bij materiële schade of persoonlijk
letsel die worden veroorzaakt door onjuist gebruik
of het niet in acht nemen van de veiligheidsinstructies
zijn wij niet aansprakelijk!
LEVENSGEVAAR EN KANS OP
ONGEVALLEN VOOR KLEUTERS
EN KINDEREN!
Laat kinderen nooit zonder toezicht achter met
het verpakkingsmateriaal. Er bestaat verstikkings-
gevaar door het verpakkingsmateriaal. Kinderen
onderschatten vaak de gevaren.
Laat de lamp of het verpakkingsmateriaal niet
achteloos liggen. Plastic folie/-zakken, kunststof
delen etc. kunnen voor kinderen een gevaarlijk
speelgoed vormen. Houd kinderen altijd uit de
buurt van het product.
Dit apparaat kan door kinderen vanaf 8 jaar
en ouder alsmede door personen met vermin-
derde fysieke, sensorische of mentale vaardig-
heden of een gebrek aan ervaring en kennis
worden gebruikt, als zij onder toezicht staan of
geïnstrueerd werden met betrekking tot het vei-
lige gebruik van het apparaat en zij de hieruit
voortvloeiende gevaren begrijpen. Kinderen
mogen niet met het apparaat spelen. Reiniging
en onderhoud mogen niet door kinderen zon-
der toezicht worden uitgevoerd.
Vermijd levensgevaar
door elektrische schok
Laat de elektronische installatie door een opge-
leide elektricien of een voor elektrische installaties
geïnstrueerde persoon uitvoeren.
Controleer de lamp en de stroomkabel voor het
aansluiten aan de stroom op eventuele bescha-
digingen. Gebruik uw lamp nooit indien u een
beschadiging constateert.
Beschadigde stroomkabels zorgen voor levens-
gevaar door elektrische schokken. Neem in geval
van beschadigingen, reparaties of andere pro-
blemen aan de lamp contact op met de klanten-
service of met een elektricien.
Verwijder voor de montage de zekering of
schakel de aardlekschakelaar in de zekering-
kast uit (0-stand).
Wees er voor de montage zeker van dat de
beschikbare netspanning overeenkomt met de
benodigde voedingsspanning van de lamp
(zie ‚Technische gegevens‘).
Vermijd dat de lamp in contact komen met
water of andere vloeistoffen.
Open nooit een van de elektrische delen en steek
er geen voorwerpen in. Bij dergelijke ingrepen
bestaat levensgevaar door elektrische schokken.
De lamp niet op vochtige op geleidende onder-
grond installeren!
Vermijd brand- en
letselgevaar
Controleer de lamp direct na het uitpakken op
beschadigingen. Neem in dit geval contact op
met het klantenservice.
VOORZICHTIG! KANS OP
BRANDWONDEN DOOR
HETE OPPERVLAKKEN!
Zorg ervoor dat de lamp uitgeschakeld en afge-
koeld is voordat u deze aanraakt om brand-
wonden te vermijden. Lampen ontwikkelen
rondom de lampenkap een behoorlijke hitte.
De lichtbron van deze lamp kan niet worden
vervangen; als de lichtbron het einde van zijn
levensduur heeft bereikt, dient de complete
lamp te worden vervangen.
Deze lamp is niet geschikt voor
externe dimmers en elektronische
schakelaars.
Niet direct in de lichtbron (verlichtingsbron,
led etc.) kijken.
Niet met optische instrumenten (bijv. vergroot-
glas) in de lichtbron kijken.
Veiligheid/Voorbereiding
35 NL/BE
Veiligheid Veiligheid/Voorbereiding
Zo handelt u correct
Monteer de lamp zo, zodat hij tegen vocht en
vuil beschermd is.
Bereid de montage zorgvuldig voor en maak hier
voldoende tijd voor vrij. Leg alle onderdelen en
extra benodigd gereedschap of materiaal van
tevoren overzichtelijk en binnen handbereik klaar.
Wees altijd alert! Let er altijd op wat u doet en
ga altijd verstandig te werk. Monteer de lamp
niet als u ongeconcentreerd bent of zich niet
lekker voelt.
Veiligheidsinstructies
voor batterijen/accu‘s
BATTERIJEN BUITEN HET BER
EIK
VAN KINDEREN BEWAREN!
Het inslikken kan chemische brandwonden, per-
foratie van zacht weefsel en de dood tot gevolg
hebben. Ernstige brandwonden kunnen binnen
2 uur na het inslikken optreden. Direct een arts
raadplegen.
LEVENSGEVAAR!
Houd batterijen/accu‘s buiten het bereik van
kinderen. Raadpleeg bij inslikken onmiddellijk
een arts!
I
nslikken kan leiden tot inwendige verbranding
en,
perforatie van zacht weefsel en tot de dood. Ern-
stige inwendige verbrandingen kunnen binnen
2 uur na het inslikken optreden.
EXPLOSIEGEVAAR!
Laad niet oplaadbare batterijen nooit op. Sluit
de batterijen/accu‘s niet kort en/of open deze
niet. Daardoor kan de batterij oververhit raken,
in brand vliegen of exploderen.
Gooi batterijen/accu‘s nooit in het vuur of water.
Stel batterijen/accu‘s nooit bloot aan mechani-
sche belastingen.
Risico dat de batterijen/accu’s lekken
Vermijd extreme omstandigheden en temperatu-
ren die invloed op de batterijen/accu‘s zouden
kunnen hebben bijv. radiatoren/direct zonlicht.
Bij lekkende batterijen/accu‘s het contact van
de chemicaliën met de huid, ogen en slijmvliezen
vermijden! Spoel de desbetreffende plekken
direct af met schoon water en raadpleeg on-
middellijk een arts!
DRAAG VEILIGHEIDSHAND-
SCHOENEN!
Lekkende of beschadigde batterijen/accu‘s
kunnen in geval van huidcontact chemische
brandwonden veroorzaken. Draag daarom in
dit geval geschikte veiligheidshandschoenen.
Als de batterijen/accu‘s lekken, dient u deze
direct uit het product te halen om beschadigin-
gen te vermijden.
Gebruik alleen batterijen/accu‘s van hetzelfde
type. Gebruik nooit nieuwe en oude batterijen/
accu‘s door elkaar!
Verwijder de batterijen/accu‘s, als u het product
gedurende een langere periode niet gebruikt.
Risico op beschadiging van het product
Gebruik uitsluitend het aangegeven type
batterij/accu!
Plaats de batterijen/accu‘s volgens de weerge-
geven polariteit (+) en (-) op batterij/accu en
op product.
Reinig de contacten van de batterij/accu en in
het batterijvak voor het plaatsen met een droge,
pluisvrije doek of wattenstaafje!
Verwijder verbruikte batterijen/accu‘s direct uit
het product.
Voorbereiding
Benodigd gereedschap
en materiaal
Het genoemde gereedschap en materiaal wordt niet
meegeleverd. Het gaat hierbij om vrijblijvende infor-
matie en waarden ter oriëntatie. De hoedanigheid
van het materiaal is afhankelijk van de individuele
omstandigheden ter plekke.
36 NL/BE
Voorbereiding/Voor de installatie/Ingebruikname
- Potlood/markeergereedschap
- 2-polige spanningzoeker
- Schroevendraaier
- Boormachine
- Boor (ca. Ø 6 mm)
- Zijkniptang
- Ladder
- Hamer
Voor de installatie
Belangrijk: Laat de installatie uitvoeren door een
opgeleide elektricien of een voor elektro-installaties
bevoegde persoon.
Deze persoon moet op de hoogte zijn van de eigen-
schappen van de lamp en van de aansluitvoorwaarden.
Maak uzelf voor de installatie vertrouwd met
alle aanwijzingen en afbeeldingen in deze
gebruiksaanwijzing alsook met de lamp zelf.
Wees er voor de installatie zeker van dat de
leiding, waaraan de lamp wordt aangesloten,
geen spanning heeft. Verwijder hiervoor de
zekering of schakel de aardlekschakelaar uit
(0-stand).
Controleer met een 2-polige spanningzoeker
of de leiding spanningsloos is.
Ingebruikname
Lamp monteren
Haal de grondplaat
1
van de lampenkap
5
af door hem tegen de klok in te draaien.
Haal de beide schroefloze klemmen
6
en de
borghaak
7
los van de grondplaat
1
.
Houd de grondplaat
1
tegen het plafond en
markeer de boorgaten met behulp van de in de
grondplaat
1
voor de schroeven
2
bestemde
gaten.
Boor de gaten (Ø 6 mm, ca. 40 mm diep). Zorg
ervoor dat de stroomkabel niet wordt bescha
digd.
Steek de pluggen
3
in de boorgaten. Gebruik
hierbij, indien nodig, een hamer.
Steek de stroomkabel (extern)
9
door de mid-
delste opening van de grondplaat
1
(zie afb. A).
Opmerking: let erop dat de stroomkabel niet
te ver door de opening wordt geschoven, om-
dat de grondplaat
1
anders niet meer op de
lampenkap
5
past.
Bevestig de grondplaat
1
met behulp van de
schroeven aan het plafond (zie afb. A).
Trek de isolatiekousen
4
over de draden L en N
van de stroomkabel (extern)
9
. Let erop dat
u de afzonderlijke draden van de stroomkabel
(extern)
9
steeds correct aansluit: fasedraad,
zwart of bruin = symbool L, nuldraad, blauw =
symbool N.
Opmerking: deze lamp heeft beschermings-
klasse , de aardedraad wordt niet aangesloten.
Plaats vervolgens de schroefloze klemmen
6
en de borghaak
7
op de hiervoor bestemde
plekken in de grondplaat
1
(zie afb. B–D).
Bevestig daarna de lampenkap
5
door deze
met de klok mee op de grondplaat
1
te draaien
(zie afb. E).
Opmerking: de pijlen op de grondplaat
1
e
n
op de lampenkap
5
moeten tegenover elkaar
leggen (zie afb. H).
Plaats de zekering weer terug of schakel de
installatie-automaat in de groepenkast weer in
(I-stand).
Batterij plaatsen/vervangen
(afstandsbediening) (zie afb. G)
Opmerking: trek voor de eerste ingebruikname
de isolatiestrip
12
uit het batterijvak
11
.
Als de reikwijdte van de afstandsbediening
10
af-
neemt, moet de batterij
13
worden vervangen.
Druk de ontgrendelingshendel naar binnen en
trek het batterijvak
11
eruit.
Verwijder eventueel de lege batterij
13
.
Plaats een nieuwe batterij
13
in het batterijvak
11
. Gebruik alleen batterijen
13
zoals beschre-
ven bij ‘Technische gegevens’.
Opmerking: let daarbij op de juiste polariteit.
Deze wordt op de afstandsbediening
10
aan-
gegeven.
Schuif het batterijvak
11
weer in de afstands-
bediening
10
.
Ingebruikname/Onderhoud en reiniging/Afvoer
37 NL/BE
Voorbereiding/Voor de installatie/Ingebruikname Ingebruikname/Onderhoud en reiniging/Afvoer
Lichteffecten met behulp van de
afstandsbediening aansturen
Opmerking: de zender van de afstandsbedie-
ning
10
bevindt zich aan de andere kant van het
batterijvak
11
. Zorg ervoor dat er zich tussen de
zender en ontvanger geen obstakels bevinden.
ON/OFF = lamp IN/UIT schakelen
Verlichtingsmiddel = warm-wit/neutraal-wit/
koud-wit
Zon = warm-wit
Sneeuwvlok = koud-wit
Zon niet ingevuld = helderheid verlagen
Zon ingevuld = helderheid verhogen
10 % = lichtsterkte 10 %
50 % = lichtsterkte 50 %
100% = lichtsterkte 100 %
Maan = nachtlampje
30 min
30 min = timerfunctie (30 min.)
D1
D1 = Geheugenplaats voor
persoonlijke kleurpro-
gramma’s
Opmerking: om het kleurprogramma onder de
knop D1 op te slaan, gaat u als volgt te werk:
Stel de lamp in zoals gewenst.
Houd de knop D1 ingedrukt.
Opmerking: als het opslaan is voltooid, licht
de lamp één keer op.
Onderhoud en reiniging
GEVAAR VOOR
ELEKTRISCHE SCHOK!
Verbreek voor de reiniging eerst de verbinding van
de lamp met het stroomnet. Verwijder hiervoor de ze-
kering of schakel de aardlekschakelaar uit (0-stand).
GEVAAR VOOR
ELEKTRISCHE SCHOK!
Op basis van de elektrische veiligheid mag de
verlichting nooit met water of andere vloeistoffen
worden gereinigd of in zijn geheel in water worden
gedompeld.
VOORZICHTIG! KANS OP BRAND-
WONDEN DOOR HETE OPPERVLAKKEN!
Laat de lamp volledig afkoelen.
Gebruik geen oplosmiddelen zoals benzine
e.d. De lamp zal hierdoor beschadigd raken.
Gebruik voor de reiniging uitsluitend een droge,
pluisvrije doek.
Plaats de zekering weer terug of schakel de
hoofdzekering in de zekeringenkast weer in
(I-stand).
Afvoer
De verpakking bestaat uit milieuvriendelijke grond-
stoffen die u via de plaatselijke recyclingcontainers
kunt afvoeren.
b
a
Neem de aanduiding van de verpakkings-
materialen voor de afvalscheiding in acht.
Deze zijn gemarkeerd met de afkortingen
(a) en een cijfers (b) met de volgende
betekenis: 1–7: kunststoffen/20–22:
papier en vezelplaten/80–98: compo-
sietmaterialen.
Het product en de verpakkingsmaterialen
zijn recyclebaar; verwijder deze afzonder-
lijk voor een betere afvalbehandeling. Het
Triman-logo geldt alleen voor Frankrijk.
Gooi het afgedankte product omwille van
het milieu niet weg via het huisvuil, maar
geef het af bij het daarvoor bestemde
39 PL
Afvoer/Garantie en service Spis zawartości
Legenda zastosowanych piktogramów............................................................Strona 40
Instrukcja ......................................................................................................................................Strona 41
Zastosowanie zgodne z przeznaczeniem .....................................................................................Strona 41
Zawartość .........................................................................................................................................Strona 41
Opis części ....................................................................................................................................... Strona 41
Dane techniczne ..............................................................................................................................Strona 41
Bezpieczeństwo ......................................................................................................................Strana 42
Wskazówki bezpieczeństwa...........................................................................................................Strona 42
Wskazówki bezpieczeństwa dla baterii/akumulatorów ..............................................................Strona 43
Przygotowanie .......................................................................................................................Strana 44
Potrzebne narzędzia i materiały .....................................................................................................Strona 44
Przed instalacją ......................................................................................................................Strona 44
Uruchomienie............................................................................................................................Strana 44
Montaż lampy ..................................................................................................................................Strona 44
Zakładanie/wymiana baterii (pilot zdalnego sterowania) ...........................................................Strona 45
Sterowanie efektami oświetleniowymi za pomocą pilota .............................................................Strona 45
Konserwacja i czyszczenie............................................................................................Strona 45
Utylizacja .....................................................................................................................................Strona 46
Gwarancja i serwis ..............................................................................................................Strana 46
Gwarancja .......................................................................................................................................Strona 46
Adres serwisu ...................................................................................................................................Strona 46
Deklaracja zgodności ......................................................................................................................Strona 47
Producent ..........................................................................................................................................Strona 47
40 PL
Legenda zastosowanych piktogramów
Przeczytać instrukcję obsługi! Okres żywotności LED w godzinach
Niniejsza lampa nadaje się wyłącznie do
pracy wewnątrz, w suchych i zamkniętych
pomieszczeniach.
Ostrzeżenie! Niebezpieczeństwo
porażenia prądem elektrycznym!
Niebezpieczeństwo utraty życia lub
odniesienia obrażeń przez dzieci!
Ostrożnie! Niebezpieczeństwo po-
parzenia gorącymi powierzchniami!
Napięcie przemienne
(Rodzaj prądu i napięcia)
Lampa ta nie nadaje się do użycia w
połączeniu z zewnętrznymi regulato-
rami jasności światła i wyłącznikami
elektronicznymi.
Herc (częstotliwość) Niebezpieczeństwo wybuchu!
Wat (moc czynna) Zakładać rękawice ochronne!
Wolt Prawidłowy sposób postępowania
Klasa ochrony II
b
a
Opakowanie i urządzenie przekazać
do utylizacji zgodnie z przepisami o
ochronie środowiska!
Należy przestrzegać ostrzeżeń i
wskazówek bezpieczeństwa!
Niewłaściwa utylizacja baterii/
akumulatorów stwarza zagrożenie
dla środowiska naturalnego!
LED LED
Źródło światła tego produktu nie jest
wymienne.
Opakowanie składa się w 100 %
ze zutylizowanego papieru.
Ra
Współczynnik oddawania barw
Lampa ta posiada stopień ochrony
„IP20“ i jest przeznaczona wyłącz-
nie do zastosowania w pomieszcze-
niach w prywatnych gospodarstwach
domowych.
Lumen Temperatura barwowa w kelwinach
20
PAP
Tektura falista
04
LDPE
Polietylen (niska gęstość)
Przechowywać poza zasięgiem dzieci!
Instrukcja
41 PL
Legenda zastosowanych piktogramów Instrukcja
Lampa sufitowa LED
Instrukcja
Gratulujemy Państwu zakupu nowego
urządzenia. Zdecydowali się Państwo na
zakup produktu najwyższej jakości. Pro-
szę dokładnie przeczytać całą niniejszą instrukcję
obsługi. Proszę wypiąć stronę z rysunkami. Niniejsza
instrukcja obsługi należy do produktu. Zawiera ona
ważne wskazówki dotyczące uruchamiania i posłu-
giwania się produktem. Zawsze należy przestrzegać
wszystkich wskazówek dotyczących bezpieczeństwa.
Przed uruchomieniem proszę sprawdzić, czy wystę-
puje prawidłowe napięcie, i czy wszystkie części są
prawidłowo zamontowane. W przypadku zapytań
lub niepewności odnośnie obchodzenia się z urzą-
dzeniem, prosimy o kontakt ze sprzedawcą lub punk-
tem serwisowym. Proszę starannie przechowyw
niniejszą instrukcję obsługi, a w razie oddania urzą-
dzenia osobom trzecim przekazać ją wraz z nim.
Zastosowanie zgodne
z przeznaczeniem
Niniejsza lampa nadaje się wyłącznie do
pracy wewnątrz, w suchych i zamkniętych
pomieszczeniach.
To urządzenie przewidziano wyłącznie do użytku w
prywatnym gospodarstwie domowym. Ten produkt
przeznaczony jest do normalnego użytku.
Zawartość
Bezpośrednio po wypakowaniu należy sprawdzić,
czy zestaw jest kompletny oraz czy urządzenie znaj-
duje się w nienagannym stanie.
1 lampa sufitowa LED (14163606L/
14163605L/14163706L)
1 pilot
3 kołki
3 śruby
2 wężyki ochronne
1 bateria CR2025 (litowa)
1 instrukcja montażu i obsługi
Opis części
1
Płyta dolna
2
Śruba
3
Kołek
4
Wężyk ochronny
5
Klosz lampy
6
Zacisk bezśrubowy
7
Hak zabezpieczający
8
Oczko
9
Kabel zasilający (zewnętrzny)
10
Pilot zdalnego sterowania
11
Komora baterii
12
Pasek izolacyjny
13
Bateria (3 V CR2025)
Dane techniczne
Lampa:
Numer modelu: 14163606L/14163605L/
14163706L
Napięcie robocze: 230-240 V∼, 50 Hz
Moc znamionowa: maks. 22 W
Klasa ochrony: II/
Rodzaj ochrony: IP20
Moduł LED:
Element świetlny: moduł LED
Moc znamionowa: 22 W
Pilot zdalnego
sterowania:
Bateria: 1 x 3 V CR2025
T
en produkt zawiera źródło światła klasy efektywno
ści
energetycznej „E”.
42 PL
Bezpieczeństwo
Bezpieczeństwo
Wskazówki
bezpieczeństwa
W przypadku szkód spowodowanych nieprzestrze-
ganiem niniejszej instrukcji obsługi wygasa prawo
do gwarancji! Za szkody pośrednie producent nie
ponosi odpowiedzialności! W przypadku szkód
materialnych lub osobowych, które powstały wskutek
niewłaściwego obchodzenia się lub nieprzestrzega-
nia wskazówek dotyczących bezpieczeństwa, nie
ponosimy żadnej odpowiedzialności!
ZAGROŻE-
NIE ŻYCIA I NIEBEZPIECZEŃ-
STWO WYPADKU U DZIECI!
Nigdy nie pozostawiać dzieci bez nadzoru z
materiałem opakowania. Istnieje zagrożenie
uduszeniem spowodowane przez materiał
opakowaniowy. Dzieci często nie dostrzegają
niebezpieczeństwa.
Lampy i materiału opakowania nie pozostawiać
bez nadzoru. Folie/worki plastikowe, elementy
z tworzywa sztucznego itp. mogą zostać użyte
przez dzieci jako niebezpieczna zabawka. Na-
leży zawsze trzymać dzieci z dala od produktu.
Niniejsze urządzenie może być używane
przez dzieci od lat 8 oraz przez osoby z obni-
żonymi zdolnościami fizycznymi, sensorycznymi
lub mentalnymi lub brakiem doświadczenia i/
lub wiedzy, jeśli pozostają pod nadzorem lub
zostały pouczone w kwestii bezpiecznego uży-
cia urządzenia i rozumieją wynikające z niego
zagrożenia. Dzieci nie mogą bawić się urzą-
dzeniem. Czyszczenie i konserwacja nie mogą
być wykonywane przez dzieci bez nadzoru.
Porażenie prądem
elektrycznym grozi śmiercią
Przeprowadzenie instalacji elektrycznej należy
zlecić wykwalifikowanemu elektrykowi lub osobie
przeszkolonej w zakresie instalacji elektrycznych.
Przed każdym podłączeniem do sieci elektrycz-
nej należy dokonać kontroli lampy oraz prze-
wodu zasilającego pod względem uszkodzeń.
Nigdy nie używać lampy w razie stwierdzenia
jakichkolwiek uszkodzeń.
Uszkodzone przewody sieciowe stwarzają
niebezpieczeństwo utraty życia wskutek pora-
żenia prądem elektrycznym. W razie uszkodzeń,
napraw lub innych problemów z lampą należy
zwrócić się do punktu serwisowego lub do
elektryka.
Przed rozpoczęciem montażu wyjąć bezpiecznik
lub wyłączyć wyłącznik nadmiarowo-prądowy
w skrzynce bezpiecznikowej (położenie 0).
Przed montażem należy upewnić się, że dos
tępne
napięcie sieci jest zgodne z wymaganym napię-
ciem roboczym lampy (patrz „Dane techniczne“).
Bezwzględnie unikać kontaktu lampy z wodą
lub innymi cieczami.
Nigdy nie otwierać elementów elektrycznych
i nie wkładać do nich jakichkolwiek przedmio-
tów. Taka ingerencja oznacza zagrożenie życia
poprzez porażenie prądem.
Lampy nie należy instalować na podłożu
wilgotnym lub przewodzącym prąd!
Jak uniknąć zagrożenia
pożarowego i obrażeń ciała
Zaraz po rozpakowaniu należy sprawdzić, czy
lampa nie jest uszkodzona. W razie uszkodze-
nia należy skontaktować się z punktem serwi-
sowym.
OSTROŻNIE! NIEBEZPIECZEŃ-
STWO POPARZENIA GORĄ-
CYMI POWIERZCHNIAMI!
Aby uniknąć oparzenia, należy upewnić się
przed dotknięciem lampy, że jest ona wyłą-
czona i schłodzona. Żarówki wytwarzają w
obrębie głowicy lampy wysokie temperatury.
Źródło światła tej lampy nie podlega wymianie;
jeśli czas działania źródła światła się zakończy,
należy wymienić całą lampę.
Lampa ta nie nadaje się do użycia w
połączeniu z zewnętrznymi regula-
torami jasności światła lub wyłączni-
kami elektronicznymi.
Nie należy bezpośrednio wpatrywać się w
źródło światła (żarówki, LED, itp.).
Bezpieczeństwo
44 PL
Przygotowanie/Przed instalacją/Uruchomienie
Przygotowanie
Potrzebne narzędzia i materiały
Wymienione narzędzia i materiały nie są częścią
zestawu. Są to jedynie niewiążące informacje i
wartości orientacyjne. Właściwości materiału za-
leżą od indywidualnych warunków w pomieszczeniu.
- ołówek/narzędzie do oznaczania
- 2-biegunowy detektor napięcia
- śrubokręt
- wiertarka
- wiertło (ok. Ø 6 mm)
- szczypce do cięcia drutu
- drabina
- młotek
Przed instalac
Ważne: Wykonanie podłączenia elektrycznego
należy zlecić wykwalifikowanemu elektrykowi lub
osobie przeszkolonej w zakresie wykonywania
instalacji elektrycznych. Osoba ta musi posiadać
wiedzę na temat właściwości lampy i przepisów
dotyczących podłączania.
Przed instalacją należy zapoznać się ze wszyst-
kimi instrukcjami i rysunkami zawartymi w niniej-
szej instrukcji oraz z samą lampą.
Przed instalacją należy upewnić się, że przewó
d,
do którego ma być podłączona lampa, nie znaj-
duje się pod napięciem. W tym celu należy wyjąć
bezpiecznik lub wyłączyć wyłącznik instalacyjny
w skrzynce bezpiecznikowej (pozycja 0).
Brak napięcia należy stwierdzić za pomocą
2-biegunowego detektora napięcia.
Uruchomienie
Montaż lampy
Odłączyć płytę dolną
1
odkręcając ją od
klosza lampy
5
w kierunku przeciwnym do
ruchu wskazówek zegara.
Odłączyć oba zaciski bezśrubowe
6
i hak
zabezpieczający
7
od płyty dolnej
1
.
Przytrzymać płytę dolną
1
przy suficie i zazna-
czyć nawiercone otwory za pomocą otworów
przewidzianych na śruby
2
w płycie dolnej
1
.
Wywiercić otwory (Ø 6 mm, głębokość ok.
40 mm). Uważać na to, aby nie uszkodzić
przewodu doprowadzającego.
Do wywierconych otworów włożyć kołki
3
.
W razie konieczności należy użyć młotka.
Przeprowadzić kabel zasilający (zewnętrzny)
9
przez środkowy otwór płyty dolnej
1
(patrz
rys. A).
Wskazówka: Zwrócić uwagę na to, aby nie
wsuwać kabla zasilającego za daleko przez
otwór, w innym razie płyta dolna
1
nie będzie
już pasowała do klosza lampy
5
.
Zamocować płytę dolną
1
za pomocą śrub
na suficie (patrz rys. A).
Naciągnąć wężyki ochronne
4
na kable L i N
k
abla zasilającego (zewnętrznego)
9
. Zwróci
ć
uwagę na to, aby każdorazowo poprawnie
podłączyć pojedyncze przewody kabla zasila-
jącego (zewnętrznego)
9
: przewód przewo-
dzący prąd, czarny lub brązowy = symbol L,
przewód neutralny, niebieski = symbol N.
Wskazówka: Ta lampa ma klasę ochrony
,
przewód ochronny nie jest podłączany.
Następnie założyć zaciski bezśrubowe
6
i
hak zabezpieczający
7
w przewidzianych
do tego miejscach w płycie dolnej
1
(patrz
rys. B–D).
Następnie zamocować klosz lampy
5
przykrę-
cając go do płyty dolnej
1
w kierunku zgod-
nym z ruchem wskazówek zegara (patrz rys. E).
Wskazówka: Strzałki na płycie dolnej
1
i
kloszu lampy
5
muszą leżeć naprzeciwko sie-
bie (patrz rys. H).
Ponownie włożyć bezpiecznik lub włączyć
wyłącznik nadmiarowo-prądowy na skrzynce
bezpiecznikowej (pozycja I).
Uruchomienie/Konserwacja i czyszczenie
45 PL
Przygotowanie/Przed instalacją/Uruchomienie Uruchomienie/Konserwacja i czyszczenie
Zakładanie/wymiana baterii
(pilot zdalnego sterowania)
(patrz rys. G)
Wskazówka: Przed pierwszym użyciem zdjąć
pasek izolacyjny
12
z komory baterii
11
.
Jeśli zasięg pilota zdalnego sterowania
10
spada,
należy wymienić baterię
13
.
Wcisnąć dźwignię odblokowującą w dół i
wyjąć komorę baterii
11
.
Ewentualnie wyjąć zużytą baterię
13
.
Włożyć nową baterię
13
do komory baterii
11
.
Używać tylko baterii
13
opisanych w rozdziale
„Dane techniczne“.
Wskazówka: Zwrócić przy tym uwagę na
prawidłowe ułożenie biegunów. Jest ono poka-
zane na spodzie pilota zdalnego sterowania
10
.
Ponownie wsunąć komorę baterii
11
do pilota
zdalnego sterowania
10
.
Sterowanie efektami
oświetleniowymi za pomocą
pilota
Wskazówka: Nadajnik pilota zdalnego stero-
wania
10
znajduje się na przeciwnej stronie komory
baterii
11
. Należy zatroszczyć się o to, aby między
nadajnikiem a odbiornikiem nie znajdowały się
żadne przeszkody.
ON/OFF = przełącznik
WŁĄCZ/WYŁĄCZ
lampy
Żarówka = ciepła biel/neutralna
biel/zimna biel
Słońce = ciepła biel
Płatek śniegu = zimna biel
Słońce niewypełnione = zmniejszanie jasności
Słońce wypełnione = zwiększanie jasności
10 % = moc świecenia 10 %
50 % = moc świecenia 50 %
100 % =
moc świecenia 100 %
Księżyc = funkcja lampy nocnej
30 min
30 min. = funkcja timera
(30 min.)
D1
D1 = Miejsce w pamięci
na indywidualne
programy kolorów
Wskazówka: Aby zapisać program koloru na
przycisku D1, należy wykonać następujące kroki:
Lampę ustawić wedle życzenia.
Przytrzymać wciśnięty przycisk D1.
Wskazówka: Jeśli zakończono proces zapi-
sywania, lampa miga jeden raz.
Konserwacja i czyszczenie
NIEBEZPIECZEŃSTWO
PORAŻENIA PRĄDEM ELEKTRYCZNYM!
Przed rozpoczęciem czyszczenia, lampę odłączyć
od sieci elektrycznej. W tym celu należy wyjąć
bezpiecznik lub wyłączyć wyłącznik instalacyjny
w skrzynce bezpiecznikowej (pozycja 0).
NIEBEZPIECZEŃSTWO
PORAŻENIA PRĄDEM ELEKTRYCZNYM!
Ze względu na zachowanie bezpieczeństwa w
zakresie elektryczności nie wolno czyścić lampy
za pomocą wody lub innych płynów, ani też zanu-
rzać w wodzie.
OSTROŻNIE! NIEBEZPIECZEŃSTWO PO-
PARZENIA GORĄCYMI POWIERZCHNIAMI!
Odczekać, aż lampa całkowicie ostygnie.
Nie używać rozpuszczalników, benzyny itp.
Mogłoby to spowodować uszkodzenie lampy.
Do czyszczenia należy używać wyłącznie
suchej, niestrzępiącej się szmatki.
Ponownie włożyć bezpiecznik lub włączyć
wyłącznik nadmiarowo-prądowy na skrzynce
bezpiecznikowej (pozycja I).
46 PL
Gwarancja i serwisUtylizacja/Gwarancja i serwis
Utylizacja
Opakowanie wykonane jest z materiałów przyja-
znych dla środowiska, które można przekazać do
utylizacji w lokalnym punkcie przetwarzania surow-
ców wtórnych.
b
a
Przy segregowaniu odpadów prosimy
zwrócić uwagę na oznakowanie mate-
riałów opakowaniowych, oznaczone są
one skrótami (a) i numerami (b) o nastę-
pującym znaczeniu: 1–7: Tworzywa
sztuczne/20–22: Papier i tektura/
80–98: Materiały kompozytowe.
Produkt i materiał opakowania nadają się
do ponownego przetworzenia, należy
je zutylizować osobno w celu lepszego
przetworzenia odpadów. Logo Triman
jest ważne tylko dla Francji.
Z uwagi na ochronę środowiska nie wy-
rzucać urządzenia po zakończeniu eks-
ploatacji do odpadów domowych, lecz
prawidłowo zutylizować. Informacji o
punktach zbiorczych i ich godzinach
otwarcia udziela odpowiedni urząd.
Uszkodzone lub zużyte baterie/akumulatory muszą
być poddane recyklingowi zgodnie z dyrektywą
2006/66/WE i jej zmianami. Oddać baterie/
akumulatory i/lub produkt w dostępnych punktach
zbiórki.
Niewłaściwa utylizacja baterii/
akumulatorów stwarza zagroże-
nie dla środowiska naturalnego!
Baterii/akumulatorów nie należy wyrzucać razem
z odpadami domowymi. Mogą one zawierać szko-
dliwe metale ciężkie i należy je traktować jak odpady
specjalne. Symbole chemiczne metali ciężkich są
następujące: Cd = kadm, Hg = rtęć, Pb = ołów. Dla-
tego też zużyte baterie/akumulatory należy prze-
kazywać do komunalnych punktów gromadzenia
odpadów niebezpiecznych.
Gwarancja i serwis
Gwarancja
W momencie zakupu otrzymują Państwo na to urzą-
dzenie 36 miesięcy gwarancji. Urządzenie wypro-
dukowano starannie i poddano dokładnej kontroli
jakości. W okresie gwarancji usuwamy bezpłatnie
wszystkie wady materiałowe lub fabryczne. Jeśli
mimo to w okresie gwarancji pojawią się usterki,
urządzenie należy przesłać na podany adres
serwisowy, podając następujący numer modelu:
14163606L/14163605L/14163706L.
Gwarancji nie podlegają uszkodzenia spowodowane
przez nieprawidłowe użytkowanie, nieprzestrzega-
nie instrukcji obsługi lub ingerencję nieautoryzowa-
nych osób, a także części szybko zużywające się
(jak np. elementy świetlne). Usługa gwarancyjna
nie przedłuża ani nie odnawia okresu gwarancji.
Zgodnie z Kodeksem Cywilnym art. 581 §1 wraz z
wymianą urządzenia lub ważnej części czas gwa-
rancji rozpoczyna się na nowo.
Adres serwisu
Briloner Leuchten GmbH & Co. KG
Im Kissen 2
59929 Brilon
NIEMCY
Tel.: +49 29 61/97 12–800
Faks: +49 29 61/97 12–199
E-mail: kundenservice@briloner.com
www.briloner.com
Bezpłatny numer serwisu:
Tel.: 00800/27456637
IAN 411276_2110
Przed skontaktowaniem się z działem serwisowym
należy przygotować paragon i numer artykułu
(IAN 411276_2110) jako dowód zakupu.
48
Obsah
49 CZ
Obsah
Legenda k použitým piktogramům ...................................................................... Strana 50
Úvod .................................................................................................................................................Strana 51
Použití ke stanovenému účelu..........................................................................................................Strana 51
Obsah dodávky ............................................................................................................................... Strana 51
Popis dílů ..........................................................................................................................................Strana 51
Technická data .................................................................................................................................Strana 51
Bezpečnost ..................................................................................................................................Strana 52
Bezpečnostní pokyny .......................................................................................................................Strana 52
Bezpečnostní pokyny pro baterie a akumulátory .......................................................................... Strana 53
Příprava ........................................................................................................................................Strana 53
Potřebné nářadí a materiál ..............................................................................................................Strana 53
Před instalací .............................................................................................................................Strana 53
Uvedení do provozu ...........................................................................................................Strana 54
Montáž svítilny ................................................................................................................................. Strana 54
Vložení a výměna baterií (dálkového ovladače) ...........................................................................Strana 54
Řízení světelných efektů pomocí dálkového ovladače .................................................................. Strana 54
Údržba a čištění ......................................................................................................................Strana 55
Zlikvidování ...............................................................................................................................Strana 55
Záruka a servis ....................................................................................................................... Strana 55
Záruka ..............................................................................................................................................Strana 55
Adresa servisu .................................................................................................................................. Strana 56
Prohlášení o shodě ...........................................................................................................................Strana 56
Výrobce ............................................................................................................................................Strana 56
50 CZ
Legenda k použitým piktogramům
Přečtěte si návod kobsluze! Životnost LED v hodinách
Toto svítidlo je určené výhradně pro
provoz vinteriéru, vsuchých a uzavřených
místnostech.
Výstraha! Nebezpečí zásahu
elektrickým proudem!
Nebezpečí ohrožení života a úrazu
pro malé i velké děti!
Pozor! Nebezpečí popálení
horkými povrchy!
Střídavé napětí
(druh proudu a napětí)
Toto svítidlo není vhodné kpoužití
externích stmívačů a elektronických
spínačů.
Hertz (kmitočet) Nebezpečí výbuchu!
Watt (činný výkon) Noste ochranné rukavice!
Volt Tak postupujete správně
Třída ochrany II
b
a
Obal i výrobek odstraňujte do
odpadu ekologicky!
Dbát na výstražná a bezpečnostní
upozornění!
Ekologické škody v důsledku chybné
likvidace baterií/akumulátorů!
LED LED
Světelný zdroj tohoto výrobku nelze
vyměnit.
Obal je vyroben ze 100 % recyklova-
telného papíru.
Ra
Index podání barev
Toto svítidlo má stupeň krytí „IP20“
a je určeno jen k privátnímu použití
ve vnitřních prostorech.
lumen Teplota světla vkelvinech
20
PAP
Vlnitá lepenka
04
LDPE
Polyethylen (nízká hustota)
Uchovávat mimo dosah dětí!
Úvod
51 CZ
Legenda k použitým piktogramům Úvod
Stropní LED svítidlo
Úvod
Blahopřejeme vám ke koupi nového vý-
robku. Rozhodli jste se tím pro vysoce
kvalitní výrobek. Přečtěte si laskavě kom-
pletně a pečlivě tento návod k obsluze. Rozevřete
stránku sobrázky. Tento návod je součástí tohoto
výrobku a obsahuje důležité informace k jehouve-
dení do provozu a kzacházení sním. Řiďte se vždy
bezpečnostními pokyny. Před uvedením do provozu
zkontrolujte, jestli je kdispozici správné napětí a
jestli jsou všechny díly správně namontované. Jest-
liže máte ještě otázky nebo jste si nejistí při ovládání
přístroje, kontaktujte vašeho prodejce nebo servis.
Návod pečlivě uschovejte a případně jej předejte
třetí osobě.
Použití ke stanovenému účelu
Toto svítidlo je určené výhradně pro pro-
voz vinteriéru, vsuchých a uzavřených
místnostech.
Tento přístroj je určen pouze k použití v domácnosti.
Tento výrobek je určen jen k normálnímu provozu.
Obsah dodávky
Bezprostředně po vybalení vždy zkontrolujte úplnost
dodávky a bezvadný stav zařízení.
1 stropní LED svítidlo (14163606L/
14163605L/14163706L)
1 dálkové ovládání
3 hmoždinky
3 šrouby
2 ochranné hadičky
1 baterie CR2025 (lithium)
1 návod kmontáži a obsluze
Popis dílů
1
Základová deska
2
Šroub
3
Hmoždinka
4
Ochranná hadička
5
Stínidlo
6
Svorka bez šroubu
7
Bezpečnostní hák
8
Oko
9
Síťový připojovací kabel (externí)
10
Dálkový ovladač
11
Přihrádka na baterie
12
Izolační pásek
13
Baterie (3 V, CR2025)
Technická data
Svítidlo:
Číslo modelu: 14163606L/
14163605L/
14163706L
Provozní napětí: 230–240 V∼, 50 Hz
Jmenovitý příkon: max. 22 W
Třída ochrany: II/
Druh ochrany: IP20
Modul s LED:
Osvětlovací prostředek: modul s LED
Jmenovitý příkon: 22W
Dálkový ovladač:
Baterie: 1x 3 V, CR2025
Tento výrobek obsahuje osvětlovací prostředek třídy
energetické účinnost „E“.
52 CZ
Bezpečnost
Bezpečnost
Bezpečnostní pokyny
Při škodách způsobených nedodržením tohoto ná-
vodu k obsluze zaniká záruka! Za následné škody
se neručí! Za věcné nebo osobní škody, způsobené
neodborným zacházením nebo nerespektováním be
z-
pečnostních pokynů, se neručí!
NEBEZPEČÍ
OHROŽENÍ ŽIVOTA A ZRANĚNÍ
MALÝCH A VĚTŠÍCH DĚTÍ!
N
enechávejte děti nikdy bez dohledu sobalovým
materiálem. Hrozí nebezpečí udušení obalovým
materiálem. Děti často podceňují nebezpečí.
Nenechávejte svítidlo nebo obalový materiál
ležet bez dohledu. Umělohmotné fólie , sáčky,
díly atd., by mohly být pro děti nebezpečnou
hračkou. Výrobek vždy chraňte před dětmi.
Tento přístroj mohou používat děti od 8 let,
osoby se sníženými fyzickými, smyslovými nebo
duševními schopnostmi nebo s nedostatečnými
zkušenostmi a znalostmi, jestliže budou pod
dohledem nebo byly poučeny o bezpečném
používání přístroje a chápou nebezpečí, která
z jeho používání vyplývají. Spřístrojem si děti
nesmí hrát. Děti nesmí bez dohledu provádět
čištění ani uživatelskou údržbu výrobku.
Zabraňte ohrožení života
v důsledku zásahu elektrickým
proudem
Elektrickou instalaci nechte provádět jen vyuče-
ného elektrikáře nebo osobu s odpovídajícími
zkušenostmi.
Před každým připojením na přívod elektrického
proudu kontrolujte svítidlo a připojovací kabel,
jestli nejsou poškozené. Nikdy nepoužívejte
svítidlo, pokud jste zjistili, že je poškozené.
Poškozené síťové kabely znamenají nebezpečí
ohrožení života elektrickým proudem. Při poško-
zeních, opravách nebo jiných problémech se
obraťte na servis nebo na kvalifikovaného elek-
trikáře.
Před montáží odstraňte pojistku nebo vypněte
jistič v pojistkové skříni (poloha 0).
Před montáží se přesvědčte, jestli se shoduje na-
pětí elektrického proudu, které máte k dispozici
s napětím potřebným pro svítidlo (viz „Technic
údaje“).
Bezpodmínečně zabraňte kontaktu lampy
svodou nebo jinými kapalinami.
Nikdy neotvírejte žádný z elektrických provoz-
ních prostředků ani do nich nestrkejte jakékoli
předměty. Takové zásahy znamenají nebezpečí
ohrožení života elektrickým proudem.
Neinstalujte svítidlo na vlhkém nebo vodivém
povrchu!
Vyvarujte se nebezpečí
požáru a poranění
Bezprostředně po vybalení zkontrolujte svítidlo,
jestli není poškozené. Vtakovém případě se
obraťte na servis se žádostí o náhradu.
POZOR! NEBEZPEČÍ POPÁLE
HORKÝMI POVRCHY!
Před dotykem se ujistěte, že je světlo vypnuté
a vychladlé, aby jste se vyhnuli popáleninám.
Svíticí prostředky vyvinou v oblasti hlavy lampy
silné horko.
Zdroj světla tohoto svítidla nelze vyměnit; jest-
liže je vadný nebo dosáhne konce životnosti,
musí se vyměnit celé svítidlo.
Toto svítidlo není vhodné kpoužití
externích stmívačů a elektronických
spínačů.
Nedívejte se přímo do zdroje světla (žárovka
LED atd.).
Nedívejte se optickými zařízeními do zdroje
světla (např. lupa).
Tak postupujete správně
Montujte lampu tak, aby byla chráněna před
vlhkem a znečištěním.
Montáž nejdříve pečlivě připravte, udělejte si na
ní čas. Připravte si předtím přehledně všechny
jednotlivé díly a navíc potřebné nástroje nebo
materiál.
Bezpečnost/Příprava/Před instalací
53 CZ
Bezpečnost Bezpečnost/Příprava/Před instalací
Buďte vždy pozorní! Dbejte vždy na to, co
děláte, a postupujte vždy srozumem. Nikdy
nemontujte svítidlo, nejste-li koncentrovaní nebo
necítíte-li se dobře.
Bezpečnostní pokyny pro
baterie a akumulátory
DRŽTE BATERIE MIMO
DOSAH DĚTÍ!
Spolknutí může způsobit chemická popálení, per-
foraci měkkých tkání a smrt. Těžké popáleniny
se mohou projevit během 2hodin po spolknutí.
Ihned vyhledejte lékaře.
NEBEZPEČÍ OHROŽENÍ ŽIVOTA!
Uchovávejte baterie a akumulátory mimo dosah
dětí. V případě spolknutí okamžitě vyhledejte
lékařskou pomoc!
Při požití může dojít kpopáleninám, perforaci
měkkých tkání a úmrtí. Kzávažným popálenin
ám
může dojít do 2hodin po požití.
NEBEZPEČÍ VÝBUCHU!
Nenabíjecí baterie nikdy znovu nenabíjejte.
Baterie nebo akumulátory nezkratujte ani je
neotevírejte. Hrozí přehřátí, nebezpečí požáru
nebo jejich prasknutí.
Nikdy neházejte baterie nebo akumulátory do
ohně ani do vody.
Nevystavujte baterie nebo akumulátory mecha-
nickému zatížení.
Nebezpečí vytečení baterií/akumulátorů
Zabraňte extrémním podmínkám a teplotám, např
.
na topení anebo na slunci, které mohou nega-
tivně ovlivnit funkci baterií nebo akumulátorů.
Vyhýbejte se kontaktu s pokožkou, očima a sliz-
nicemi! Po kontaktu s kyselinou baterií ihned o
myjte
postižená místa dostatečným množstvím čisté
vody a okamžitě vyhledejte lékařskou pomoc!
NOSTE OCHRANNÉ
RUKAVICE!
Vyteklé i poškozené baterie nebo akumulátory
mohou při kontaktu s pokožkou způsobit její
poleptání. Noste proto vhodné rukavice.
V případě vytečení ihned odstraňte baterie nebo
akumulátory z výrobku, abyste zabránili jeho
poškození!
Používejte jen baterie nebo akumulátory stejného
typu. Nekombinujte staré baterie nebo akumu-
látory s novými!
Odstraňte baterie nebo akumulátory při delším
nepoužívání z výrobku.
Nebezpečí poškození výrobku
Používejte jen udaný typ baterie nebo
akumulátoru!
Nasazujte baterie nebo akumulátory podle
označení polarity (+) a (-) na bateriích nebo
akumulátorech a na výrobku.
Vyčistěte kontakty na baterii/akumulátoru a vpři-
hrádce na baterie před jejich vložením suchou
utěrkou, která nepouští vlákna, nebo vatovým
tamponem!
Vybité baterie nebo akumulátory ihned vyjměte
z výrobku.
Příprava
Potřebné nářadí a materiál
Uvedené nářadí a materiály nejsou součástí dodávky.
Jedná se zde o nezávazné údaje a orientační hod-
noty. Vlastnosti materiálu jsou závislé na individuál-
ních podmínkách v místě.
- tužka/nástroj k označení
- 2pólová zkoušečka napětí
- šroubovák
- vrtačka
- vrták (cca Ø 6 mm)
- kleště štípačky
- žebřík
- kladivo
Před instalací
Důležité: Připojení na elektrický rozvod musí pro-
vést vyučený elektrikář nebo osoba zaškolená pro
práce na elektrických rozvodech.
Tato osoba musí být seznámena svlastnostmi svítidla
a spředpisy pro připojení.
54 CZ
Před instalací/Uvedení do provozu
Před instalací se nejdříve seznamte se světlem,
pokyny a obrázky v tomto návodu.
Před instalací zajistěte, aby byl přívod elektric-
kého proudu ke svítidlu bez napětí. Za tímto úče-
le
m vyjměte pojistku nebo vypněte jistič vpojistko
skříni (poloha0).
Zkontrolujte beznapěťový stav 2pólovou
zkoušečkou.
Uvedení do provozu
Montáž svítilny
Odšroubujte základovou desku
1
od stínidla
5
otáčením proti směru chodu hodinových ručiček.
Uvolněte obě svorky bez šroubů
6
a bezpeč-
nostní hák
7
ze základové desky
1
.
Přiložte základovou desku
1
na strop a ozna-
čte si pomocí příslušných otvorů pro šrouby
2
v základové desce
1
místa k vrtání otvorů do
stropu.
Vyvrtejte otvory (Ø 6 mm, cca 40 mm hluboké).
Dávejte pozor, abyste nepoškodili vodiče přívodu
elektrického proudu.
Nastrčte do vyvrtaných otvorů hmoždinky
3
.
V případě potřeby použijte kladivo.
Protáhněte síťový připojovací kabel (externí)
9
skrz prostřední otvor základové desky
1
(viz obr. A).
Upozornění: Dbejte na to, abyste neprostrčili
síťový připojovací kabel otvorem příliš daleko,
jinak nelze základovou desku
1
smontovat se
stínidlem
5
.
Přišroubujte základovou desku
1
pomocí šroubů
na strop (viz obr. A).
Přetáhněte ochranné hadičky
4
přes vodiče L
a N síťového připojovacího kabelu (externího)
9
. Dávejte pozor, abyste správně připojili jed-
notlivé vodiče síťového připojovací kabelu (ex-
terního)
9
: vodič pod napětím, černý nebo
hnědý vodič = symbol L, nulový vodič, modrý =
symbol N.
Upozornění: Toto svítidlo má třídu ochrany
,
ochranný vodič se nepřipojuje.
Nyní umístěte svorky bez šroubů
6
a bezpeč-
nostní hák
7
na příslušná místa vzákladové
desce
1
(viz obr. B–D).
Nyní připevněte stínidlo
5
na základovou desku
1
otáčením ve směru chodu hodinových ručiček
(viz obr. E).
Upozornění: Šipky na základové desce
1
a
na stínidle
5
musí ležet proti sobě (viz obr. H).
Nasaďte opět pojistku nebo zapněte jistič
vpojistkové skříni (do polohy I).
Vložení a výměna baterií
(dálkového ovladače) (viz obr. G)
Upozornění: Před prvním použitím vytáhněte
izolační pásek
12
z přihrádky na baterie
11
.
Jestliže se zkrátí dosah dálkového ovladače
10
, je
třeba vyměnit jeho baterii
13
.
Stlačte uvolňovací páčku směrem dovnitř a
vytáhněte přihrádku na baterie
11
.
V případě potřeby vyjměte vybitou baterii
13
.
Vložte novou baterii
13
do přihrádky na baterie
11
. Používejte pouze baterie
13
uvedené v ka-
pitole „Technická data“.
Upozornění: Přitom dbejte na správnou pola-
ri
tu. Správná polarita je zobrazena na dálko
m
ovladači
10
.
Zasuňte přihrádku na baterie
11
zpět do dál-
kového ovladače
10
.
Řízení světelných efektů
pomocí dálkového ovladače
Upozornění: Vysílač dálkového ovladače
10
se
nachází na protější straně od přihrádky na baterie
11
. Zajistěte, aby mezi vysílačem a přijímačem ne-
byly žádné překážky.
ON/OFF = svítidlo ZAP/VYP
(zapnout/vypnout)
Osvětlovací
prostředek = teplá bílá/neutrální bílá/
studená bílá barva
Slunce = teplá bílá barva
Sněhová vločka = studená bílá barva
Uvedení do provozu/Údržba a čištění/Zlikvidování/Záruka a servis
55 CZ
Před instalací/Uvedení do provozu Uvedení do provozu/Údržba a čištění/Zlikvidování/Záruka a servis
Slunce nevyplněné = jas redukovat
Slunce vyplněné = jas zvýšit
10 % = intenzita světla 10 %
50 % = intenzita světla 50 %
100 % = intenzita světla 100 %
Měsíc = funkce nočního světla
30 min
30 Min. = funkce časovače
(30 minut)
D1
D1 = Paměť pro individuální
programy barev
Upozornění: Pro uložení programu barev na
tlačítko D1, postupujte následovně:
Nastavte svítidlo podle potřeby.
Stiskněte a přidržte tlačítko D1.
Upozornění: Po dokončení operace ukládání
svítidlo jednou blikne.
Údržba a čištění
NEBEZPEČÍ ZÁSAHU
ELEKTRICKÝM PROUDEM!
Při čištění nejprve svítidlo odpojte od elektrické sítě.
Za tímto účelem vyjměte pojistku nebo vypněte jistič
vpojistkové skříni (poloha0).
NEBEZPEČÍ ZÁSAHU
ELEKTRICKÝM PROUDEM!
Z důvodu elektrické bezpečnosti se svítidlo nikdy
nesmí čistit vodou nebo jinými kapalinami anebo
dokonce do vody ponořovat.
POZOR! NEBEZPEČÍ POPÁLENÍ
HORKÝMI POVRCHY!
Nechte výrobek úplně vychladnout.
Nepoužívejte žádná rozpouštědla, benzín
apod. Svítidlo by se tím poškodilo.
K čištění používejte jen suchou utěrku nepouš-
tějící vlákna.
Nasaďte zase pojistku nebo zapněte jistič
vpojistkové skříni (do polohy I).
Zlikvidování
Obal se skládá zekologických materiálů, které
můžete zlikvidovat prostřednictvím místních sběren
recyklovatelných materiálů.
b
a
Při třídění odpadu se řiďte podle ozna-
čení obalových materiálů zkratkami (a)
a čísly (b), s následujícím významem:
1–7: umělé hmoty/20–22: papír a
lepenka/80–98: složené látky.
Výrobek a obalové materiály jsou recy-
klovatelné, zlikvidujte je odděleně pro
lepší odstranění odpadu. Logo Triman
platí jen pro Francii.
Vzájmu ochrany životního prostředí vy-
sloužilý výrobek nevyhazujte do domov-
ního odpadu, ale předejte k odborné
likvidaci. O sběrnách a jejich otevíracích
hodinách se můžete informovat u přísluš
správy města nebo obce.
Vadné nebo vybité baterie resp. akumulátory se musí,
podle směrnice 2006/66/ES a jejích příslušných
změn, recyklovat. Baterie, akumulátory i výrobek
odevzdejte zpět do nabízených sběren.
Ekologické škody v důsledku
chybné likvidace baterií/
akumulátorů!
Baterie/akumulátory se nesmí zlikvidovat v domá-
cím odpadu. Mohou obsahovat jedovaté těžké kovy
a musí se zpracovávat jako zvláštní odpad. Chemic
symboly těžkých kovů: Cd = kadmium, Hg = rtuť,
Pb = olovo. Proto odevzdejte opotřebované baterie/
akumulátory u komunální sběrny.
Záruka a servis
Záruka
Od okamžiku zakoupení dostáváte na výrobek zá-
ruku po dobu 36 měsíců. Přístroj byl pečlivě vyroben
a podroben přesné kontrole kvality. Během záruční
56 CZ
Záruka a servis
doby odstraníme bezplatně všechny vady materiálu a
opravíme závady z výroby. Vpřípadě, že se během
záruční lhůty přesto vyskytnou závady, zašlete přís
troj
na uvedenou adresu servisu a uveďte následující číslo
modelu: 14163606L/14163605L/14163706L.
Ze záruky vyloučeny škody způsobené neodborným
zacházením, nerespektováním návodu kobsluze
nebo zásahem neautorizovanou osobou, jakož i
poškození rychle opotřebitelných dílů (např. svíticí
prostředky). Záručním výkonem se záruční doba
neprodlouží ani neobnoví.
Adresa servisu
Briloner Leuchten GmbH & Co. KG
Im Kissen 2
59929 Brilon
NĚMECKO
Tel.: +49 29 61/97 12–800
Fax: +49 29 61/97 12–199
E-mail: kundenservice@briloner.com
www.briloner.com
Servisní číslo zdarma:
Tel.: 00800/27456637
IAN 411276_2110
Pro všechny požadavky si připravte pokladní blok
a číslo výrobku (IAN 411276_2110) jako doklad
o nákupu.
Prohlášení o shodě
Tento výrobek splňuje požadavky platných evrop-
ských a národních směrnic. Shoda byla prokázána.
Příslušná prohlášení a dokumentace jsou uloženy
uvýrobce.
Výrobce
Briloner Leuchten GmbH & Co. KG
Im Kissen 2
59929 Brilon
NĚMECKO
Zoznam obsahu
58 SK
Legenda použitých piktogramov
Prečítajte si návod na obsluhu! Životnosť LED v hodinách
Toto svietidlo je určené výhradne na
prevádzku v interiéri, v suchých a
uzatvorených priestoroch.
Výstraha! Nebezpečenstvo zásahu
elektrickým prúdom!
Nebezpečenstvo ohrozenia života
a nebezpečenstvo úrazu pre malé
a staršie deti!
Opatrne! Nebezpečenstvo popálenia
skrze horúce povrchy!
Striedavé napätie
(druh prúdu a druh napätia)
Toto svietidlo nie je vhodné pre exter
stmievače a elektronické spínače.
Hertz (frekvencia) Nebezpečenstvo explózie!
Watt (efektívny výkon) Noste ochranné rukavice!
Volt Takto postupujete správne
Trieda ochrany II
b
a
Obal a zariadenie ekologicky
zlikvidujte!
Dodržiavajte výstražné a
bezpečnostné pokyny!
Nesprávna likvidácia batérií/akumulá-
torových batérií ničí životné prostredie!
LED LED
Zdroj svetla tohto výrobku nie je možné
vymeniť.
Obal je vyrobený zo 100 %
recyklovaného papiera.
Ra
Index reprodukcie farieb
Toto svietidlo disponuje stupňom
ochrany „IP20“ a je určené výlučne
pre použitie v interiéroch v súkrom-
ných domácnostiach.
Lúmen Teplota svetla v Kelvin
20
PAP
Vlnitá lepenka
04
LDPE
Polyetylén (s nízkou hustotou)
Držte v bezpečnej vzdialenosti od detí!
Úvod
59 SK
Legenda použitých piktogramov Úvod
Stropné LED svietidlo
Úvod
Blahoželáme Vám ku kúpe Vášho nového
prístroja. Rozhodli ste sa tým pre vyso-
kokvalitný výrobok. Dôkladne si prečí-
tajte celý tento návod na obsluhu. Otvorte stranu
s obrázkami. Tento návod patrí k tomuto výrobku
a obsahuje dôležité upozornenia pre uvedenie do
prevádzky a manipuláciu. Dodržiavajte vždy všetky
bezpečnostné upozornenia. Pred uvedením do pre-
vádzky prekontrolujte, či je k dispozícii správne na-
pätie a či sú všetky diely správne namontované. V
prípade otázok alebo neistoty ohľadom manipulácie
s prístrojom sa prosím spojte s Vaším predajcom ale
bo
servisným pracoviskom. Tento návod si starostlivo
uschovajte a prípadne ho odovzdajte tretej osobe.
Používanie v súlade
s určeným účelom
Toto svietidlo je určené výhradne na pre-
vádzku v interiéri, v suchých a uzatvore-
ných priestoroch.
Tento prístroj je určený len na používanie v súkrom-
ných domácnostiach. Tento výrobok je určený len na
normálnu prevádzku.
Obsah dodávky
Bezprostredne po vybalení vždy skontrolujte úplnosť
dodávky ako aj bezchybný stav zariadenia.
1 stropné LED svietidlo (14163606L/
14163605L/14163706L)
1 diaľkové ovládanie
3 hmoždinky
3 skrutky
2 ochranné hadičky
1 batéria CR2025 (lítiová)
1 návod na montáž a obsluhu
Popis častí
1
Podložná doska
2
Skrutka
3
Rozperka
4
Ochranná hadička
5
Tienidlo lampy
6
Bezskrutková svorka
7
Zaisťovací hák
8
Krúžok
9
Sieťový prípojný kábel (externý)
10
Diaľkové ovládanie
11
Priečinok pre batérie
12
Izolačný pásik
13
Batéria (3 V CR2025)
Technické údaje
Svietidlo:
Model č.: 14163606L/
14163605L/14163706L
Prevádzkové napätie: 230–240 V∼, 50 Hz
Menovitý výkon: max. 22 W
Trieda ochrany: II/
Druh ochrany: IP20
LED modul:
Osvetľovací prostriedok: LED modul
Menovitý výkon: 22 W
Diaľkové ovládanie:
Batéria: 1 x 3 V CR2025
Tento výrobok obsahuje svetelný zdroj triedy
energetickej účinnosti „E“.
60 SK
Bezpečnosť
Bezpečnosť
Bezpečnostné
upozornenia
V prípade škôd, ktoré vzniknú nedodržiavaním tohto
návodu na obsluhu, zaniká garančný nárok! Pri ná-
sledných škodách nepreberá výrobca ručenie! V
prípade vecných škôd alebo poranenia osôb, ktoré
boli zapríčinené neodbornou manipuláciou alebo
nedodržiavaním bezpečnostných pokynov, nepre-
berá výrobca ručenie!
NEBEZPE-
ČENSTVO OHROZENIA ŽI-
VOTA A NEBEZPEČENSTVO
ÚRAZU PRE MALÉ I STARŠIE DETI!
Nikdy nenechávajte deti bez dozoru s obalovým
materiálom. Existuje nebezpečenstvo zadusenia
obalovým materiálom. Deti často podceňujú
nebezpečenstvá.
Svietidlo alebo obalový materiál nenechávajte
voľne ležať bez povšimnutia. Plastové fólie/vr
ecká,
plastové diely atď. by mohli byť pre deti nebez-
pečnou hračkou. Držte deti vždy v bezpečnej
vzdialenosti od výrobku.
Tento prístroj môžu používať deti od 8 rokov
ako aj osoby so zníženými psychickými, senzo-
rickými alebo duševnými schopnosťami alebo s
nedostatkom skúseností a vedomostí, ak sú pod
dozorom, alebo ak boli poučené vzhľadom na
bezpečné používanie prístroja, a ak porozu-
meli nebezpečenstvám spojeným s jeho použí-
vaním. Deti sa s prístrojom nesmú hrať. Čistenie
a údržbu nesmú vykonávať deti bez dozoru.
Zabráňte ohrozeniu života
zásahom elektrickým prúdom
Elektrickú inštaláciu prenechajte kvalifikova-
nému elektrikárovi alebo osobe zaškolenej
pre elektroinštalácie.
Pred každým pripojením do siete prekontrolujte
svietidlo a sieťový prípojný kábel ohľadom prípa
d-
ných poškodení. Ak zistíte akékoľvek poškodenia,
svietidlo za žiadnych okolností nepoužívajte.
Poškodené sieťové káble predstavujú nebezpe-
čenstvo ohrozenia života zásahom elektrickým
prúdom. V prípade poškodení, opráv alebo iných
problémov so svietidlom sa obráťte na servisné
stredisko alebo kvalifikovaného elektrikára.
Pred montážou odstráňte poistku alebo vypnite
istič vedenia v poistkovej skrinke (poloha 0).
Pred montážou sa uistite, že sa existujúce sie-
ťové napätie zhoduje s potrebným prevádzko-
vým napätím svietidla (pozri „Technické údaje“).
Bezpodmienečne zabráňte kontaktu svietidla s
vodou alebo inými kvapalinami.
Nikdy neotvárajte žiadny z elektrických prevádz-
k
ových prostriedkov, ani do nich nestrkajte žiad
ne
predmety. Takéto zásahy predstavujú ohrozenie
života v dôsledku zásahu elektrickým prúdom.
Svietidlo neinštalujte na vlhký alebo vodivý
podklad!
Zabráňte nebezpečenstvu
požiaru a poranení
Bezprostredne po vybalení skontrolujte svietidlo
ohľadom prípadných poškodení. V takom prí-
pade sa spojte so servisným strediskom kvôli
výmene.
OPATRNE! NEBEZPEČENSTVO
POPÁLENIA SKRZE HORÚCE
POVRCHY!
Zabezpečte, aby bolo svietidlo vypnuté a
vychladnuté skôr, ako sa ho budete dotýk,
pretože inak hrozí nebezpečenstvo popálenia.
Osvetľovacie prostriedky vytvárajú v oblasti
hlavy lampy silné teplo.
Svetelný zdroj tohto svietidla nie je možné vy-
meniť; keď dosiahne koniec svojej životnosti, je
potrebné vymeniť celé svietidlo.
Toto svietidlo nie je vhodné pre
externé stmievače a elektronické
spínače.
Nepozerajte sa priamo do svetelného zdroja
(osvetľovací prostriedok, LED atď.).
Nepozerajte sa do svetelného zdroja pomocou
optických nástrojov (napr. lupa).
Bezpečnosť
61 SK
Bezpečnosť Bezpečnosť
Takto postupujete správne
Svietidlo namontujte tak, aby bolo chránené
pred vlhkosťou a znečistením.
Montáž si starostlivo pripravte a doprajte si
dostatok času. Dopredu si pripravte všetky jed-
notlivé diely a dodatočne potrebné náradie al
ebo
materiál prehľadne a na dosah ruky.
Buďte neustále opatrný! Dávajte vždy pozor na
to, čo robíte, a vždy konajte rozvážne. Svietidlo
v žiadnom prípade nemontujte, ak ste práve
nesústredený alebo sa necítite dobre.
Bezpečnostné upozornenia
týkajúce sa batérií/
akumulátorových batérií
BATÉRIE SKLADUJTE MIMO
DOSAHU DETÍ!
Prehltnutie môže spôsobiť chemické popáleniny,
perforácie mäkkých častí tkaniva a smrť. Ťažké
popáleniny môžu nastať v priebehu 2 hodín po
prehltnutí. Ihneď vyhľadajte lekára.
NEBEZPEČENSTVO OHROZENIA ŽIVOTA!
Batérie/akumulátorové batérie držte mimo
dosahu detí. V prípade prehltnutia okamžite
vyhľadajte lekára!
Prehltnutie môže mať za následok popáleniny,
perforáciu mäkkých tkanív a smrť. Ťažké popá-
leniny môžu nastať do 2 hodín po prehltnutí.
NEBEZPEČENSTVO EXPLÓZIE!
Nenabíjateľné batérie nikdy znova nenabíjajte.
Batérie/akumulátorové batérie neskratujte a/
alebo neotvárajte. Následkom môže byť prehria-
tie, požiar alebo explózia.
Batérie/akumulátorové batérie nikdy nehádžte
do ohňa alebo vody.
Nevystavujte batérie/akumulátorové batérie
mechanickej záťaži.
Riziko vytečenia batérií/akumulátorových
batérií
Batérie/akumulátorové batérie nikdy nevysta-
vujte extrémnym podmienkam a teplotám, ktoré
by na ne mohli pôsobiť, napr. na vykurovacích
telesách/priamom slnečnom žiarení.
Ak batérie/akumulátorové batérie vytiekli, za-
bráňte kontaktu pokožky, očí a slizníc s chemi-
káliami! Ihneď vypláchnite postihnuté miesta
väčším množstvom čistej vody a okamžite vyhľa-
dajte lekára!
NOSTE OCHRANNÉ
RUKAVICE!
Vytečené alebo poškodené batérie/akumuláto-
rové batérie môžu pri kontakte s pokožkou spô-
sobiť poleptanie. V takom prípade preto noste
vhodné ochranné rukavice.
V prípade vytečenia batérií/akumulátorových
batérií ich ihneď vyberte z výrobku, aby ste
predišli vzniku škôd.
Používajte iba batérie/akumulátorové batérie
rovnakého typu. Nekombinujte staré batérie/
akumulátorové batérie s novými!
Ak produkt dlhší čas nepoužívate, vyberte z
neho batérie/akumulátorové batérie.
Riziko poškodenia produktu
Používajte výhradne uvedený typ batérií/
akumulátorových batérií!
Vložte batérie/akumulátorové batérie podľa
označenia polarity (+) a (-) na batérii/akumu-
látorovej batérii a výrobku.
Pred vložením očistite kontakty na batérii/akumu-
látorovej batérii a v priečinku pre batériu suchou
h
andričkou, ktorá nepúšťa vlákna, alebo vatovo
u
tyčinkou!
Vybité batérie/akumulátorové batérie ihneď
vyberte z produktu.
62 SK
Príprava/Pred inštaláciou/Uvedenie do prevádzky
Príprava
Potrebné náradie a materiál
Uvedené náradie/nástroje a materiál nie sú súčas-
ťou dodávky. Ide tu o nezáväzné údaje a hodnoty
pre orientáciu. Charakter materiálu sa riadi podľa
individuálnych daností na mieste.
- ceruzka/nástroj na označovanie
- 2-pólová skúšačka napätia
- skrutkovač
- vŕtačka
- vrták (cca. Ø 6 mm)
- bočné štípacie kliešte
- rebrík
- kladivo
Pred inštaláciou
Dôležité: Elektrické pripojenie musí vykonať kvali-
fikovaný elektrikár alebo osoba zaškolená pre elek-
troinštalácie.
Táto musí mať znalosti o vlastnostiach svietidla a
predpisoch o pripojení.
Pred inštaláciou sa oboznámte so všetkými
pokynmi a obrázkami v tomto návode, ako
aj so samotným svietidlom.
Pred inštaláciou zabezpečte, aby bolo vedenie,
na ktoré bude svietidlo pripojené, bez napätia.
Z tohto dôvodu odstráňte poistku alebo vypnite
istič vedenia v skrinke na poistky (poloha 0).
Beznapäťový stav prekontrolujte pomocou
2-pólovej skúšačky napätia.
Uvedenie do prevádzky
Montáž svietidla
Uvoľnite podložnú dosku
1
otáčaním proti
smeru hodinových ručičiek z tienidla lampy
5
.
Uvoľnite obe bezskrutkové svorky
6
a zaisťo-
vací hák
7
z podložnej dosky
1
.
Pridržte podložnú dosku
1
oproti stropu a
označte otvory pre vŕtanie pomocou dier urče-
ných pre skrutky
2
v podložnej doske
1
.
Vyvŕtajte otvory (Ø 6 mm, cca 40 mm hlboké).
Zabezpečte, aby ste nepoškodili prívodové
vedenie.
Do vyvŕtaných otvorov zasuňte rozperky
3
.
V prípade potreby si pomôžte kladivom.
Preveďte sieťový prípojný kábel (externý)
9
cez
stredný otvor podložnej dosky
1
(pozri obr. A).
Poznámka: Dbajte na to, aby ste sieťový prí-
pojný kábel nezasunuli príliš ďaleko cez otvor,
pretože inak podložná doska
1
nezapadne
na tienidle lampy
5
.
Upevnite podložnú dosku
1
pomocou skrutiek
na strop (pozri obr. A).
Natiahnite ochranné hadičky
4
na káble L a N
siového prípojného kábla (externý)
9
. Dbajte
na to, aby ste zakaždým správne pripojili jednot-
livé vodiče sieťového prípojného kábla (externý)
9
: vodič vedúci prúd, čierny alebo hnedý =
symbol L, neutrálny vodič, modrý = symbol N.
Poznámka: Toto svietidlo má triedu ochrany
, ochranný vodič nie je zapojený.
Teraz nasaďte bezskrutkové svorky
6
a zais-
ťovací hák
7
na miesta určené na tento účel
v podložnej doske
1
(pozri obr. B–D).
Teraz upevnite tienidlo lampy
5
otáčaním v
smere hodinových ručičiek na podložnej doske
1
(pozri obr. E).
Poznámka: Šípky na podložnej doske
1
a
na tienidle lampy
5
musia byť nasmerované
oproti sebe (pozri obr. H).
Opäť nasaďte poistku alebo zapnite istič vede-
nia v skrinke s poistkami (poloha I).
Vkladanie/výmena batérie
(diaľkové ovládanie) (pozri
obr. G)
Poznámka: Pred prvým použitím odstráňte izo-
lačný pásik
12
z priečinka pre batériu
11
.
Keď dosah diaľkového ovládania
10
slabne, je
potrebné vymeniť batériu
13
.
Zatlačte odblokovaciu páčku dovnútra a vytiah-
nite priečinok pre batériu
11
.
V prípade potreby vyberte vybitú batériu
13
.
Uvedenie do prevádzky/Údržba a čistenie/Likvidácia
63 SK
Príprava/Pred inštaláciou/Uvedenie do prevádzky Uvedenie do prevádzky/Údržba a čistenie/Likvidácia
Vložte novú batériu
13
do priečinka pre batériu
11
. Používajte iba batérie
13
popísané v kapi-
tole „Technické údaje“.
Poznámka: Dodržte pritom správnu polaritu.
Táto je znázornená na diaľkovom ovládaní
10
.
Priečinok pre batériu
11
opäť zasuňte do diaľ-
kového ovládania
10
.
Ovládanie svetelných efektov
pomocou diaľkového ovládania
Poznámka: Vysielač diaľkového ovládania
10
sa
nachádza na protiľahlej strane priečinka pre batérie
11
. Zabezpečte, aby sa medzi vysielačom a prijíma-
čom nenachádzali žiadne prekážky.
ON/OFF = ZAPNUTIE/VYPNUTIE
svietidla
Osvetľovací
prostriedok = Teplá biela/neutrálna
biela/studená biela
Slnko = Teplá biela
Snehová vločka = Studená biela
Slnko bez výplne = Zníženie jasu
Slnko s výplňou = Zvýšenie jasu
10 % = Intenzita svetla 10 %
50 % = Intenzita svetla 50 %
100 % = Intenzita svetla 100 %
Mesiac = Funkcia nočného svetla
30 min
30 Min = Funkcia časovača
(30 min.)
D1
D1 = Pamäťové miesto pre indi-
viduálne farebné program
y
Poznámka: Ak chcete uložiť farebný program
na tlačidle D1, postupujte takto:
Nastavte svietidlo podľa želania.
Podržte stlačené tlačidlo D1.
Poznámka: Po dokončení procesu ukladania
svietidlo raz zabliká.
Údržba a čistenie
NEBEZPEČENSTVO
ZÁSAHU ELEKTRICKÝM PRÚDOM!
Pred čistením najskôr odpojte svietidlo od elektrickej
siete. Z tohto dôvodu odstráňte poistku alebo vypn
ite
istič vedenia v skrinke na poistky (poloha 0).
NEBEZPEČENSTVO
ZÁSAHU ELEKTRICKÝM PRÚDOM!
Z
dôvodu elektrickej bezpečnosti sa svietidlo n
esmie
nikdy čistiť vodou alebo inými kvapalinami a v žiad-
nom prípade sa nesmie ponárať do vody.
OPATRNE! NEBEZPEČENSTVO POPÁLE-
NIA SKRZE HORÚCE POVRCHY!
Svietidlo nechajte úplne ochladnúť.
Nepoužívajte žiadne rozpúšťadlá, benzín a. i.
Svietidlo by sa pritom poškodilo.
Na čistenie používajte iba suchú handričku, ktorá
nepúšťa vlákna.
Opäť nasaďte poistku alebo zapnite istič vedenia
v skrinke s poistkami (poloha I).
Likvidácia
Obal pozostáva z ekologických materiálov, ktoré
môžete odovzdať na miestnych recyklačných zber-
ných miestach.
b
a
Všímajte si prosím označenie obalových
materiálov pre triedenie odpadu, sú
označené skratkami (a) a číslami (b) s
nasledujúcim významom: 1–7: Plasty/
20–22: Papier a kartón/80–98: Spo-
jené látky.
Výrobok a obalové materiály sú recyklo-
vateľné, zlikvidujte ich oddelene pre lepšie
spracovanie odpadu. Triman-Logo platí
iba pre Francúzsko.
64 SK
Likvidácia/Záruka a servis
Ak výrobok doslúžil, v záujme ochrany
životného prostredia ho neodhoďte do
domového odpadu, ale odovzdajte na
odbornú likvidáciu. Informácie o zberných
miestach a ich otváracích hodinách zís-
kate na Vašej príslušnej správe.
Defektné alebo použité batérie/akumulátoro
batérie musia byť odovzdané na recykláciu podľa
smernice 2006/66/ES a jej zmien. Batérie/aku-
mulátorové batérie a/alebo výrobok odovzdajte
prostredníctvom dostupných zberných stredísk.
Nesprávna likvidácia batérií/
akumulátorových batérií ničí
životné prostredie!
Batérie/akumulátorové batérie sa nesmú likvidovať
spolu s domovým odpadom. Môžu obsahovať jedo-
vaté ťažké kovy a je potrebné zaobchádzať s nimi
ako s nebezpečným odpadom. Chemické značky
ťažkých kovov sú nasledovné: Cd = kadmium, Hg =
ortuť, Pb = olovo. Opotrebované batérie/akumulá-
torové batérie preto odovzdajte v komunálnej zberni.
Záruka a servis
Záruka
Na tento prístroj poskytujeme záruku 36 mesiacov
od dátumu kúpy. Prístroj bol starostlivo vyrobený a
podrobený dôkladnej kontrole kvality. Vrámci záruč-
nej
doby bezplatne opravíme všetky chyby materiálu
a výrobné chyby. Ak by sa však počas záručnej doby
vyskytli nedostatky, odošlite prístroj na uvedenú ad
resu
servisu s uvedením nasledovného čísla modelu:
14163606L/14163605L/14163706L.
Zo záruky sú vylúčené škody spôsobené neodbor-
nou manipuláciou, nedodržaním návodu na obsluhu
alebo zásahom neautorizovanej osoby, ako aj diely
podliehajúce opotrebovaniu (napr. osvetľovacie
prostriedky). Poskytnutím záruky sa záručná doba
nepredlžuje ani neobnovuje.
Servisná adresa
Briloner Leuchten GmbH & Co. KG
Im Kissen 2
59929 Brilon
NEMECKO
Tel.: +49 29 61/97 12‒800
Fax: +49 29 61/97 12‒199
E-Mail: kundenservice@briloner.com
www.briloner.com
Bezplatné servisné číslo:
Tel.: 00800/27456637
IAN 411276_2110
Pre všetky otázky majte pripravený pokladničný
doklad a číslo výrobku (IAN 411276_2110) ako
dôkaz o kúpe.
Prehlásenie o zhode
Tento výrobok spĺňa požiadavky platných európskych
a národných smerníc. Zhoda bola preukázaná. Prís-
lušné vysvetlenia a podklady sú uložené u výrobcu.
Výrobca
Briloner Leuchten GmbH & Co. KG
Im Kissen 2
59929 Brilon
NEMECKO
Índice
65 ES
Likvidácia/Záruka a servis
Leyenda de pictogramas utilizados ..................................................................... Página 66
Introducción .............................................................................................................................. Página 67
Especificaciones de uso .................................................................................................................. Página 67
Volumen de suministro .................................................................................................................... Página 67
Descripción de los componentes ................................................................................................... Página 67
Características técnicas .................................................................................................................. Página 67
Seguridad ................................................................................................................................... Página 68
Indicaciones de seguridad ............................................................................................................. Página 68
Indicaciones de seguridad sobre las pilas/baterías .................................................................... Página 69
Preparativos ............................................................................................................................. Página 70
Herramientas y materiales necesarios ........................................................................................... Página 70
Antes de la instalación ..................................................................................................... Página 70
Puesta en funcionamiento ............................................................................................ Página 70
Cómo montar la lámpara ............................................................................................................... Página 70
Insertar/cambiar la pila (mando a distancia) ............................................................................... Página 70
Controlar los efectos de luz con mando a distancia .................................................................... Página 71
Mantenimiento y limpieza............................................................................................ Página 71
Eliminación ................................................................................................................................. Página 71
Garantía y servicio técnico ........................................................................................... Página 72
Garantía .......................................................................................................................................... Página 72
Dirección del servicio técnico ......................................................................................................... Página 72
Declaración de conformidad ......................................................................................................... Página 72
Fabricante ........................................................................................................................................ Página 72
Índice
66 ES
Leyenda de pictogramas utilizados
¡Lea el manual de instrucciones! Vida útil del LED en horas
Esta lámpara solo es apta para el
uso en interiores, en espacios secos y
cerrados.
¡Advertencia! ¡Peligro de descarga
eléctrica!
¡Peligro mortal y de accidentes para
bebés y niños!
¡Precaución! ¡Peligro de quemaduras
debido a superficies calientes!
Corriente alterna
(tipo de corriente y de tensión)
Esta lámpara no está diseñada para
utilizarse con interruptores electróni-
cos ni con reguladores externos.
Hercio (frecuencia) ¡Peligro de explosión!
Vatio (potencia real) ¡Use guantes de seguridad!
Voltio Cómo proceder de forma segura
Clase de protección II
b
a
¡Deseche el embalaje y el aparato
de forma respetuosa con el
medioambiente!
¡Tenga en cuenta las advertencias e
indicaciones de seguridad!
¡Daños medioambientales por un
reciclaje indebido de las pilas/
baterías!
LED LED
La bombilla de este producto no puede
reemplazarse.
El embalaje está compuesto por
papel 100 % reciclado.
Ra
Índice de reproducción cromática
Esta lámpara cuenta con un tipo de
protección «IP20» y únicamente se
recomienda su uso en espacios inte-
riores de hogares.
Lumen Temperatura lumínica en kelvin
20
PAP
Cartón ondulado
04
LDPE
Polietileno (densidad baja)
¡Manténgalo fuera del alcance de
los niños!
Introducción
67 ES
Leyenda de pictogramas utilizados Introducción
Lámpara led de techo
Introducción
Le damos la enhorabuena por haber
adquirido este nuevo aparato. Con su
compra ha elegido un producto de gran
calidad. Lea atenta y completamente las siguientes
instrucciones de uso. Despliegue la página con las
ilustraciones. Estas instrucciones forman parte del
producto y contienen información importante sobre
su puesta en funcionamiento y uso. Tenga siempre
en cuenta todas las advertencias de seguridad. An-
tes de poner el artículo en funcionamiento, com-
pruebe que la tensión es la adecuada y que todas
las piezas están bien montadas. Si tiene dudas o no
sabe cómo utilizar el aparato, póngase en contacto
con su distribuidor o el servicio técnico. Conserve
estas instrucciones en un lugar seguro y adjúntelas
en caso de entregar el producto a otra persona.
Especificaciones de uso
Esta lámpara solo es apta para el uso en
interiores, en espacios secos y cerrados.
Este aparato ha sido diseñado exclusivamente para
uso doméstico. Este producto ha sido diseñado para
un funcionamiento normal.
Volumen de suministro
Después de desembalar el aparato, compruebe
siempre que dispone de todo el contenido indicado
y que el aparato se encuentra en perfecto estado.
1 lámpara led de techo (14163606L/
14163605L/14163706L)
1 mando a distancia
3 tacos
3 tornillos
2 tubos de protección
1 pila CR2025 (litio)
1 manual de instrucciones de montaje y manejo
Descripción de los componentes
1
Base
2
Tornillo
3
Taco
4
Tubo protector
5
Pantalla de la lámpara
6
Sujeción sin tornillos
7
Gancho de seguridad
8
Ojal
9
Cable de alimentación (externo)
10
Mando a distancia
11
Compartimento de la pila
12
Cintas de aislamiento
13
Pila (3 V CR2025)
Características técnicas
Lámpara:
Número de modelo: 14163606L/
14163605L/
14163706L
Tensión de funcionamiento: 230–240 V∼, 50 Hz
Potencia nominal: máx. 22 W
Clase de protección: II/
Tipo de protección: IP20
Módulo LED:
Bombilla: módulo LED
Potencia nominal: 22 W
Mando a distancia:
Pila: 1 x 3 V CR2025
Este producto contiene un foco de luz de clase de
eficiencia energética «E».
68 ES
Seguridad
Seguridad
Indicaciones de seguridad
¡La garantía no cubre los daños provocados por el
incumplimiento de estas instrucciones de uso! ¡No
se asumirá ninguna responsabilidad por daños in-
directos! ¡No se asume ninguna responsabilidad
en caso de daños materiales o personales provo-
cados por un uso inadecuado o la inobservancia
de las instrucciones de seguridad!
¡PELIGRO
DE MUERTE Y ACCIDENTE
PARA NIÑOS!
Nunca deje a los niños sin vigilancia con el
material de embalaje. Existe peligro de asfixia
por el material de embalaje. A menudo los ni-
ños no son conscientes de los peligros.
No deje la lámpara ni el material de embalaje
sin supervisión. Las láminas y bolsas de plástico,
las piezas de plástico, etc. pueden convertirse
en juguetes peligrosos para los niños. Man-
tenga siempre el producto fuera del alcance
de los niños.
Este aparato puede ser utilizado por niños ma-
yores de 8 años, así como por personas con
capacidades físicas, sensoriales o mentales re-
ducidas o que cuenten con poca experiencia
y/o falta de conocimientos, siempre y cuando
se les haya enseñado cómo utilizar el aparato
de forma segura y hayan comprendido los pe-
ligros que pueden resultar de un mal uso del
mismo. No permita que los niños jueguen con
el aparato. Las labores de limpieza y manteni-
miento no pueden ser efectuadas por niños sin
la supervisión de un adulto.
Evite peligros mortales
por descarga eléctrica
La instalación eléctrica debe ser realizada por
un electricista formado o por una persona con
formación en instalaciones eléctricas.
Antes de conectar el aparato a la red, compruebe
que la lámpara y el cable de alimentación estén
en perfecto estado. Nunca utilice la lámpara si
detecta algún tipo de daño.
Los cables de red dañados conllevan peligro
de muerte por descarga eléctrica. En caso de
detectar daños, requerir reparaciones o surgir
otros problemas en la lámpara, diríjase al cen-
tro de asistencia o a un técnico electricista.
Antes de instalar el producto, retire el fusible o
desconecte el correspondiente interruptor de la
caja de fusibles (posición 0).
Asegúrese antes del montaje de que la tensión
de red disponible coincida con la tensión de
funcionamiento necesaria de la lámpara (con-
sultar «Características técnicas»).
Evite que la lámpara entre en contacto con agua
u otros líquidos.
Nunca abra el equipo eléctrico ni introduzca
objetos en el mismo. Esto podría suponer peli-
gro de muerte por descarga eléctrica.
¡No instalar la lámpara sobre una superficie
húmeda o conductora!
Evite peligros de incendio
y de lesiones
Compruebe el estado de cada bombilla nada
más desembalarlas. En ese caso, póngase en
contacto con el servicio de mantenimiento para
que lo sustituya.
¡PRECAUCIÓN! ¡PELIGRO DE
QUEMADURAS DEBIDO A
SUPERFICIES CALIENTES!
Asegúrese de que la lámpara está apagada
y se ha enfriado antes de tocarla para evitar
quemaduras. Las bombillas generan mucho
calor en la zona del cabezal.
El foco de luz de esta lámpara no puede cam-
biarse, por lo que, cuando llegue al final de su
vida útil, deberá desecharse toda la lámpara.
Esta lámpara no está diseñada para
utilizarse con interruptores electróni-
cos ni con reguladores externos.
No mire directamente al foco de luz (bombilla,
LED, etc.).
No mire al foco de luz con instrumentos ópticos
(por ej. una lupa).
Seguridad
69 ES
Seguridad Seguridad
Cómo proceder de
forma segura
Monte la lámpara de modo que esté protegida
de la humedad, el viento y la suciedad.
Prepare cuidadosamente la instalación del pro-
ducto y dedíquele el tiempo suficiente. Antes de
comenzar, ordene todas las piezas y asegúrese
de que las tiene a mano junto con el resto de
las herramientas o el material que necesite.
¡Proceda siempre con sumo cuidado! Preste
mucha atención a lo que hace y actúe siempre
con sentido común. Bajo ningún concepto monte
la lámpara si está distraído o no se encuentra
bien.
Indicaciones de seguridad
sobre las pilas/baterías
¡MANTENGA LAS PILAS
FUERA DEL ALCANCE DE
LOS NIÑOS!
Su ingesta puede provocar quemaduras quími-
cas, perforaciones del tejido blando y la m
uerte.
Las quemaduras graves pueden aparecer en un
plazo de 2 horas tras la ingesta. Busque asis-
tencia médica de inmediato.
¡PELIGRO DE MUERTE!
Mantenga las pilas/baterías fuera del alcance
de los niños. ¡En caso de ingestión, acuda in-
mediatamente a un médico!
La ingestión puede provocar quemaduras, per-
foraciones de tejidos blandos y la muerte. Las
quemaduras graves pueden aparecer pasadas
2 horas tras la ingestión.
¡PELIGRO DE EXPLOSIÓN!
No recargue nunca pilas no recargables. No
ponga las pilas/baterías en cortocircuito ni
tampoco las abra. Estas podrían recalentarse,
explotar o provocar un incendio.
Nunca arroje pilas/baterías al fuego o al agua.
No aplique cargas mecánicas sobre las pilas /
baterías.
Riesgo de sulfatación de las pilas/
baterías
Evite condiciones y temperaturas extremas que
puedan influir en el funcionamiento de las pilas/
baterías, por ejemplo, acercarlas a un radiador
o exponerlas directamente a la luz solar.
¡Si las pilas/baterías se sulfatan, evite el con-
tacto de la piel, los ojos y las mucosas con los
productos químicos! ¡En caso de entrar en con-
tacto con el ácido, lave inmediatamente la zona
afectada con abundante agua y busque aten-
ción médica!
¡UTILICE GUANTES DE
SEGURIDAD!
Las pilas/baterías sulfatadas o dañadas pue-
den provocar abrasiones al entrar en contacto
con la piel. Por tanto, es imprescindible el uso
de guantes de protección en estos casos.
En caso de sulfatación de las pilas/baterías,
retírelas inmediatamente del producto para
evitar daños.
Utilice únicamente pilas/baterías del mismo
tipo. ¡No mezcle pilas/baterías usadas con
nuevas!
Retire las pilas/baterías del producto si no
va a utilizarlo durante un período de tiempo
prolongado.
Riesgo de daño del producto
¡Utilice exclusivamente el tipo de pila/batería
indicado!
Introduzca las pilas/baterías teniendo en cuenta
la polaridad marcada con (+) y (-) tanto en las
pilas/baterías como en el producto.
¡Limpie los contactos de la pila/batería y en el
compartimento de las pilas antes de la inserción
con un paño seco y libre de pelusas o un bas-
toncillo de algodón!
Retire inmediatamente las pilas/baterías
agotadas del producto.
70 ES
Preparativos/Antes de la instalación/Puesta en funcionamiento
Preparativos
Herramientas y materiales
necesarios
Las herramientas y los materiales mencionados no
se incluyen en el volumen de suministro. Los datos
y valores indicados son aproximados y meramente
orientativos. Los materiales necesarios dependerán
de las circunstancias particulares de cada situación.
- Lápiz/herramienta de marcación
- Detector de tensión de 2 polos
- Destornillador
- Taladro
- Broca (aprox. Ø 6 mm)
- Alicates
- Escalera
- Martillo
Antes de la instalación
Importante: Encargue la instalación eléctrica a
un electricista o a una persona especialmente cua-
lificada para ello.
Esta persona deberá conocer las características de
la lámpara y las normas de conexión.
Familiarícese antes de la instalación con todas
las indicaciones e imágenes de estas instruc-
ciones, así como con la propia lámpara.
Asegúrese antes de la instalación de que el
cable al que se vaya a conectar la lámpara no
tenga tensión. Para ello, retire el fusible o des-
active el interruptor protector automático en la
caja de fusibles (posición 0).
Compruebe que no haya tensión con un detec-
tor de tensión de 2 polos.
Puesta en funcionamiento
Cómo montar la lámpara
Suelte la base
1
de la pantalla de la lám-
para
5
girándola en sentido contrario a las
agujas del reloj.
Suelte las dos sujeciones sin tornillos
6
y el
gancho de seguridad
7
de la base
1
.
Sujete la base
1
contra el techo y marque los
orificios de perforación utilizando los agujeros
de la base
1
dispuestos para los tornillos
2
.
Taladre los orificios (Ø 6 mm, aprox. 40 mm de
profundidad). Asegúrese de no dañar el cable
de alimentación.
Introduzca los tacos
3
en los orificios de per-
foración. De ser necesario, utilice un martillo.
Pase el cable de alimentación (externo)
9
por
el orificio central de la base
1
(ver fig. A).
Nota: Asegúrese de no pasar en exceso el
cable de alimentación por el orificio, p70-ya que
de lo contrario la base
1
no coincidirá con la
pantalla de la lámpara
5
.
Fije la base
1
con los tornillos al techo (ver
fig. A).
Pase los tubos de protección
4
por los cables
L y N del cable de alimentación (externo)
9
.
Asegúrese de que cada uno de los conductores
del cable de alimentación (externo)
9
están
correctamente conectados: conductor de cor-
riente, negro o marrón = símbolo L; conductor
neutro, azul = símbolo N.
Nota: Esta lámpara cuenta con clase de pro-
tección
, el conductor de protección no se
conecta.
Después, coloque la sujeción sin tornillos
6
y
el gancho de seguridad
7
en los lugares dis-
puestos para ello en la base
1
(ver fig. B–D).
Ahora, fije la pantalla de la lámpara
5
a la
base
1
girándola en el sentido de las agujas
del reloj (ver fig. E).
Nota: Las flechas de la base
1
y de la pan-
talla de la lámpara
5
deben quedar enfrenta-
das (ver fig. H).
Vuelva a colocar el fusible o conecte el inter-
ruptor automático de protección en la caja de
fusibles (posición I).
Insertar/cambiar la pila
(mando a distancia) (ver fig. G)
Nota: Tire de la cinta de aislamiento
12
del com-
partimento de la pila
11
antes del primer uso.
Si el alcance del mando a distancia
10
disminuye,
cambie la pila
13
.
Puesta en funcionamiento/Mantenimiento y limpieza/Eliminación
72 ES
Eliminación/Garantía y servicio técnico
El producto y el material de embalaje
son reciclables. Separe los materiales
para un mejor tratamiento de los resi-
duos. El logotipo Triman se aplica solo
para Francia.
Para proteger el medio ambiente no tire
el producto junto con la basura domés-
tica cuando p72-ya no le sea útil. Deséchelo
en un contenedor de reciclaje. Diríjase a
la administración competente para obte-
ner información sobre los puntos de re-
cogida de residuos y sus horarios.
Las pilas/baterías defectuosas o usadas deben
ser recicladas según lo indicado en la directiva
2006/66/CE y en sus modificaciones. Recicle las
pilas/baterías y/o el producto en los puntos de
recogida adecuados.
¡Daños en el medio ambiente
por un reciclaje indebido de las
pilas/baterías!
Las pilas/baterías no deben eliminarse junto con los
residuos domésticos. Estas pueden contener metales
pesados tóxicos que deben tratarse conforme a la
normativa aplicable a los residuos especiales. Los
símbolos químicos de los metales pesados son: Cd =
cadmio, Hg = mercurio, Pb = plomo. Las pilas/ba-
terías deben reciclarse en un punto de recolección
específico para ello.
Garantía y servicio técnico
Garantía
Este aparato cuenta con una garantía de 36 meses
a partir de la fecha de compra. Este aparato ha
sido meticulosamente fabricado y ha sido sometido
a estrictos controles de calidad. Dentro del periodo
de garantía, reparamos gratuitamente todos los
defectos de los materiales o de fabricación. Si aún
así detecta defectos durante el período de garantía,
por favor, envíe el aparato a la dirección de servicio
que figura indicando el siguiente número de model
o:
14163606L/14163605L/14163706L.
Quedan excluidos de la garantía los daños produ-
cidos por un manejo incorrecto, por incumplimiento
del manual de instrucciones o en caso de manipu-
lación por parte de personas no autorizadas, así
como las piezas de desgaste (por ej. las bombillas).
Si se hace uso de la garantía, no se prolongará ni
renovará el período de garantía.
Dirección del servicio técnico
Briloner Leuchten GmbH & Co. KG
Im Kissen 2
59929 Brilon
ALEMANIA
Tlf.: +49 29 61/97 12–800
Fax: +49 29 61/97 12–199
Correo
electrónico: kundenservice@briloner.com
www.briloner.com
Número gratuito del servicio técnico:
Tlf.: 00800/27456637
IAN 411276_2110
Por favor, para cualquier consulta, tenga a mano
el tique de compra y el número del artículo (IAN
411276_2110) como justificante de compra.
Declaración de conformidad
Este producto cumple las exigencias de las directiv
as
europeas y nacionales vigentes. Se ha comprobado
la conformidad. El fabricante posee las declaracio-
nes y documentos correspondientes.
Fabricante
Briloner Leuchten GmbH & Co. KG
Im Kissen 2
59929 Brilon
ALEMANIA
Indholdsfortegnelse
73 DK
Eliminación/Garantía y servicio técnico
De anvendte piktogrammers legende ....................................................................Side 74
Indledning .......................................................................................................................................Side 75
Formålsbestemt anvendelse ................................................................................................................Side 75
Leverede dele .......................................................................................................................................Side 75
Beskrivelse af de enkelte dele .............................................................................................................Side 75
Tekniske data........................................................................................................................................Side 75
Sikkerhed.........................................................................................................................................Side 76
Sikkerhedsanvisninger .........................................................................................................................Side 76
Sikkerhedshenvisninger for batterier/akkuer......................................................................................Side 77
Forberedelse .................................................................................................................................Side 77
Nødvendigt værktøj og materiale .......................................................................................................Side 77
Før installationen .......................................................................................................................Side 78
Ibrugtagning .................................................................................................................................Side 78
Montering af lampen ...........................................................................................................................Side 78
Isætning/udskiftning af batteri (fjernbetjening) ..................................................................................Side 78
Styring af lyseffekter ved hjælp af fjernbetjeningen...........................................................................Side 78
Vedligeholdelse og rengøring .......................................................................................Side 79
Bortskaffelse .................................................................................................................................Side 79
Garanti og service ....................................................................................................................Side 80
Garanti .................................................................................................................................................Side 80
Serviceadresse .....................................................................................................................................Side 80
Konformitetserklæring ..........................................................................................................................Side 80
Producent ..............................................................................................................................................Side 80
Indholdsfortegnelse
75 DK
De anvendte piktogrammers legende Indledning
LED loftslampe
Indledning
Vi ønsker dig tillykke med købet af dit
nye apparat. Med købet har du besluttet
dig for et førsteklasses produkt. Læs ven-
ligst hele denne betjeningsvejledning omhyggeligt
igennem. Fold siden med afbildningerne ud. Denne
vejledning hører til dette produkt og indeholder vig-
tige anvisninger om ibrugtagning og håndtering.
Overhold altid alle sikkerhedsanvisninger. Kontrol-
lér inden ibrugtagningen, om den korrekte spæn-
ding er til stede og om alle dele er rigtigt monteret.
Skulle du have spørgsmål eller være usikker med
hensyn til håndteringen af apparatet, bedes du rette
henvendelse til din forhandler eller til servicestedet.
Denne vejledning skal opbevares omhyggeligt og i
givet fald gives videre til tredjemand.
Formålsbestemt anvendelse
Denne lampe er udelukkende egnet til
indendørs brug i tørre og lukkede rum.
Dette apparat er kun beregnet til anvendelse i pri-
vate husholdninger. Dette produkt er beregnet til
normal drift.
Leverede dele
Kontrollér altid umiddelbart efter udpakningen, at
leveringsomfanget er komplet og apparatet i en fejlfri
tilstand.
1 LED loftslampe (14163606L/14163605L/
14163706L)
1 fjernbetjening
3 rawlplugs
3 skruer
2 beskyttelsesslanger
1 batteri CR2025 (litium)
1 monterings- og betjeningsvejledning
Beskrivelse af de enkelte dele
1
Bundplade
2
Skrue
3
Dyvel
4
Beskyttelsesslange
5
Lampeskærm
6
Skrueløs klemme
7
Sikringskrog
8
Øje
9
Nettilslutningsledning (ekstern)
10
Fjernbetjening
11
Batterirum
12
Isoleringsstrimmel
13
Batteri (3 V CR2025)
Tekniske data
Lampe:
Modelnummer: 14163606L/14163605L/
14163706L
Driftsspænding: 230–240 V∼, 50 Hz
Nominel effekt: maks. 22 W
Beskyttelsesklasse: II/
Beskyttelsestype: IP20
LED-modul:
Lyskilde: LED-modul
Nominel effekt: 22 W
Fjernbetjening:
Batteri: 1 x 3 V CR2025
Dette produkt indeholder en lyskilde i energieffekti-
vitetsklasse ”E”.
77 DK
Sikkerhed Sikkerhed/Forberedelse
nødvendigt værktøj eller materiale overskueligt
til rette inden for rækkevidde.
Vær hele tiden agtpågivende! Vær hele tiden
bevidst om, hvad du gør, og brug hele tiden
din sunde fornuft. Montér ikke lampen, hvis du
er ukoncentreret eller føler dig dårligt tilpas.
Sikkerhedshenvisninger
for batterier/akkuer
OPBEVAR BATTERIER UDEN
FOR BØRNS RÆKKEVIDDE!
Slugning kan forårsage kemiske forbrændinger,
perforering af bløddelsvæv og døden. Alvorlige
forbrændinger kan forekomme inden for 2 timer
efter slugningen. Opsøg straks en læge.
LIVSFARE!
Hold batterier/akkuer udenfor børns rækkevidde.
Opsøg i tilfælde af slugning straks lægehjælp!
Indtagelse kan forårsage forbrændinger, perfore-
ring af blødt væv og døden. Alvorlige forbræn-
dinger kan forekomme inden for 2 timer efter
indtagelse.
EKSPLOSIONSFARE!
Genoplad aldrig ikkeopladelige batterier igen.
Kortslut ikke batterier/akkuer og/eller åben
disse ikke. Der kan opstå overophedning, brand-
fare eller eksplosion.
Smid batterier/akkuer aldrig i ild eller vand.
Udsæt batterier/akkuer ikke for mekanisk
belastning.
Risiko for udsivning fra batteriene/
akkuerne
Undgå ekstreme betingelser og temperaturer,
som kan påvirke batterier/akkuer, f.eks. varme-
legemer/direkte sollys.
Hvis batterier/akkuer er lækket, skal du undgå
at få kemikalierne på huden, i øjnene og i slim-
hinderne! Skyl de berørte steder med det samme
med klart vand og opsøg en læge!
BÆR BESKYTTELSESHANDSKER!
Udløbne eller beskadigede batterier/akkuer
kan forårsage ætsninger ved berøring med
huden. Bær i dette tilfælde derfor egnede be-
skyttelseshandsker.
I tilfælde af en lækage hos batterierne/akku-
erne, skal De fjerne disse med det samme fra
produktet for at undgå beskadigelser.
Anvend kun batterier/akkuer af samme type.
Bland ikke gamle batterier/akkuer med nye!
Fjern batterierne/akkuerne, når produktet ikke
anvendes i en længere periode.
Risiko for beskadigelse af produktet
Anvend udelukkende den angivne batteri-/
akkutype!
Indsæt batterier/akkuer iht. polaritetsmærknin-
gen (+) og (-) til batteri/akku og produktet.
Rengør kontakter ved batteriet/det genoplade-
lige batteri og i batterirummet før ilægningen
med en tør, fnugfri klud eller en vatpind!
Fjern brugte batterier/akkuer omgående fra
produktet.
Forberedelse
N
ødvendigt værktøj og materiale
De angivne værktøjer og materialer er ikke en del
af leveringsomfanget. Der er herved tale om ufor-
pligtende angivelser og værdier til orientering. Ma-
terialets beskaffenhed afhænger af de individuelle,
lokale forhold.
- blyant/markeringsværktøj
- 2-polet spændingstester
- skruetrækker
- boremaskine
- bor (ca. Ø 6 mm)
- skævbider
- stige
- hammer
78 DK
Før installationen/Ibrugtagning
Før installationen
Vigtigt: Den elektriske tilslutning skal foretages af
en uddannet elektriker eller en person, der er instru-
eret i el installationer.
Denne person skal have kendskab til lampens egen-
skaber og bestemmelserne for tilslutningen.
Gør dig fortrolig med alle anvisninger og af-
bildninger i denne vejledning samt med selve
lampen inden installationen.
Før installationen skal du sikre dig, at der ikke
er spænding på den ledning, som lampen skal
tilsluttes til. Fjern hertil sikringen eller slå over
strøms-
afbryderen i tavlen fra (0-stilling).
K
ontrollér ved brug af en 2-polet spændingstester
,
at der ikke er spænding på.
Ibrugtagning
Montering af lampen
Løsn bundpladen
1
fra lampeskærmen
5
ved
at dreje mod urets retning.
Løsn begge skrueløse klemmer
6
og sikkerheds-
krogen
7
fra bundpladen
1
.
Hold bundpladen
1
mod loftet og markér bo-
rehullerne ved hjælp af de huller i bundpladen
1
, som er beregnet til skruerne
2
.
Bor hullerne (Ø 6 mm, ca. 40 mm dybe). Sørg
for, at du ikke beskadiger tilledningen.
Stik dyvlerne
3
i borehullerne. Brug en hammer,
hvis det er nødvendigt.
Før nettilslutningsledningen (ekstern)
9
gen-
nem den mellemste åbning i bundpladen
1
(se afbildning A).
Bemærk: Vær opmærksom på, at du ikke
skubber nettilslutningsledningen for langt gen-
nem åbningen, da bundpladen
1
ellers ikke
passer på lampeskærmen
5
.
Fastgør bundpladen
1
til loftet ved hjælp af
skruerne (se afbildning A).
Træk beskyttelsesslangerne
4
over ledningerne
L og N af nettilslutningsledningen (ekstern)
9
.
Sørg for at nettilslutningsledningens (ekstern)
9
enkelte ledere tilsluttes korrekt: strømførende
leder; sort eller brun = symbol L, nulleder, blå =
symbol N.
Bemærk: Denne lampe har beskyttelsesklasse
, beskyttelseslederen tilsluttes ikke.
Indsæt nu de skrueløse klemmer
6
og sikker-
hedskrogen
7
på de hertil beregnede steder
i bundpladen
1
(se afbildning B–D).
Fastgør nu lampeskærmen
5
til bundpladen
1
ved at dreje den med urets retning (se af-
bildning E).
Bemærk: Pilene på bundpladen
1
og på
lampeskærmen
5
skal ligge lige over for hin-
anden (se afbildning H).
Sæt sikringen i igen eller slå overstrømsafbry-
deren i tavlen til (I-stilling).
Isætning/udskiftning af batteri
(fjernbetjening) (se afbildning G
)
Bemærk: Fjern inden den første ibrugtagning
isoleringsstrimlen
12
fra batterirummet
11
.
Når fjernbetjeningens
10
rækkevidde aftager, skal
batteriet
13
skiftes.
Tryk låsen indad og træk batterirummet
11
ud.
Fjern i givet fald det brugte batteri
13
.
Isæt et nyt batteri
13
i batterirummet
11
. An-
vend kun batterier
13
som beskrevet i kapitlet
”Tekniske data”.
Bemærk: Vær opmærksom på den korrekte
polaritet. Denne vises på fjernbetjeningen
10
.
Skub batterirummet
11
ind i fjernbetjeningen
10
igen.
Styring af lyseffekter ved
hjælp af fjernbetjeningen
Bemærk: Fjernbetjeningens
10
sender befinder
sig på den modsatte side af batterirummet
11
.
Sørg for, at der ingen forhindringer er mellem sender
og modtager.
ON/OFF = lampe TÆNDES/SLUKKES
Lyskilde = varmhvid/neutralhvid/koldhvid
Sol = varmhvid
Ibrugtagning/Vedligeholdelse og rengøring/Bortskaffelse
80 DK
Garanti og service
Garanti og service
Garanti
Du får 36 måneders garanti på dette apparat fra
købstidspunktet. Apparatet er blevet omhyggeligt
produceret og har gennemgået en grundig kvali-
tetskontrol. Inden for garantiperioden afhjælper vi
alle materiale- eller produktionsfejl omkostningsfrit.
Skulle der alligevel vise sig mangler i løbet af garan-
titiden, bedes du sende apparatet til den angivne
serviceadresse under angivelse af følgende model-
nummer: 14163606L/14163605L/14163706L.
Garantien dækker ikke skader som følge af ukorrekt
håndtering, ikke-overholdelse af betjeningsvejlednin-
gen eller et indgreb foretaget af uautoriserede per-
soner samt sliddele (som f.eks. pærer). Garantitiden
forlænges eller fornys ikke gennem garantiydelsen.
Serviceadresse
Briloner Leuchten GmbH & Co. KG
Im Kissen 2
59929 Brilon
TYSKLAND
Tlf.: +49 29 61/97 12–800
Fax: +49 29 61/97 12–199
E-mail: kundenservice@briloner.com
www.briloner.com
Gratis servicenummer:
Tlf.: 00800/27456637
IAN 411276_2110
Hold kvitteringen og varenummeret (IAN
411276_2110) klar som dokumentation for
købet i forbindelse med alle forespørgsler.
Konformitetserklæring
Dette produkt opfylder kravene iht. de gældende
europæiske og nationale retningslinjer. Overens-
stemmelsen er blevet dokumenteret. Tilsvarende er-
klæringer og bilag er deponeret hos producenten.
Producent
Briloner Leuchten GmbH & Co. KG
Im Kissen 2
59929 Brilon
TYSKLAND
Indice
81 IT
Legenda dei pittogrammi utilizzati ....................................................................... Pagina 82
Introduzione ............................................................................................................................. Pagina 83
Uso conforme alla destinazione d'uso .......................................................................................... Pagina 83
Contenuto della confezione ........................................................................................................... Pagina 83
Descrizione dei componenti ........................................................................................................... Pagina 83
Specifiche tecniche ......................................................................................................................... Pagina 83
Sicurezza ..................................................................................................................................... Pagina 84
Avvertenze di sicurezza.................................................................................................................. Pagina 84
Avvertenze di sicurezza per batterie/accumulatori ..................................................................... Pagina 85
Preparazione ........................................................................................................................... Pagina 86
Attrezzi e materiali necessari ......................................................................................................... Pagina 86
Prima dell'installazione................................................................................................... Pagina 86
Messa in funzione ................................................................................................................ Pagina 86
Montaggio della lampada ............................................................................................................. Pagina 86
Inserimento/Sostituzione delle batterie (telecomando) ................................................................ Pagina 87
Regolazione degli effetti luminosi tramite il telecomando ............................................................ Pagina 87
Manutenzione e pulizia .................................................................................................. Pagina 87
Smaltimento .............................................................................................................................. Pagina 87
Garanzia e assistenza ...................................................................................................... Pagina 88
Garanzia ......................................................................................................................................... Pagina 88
Indirizzo del servizio di assistenza ................................................................................................ Pagina 88
Dichiarazione di conformità ........................................................................................................... Pagina 88
Produttore ........................................................................................................................................ Pagina 89
Garanti og service Indice
82 IT
IntroduzioneLegenda dei pittogrammi utilizzati
Legenda dei pittogrammi utilizzati
Leggere il manuale di istruzioni per l'uso! Durata utile dei LED in ore
Questa lampada è destinata esclusiva-
mente all'uso in ambienti interni, asciutti
e chiusi.
Avvertenza! Pericolo di folgorazione!
Pericolo di morte e di incidente per
neonati e bambini!
Cautela! Pericolo di ustione a causa
di superfici bollenti!
Tensione alternata
(tipo di corrente e di tensione)
Questa lampada non è idonea per
regolatori di luminosità esterni e in-
terruttori elettronici.
Hertz (frequenza) Pericolo di esplosione!
Watt (potenza attiva) Indossare guanti protettivi!
Volt Questa è la procedura corretta
Classe di isolamento II
b
a
Smaltire l'imballaggio e l'apparecchio
in modo ecocompatibile!
Rispettare le avvertenze e le indicazioni
di sicurezza!
Uno smaltimento scorretto delle batte-
rie/degli accumulatori provoca danni
all'ambiente!
LED LED
La fonte luminosa di questo prodotto
non è sostituibile.
La confezione è realizzata al 100 %
in carta riciclata.
Ra
Indice di resa cromatica
Questa lampada possiede il grado
di protezione “IP20” ed è destinata
esclusivamente all'utilizzo privato in
ambienti interni.
Lumen Temperatura luce in gradi Kelvin
20
PAP
Cartone ondulato
04
LDPE
Polietilene (bassa densità)
Conservare lontano dalla portata dei
bambini!
83 IT
IntroduzioneLegenda dei pittogrammi utilizzati
Lampada LED da soffitto
Introduzione
Vi ringraziamo per l'acquisto del vostro
nuovo apparecchio. Con il vostro acquisto
avete scelto un prodotto di alta qualità.
Leggere interamente e attentamente queste istruzioni
per l'uso. Aprire la pagina con le illustrazioni. Que-
ste istruzioni sono parte integrante di questo prodotto
e contengono importanti indicazioni per la sua messa
in funzione e il suo utilizzo. Rispettare sempre tutte
le avvertenze in materia di sicurezza. Prima della
messa in funzione, controllare che la tensione elettrica
presente sia quella corretta e che tutti i componenti
siano installati correttamente. In caso di domande
o dubbi circa l'utilizzo dell'apparecchio, contattare
il proprio rivenditore oppure il servizio di assistenza.
Conservare con cura queste istruzioni e consegnarle
a terzi in caso di cessione del prodotto.
Uso conforme alla
destinazione d'uso
Questa lampada è destinata esclusiva-
mente all'uso in ambienti interni, asciutti
e chiusi.
Questo apparecchio è destinato esclusivamente
all'utilizzo domestico privato. Questo prodotto è
destinato a un utilizzo normale.
Contenuto della confezione
Dopo aver aperto l'imballaggio, controllare subito
che la fornitura sia completa e che l'apparecchio
sia in perfette condizioni.
1 lampada LED da soffitto (14163606L/
14163605L/14163706L)
1 telecomando
3 tasselli
3 viti
2 guaine di protezione
1 batteria CR2025 (litio)
1 manuale per il montaggio e l'uso
Descrizione dei componenti
1
Base
2
Vite
3
Tassello
4
Guaina di protezione
5
Paralume
6
Morsetto senza viti
7
Gancio di sicurezza
8
Occhiello
9
Cavo di alimentazione di rete (esterno)
10
Telecomando
11
Vano portabatterie
12
Striscia di isolamento
13
Batteria (3 V CR2025)
Specifiche tecniche
Lampada:
Modello numero: 14163606L/14163605L/
14163706L
Tensione di esercizio: 230–240 V∼, 50 Hz
Potenza nominale: max. 22 W
Classe di isolamento: II/
Tipo di protezione: IP20
Modulo LED:
Lampadina: modulo LED
Potenza nominale: 22 W
Telecomando:
Batteria: 1 x 3 V CR2025
Questo prodotto contiene una fonte luminosa della
classe di efficienza energetica ”E”.
84 IT
SicurezzaSicurezza
Sicurezza
Avvertenze di sicurezza
Il diritto di garanzia decade in caso di danni deriv
anti
dal mancato rispetto delle indicazioni contenute in
questo manuale di istruzioni per l'uso! Si declina
ogni responsabilità per danni indiretti! Si declina
qualsiasi responsabilità per lesioni personali o danni
materiali causati da un uso improprio o dal mancato
rispetto delle avvertenze di sicurezza!
PERICOLO
DI MORTE E INCIDENTE PER
NEONATI E BAMBINI!
Non lasciare mai i bambini incustoditi con il ma-
teriale di imballaggio. Il materiale di imballaggio
potrebbe provocarne il soffocamento. I bambini
sottovalutano spesso i pericoli.
Non lasciare incustoditi la lampada o il mate-
riale di imballaggio. Le pellicole/i sacchetti di
p
lastica, i componenti in plastica, ecc. potrebb
ero
diventare un gioco pericoloso per i bambini.
Tenere sempre il prodotto lontano dalla por-
tata dei bambini.
Questo apparecchio può essere utilizzato dai
bambini dagli 8 anni in su, da persone con
capacità fisiche, sensoriali o mentali limitate o
da persone inesperte, solo se supervisionate
o preventivamente istruite sull’utilizzo sicuro
dell'apparecchio e solo dopo che abbiano com-
preso i pericoli ad esso correlati. I bambini non
devono giocare con questo apparecchio. La
pulizia e la manutenzione eseguibili dall'utente
non possono essere effettuate da bambini
senza la supervisione di un adulto.
Evitare situazioni che espon-
gono al pericolo di morte
per folgorazione
Per l'installazione elettrica rivolgersi a un elettri-
cista qualificato o a una persona competente in
materia.
Prima di ogni collegamento alla rete elettrica con-
trollare la lampada e il cavo di alimentazione
per assicurarsi che non siano danneggiati.
Non utilizzare mai la lampada se si notano
segni di danneggiamento.
In
presenza di cavi di alimentazione dannegg
iati
sussiste il pericolo di morte per folgorazione. In
caso di danneggiamenti, necessità di riparazione
o altri problemi relativi alla lampada, rivolgersi
al servizio di assistenza o a un elettricista qua-
lificato.
Prima di eseguire il montaggio, rimuovere il
fusibile oppure disattivare l’interruttore magne-
totermico ubicato nel quadro dei fusibili (posi-
zione 0).
Prima del montaggio assicurarsi che la tensione
di rete presente coincida con la tensione di eser-
cizio necessaria alla lampada (vedi “Specifiche
tecniche”).
Evitare tassativamente che la lampada entri in
contatto con acqua o altri liquidi.
Non aprire mai nessuno dei componenti elet-
trici e non inserirvi alcun oggetto. Interventi di
questo tipo provocano un pericolo di morte per
folgorazione.
Non installare la lampada su una superficie
umida o non isolata!
Evitare situazioni di pericolo che
possono causare incendi o lesioni
Subito dopo l'apertura dell'imballaggio control-
lare che la lampada non sia danneggiata. In
tal caso, contattare il servizio di assistenza per
la sostituzione.
CAUTELA! PERICOLO DI
USTIONE A CAUSA DI SUPER-
FICI BOLLENTI!
Per evitare ustioni, assicurarsi che la lampada
sia spenta e raffreddata prima di toccarla. Le
lampadine sviluppano un forte calore in corri-
spondenza della testa della lampada.
La fonte luminosa di questa lampada non è
sostituibile e quando raggiunge il termine del
proprio ciclo di servizio sarà necessario sostituire
l’intera lampada.
Questa lampada non è idonea per
regolatori di luminosità esterni e in-
terruttori elettronici.
85 IT
SicurezzaSicurezza
Non rivolgere lo sguardo direttamente verso la
fonte luminosa (lampadina, LED, ecc.).
Non guardare la fonte luminosa con strumenti
ottici (ad es. una lente di ingrandimento).
Questa è la procedura corretta
Montare la lampada in modo tale che sia
protetta da umidità e sporcizia.
Predisporre con cura il montaggio e impiegare
tutto il tempo necessario. Disporre in modo or-
dinato e a portata di mano tutti i componenti
ed eventuali attrezzi o materiali necessari.
Prestare sempre la massima attenzione! Stare
sempre attenti a quel che si fa e procedere
sempre con prudenza. Non montare mai la
lampada se non si è concentrati o non ci si
sente bene.
Avvertenze di sicurezza
per batterie/accumulatori
CONSERVARE LE BATTERIE
LONTANO DALLA PORTATA
DEI BAMBINI!
L'ingerimento può provocare ustioni chimiche,
perforazione dei tessuti molli e morte. Eventuali
ustioni gravi possono comparire entro 2 ore
dall'ingerimento. Consultare immediatamente
un medico.
PERICOLO DI MORTE!
Tenere le batterie/gli accumulatori fuori dalla
portata dei bambini. In caso di ingerimento
consultare subito un medico!
L’ingerimento può provocare ustioni, perforazione
di tessuti molli e la morte. Eventuali ustioni gravi
possono comparire anche nel corso delle 2 ore
successive all’ingerimento.
PERICOLO DI ESPLOSIONE!
Non ricaricare mai batterie non ricaricabili. Non
cortocircuitare e/o aprire le batterie o gli accu-
mulatori. Ne conseguirebbe un rischio di incen-
dio, surriscaldamento o scoppio.
Non gettare mai le batterie/gli accumulatori nel
fuoco o in acqua.
Non esercitare alcuna pressione meccanica
sulle batterie/sugli accumulatori.
Rischio di perdita di liquido dalle batterie/
dagli accumulatori
Evitare condizioni e temperature estreme che
possano ripercuotersi sulle batterie/sugli accu-
mulatori, quali ad esempio la vicinanza a ter-
mosifoni o l‘irraggiamento solare diretto.
Evitare il contatto delle sostanze chimiche con
la pelle, gli occhi e le mucose in caso di fuoriu-
scita del liquido dalle batterie/dagli accumula-
tori! Sciacquare subito le aree colpite con
acqua pulita e consultare immediatamente un
medico!
INDOSSARE GUANTI
PROTETTIVI!
Batterie e accumulatori danneggiati o che pre-
sentano perdite possono corrodere la pelle in
caso di contatto. Pertanto, in questo caso in-
dossare sempre guanti di protezione adatti.
Nel caso di perdita di liquido delle batterie/
degli accumulatori, rimuoverli subito dal pro-
dotto per evitare danneggiamenti.
Utilizzare solamente batterie/gli accumulatori
dello stesso tipo. Non mischiare le batterie/gli
accumulatori vecchi con quelli nuovi!
Rimuovere le batterie/gli accumulatori, quando
il prodotto non viene utilizzato a lungo.
Rischio di danneggiamento del prodotto
Utilizzare esclusivamente il tipo di batterie/
di accumulatori indicato!
Inserire le batterie/gli accumulatori secondo
il contrassegno della polarità (+) e (-) sulla
batteria/sull‘accumulatore del prodotto.
Pulire i contatti della batteria/dell’accumulatore
e quelli presenti nel vano portabatterie con un
panno asciutto e privo di lanugine o un baston-
cino cotonato prima dell’inserimento!
Rimuovere immediatamente le batterie/gli accu-
mulatori esausti dal prodotto.
86 IT
Messa in funzione/Manutenzione e pulizia/SmaltimentoPreparazione/Prima dell'installazione/Messa in funzione
Preparazione
Attrezzi e materiali necessari
Gli attrezzi e i materiali indicati non sono inclusi nel
la
fornitura. Si tratta in questo caso di dati e valori
non vincolanti, forniti a titolo orientativo. Le caratte-
ristiche del materiale dipendono dalle specifiche
condizioni in loco.
- Matita/strumento di marcatura
- Rilevatore di tensione a 2 poli
- Cacciavite
- Trapano
- Punta del trapano (ca. Ø 6 mm)
- Tronchese
- Scala
- Martello
Prima dell'installazione
Importante: il collegamento elettrico deve essere
eseguito da un elettricista qualificato o da una per-
sona competente in materia.
Quest'ultima deve conoscere le caratteristiche della
lampada e le modalità di collegamento.
Leggere le istruzioni e osservare attentamente
le illustrazioni contenute in questo manuale,
nonché acquisire familiarità con la lampada,
prima di installarla.
Prima dell'installazione, assicurarsi che non ci
sia tensione nel cavo di alimentazione al quale
si collega la lampada. A questo proposito, di-
sinserire il fusibile oppure disattivare l'interrut-
tore magnetotermico ubicato nel quadro dei
fusibili (posizione 0).
Verificare l'assenza di tensione con un rileva-
tore di tensione a 2 poli.
Messa in funzione
Montaggio della lampada
Staccare la base
1
dal paralume
5
ruotan-
dolo in senso antiorario.
Allentare i due morsetti senza viti
6
e il gancio
di sicurezza
7
dalla base
1
.
Tenere la base
1
contro il soffitto e segnare i
punti destinati ai fori per la trapanatura mediante
i buchi per le viti
2
predisposti sulla base
1
.
E
seguire i fori (Ø 6 mm, ca. 40 mm di profondit
à).
Assicurarsi di non danneggiare le condutture.
Inserire i tasselli
3
nei fori. Se necessario,
aiutarsi con un martello.
Inserire il cavo di alimentazione di rete (esterno)
9
nel foro centrale della base
1
(vedi Fig. A).
Nota: Assicurarsi di non spingere troppo nella
fessura il cavo di alimentazione di rete altrimenti
la base
1
non ci starà più nel paralume
5
.
Fissare la base
1
con le vit sul soffitto (vedi
Fig. A).
Applicare le guaine di protezione
4
sui cavi L
ed N del cavo di alimentazione (esterno)
9
.
Assicurarsi di collegare correttamente i singoli
conduttori del cavo di alimentazione (esterno)
9
: conduttori a conduzione di corrente, nero
o marrone = simbolo L, conduttore neutro, blu
= simbolo N.
Nota: questa lampada presenta la classe di
isolamento
, il conduttore di protezione non
è collegato.
Inserire ora i morsetti senza vite
6
e il gancio
di sicurezza
7
negli appositi punti sulla base
1
(vedi Fig. B–D).
Fissare poi il paralume
5
alla base
1
ruotan-
dolo in senso orario (vedi Fig. E).
Nota: la freccia sulla base
1
e sul paralume
5
devono essere sovrapposti (vedi Fig. H).
Inserire nuovamente il fusibile o attivare l'inter-
ruttore magnetotermico ubicato nel quadro dei
fusibili (posizione I).
87 IT
Messa in funzione/Manutenzione e pulizia/SmaltimentoPreparazione/Prima dell'installazione/Messa in funzione
Inserimento/Sostituzione delle
batterie (telecomando) (vedi
Fig. G)
Nota: estrarre prima del primo uso la striscia iso-
lante
12
dal vano portabatterie
11
.
Quando diminuisce la portata del telecomando
10
,
occorre sostituire la batteria
13
.
Premere la leva di sblocco verso l'interno ed
estrarre il vano portabatterie
11
.
Estrarre eventualmente la batteria usata
13
.
Inserire una nuova batteria
13
nel vano porta-
batterie
11
. Utilizzare ora le batterie
13
come
descritto nel capitolo “Specifiche tecniche”.
Nota: assicurarsi che la polarità sia corretta.
Questa è indicata sul telecomando
10
.
Spingere di nuovo il vano portabatterie
11
nel
telecomando
10
.
Regolazione degli effetti luminosi
tramite il telecomando
Nota: il trasmettitore del telecomando
10
si trova
sul lato contrario del vano portabatterie
11
. Assicu-
rarsi che tra il trasmettitore e il ricevitore non ci siano
ostacoli.
ON/OFF = accendere/spegnere la
lampada
Lampadina = bianco caldo/bianco
neutro/bianco freddo
Sole = bianco caldo
Fiocco di neve = bianco freddo
Sole non pieno = ridurre la luminosità
Sole pieno = aumentare la luminosità
10 % = intensità luminosa 10 %
50 % = intensità luminosa 50 %
100 % = intensità luminosa 100 %
Luna = funzione di luce notturna
30 min
30 min. = funzione timer (30 min.)
D1
D1 = memoria per programmi
cromatici individuali
Nota: per memorizzare il programma cromatico
sul tasto D1, procedere come segue:
Posizionare la lampada nel punto prescelto.
Tenere premuto il tasto D1.
Nota: quando la procedura di memorizzaz
ione
è conclusa la lampada lampeggia una volta.
Manutenzione e pulizia
PERICOLO DI
FOLGORAZIONE!
Prima di ogni intervento di pulizia scollegare la
lampada dalla rete elettrica. A questo proposito,
disinserire il fusibile oppure disattivare l'interruttore
magnetotermico ubicato nel quadro dei fusibili
(posizione 0).
PERICOLO DI
FOLGORAZIONE!
Per motivi di sicurezza elettrica, la lampada non
deve essere mai pulita con acqua o altri liquidi, né
immersa in acqua.
CAUTELA! PERICOLO DI USTIONE A
CAUSA DI SUPERFICI BOLLENTI!
Lasciar raffreddare completamente la lampada.
Non usare solventi, benzina o simili. Queste
sostanze potrebbero danneggiare la lampada.
P
er la pulizia utilizzare soltanto un panno as
ciutto
e privo di pelucchi.
Inserire nuovamente il fusibile o attivare l'inter-
ruttore magnetotermico ubicato nel quadro dei
fusibili (posizione I).
Smaltimento
L’imballaggio è composto da materiali ecologici
che possono essere smaltiti presso i siti di raccolta
locali per il riciclo.
88 IT
Garanzia e assistenzaSmaltimento/Garanzia e assistenza
b
a
Osservare l‘identificazione dei materiali
di imballaggio per lo smaltimento diffe-
renziato, i quali sono contrassegnati da
abbreviazioni (a) e da numeri (b) con il
seguente significato: 1–7: plastiche/
20–22: carta e cartone/80–98: mate-
riali compositi.
Il prodotto e il materiale da imballaggio
sono riciclabili. Smaltire separatamente
per un ottimale trattamento dei rifiuti. Il
logo Triman è valido solamente per la
Francia.
Per questioni di tutela ambientale non
gettare il prodotto usato tra i rifiuti dome-
stici, ma provvedere invece al suo corretto
smaltimento. Presso l’amministrazione
competente è possibile ricevere informa-
zioni circa i siti di raccolta e i relativi orari
di apertura.
Le batterie/gli accumulatori difettosi o usati devono
essere riciclati secondo la direttiva 2006/66/CE e
relative modifiche. Smaltire le batterie/gli accumula-
tori e/o il prodotto presso i punti di raccolta indicati.
Uno smaltimento scorretto delle
batterie/gli accumulatori procura
danni all‘ambiente!
È vietato smaltire le batterie/gli accumulatori con
i rifiuti domestici. Possono contenere metalli pesanti
nocivi e sono soggetti a smaltimento come rifiuti spe-
ciali. I simboli chimici dei metalli pesanti sono i segu-
enti: Cd = cadmio, Hg = mercurio, Pb = piombo.
Consegnare, pertanto, le batterie/gli accumulatori
esausti presso un punto di raccolta comunale.
Garanzia e assistenza
Garanzia
L'apparecchio è provvisto di una garanzia di 36 mesi
a decorrere dalla data di acquisto. L'apparecchio è
stato prodotto con estrema cura ed è stato
sottoposto
a severi controlli di qualità. Per la durata del periodo
di garanzia risolviamo gratuitamente qualunque
problema legato a difetti di materiale o di produ-
zione. Se si dovessero riscontrare tuttavia dei difetti
durante il periodo di garanzia, si prega di inviare
l'apparecchio all'indirizzo assistenza indicato indi-
cando il seguente numero di modello: 14163606L/
14163605L/14163706L.
Sono esclusi dalla garanzia danni causati da uso
improprio, mancato rispetto delle istruzioni per l'uso
o interventi da parte di persone non autorizzate, così
come i componenti usurabili (ad es. le lampadine).
Un eventuale intervento in garanzia non prolunga
né rinnova il periodo di garanzia stesso.
Indirizzo del servizio
di assistenza
Briloner Leuchten GmbH & Co. KG
Im Kissen 2
59929 Brilon
GERMANIA
Tel.: +49 29 61/97 12–800
Fax: +49 29 61/97 12–199
E-mail: kundenservice@briloner.com
www.briloner.com
Servizio gratuito di assistenza:
Tel.: 00800/27456637
IAN 411276_2110
Per qualunque richiesta conservare lo scontrino e il
codice articolo (IAN 411276_2110) come prova
d'acquisto.
Dichiarazione di conformità
Questo prodotto è conforme ai requisiti stabiliti dalle
direttive europee e nazionali vigenti. La conformità
è stata comprovata. Le relative dichiarazioni e la
documentazione pertinente sono depositate presso
il produttore.
89 IT
Garanzia e assistenza
Produttore
Briloner Leuchten GmbH & Co. KG
Im Kissen 2
59929 Brilon
GERMANIA
Smaltimento/Garanzia e assistenza
90
Tartalomjegyzék
91 HU
Az alkalmazott piktogramok jelmagyarázata .............................................Oldal 92
Bevezetés .......................................................................................................................................Oldal 93
Rendeltetésszerű használat ...............................................................................................................Oldal 93
A csomag tartalma .............................................................................................................................Oldal 93
Alkatrészleírás ....................................................................................................................................Oldal 93
Műszaki adatok .................................................................................................................................Oldal 93
Biztonság ........................................................................................................................................Oldal 94
Biztonsági tudnivalók .........................................................................................................................Oldal 94
Az elemekre/akkukra vonatkozó biztonsági tudnivalók .................................................................Oldal 95
Előkészítés .....................................................................................................................................Oldal 95
Szükséges szerszámok és anyagok .................................................................................................Oldal 95
A felszerelés előtt ....................................................................................................................Oldal 96
Üzembe helyezés ....................................................................................................................Oldal 96
A lámpa szerelése .............................................................................................................................Oldal 96
Helyezze be/cserélje ki az elemet (távirányító) ..............................................................................Oldal 96
Fényeffektek vezérlése távirányító segítségével ...............................................................................Oldal 97
Karbantartás és tisztítás ...................................................................................................Oldal 97
Mentesítés .....................................................................................................................................Oldal 97
Garancia és szerviz ...............................................................................................................Oldal 98
Garancianyilatkozat ..........................................................................................................................Oldal 98
Szerviz címe .......................................................................................................................................Oldal 98
Megfelelőségi nyilatkozat .................................................................................................................Oldal 98
Gyártó ................................................................................................................................................Oldal 98
Jótállási tájékoztató .............................................................................................................Oldal 99
Tartalomjegyzék

Produkspesifikasjoner

Merke: Livarno Lux
Kategori: Ikke kategorisert
Modell: IAN 410820

Trenger du hjelp?

Hvis du trenger hjelp med Livarno Lux IAN 410820 still et spørsmål nedenfor, og andre brukere vil svare deg


Ikke kategorisert Livarno Lux Manualer

Ikke kategorisert Manualer

Nyeste Ikke kategorisert Manualer