Morphy Richards Essentials 980563 Bruksanvisning
Morphy Richards
Støvsuger
Essentials 980563
Les nedenfor 📖 manual på norsk for Morphy Richards Essentials 980563 (4 sider) i kategorien Støvsuger. Denne guiden var nyttig for 22 personer og ble vurdert med 4.5 stjerner i gjennomsnitt av 2 brukere
Side 1/4

980563 / 980571
+353 1 8424833
+353 1 8424833
+353 1 8424833
+353 1 8424833
Bagless
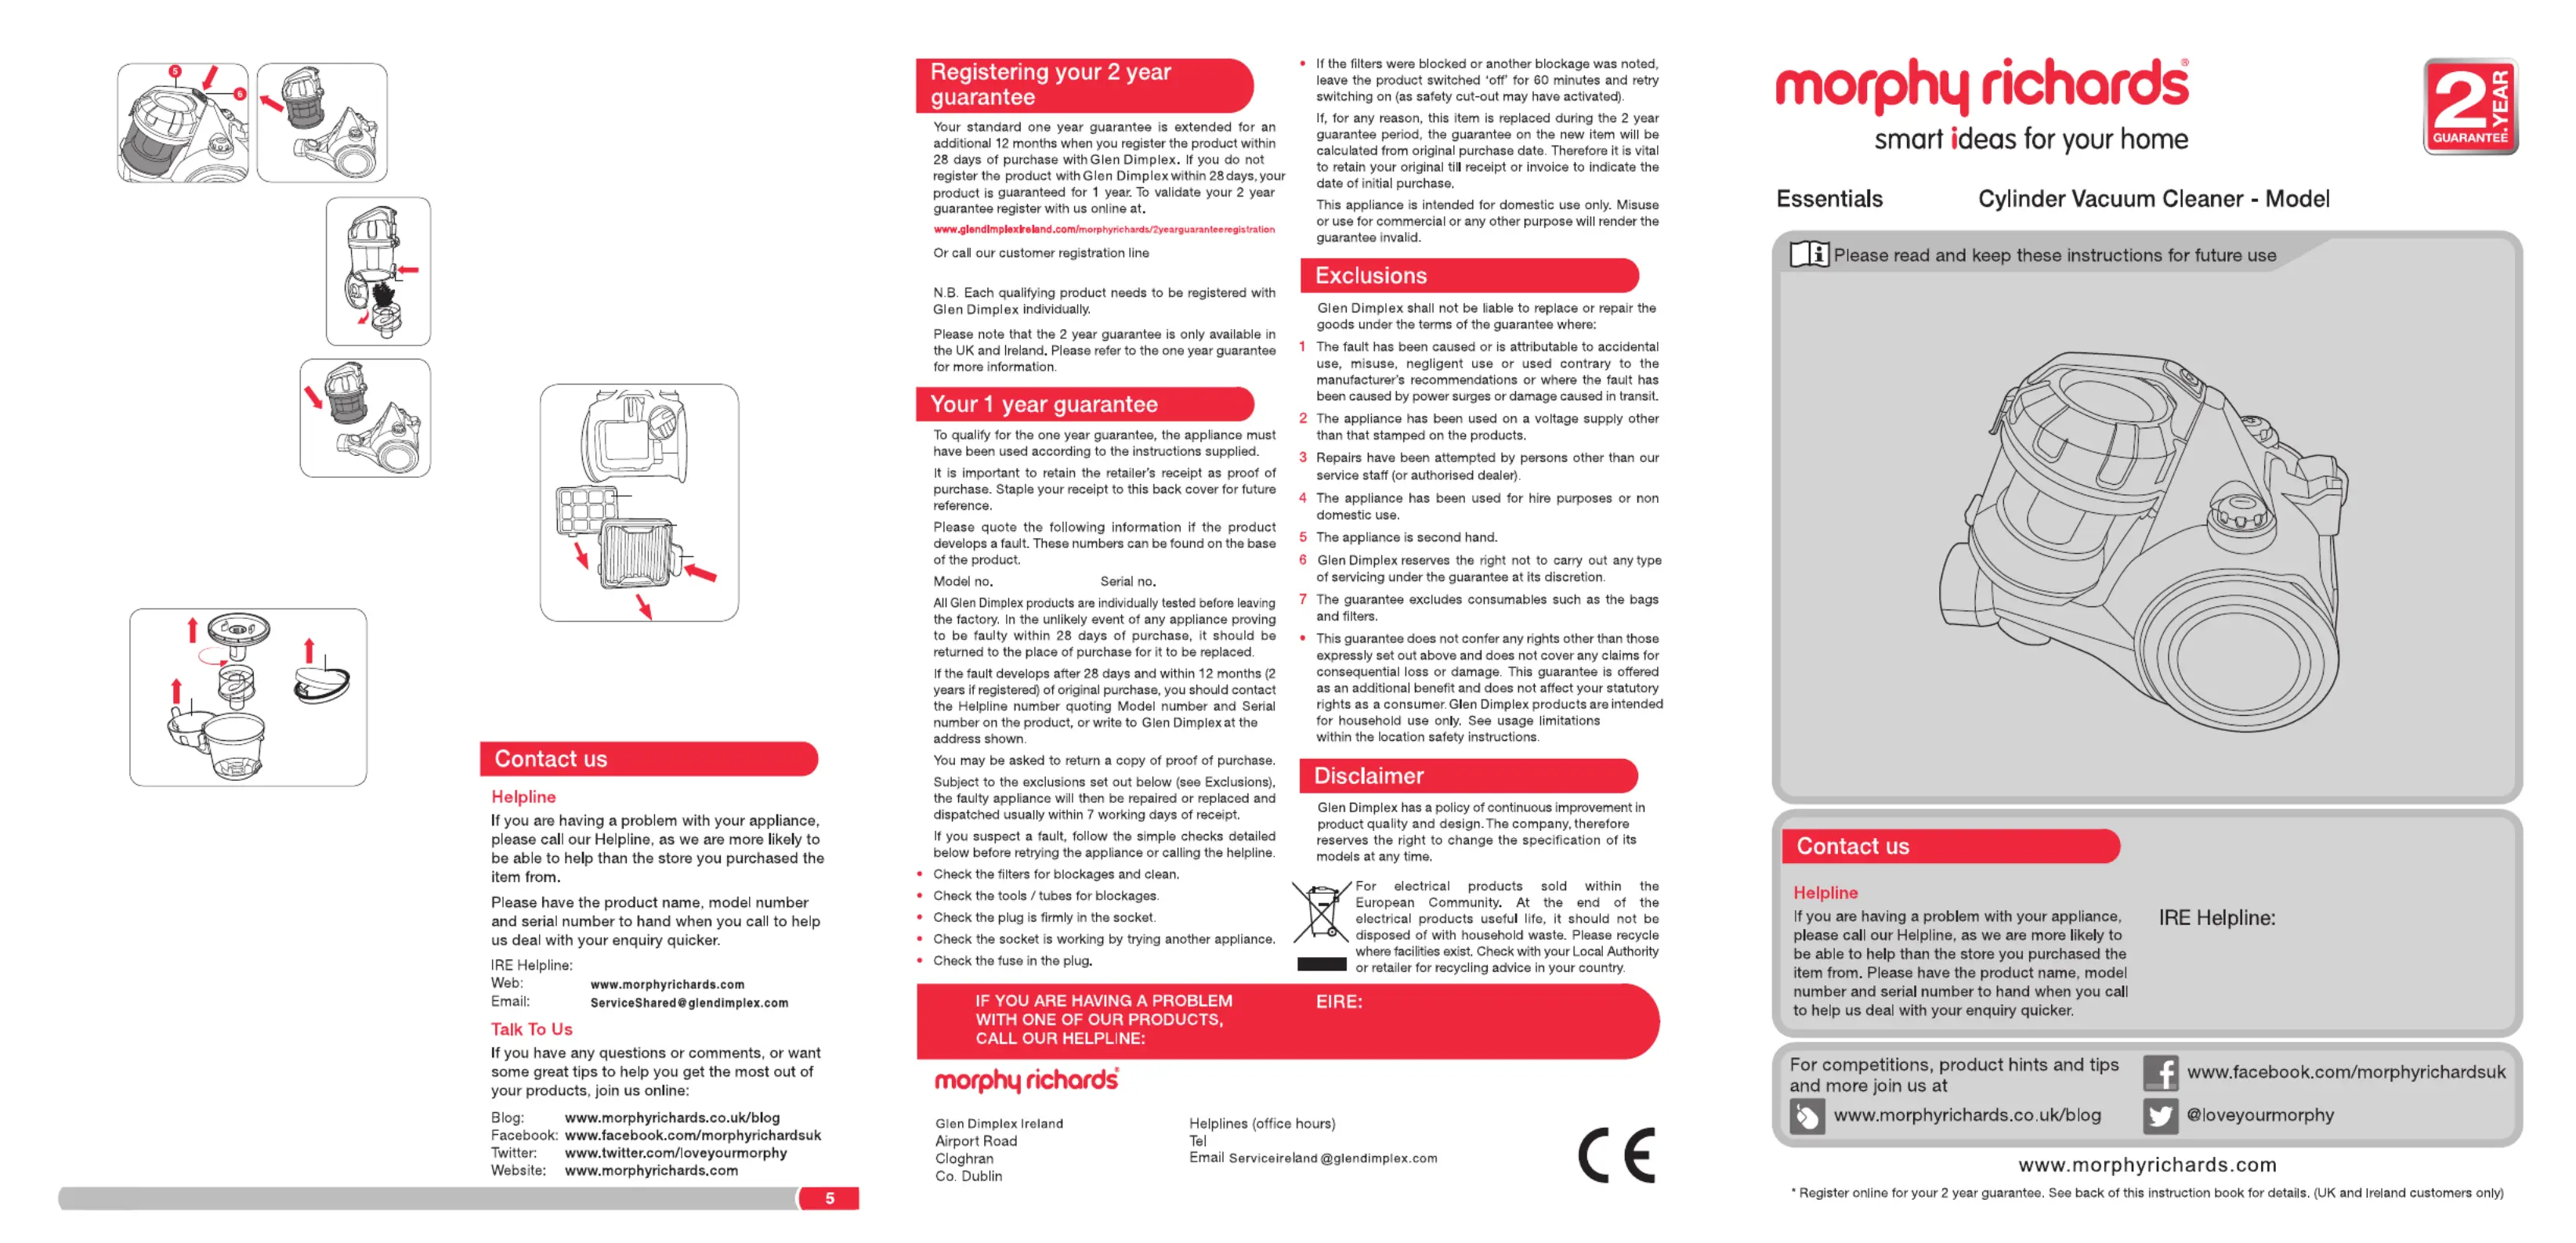
Grab the dust container by its
handle and press the release
button to unlock it. Pull the
container out of the appliance.
Hold the dust container over a
rubbish bin or bag. Press the dust
release button. The bottom lid
of the dust container will
automatically open, allowing
you to empty the container.
After emptying the dust
container, close the bottom lid
and replace the container in the
appliance. Press the container down in its original
position. When you hear a click sound, the dust
container is correctly inserted.
Cleaning the HEPA Filter
Remove the container.
Open the top lid by pulling its lock upwards.
Pull out the cylinder.
Separate the cylinders from each other by rotating
either one of them counter-clockwise.
If necessary, clean the cylinders and the dust
container with a damp cloth or under running water.
Remove the filter frame from the lid by simply pulling it
out.
Remove the foam inlay.
Tap the filter frame to remove dust.
If necessary, rinse the filter frame and the foam inlay
under running water.
To avoid damaging the filter, do not use any tools.
•
•
•
•
•
•
•
•
•
•
•
•
•
+353 1 8424833
Cleaning the Motor filter
We recommend to clean the Motor filter about twice a
year or when it appears to be dirty.
The filter is installed behind the air outlet grid. Push
the grid lock to the left and pull out the air outlet grid at
the same time.
Slightly press down the lock on the top side of the filter
frame and pull out the filter frame.
Rinse the filter with warm water.
Let the filter dry completely. Do not expose it to direct
sunlight.
Put the filter back in place and reinstall the air outlet
grid.
Both filter and grid must click into place.
Notice: Never use the appliance without filters
installed. This can cause power loss or damage to the
appliance.
•
•
•
•
•
•
•
Release
button
Foam inlay
Foam inlay
Grid lock
Air outlet grid
Motor filter

Hose and Handle
2 pcs Plastic Tube
Top Lid Lock
Dust Container
Handle
Container Release Button
Cable Winder Button
Holder for Hard Floor Brush
Power Cord with Power Plug
Motor Filter
Wheel
On/off Button
Hose Intake
2 in 1 Crevice Tool
Main Brush
Intended Use
Before First Use
This appliance is only intended for vacuuming of dust,
lint and general dirt on soft and hard surfaces. Do not
use it for vacuuming ashes, sharp objects e.g. glass or
to suck up liquids or other flammable substances.
The appliance is intended for private indoor use only.
Use the appliance only as described in this manual.
No liability will be accepted for damage resulting from
improper use or non-compliance with this manual.
Operation
Cleaning and Maintenance
Step 1:
Pull out the power cord until
the yellow marking on the
cord appears. Pull no further.
Connect the power plug to a
suitable electrical outlet.
•
•
•
•
Before First Use
Carefully remove all packaging materials and retain for
future use.
Check for transport damages.
Clean the appliance ( Cleaning and Maintenance).
Check whether the dust container is correctly in place
( Cleaning and Maintenance).
WARNING - DANGER OF SUFFOCATION! Children
should not play with the packaging materials, as they
pose a risk of swallowing and suffocation!
Assembly
Step 1:
Insert the flexible hose into the
hose intake at the front of the
appliance. There should be a
click sound when the hose is
correctly inserted.
Step 2:
Insert the handle of the flexible
hose into the wider end of the
plastic tube.
Step 3:
Insert the plastic tube into the
connector of the hard floor
brush (or one of the other
accessories).
Note: The accessories can be
attached directly to the flexible
hose.
•
•
•
•
•
•
•
•
•
•
•
Step 2:
Press the on/off button to
switch on the appliance.
Step 3:
Use the suction power
control on the flexible hose
handle to increase/decrease
suction power.
Step 4:
Press the on/off button to
power off the appliance.
Unplug the cable and press
the cable winder button to
wind up the power cable.
After use, the hard floor brush
can be attached to the back
of the appliance using the foreseen hard floor brush
holder .
Notice: Hold the power cable with one hand and
slowly guide it while it rolls back into storage.
Warning: Always disconnect the power plug from the
electrical outlet before cleaning or storing.
Cleaning
Remove any accessory attached to the extension tube
or flexible hose.
Clean the appliance and accessories with a slightly
moistened cloth. Do not allow any liquid to enter the
appliance’s interior.
Never use corrosive detergents, wire brushes,
abrasive scourers, metal or sharp utensils to clean the
appliance or accessories.
Carefully dry the appliance and accessories after
cleaning.
To dislodge the flexible hose
from the hose intake press
the release button and pull
the hose out.
Emptying the Dust Container
Regularly empty the dust container to avoid damage
to the appliance.
•
•
•
•
•
•
•
•
•
•
•
14
15
Dimplex
Produkspesifikasjoner
Merke: | Morphy Richards |
Kategori: | Støvsuger |
Modell: | Essentials 980563 |
Trenger du hjelp?
Hvis du trenger hjelp med Morphy Richards Essentials 980563 still et spørsmål nedenfor, og andre brukere vil svare deg
Støvsuger Morphy Richards Manualer
5 August 2025
5 Januar 2025
5 Januar 2025
Støvsuger Manualer
- Støvsuger Ulsonix
- Støvsuger Aiwa
- Støvsuger Miele
- Støvsuger Adler
- Støvsuger LG
- Støvsuger Bosch
- Støvsuger BEKO
- Støvsuger Grundig
- Støvsuger Hisense
- Støvsuger Electrolux
- Støvsuger Severin
- Støvsuger DeWalt
- Støvsuger Siemens
- Støvsuger Hoover
- Støvsuger Philips
- Støvsuger Russell Hobbs
- Støvsuger Amica
- Støvsuger AEG
- Støvsuger Cecotec
- Støvsuger Gallet
- Støvsuger Rikon
- Støvsuger Samsung
- Støvsuger Delonghi
- Støvsuger Imarflex
- Støvsuger Kogan
- Støvsuger Xiaomi
- Støvsuger Midea
- Støvsuger Eufy
- Støvsuger Candy
- Støvsuger Riccar
- Støvsuger Gorenje
- Støvsuger Gemini
- Støvsuger Panasonic
- Støvsuger Vox
- Støvsuger Pyle
- Støvsuger Sencor
- Støvsuger Medion
- Støvsuger Orava
- Støvsuger Schneider
- Støvsuger Koblenz
- Støvsuger Delta
- Støvsuger MPM
- Støvsuger Khind
- Støvsuger Gude
- Støvsuger Taurus
- Støvsuger Dimplex
- Støvsuger Ryobi
- Støvsuger Turbotronic
- Støvsuger RIDGID
- Støvsuger Ezviz
- Støvsuger Concept
- Støvsuger Livoo
- Støvsuger Flex
- Støvsuger Irobot
- Støvsuger Brandson
- Støvsuger Hyundai
- Støvsuger Ufesa
- Støvsuger Milwaukee
- Støvsuger Lavorwash
- Støvsuger Ghibli & Wirbel
- Støvsuger Scarlett
- Støvsuger Rowenta
- Støvsuger Blaupunkt
- Støvsuger Einhell
- Støvsuger VAX
- Støvsuger Mitsubishi
- Støvsuger JIMMY
- Støvsuger Tower
- Støvsuger E.ziclean
- Støvsuger Tristar
- Støvsuger MetroVac
- Støvsuger Nedis
- Støvsuger Dyson
- Støvsuger Eldom
- Støvsuger Elba
- Støvsuger Vonroc
- Støvsuger Worx
- Støvsuger ECG
- Støvsuger Dreame
- Støvsuger Tesla
- Støvsuger Shark
- Støvsuger Bestron
- Støvsuger Dedra
- Støvsuger Vivax
- Støvsuger Black And Decker
- Støvsuger Karcher
- Støvsuger Princess
- Støvsuger Craftsman
- Støvsuger Ambiano
- Støvsuger Bissell
- Støvsuger Vaddio
- Støvsuger Eureka
- Støvsuger Heinner
- Støvsuger Innoliving
- Støvsuger Mesko
- Støvsuger Mx Onda
- Støvsuger Kenmore
- Støvsuger Hilti
- Støvsuger Fagor
- Støvsuger Ariete
- Støvsuger Vacmaster
- Støvsuger Armor All
- Støvsuger Imou
- Støvsuger Di4
- Støvsuger Mellerware
- Støvsuger Tefal
- Støvsuger Hiberg
- Støvsuger Doffler
- Støvsuger Baumatic
- Støvsuger Ecovacs
- Støvsuger Primo
- Støvsuger Trisa
- Støvsuger Izzy
- Støvsuger Polti
- Støvsuger Maytronics
- Støvsuger I-Vac
- Støvsuger Girmi
- Støvsuger Fieldmann
- Støvsuger Hikoki
- Støvsuger Solac
- Støvsuger Emerio
- Støvsuger OBH Nordica
- Støvsuger Duronic
- Støvsuger Sanitaire
- Støvsuger Conrad
- Støvsuger Continental Edison
- Støvsuger Oreck
- Støvsuger Winia
- Støvsuger Haeger
- Støvsuger Cleanmaxx
- Støvsuger Sogo
- Støvsuger Gtech
- Støvsuger Arthur Martin
- Støvsuger Moulinex
- Støvsuger Livington
- Støvsuger Astralpool
- Støvsuger Goon
- Støvsuger Zelmer
- Støvsuger Bavaria
- Støvsuger Superior
- Støvsuger Nilfisk
- Støvsuger Sun Joe
- Støvsuger Black Decker
- Støvsuger Zipper
- Støvsuger Clatronic
- Støvsuger Kernau
- Støvsuger Hanseatic
- Støvsuger Proline
- Støvsuger Xoro
- Støvsuger Tesvor
- Støvsuger Pontec
- Støvsuger Fein
- Støvsuger King Craft
- Støvsuger Heissner
- Støvsuger Tornado
- Støvsuger Bestway
- Støvsuger Clarke
- Støvsuger Teesa
- Støvsuger Kokido
- Støvsuger Berger & Schröter
- Støvsuger Lenoxx
- Støvsuger Minuteman
- Støvsuger Thomas
- Støvsuger RugDoctor
- Støvsuger Magivaac
- Støvsuger Narwal
- Støvsuger Echo
- Støvsuger Tineco
- Støvsuger Hutt
- Støvsuger Hayward
- Støvsuger Duro Pro
- Støvsuger Rex
- Støvsuger HTE Erfolg
- Støvsuger Mestic
- Støvsuger Clever Clean
- Støvsuger Airflo
- Støvsuger Festool
- Støvsuger TESLA Electronics
- Støvsuger Zaco
- Støvsuger Igenix
- Støvsuger Harper
- Støvsuger Beldray
- Støvsuger Invictus
- Støvsuger Linsar
- Støvsuger Carneo
- Støvsuger Berlinger Haus
- Støvsuger Zigma
- Støvsuger Puppyoo
- Støvsuger Kraftronic
- Støvsuger Numatic
- Støvsuger Lavor
Nyeste Støvsuger Manualer
7 August 2025
7 August 2025
7 August 2025
7 August 2025
7 August 2025
7 August 2025
7 August 2025
7 August 2025
7 August 2025
7 August 2025