NAKS 10D-700-FF Bruksanvisning
NAKS
eksoshette
10D-700-FF
Les nedenfor 📖 manual på norsk for NAKS 10D-700-FF (7 sider) i kategorien eksoshette. Denne guiden var nyttig for 3 personer og ble vurdert med 4.5 stjerner i gjennomsnitt av 2 brukere
Side 1/7

RECEIVING AND INSPECTION
Immediately upon receipt of a shipment, carefully inspect for
damage and shortage. Turn impeller by hand to see that it
turns freely and does not bind. If any damage and/or shortage
is detected or suspected, the carrier must be asked to conduct
an inspection. The consignees representative should not accept
shipment without a notation on the delivery receipt indicating items
not delivered or apparent extent of damage.
When a shipment is opened and damage is found which was not
evident externally (concealed damage), it is mandatory that the
consignee request an immediate inspection by the carrier. Report
damage to the carrier within 15 days. Failure to report damage
within the above time limit will cause rejection of a claim.
HANDLING
When handling fans and their accessories, always use equipment
and methods that will not cause damage. Fans should be lifted
using slings and padding or spreaders to avoid damage.
CAUTION! Always make sure that all lifting and handling equipment
and techniques conform to current safety standards.
Avoid lifting fans in a way that will bend or distort fan parts. Never
pass slings or timbers through the orices of fan.
CAUTION! Do not lift by the fan hood. Fans with special coatings
or paints must be protected in handling to prevent damage.
STORAGE
Fans are protected against damage during shipment. If they
cannot be installed and put into operation immediately upon receipt
certain precautions are necessary to prevent deterioration during
storage. Responsibility for integrity of fans and accessories during
storage must be assumed by the user. The manufacturer will not
be responsible for damage during storage. These suggestions are
provided solely as a convenience to the user, who shall make his
own decision as to whether to use any or all of them.
INDOOR: The ideal storage environment for fans and accessories
is indoors, above grade, in a low humidity atmosphere which
is sealed to prevent the entry of blowing dust, rain, or snow.
Temperatures should be evenly maintained at between 70°F and
105°F (wide temperature swings may cause condensation and
“sweating” of metal parts). Windows should be covered to prevent
temperature variations caused by sunlight. Provide thermometers
and humidity indicators at several points and maintain the
atmosphere at 40% relative humidity, or lower.
It maybe necessary to use trays of renewable desiccant or portable
dehumidier to remove moisture from the air in the storage
enclosure.
Thermostatically controlled portable heaters (vented to outdoors)
may be required to maintain even temperatures inside the
enclosure.
CAUTION! Provide re extinguishers, or re alarms, or emergency
response communication to protect building and equipment against
re damage. Be sure that building and storage practices meet all
local, state and federal re and safety codes.
The following fans or accessories must be stored indoors, in a
clean dry atmosphere:
a. Any fan that is protected by a cardboard carton.
b. Spare wheels or propellers.
c. Boxes, bags or cartons of hardware.
d. Curbs
e. Dampers
Remove any accumulations of dirt, water, ice or snow and wipe
dry before moving indoor storage. Allow cold parts to reach room
temperature to avoid “sweating” of metal parts. Open boxes
or cartons. Remove any accumulated moisture; if necessary
use portable electric heaters to dry parts and packages. Leave
coverings loose to permit air circulation and to permit periodic
inspection.
Rotate wheels or propellers by hand to distribute bearing grease
over the entire bearing surfaces.
Store at least 3 ½” off the oor on wooden blocks covered with
moisture proof paper or polyethylene sheathing. Provide aisles
between parts and along all walls, to permit air circulation and
space for inspection.
OUTDOOR: Fans designed for outdoor use may be stored
outdoors, if absolutely necessary. The storage area should be
reasonably level and drained or ditched to prevent accumulation
of water. Fencing and lighting for security are desirable. Roads
or aisles for portable cranes and hauling equipment are needed.
Consider the use of drift fencing to minimize accumulation of
blowing snow or dirt.
The following fans may be stored outdoors, if dry indoor storage
space is not available:
a. Fans intended for outdoor use that are crated in wood.
b. Wall fans installed in wall housings.
All fans must be supported on wooden blocks or timbers above
water or normal snow levels. Provide enough blocking to prevent
settling into soft ground. Fans should be set in place using the
directional arrow markings on the crate as a guide.
Locate pieces far enough apart to permit air circulation, sunlight,
and space for periodic inspection. Place all parts on their supports
so that rain water will run off, or to minimize water accumulation. Do
not cover parts with plastic lm or tarps-these cause condensation
of moisture from the air passing through heating and cooling
cycles.
Fan wheels and propellers should be blocked to prevent spinning
caused by strong winds.
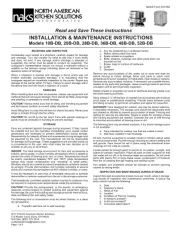
Read and Save These Instructions
NAKS Form 613157
INSTALLATION & MAINTENANCE INSTRUCTIONS
Direct Drive Exhaust Fans
______________________________________________________________________________________________________________________________
2017 © North American Kitchen Solutions
172 Reaser Court
Elyria, OH 44035
www.naksinc.com
Page 1 of 7

INSPECTION AND MAINTENANCE DURING STORAGE
Inspect fans and accessories at least once per month, while in
storage. Log results of inspection and maintenance performed. A
typical log entry should include the following:
a. Date
b. Inspector’s Name
c. Name of Fan
d. Location
e. Condition of Paint or Coating
f. Is moisture present?
g. Is dirt accumulated?
h. Corrective steps taken?
If moisture or dirt accumulations are found on parts, the source
should be located and eliminated. Fans should be rotated at each
inspection by hand ten to fteen revolutions to redistribute the
motor and bearing lubricant.
If paint deterioration begins, consideration should be given to
touch-up or repainting. Fans with special coatings may require
special techniques for touch-up or repair.
Machined parts coated with rust preventive should be restored to
good condition promptly if signs of rust occur. The most critical
items are pulleys, shafts and bearing locking collars. At the rst
sign of rusting on any of the above parts, remove the original
rust preventive coating with petroleum solvent and clean lint-free
cloths. Polish any remaining rust from surfaces with crocus cloth
or ne emery paper and oil. Do not destroy the continuity of the
surfaces. Wipe clean with lint-free cloths and recoat surfaces
evenly and thoroughly with Tectly 506 (Ashland Oil Company) or
equal. For hard to reach internal surfaces or for occasional use,
consider using Tectly 511M Rust Preventive or WD40 or equal.
REMOVING FROM STORAGE
As fans are removed from storage to be installed in their nal
location, they should be protected and maintained in similar
fashion, until the fan equipment goes into operation.
INSTALLATION
1. CAUTION! This unit has rotating parts and safety precautions
should be exercised during installation, operation and
maintenance.
2. WARNING! If gases, other than clean air, are to be
exhausted using the fan, then the user bears the
responsibility of determining that the fan is appropriate
and safe for the application.
3. WARNING! Do not use in hazardous environments
where the fan’s electrical system could provide ignition to
combustible or ammable materials, unless unit is built
specically for the environment.
4. COMMERCIAL KITCHEN EXHAUST APPLICATIONS
Ventilators should be installed in accordance with the
requirements of the National Fire Protection Association
Bulletin NFPA96 “Vapor Removal From Cooking Equipment”
taking specic note of the following:
a. Ducts terminating into the base of an up-discharge
exhaust fan must be constructed of carbon steel not less
than 16MSG (67.47 mm) and extend a minimum of 18”
(457 mm) above the roof surface.
b. Air velocity through the duct not less than 1500 FPM
(7.620 m/s).
c. A minimum of 40” (1016 mm) clearance be maintained
between the exhaust discharge and any roof surface. (To
comply, size 80 to 135 require 24” [610 mm] roof curb.
Size 150 to 200 require 18” [457 mm] roof curb.)
5. FAN INSTALLATION:
WALL MOUNT: If wall mounted, provide an opening
sufcient for enclosing the curb cap. Securely fasten to the
wall through the cap. Fan breather tube should be on the
side of the fan at a 90° angle from vertical. A wall mounting
adapter option is available from the manufacturer. On wall
mounted models the wall bracket is shipped with the fan.
ROOF MOUNT: Roof exhausters should be mounted on a
roof curb suitable for the purpose, either eld fabricated or
prefab type. (Prefab type available as an accessory at extra
cost.) The fan should rest on the curb as level as possible.
When curb is not level (slightly pitched on at roofs) the
down spout drain tting should be located on lowest side of
curb. Securely fasten exhauster to curb using a minimum of
4 lag bolts - one centered each side.
6. CAUTION! Guards must be installed when fan is within
reach of personnel or within eight (8) feet (2.5 m) of working
level or when deemed advisable for safety.
7. IMPELLER-ORIFICE ADJUSTMENT: Turn centrifugal
impeller by hand to make sure it rotates freely. If impeller
hits inlet orice, adjust as follows: Loosen four (4) nuts inside
motor enclosure. Adjust motor laterally to equalize clearance
on all sides of impeller. Tighten four (4) nuts.
8. ELECTRICAL CAUTION: Before proceeding, make sure
electrical service to fan is locked in “OFF” position. Run
wires through the internal wiring post to the motor, to safety
disconnect switch if used. (Restaurant exhaust fans have
wires through breather tube.)
9. All wiring should be in accordance with local ordinances and
the National Electric Code.
FOR EC MOTOR WIRING - CONTACT FACTORY
10. WARNING! Check voltage at the fan to see if it corresponds
with the motor nameplate. High or low voltage can seriously
damage the motor. Extra care should be taken when wiring
to two or three speed motors since improper connections will
damage motor and void motor warranty.
11. Apply power momentarily and compare the rotation of the
impeller with the directional arrow on fan. WHEEL ROTATION
IS CLOCKWISE AS VIEWED FROM TOP OF FAN.
WARNING! Do not operate at speeds higher than shown in
catalog for this equipment. Operation in the wrong direction
will deliver air but will overload the motor to the extent of
blowing fuses, or overload protection and could seriously
damage the motor. In the case of three phase motors, the
direction can be changed by interchanging any two of the
three motor leads. In the case of single phase motors, the
reversing instructions will appear on the wiring diagram in
the motor wiring compartment or on the motor.
12. GREASE TROUGHS AND CURB HINGES are available as
optional accessories. Installation instructions are shipped
with the accessories.
______________________________________________________________________________________________________________________________
2017 © North American Kitchen Solutions
172 Reaser Court
Elyria, OH 44035
www.naksinc.com
Page 2 of 7

MAINTENANCE
1. Under normal usage, no spare parts are expected to be
required for one year of operation. Recommended spare
parts are shown on pages 4 and 5.
2. CAUTION: Before proceeding, make sure electrical service
to fan is locked in “OFF” position.
WINDMILLING: Even when the power supply is locked out,
fans may cause injury or damage if the impeller is subject to
“windmilling” which is the turning of the impeller and drive
components due to a draft in the system. To guard against
this hazard, the impeller should be secured to physically
restrict rotational movement.
3. Motor bearings are prelubricated. Consult information
printed on motor for lubrication instructions.
4. REGULAR MAINTENANCE: Determined by the condition
of the air passing through the fan, regularly scheduled
inspection of all fan parts establishes a good maintenance
routine. When the air is clean, maintenance can be as
infrequent as once a year. When air is contaminated with
grease vapors from cooking operations, maintenance may
be required as often as once a week. Regular maintenance
should include inspection and cleaning of all fan parts to
remove all grease and other foreign particles from the entire
wheel surface including blades and front and back plates.
WARNING! Care must be taken when cleaning the wheel to
remove grease and other foreign particles. Damage to the
wheel can occur if it is hit or if pressure is applied causing
the wheel to be distorted. Either case can cause serious
vibration and damage to the fan.
SET SCREW TIGHTENING SCHEDULE
1. Before initial operation of the fan, tighten set screws
according to the procedure outlined below.
2. After 500 operating hours or three months, whichever comes
rst, tighten set screws to the full recommended torque.
3. At least once a year, tighten set screws to the full
recommended torque.
PROCEDURE FOR TIGHTENING SET SCREWS
IN BEARINGS AND HUBS
One Set Screw Application
Using a torque wrench, tighten the set screw to the torque
recommended in Table 1.
Two Set Screw Application
1. Using a torque wrench, tighten one set screw to half of the
torque recommended in Table 1.
2. Tighten the second set screw to the full recommended
torque.
3. Tighten the rst set screw to the full recommended torque.
VARIABLE FREQUENCY DRIVES AND MOTORS
There are occasions when a Variable Frequency Drive (VFD) will
cause poor motor performance and possible damage. To avoid
these problems, the Company recommends the following:
1. Select compatible motor and VFD inverter; if possible, the
motor and the inverter should be from the same manufacturer
or at least the inverter selected should be recommended by
the motor manufacturer.
2. A motor shaft grounding system should be used to prevent
motor bearing damage from eddy currents.
NOTE: The Company will not honor motor warranty claims if
the customer fails to follow these recommendations.
Table 1. Recommended Tightening Torque for Set Screws
Set Screw Diameter Torque (in-lbs)
#10 35
1/4 80
5/16 126
3/8 240
7/16 384
1/2 744
9/16 1080
5/8 1500
3/4 2580
7/8 3600
1 5400
______________________________________________________________________________________________________________________________
2017 © North American Kitchen Solutions
172 Reaser Court
Elyria, OH 44035
www.naksinc.com
Page 3 of 7
Produkspesifikasjoner
Merke: | NAKS |
Kategori: | eksoshette |
Modell: | 10D-700-FF |
Trenger du hjelp?
Hvis du trenger hjelp med NAKS 10D-700-FF still et spørsmål nedenfor, og andre brukere vil svare deg
eksoshette NAKS Manualer
21 September 2025
21 September 2025
21 September 2025
eksoshette Manualer
- eksoshette Teka
- eksoshette Maytag
- eksoshette Miele
- eksoshette Whirlpool
- eksoshette Etna
- eksoshette Haier
- eksoshette KitchenAid
- eksoshette Pelgrim
- eksoshette Bosch
- eksoshette BEKO
- eksoshette Exquisit
- eksoshette Grundig
- eksoshette Electrolux
- eksoshette Café
- eksoshette Balay
- eksoshette Siemens
- eksoshette Smeg
- eksoshette Thermex
- eksoshette Hotpoint
- eksoshette Amica
- eksoshette IKEA
- eksoshette AEG
- eksoshette Rosieres
- eksoshette Inventum
- eksoshette Artusi
- eksoshette Cecotec
- eksoshette Samsung
- eksoshette Neff
- eksoshette Best
- eksoshette Faber
- eksoshette Midea
- eksoshette Franke
- eksoshette Candy
- eksoshette Viking
- eksoshette Trade-Wind
- eksoshette Gorenje
- eksoshette Toolcraft
- eksoshette Gram
- eksoshette Vox
- eksoshette Bertazzoni
- eksoshette Coyote
- eksoshette Defy
- eksoshette XO
- eksoshette Ciarra
- eksoshette Omega
- eksoshette Fisher Paykel
- eksoshette Fulgor Milano
- eksoshette Boretti
- eksoshette Indesit
- eksoshette Asko
- eksoshette Falmec
- eksoshette Dacor
- eksoshette Cylinda
- eksoshette Respekta
- eksoshette Philco
- eksoshette Jenn-Air
- eksoshette Klarstein
- eksoshette ATAG
- eksoshette V-Zug
- eksoshette Cata
- eksoshette Witt
- eksoshette Glem Gas
- eksoshette Hansa
- eksoshette Thor
- eksoshette Vent-A-Hood
- eksoshette Fagor
- eksoshette Edesa
- eksoshette Wolf
- eksoshette Ilve
- eksoshette Rommer
- eksoshette Svan
- eksoshette Corberó
- eksoshette Broan
- eksoshette Ecotronic
- eksoshette Thermador
- eksoshette JennAir
- eksoshette Kaiser
- eksoshette NuTone
- eksoshette Blomberg
- eksoshette ZLine
- eksoshette De Dietrich
- eksoshette Bora
- eksoshette Hanseatic
- eksoshette Oranier
- eksoshette Berbel
- eksoshette Turbo Air
- eksoshette Ariston Thermo
- eksoshette InAlto
- eksoshette BlueStar
- eksoshette Roblin
- eksoshette Seenergy
- eksoshette Vollrath
- eksoshette Premier
- eksoshette FAR
Nyeste eksoshette Manualer
21 September 2025
21 September 2025
21 September 2025
21 September 2025
21 September 2025
21 September 2025
21 September 2025
21 September 2025
21 September 2025
21 September 2025