Nitecore EBP10 mini Bruksanvisning
Nitecore
Batterilader
EBP10 mini
Les nedenfor 📖 manual på norsk for Nitecore EBP10 mini (2 sider) i kategorien Batterilader. Denne guiden var nyttig for 35 personer og ble vurdert med 4.5 stjerner i gjennomsnitt av 18 brukere
Side 1/2
⚠ IMPORTANT
Thanks for purchasing NITECORE!
Please read this manual carefully before using the product and follow
the instructions.
This manual contains important safety information and operating
instructions. Please keep it for future reference.
In case of updates, please refer to the latest version available on the
ocial website.
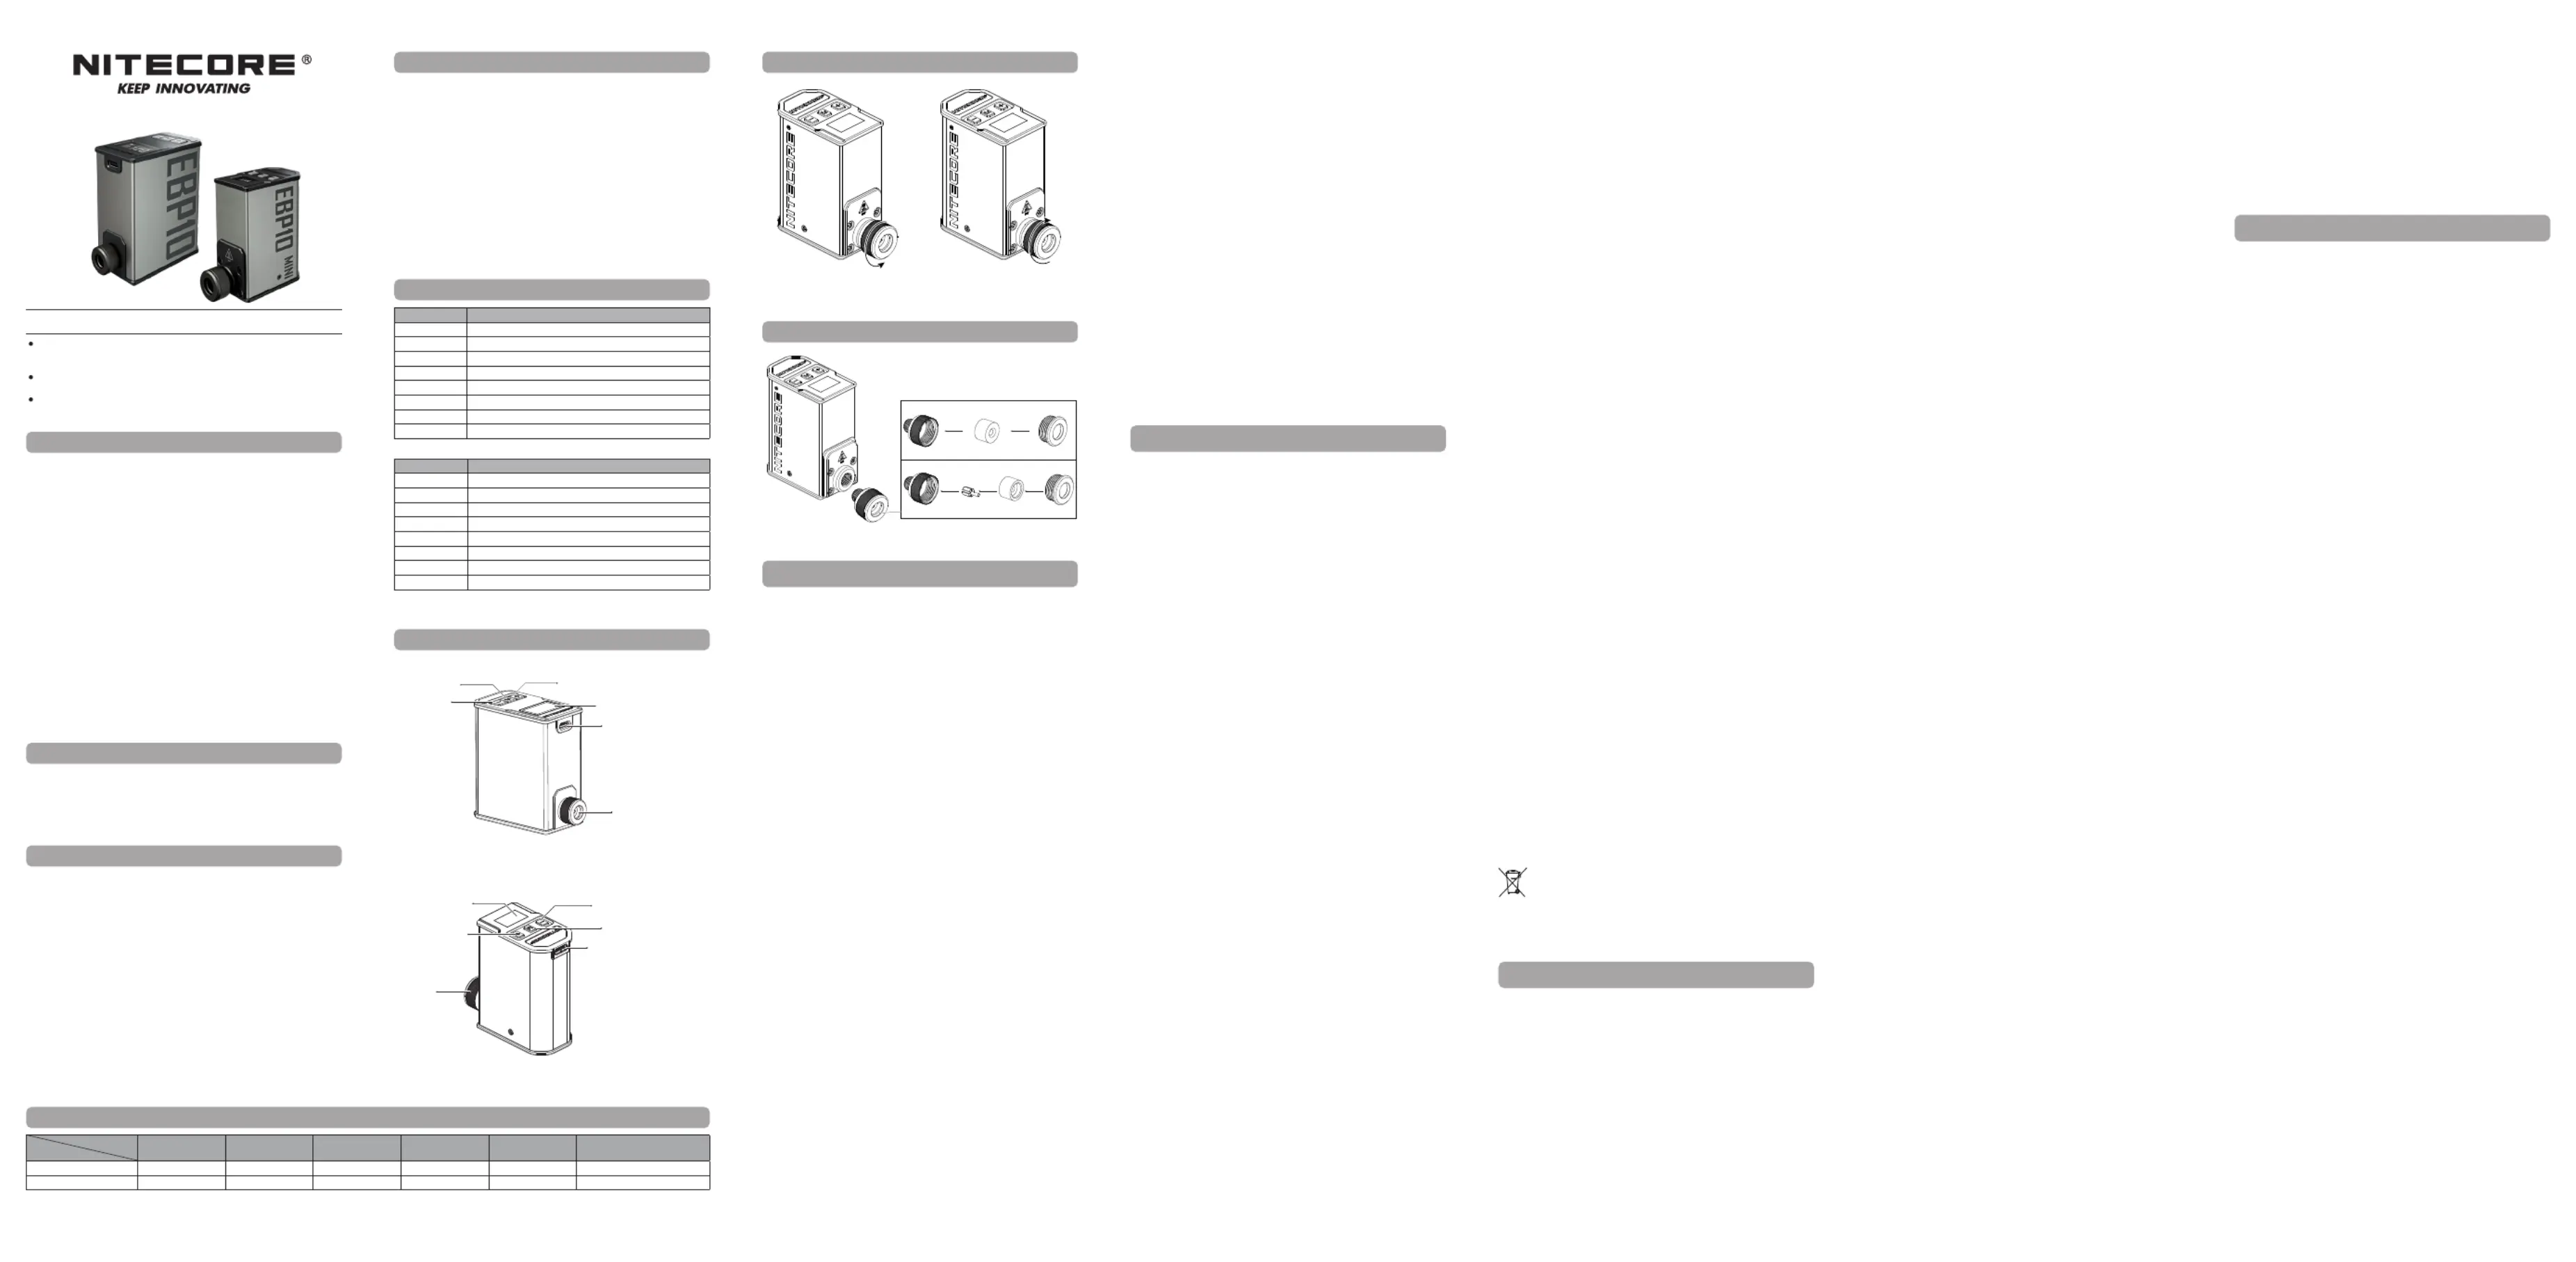
EBP10/EBP10 mini User Manual
Charging Function
The product is equipped with an intelligent charging system. Please charge it
before rst use.
Power Connection: Use the USB-C charging cable to connect an external
power supply (e.g. a USB adapter, a power bank or other USB charging
devices) to the USB-C port to begin the charging process.
Charging Indication: During the charging process, the screen will show
the battery charging process. When the battery is fully charged, the screen
will display a full progress bar. The charging time for the EBP10 is approx.
1 hour 30 minutes (Charged via the 5V 2A adapter). The charging time for ⎓
the EBP10 mini is approx. 40 minutes (Charged via the 5V 2A adapter).⎓
Note: The product will automatically turn o due to low battery power.
Multifunctional OLED Display
The product is equipped with a multifunctional OLED display. (Please remove
the screen protector before rst use.) A short press of the Mode Button
displays the remaining battery power. A long press of the Mode Button
accesses the mode interface, showing the current info (ination mode,
pressure, remaining battery power, etc.). The screen will automatically turn
o if there is no operation in 3 minutes. Long press the Mode Button again
to reenter the mode interface.
Note: The EBP10 mini does not have MC Mode. The MEASURE Mode of the
EBP10 mini is displayed as MEA on the screen.
Installing / Removing the Nozzle
The nozzle is set up to accept Schrader valves at the factory. Before using
the product, ensure the item to be inated is compatible with the nozzle.
Removing the nozzle: Rotate the nozzle in the direction shown in Figure 1
to remove it.
Installing the nozzle: Attach the nozzle to the pump and rotate it in the
direction shown in Figure 2 until it is tight.
How to Convert
For Presta Valve: After removing the nozzle, unscrew the cap
counterclockwise, attach the seal part and the cap to the base as shown in
the gure below, and screw the cap clockwise.
For Schrader Valve: After removing the nozzle, unscrew the cap
counterclockwise, attach the pillar, the seal part, and the cap to the base as
shown in the gure below, and screw the cap clockwise.
Note: Please store the pillar after removal.
Operating Instructions
On / O
On: To use the product, rst long press the Mode Button to enter the mode
interface. Then double press the Mode Button to turn on the pumping
function.
O: When the pumping function is on, short press the Mode Button to turn
it o. Long press the Mode Button again to exit the mode interface and turn
o the product.
1. Only use the product for its intended purposes. Using the product in any
other way could potentially lead to risks and hazards.
2. This product is intended for use by adults aged 18 and over. Please keep
this product out of the reach of children.
3. To ensure the longevity of the product, DO NOT use the EBP10
continuously for more than 10 minutes, and DO NOT use the EBP10 mini
continuously for more than 4 minutes.
4. DO NOT use the product to inate large volume objects such as inatable
pools, inatable boats, and large inatable toys.
5. Keep the ination port of the product clean.
6. Please recharge the product every 3 months when left unused for a
prolonged time.
7. DO NOT immerse the product in water.
8. DO NOT expose the product to water or rain.
9. Ambient Temperature of Usage: -10~40°C (14~104°F); Temperature of
Storage: -20~60°C (-4~140°F)
10. DO NOT put your hands or any foreign objects into the ination port or
the charging port to avoid damage to the product.
11.
Stop using the product immediately if any signs of malfunction are observed.
12. Store the product in ventilated and dry places. Keep it away from any
combustible materials.
13. DO NOT clean the product with any liquids.
14. DO NOT disassemble, modify or repair the product as doing so will
render the product warranty invalid. Please refer to the warranty section
in the manual for complete warranty information.
⚠ Warning
⚠ Battery Safety
Features
Specifications
Product Overview
Installing / Removing the Nozzle
How to Convert
Warranty Service
Multifunctional OLED Display
Improper use of devices with built-in Li-ion batteries may result in severe
battery damage or safety hazards such as combustion or explosion. DO NOT
use the device if it is damaged. DO NOT disassemble puncture, cut, crush,
or incinerate the device. If any leakage or abnormal odor is noticed, stop
using the device immediately. Dispose of the device/batteries in accordance
with applicable local laws and regulations.
• Includes a nozzle that ts both Presta and Schrader valves
• Multifunctional OLED display to show the ination mode, pressure,
remaining battery power, etc.
• The EBP10 has 6 ination modes, with a max pressure of 144psi
• The EBP10 mini has 5 ination modes, with a max pressure of 120psi
• Custom mode available to set the desired pressure freely
• Real-time pressure measurement available
• Quick conversion function of pressure units (psi and Bar)
• The EBP10 includes a built-in 8.88Wh high performance Li-ion battery
• The EBP10 mini includes a built-in 2.55Wh high performance Li-ion battery
• Intelligent Li-ion battery charging system with a USB-C charging port
• The EBP10 mini is ultra compact and portable
•
Constructed from durable PC and aluminum alloy materials
• Impact resistant to 1 meter
• Waterproof and dustproof rating in accordance with IP44
Model EBP10
Input 5V 2A⎓
Rated Power 83W (MAX)
Battery Capacity 8.88Wh (14.8V)
Dimensions 66.0mm x 38.0mm x 79.0mm (2.60" x 1.50" x 3.11")
Weight 280g / 9.88 oz (Nozzle Included)
Pressure 144psi / 9.93 Bar (MAX)
Runtime 600s
Accessories Base, Seal Part, Pillar, Cap
Model EBP10 mini
Input 5V 2A⎓
Rated Power 48W (MAX)
Battery Capacity 2.55Wh (11.1V)
Dimensions 65.0mm x 30.0mm x 65.0mm (2.56" x 1.18" x 2.56")
Weight 140g / 4.94 oz (Nozzle Included)
Pressure 120psi / 8.27 Bar (MAX)
Runtime 240s
Accessories Base, Seal Part, Pillar, Cap, Silicone Protective Cover
EBP10
USB-C Charging Port
Nozzle
OLED Display
Button
"+"
Mode Button
Button "—"
EBP10 mini
For Presta Valve
For Schrader Valve
Base
Seal Part
(Small Hole Facing Outward)
Cap
PillarBase
Seal Part
(Big Hole Facing Outward)
Cap
① ②
MC Mode
(Motorcycle)
ROAD Mode
(Road Bike)
MTB Mode
(Mountain Bike)
BALL Mode
(Ball)
USER Mode
(Custom Mode)
MEASURE Mode
(Pressure Measurement)
EBP10 21 – 37psi 60 – 120psi 15 – 50psi 4 – 16psi 0 – 144psi 0 – 144psi
EBP10 mini —60 – 120psi 15 – 50psi 4 – 16psi 0 – 120psi 0 – 120psi
Note: The EBP10 mini does not have MC Mode. The MEASURE Mode of the EBP10 mini is displayed as MEA on the screen.
Ination Mode
Model
(English)
All NITECORE
®
products are warranted for quality. Any DOA / defective
product can be exchanged for a replacement through a local distributor /
dealer within 15 days of purchase. After that, all defective/malfunctioning
NITECORE
®
products can be repaired free of charge within 12 months
from the date of purchase. Beyond 12 months, the charge for accessories
replacement parts and delivery shall be at your own expenses. The warranty
will be nullied if
1. the product(s) is/are broken down, reconstructed and/or modied by
unauthorized parties.
2. the product(s) is/are damaged due to improper use.
For the latest information on NITECORE
®
products and services please
contact a local NITECORE
®
distributor or send an email to service@nitecore.
com.
※ The trademarks and product images specied herein this user manual are
for reference purposes only. The copyright belongs to their lawful holders.
※ All images, texts and statements specied herein this user manual are
for reference purposes only. Should any discrepancy occur between
this manual and information specied on www.nitecore.com, Sysmax
Innovations Co, Ltd. reserves the rights to interpret and amend the
content of this document at any time without prior notice.
(Deutsch)
(Francais)
( ) Русский
⚠ Warnungen
1. Verwenden Sie das Produkt nur für die vorgesehenen Zwecke. Jede
andere Verwendung des Produkts kann zu Risiken und Gefahren führen.
2. Dieses Produkt ist für die Verwendung durch Erwachsene ab 18 Jahren
bestimmt. Bitte bewahren Sie dieses Produkt außerhalb der Reichweite
von Kindern auf.
3. Um die Langlebigkeit des Produkts zu gewährleisten, verwenden Sie die
EBP10 NICHT länger als 10 Minuten und die EBP10 mini NICHT länger
als 4 Minuten ohne Unterbrechung.
4. Verwenden Sie das Produkt NICHT zum Aufblasen von großvolumigen
Objekten wie aufblasbaren Pools, aufblasbaren Booten und großen
aufblasbaren Spielzeugen.
5. Halten Sie die Aufblasönung des Geräts sauber.
6. Bitte laden Sie das Produkt alle 3 Monate auf, wenn es längere Zeit nicht
benutzt wird.
7. Tauchen Sie das Produkt NICHT in Wasser ein.
8. Setzen Sie das Produkt NICHT dem Wasser oder Regen aus.
9. Umgebungstemperatur bei der Verwendung: -10 ~ 40°C;
Lagertemperatur: -20 ~ 60°C
10. Stecken Sie NICHT Ihre Hände oder fremde Gegenstände in die
Aufblasönung oder den Ladeanschluss, um Schäden am Produkt zu
vermeiden.
11. Stellen Sie die Verwendung des Produkts sofort ein, wenn Sie Anzeichen
einer Fehlfunktion feststellen.
12. Lagern Sie das Produkt an einem belüfteten und trockenen Ort. Halten
Sie es von allen brennbaren Materialien fern.
13. Reinigen Sie das Gerät NICHT mit irgendwelchen Flüssigkeiten.
14. Das Gerät darf NICHT zerlegt, modiziert oder repariert werden, da dies
zum Erlöschen der Produktgarantie führt. Vollständige Informationen zur
Garantie nden Sie im Abschnitt „Garantie“ in diesem Handbuch.
⚠ Batteriesicherheit
Die unsachgemäße Verwendung von Geräten mit eingebauten Li-Ionen-
Akkus kann zu schweren Akkuschäden oder Sicherheitsrisiken wie
Verbrennung oder Explosion führen. Verwenden Sie das Gerät NICHT,
wenn es beschädigt ist. Zerlegen Sie das Gerät NICHT, durchstechen,
zerschneiden, zerquetschen oder verbrennen Sie es nicht. Wenn Sie
ein Leck oder einen ungewöhnlichen Geruch feststellen, stellen Sie die
Verwendung des Geräts sofort ein. Entsorgen Sie das Gerät/die Batterien in
Übereinstimmung mit den geltenden örtlichen Gesetzen und Vorschriften.
Laden
Das Produkt ist mit einem intelligenten Ladesystem ausgestattet. Bitte laden
Sie es vor dem ersten Gebrauch auf.
Stromanschluss: Verwenden Sie das USB-C-Ladekabel, um ein externes
Netzteil (z. B. einen USB-Adapter, eine PowerBank oder andere USB-Ladegeräte)
an den USB-C-Anschluss anzuschließen und den Ladevorgang zu starten.
Anzeige des Ladevorgangs: Während des Ladevorgangs wird auf dem
Display der Ladevorgang des Akkus angezeigt. Wenn der Akku vollständig
aufgeladen ist, wird auf dem Display ein vollständiger Fortschrittsbalken
angezeigt. Die Ladezeit für die EBP10 beträgt ca. 1 Stunde 30 Minuten
(aufgeladen über den 5V 2A-Adapter). Die Ladezeit für die EBP10 mini ⎓
beträgt ca. 40 Minuten (Auadung über den 5V⎓2A-Adapter).
Hinweis: Das Gerät schaltet sich automatisch ab, wenn die Batterieleistung
schwach ist.
Multifunktionales OLED Display
Das Produkt ist mit einem multifunktionalen OLED-Display ausgestattet.
(Bitte entfernen Sie den Bildschirmschutz vor dem ersten Gebrauch.) Ein
kurzer Druck auf die Mode-Taste zeigt die Rest-Energie an. Durch langes
Drücken der Mode-Taste wird das Mode-Display aufgerufen, das die
aktuellen Informationen anzeigt (Aufpump-Mode, Druck, Rest-Energie usw.).
Das Display schaltet sich automatisch aus, wenn innerhalb von 3 Minuten
keine Bedienung erfolgt. Durch erneutes langes Drücken der Mode-Taste
gelangen Sie wieder in das Mode-Display.
⚠ Avertissement
1. N'utilisez le produit qu'aux usages pour lesquels il a été conçu. Toute
autre utilisation du produit peut potentiellement entraîner des risques et
des dangers.
2. Ce produit est destiné à être utilisé par des adultes âgés de 18 ans et
plus. Tenez-le hors de portée des enfants.
3. Pour assurer la longévité du produit, NE PAS utiliser l'EBP10 en continu
pendant plus de 10 minutes, et NE PAS utiliser l'EBP10 mini en continu
pendant plus de 4 minutes.
4. NE PAS utiliser le produit pour goner des objets de grand volume
tels que des piscines gonables, des bateaux gonables et des jouets
gonables de grande taille.
5. Gardez l'orice de gonage du produit propre.
6. Rechargez le produit tous les 3 mois s'il n'est pas utilisé pendant une
période prolongée.
7. NE PAS immerger le produit dans l'eau.
8. NE PAS exposer le produit à l'eau ou à la pluie.
9. Température ambiante d'utilisation : -10~40°C (14~104°F) ;
Température de stockage : -20~60°C (-4~140°F)
⚠ Меры предосторожности
1. Используйте устройства исключительно по назначению.
Эксплуатация устройств любым иным способом повышает риск
возникновения опасных ситуаций.
2. Данный продукт предназначен для использования взрослыми в
возрасте от 18 лет и старше. Пожалуйста, храните устройства в
недоступном для детей месте.
3. Для поддержания как можно более длительного срока службы НЕ
следует использовать EBP10 непрерывно более 10 минут, а EBP10
mini НЕ следует использовать непрерывно более 4 минут.
4. НЕ используйте устройства для надувания сфер большого объема,
таких как надувные бассейны, надувные лодки и большие надувные
игрушки.
5. Содержите отверстие подачи воздуха в чистоте.
6. Пожалуйста, перезаряжайте устройства каждые 3 месяца, если они
не находятся в эксплуатации в течение длительного времени.
7. НЕ погружайте устройства в воду.
8. НЕ подвергайте устройства воздействию воды или дождя.
9. Температура окружающей среды при эксплуатации: -10~40°C
(14~104°F); Температура хранения: -20~60°C (-4~140°F)
10. НЕ помещайте пальцы рук или посторонние предметы в порт подачи
воздуха или порт зарядки во избежание повреждения устройства.
11. Незамедлительно прекратите использование устройства при
обнаружении каких-либо признаков его неисправности.
12. Храните устройства в проветриваемых и сухих местах. Держите их
подальше от любых горючих материалов.
13. При чистке устройств НЕ используйте какие-либо жидкости.
14. НЕ разбирайте и НЕ вносите какие-либо изменения в конструкцию
устройств, поскольку это сделает гарантию на продукцию
недействительной. Полную информацию о гарантийном
обслуживании вы можете найти в разделе «Гарантийного
обслуживания» текущего руководства.
⚠ Безопасность аккумулятора
Неправильное использование устройств со встроенными литий-ионными
аккумуляторами может привести к серьезному повреждению элемента
питания или угрозе безопасности, например возгоранию и даже взрыву.
НЕ используйте устройство, если аккумулятор поврежден. НЕ разбирайте,
НЕ прокалывайте, НЕ режьте, НЕ разбивайте и НЕ поджигайте
устройство. При обнаружении каких-либо утечек или необычного запаха
незамедлительно прекратите использование устройства. Утилизируйте
устройство / элементы питания в соответствии с действующим
законодательством и принятыми в вашем регионе правилами.
Зарядка
EBP10 / EBP10 mini оснащен умной системой зарядки. Пожалуйста, не
забудьте зарядить аккумулятор перед первым использованием.
Подключение к источнику питания: чтобы начать зарядку,
используйте USB-кабель для подключения к порту USB-C внешнего
источника питания (например, USB-адаптера, блока питания или любого
другого устройства, поддерживающего зарядку посредством USB-C).
Сообщение уровня заряда: во время зарядки на дисплее будет
отображаться информация о текущем уровне заряда аккумулятора.
Когда зарядка будет завершена, вы увидите полную шкалу прогресса на
экране. Время полной зарядки EBP10 составляет приблизительно 1 час
30 минут (при зарядке посредством адаптера 5 В 2 А). Время полной ⎓
зарядки EBP10 mini составляет приблизительно 40 минут (при зарядке
посредством адаптера 5 В 2 А).⎓
Примечание. Устройство автоматически выключится при низком
уровне заряда аккумулятора.
Многофункциональный OLED-дисплей
Устройство оснащено многофункциональным OLED-дисплеем. (Перед
первым использованием не забудьте снять защитную пленку с
экрана). Кратковременное нажатие на кнопку режима (M) отображает
оставшийся уровень заряда аккумулятора. Долгое зажатие кнопки
режима (M) открывает меню, в котором представлена вся информация
о текущих настройках (выбранный режим подачи воздуха, давление,
оставшийся уровень заряда и т. д.). При отсутствии каких-либо
действий в течение 3 минут экран автоматически погаснет. Для
возврата в меню снова зажмите и удерживайте кнопку режима (M).
Примечание. EBP10 mini не предоставляет доступ к режиму MC (для
мотоциклов). Режим MEASURE (для измерения давления) на дисплее
EBP10 mini отображается как MEA.
Установка / открепление штуцера
По умолчанию на насосе установлен штуцер под клапан Schrader. Перед
использованием насоса убедитесь в совместимости штуцера с клапаном,
к которому вы планируете его присоеденить.
Открепление штуцера: для открепления штуцера открутите его так,
это показано на рис. 1.
Установка штуцера: прикрепите штуцер к насосу и закрутите его так,
как это показано на рис. 2. Крутить необходимо до того момента, пока
штуцер не будет надежно закреплен.
10. NE METTEZ PAS vos mains ou des objets étrangers dans le système de
gonage ou le port de charge pour éviter d'endommager le produit.
11. Cessez immédiatement d'utiliser le produit si vous observez des signes
de dysfonctionnement.
12. Stockez le produit dans des endroits ventilés et secs. Tenez-le éloigné de
tout matériau combustible.
13. NE PAS nettoyer le produit avec des liquides.
14. NE PAS démonter, modier ou réparer le produit car cela rendrait la
garantie du produit invalide. Veuillez-vous référer à la section garantie
du manuel pour des informations complètes sur la garantie.
⚠ Sécurité des batteries
L'utilisation incorrecte d'appareils dotés de batteries Li-ion intégrées peut
entraîner de graves dommages à la batterie ou des risques de sécurité
tels que la combustion ou l'explosion. N'utilisez PAS l'appareil s'il est
endommagé. NE PAS démonter, perforer, couper, écraser ou incinérer
l'appareil. En cas de fuite ou d'odeur anormale, cessez immédiatement
d'utiliser l'appareil. Recyclez l'appareil/les piles conformément aux lois et
réglementations locales en vigueur.
Fonction de charge
Le produit est équipé d'un système de chargement intelligent. Veuillez le
charger avant la première utilisation.
Connexion à l’alimentation : Utilisez le câble de charge USB-C pour
connecter une alimentation externe (par exemple, un adaptateur USB, une
batterie externe ou d'autres dispositifs de charge USB) au port USB-C pour
commencer le processus de charge.
Indication de charge : Pendant le processus de chargement, l'écran
ache le niveau de charge de la batterie. Lorsque la batterie est
entièrement chargée, l'écran ache une barre de progression complète. Le
temps de charge de l'EBP10 est d'environ 1 heure 30 minutes (charge via
l'adaptateur 5V 2A). Le temps de charge de l'EBP10 mini est d'environ 40 ⎓
minutes (charge via l'adaptateur 5V 2A).⎓
Remarque : Le produit s'éteint automatiquement lorsque la batterie est faible.
Écran OLED multifonctionnel
Le produit est équipé d'un écran OLED multifonctionnel. (Veuillez retirer le
lm protecteur de l'écran avant la première utilisation.) Une brève pression
sur le bouton Mode permet d'acher la puissance restante de la batterie. Une
pression longue sur le bouton Mode permet d'accéder à l'interface mode, qui
ache les informations en cours (mode de gonage, pression, charge restante
de la batterie, etc.) L'écran s'éteint automatiquement si aucune opération n'est
eectuée dans les 3 minutes. Une nouvelle pression longue sur le bouton
Mode permet d'accéder à nouveau à l'interface de mode.
Remarque : l'EBP10 mini ne dispose pas du mode MC. Le mode MESURE
de l'EBP10 mini est aché à l'écran sous la forme MEA.
Installation / Démontage de la buse
La buse est réglée en usine pour être compatible les valves Schrader. Avant
d'utiliser le produit, assurez-vous que le matériel à goner est compatible
avec la buse.
Démontage de la buse : Tournez la buse dans le sens indiqué à la gure 1
pour la retirer.
Installation de la buse : Fixez la buse à la pompe et tournez-la dans le
sens indiqué à la gure 2 jusqu'à ce qu'elle soit bien serrée.
Comment convertir
Pour la valve Presta : Après avoir retiré la buse, dévisser le capuchon
dans le sens inverse des aiguilles d'une montre, xer le joint et le capuchon
à la base comme indiqué dans la gure ci-dessous, et visser le capuchon
dans le sens des aiguilles d'une montre.
Pour la valve Schrader : Après avoir retiré la buse, dévisser le capuchon
dans le sens inverse des aiguilles d'une montre, xer le pilier, le joint
d'étanchéité et le capuchon à la base comme indiqué sur la gure ci-
dessous, et visser le capuchon dans le sens des aiguilles d'une montre.
Remarque : Conservez le pilier après l'avoir retiré.
Instructions d'utilisation
Marche / Arrêt
Marche : Pour utiliser le produit, appuyez d'abord longuement sur le bouton
de mode pour accéder à l'interface de mode. Ensuite, appuyez deux fois sur
le bouton Mode pour activer la fonction de gonage.
Arrêt : Lorsque la fonction de gonage est activée, appuyez brièvement sur
le bouton Mode pour l'arrêter. Appuyez à nouveau longuement sur le bouton
de mode pour quitter l'interface de mode et éteindre le produit.
Changement de mode
EBP10 : dans l'interface de mode, appuyez brièvement sur le bouton de
mode pour passer à la séquence suivante : Mode MC - Mode ROUTE - Mode
VTT - Mode BALL - Mode UTILISATEUR - Mode MESURE.
EBP10 mini : dans l'interface de mode, appuyez brièvement sur le bouton
de mode pour passer à la séquence suivante : mode ROUTE - mode VTT -
mode BALL - mode UTILISATEUR - Mode MEA (Mode MESURE).
Remarque : l'appareil est doté d'une fonction de mémorisation.
Lorsqu'il est réactivé, il accède automatiquement au mode de gonage
précédemment mémorisé.
Réglage de la pression
Dans l'interface de mode, appuyez brièvement et continuellement sur le
bouton « + » ou le bouton « - » pour augmenter ou diminuer la pression
dans le mode de gonage actuel.
Conversion des unités de pression
Dans l'interface de mode, appuyez brièvement sur les boutons « + » et « - »
pour passer de psi à bar.
Hinweis: Die EBP10 mini hat keinen MC-Mode. Der MESS-Mode der EBP10
mini wird als “MEA” angezeigt.
Installieren / Entfernen der Düse
Die Düse ist werksseitig für Schrader-Ventile ausgelegt. Vergewissern Sie
sich vor der Verwendung des Produkts, dass der aufzublasende Gegenstand
mit der Düse kompatibel ist.
Entfernen der Düse: Drehen Sie die Düse in die in Abbildung 1 gezeigte
Richtung, um sie zu entfernen.
Installieren der Düse: Bringen Sie die Düse an der Pumpe an und drehen
Sie sie in die in Abbildung 2 gezeigte Richtung, bis sie festsitzt.
Umrüsten
Für Presta-Ventil: Nachdem Sie die Düse entfernt haben, schrauben Sie
die Kappe gegen den Uhrzeigersinn ab, befestigen das Dichtungsteil und die
Kappe an der Basis - wie in der Abbildung unten gezeigt - und schrauben die
Kappe im Uhrzeigersinn fest
Für Schrader-Ventil: Nachdem Sie die Düse entfernt haben, schrauben
Sie die Kappe gegen den Uhrzeigersinn ab, befestigen den Stempel, das
Dichtungsteil und die Kappe an der Basis - wie in der Abbildung unten
gezeigt - und schrauben die Kappe im Uhrzeigersinn fest.
Hinweis: Bitte bewahren Sie den Stempel nach dem Abnehmen auf.
Betriebsanleitung
Ein / Aus
Ein: Um das Produkt zu verwenden, drücken Sie zunächst lange auf die
Mode-Taste, um das Mode-Display aufzurufen. Drücken Sie dann zweimal die
Mode-Taste, um die Pumpfunktion einzuschalten.
Aus: Wenn die Pumpfunktion eingeschaltet ist, drücken Sie kurz die Mode-
Taste, um sie auszuschalten. Drücken Sie die Mode-Taste erneut lange, um
das Mode-Display zu verlassen und das Gerät auszuschalten.
Mode-Umschaltung
EBP10: Drücken Sie im Mode-Display kurz die Mode-Taste, um die folgende
Reihenfolge zu durchlaufen: „MC-Mode“ – „ROAD-Mode“ – „MTB-Mode“ –
„BALL-Mode“ – „USER-Mode“ – „MEASURE-Mode“.
EBP10 mini: Drücken Sie im Mode-Display kurz die Mode-Taste, um die
folgende Sequenz zu durchlaufen: „ROAD-Mode“ – „MTB-Mode“ – „BALL-
Mode“ – „USER-Mode“ – „MEA-Mode“ (MEASURE-Modus).
Hinweis: Das Produkt verfügt über eine Speicherfunktion. Wenn es wieder
aktiviert wird, greift es automatisch auf den zuvor gespeicherten Aufpump-
Mode zu.
Druckanpassung
Drücken Sie im Mode-Display kurz die Taste „+“ oder die Taste „-“, um den
Druck im aktuellen Aufpumpmodus zu erhöhen oder zu verringern.
Umrechnung der Druckeinheit
Drücken Sie im Mode-Display kurz die Taste „+“ und die Taste „-“, um
zwischen PSI und Bar umzuschalten.
MEASURE-Modus (Druckmessung)
Dieser Mode wird für die Druckmessung verwendet. Nachdem Sie den Mess-
Mode ausgewählt haben, schließen Sie die Düse an den Aufblasanschluss an,
und das Display zeigt den Echtzeitdruck des Objekts an. Um diesen Mode zu
verlassen, drücken Sie kurz die Mode-Taste, um zu einem anderen Mode zu
wechseln.
USER-Mode (Benutzerdenierter Modus)
In diesem Mode kann der Benutzer einen benutzerdenierten Druck
einstellen. Nach Auswahl des USER-Mode drücken Sie kurz die Taste „+“
oder die Taste „-“, um den gewünschten Druck einzustellen.
• Bei der EBP10 kann der Druck zwischen 0 und 144 PSI eingestellt werden.
• Bei der EBP10 mini kann der Druck von 0 - 120 PSI eingestellt werden.
Entsorgung von Elektro- und Elektronikgeräten
Die durchgestrichene Mülltonne bedeutet, dass Sie gesetzlich
verpichtet sind, diese Geräte einer vom unsortierten Siedlungsabfall
getrennten Erfassung zuzuführen. Die Entsorgung über die
Restmülltonne oder die gelbe Tonne ist untersagt. Enthalten die Produkte
Batterien oder Akkus, die nicht fest verbaut sind, müssen diese vor der
Entsorgung entnommen und getrennt als Batterie entsorgt werden.
Mode Switching
EBP10: In the mode interface, short press the Mode Button to cycle
through the following sequence: MC Mode – ROAD Mode – MTB Mode –
BALL Mode – USER Mode – MEASURE Mode.
EBP10 mini: In the mode interface, short press the Mode Button to cycle
through the following sequence: ROAD Mode – MTB Mode – BALL Mode –
USER Mode – MEA Mode (MEASURE Mode).
Note: The product has memory function. When reactivated, it will
automatically access the previous memorized ination mode.
Pressure Adjustment
In the mode interface, continuously short press the Button "+" or the Button
"-" to increase or decrease the pressure in the current ination mode.
Pressure Unit Conversion
In the mode interface, short press both Button "+" and Button "-" to switch
between psi and Bar.
MEASURE Mode (Pressure Measurement)
This mode is used for measuring pressure. After selecting MEASURE mode,
connect the nozzle to the ination port, and the screen will display the real-
time pressure of the object. To exit this mode, short press the Mode Button
to switch to another mode.
USER Mode (Custom Mode)
This mode allows users to set a custom pressure. After selecting USER mode,
short press the Button "+" or the Button "-" to set the desired pressure.
• For the EBP10, the pressure can be set from 0 – 144psi.
• For the EBP10 mini, the pressure can be set from 0 – 120psi.
Mode MESURE (mesure de la pression)
Ce mode est utilisé pour mesurer la pression. Après avoir sélectionné
le mode MESURE, connectez l'embout à l'orice de gonage et l'écran
achera la pression en temps réel de l'objet. Pour quitter ce mode, appuyez
brièvement sur le bouton Mode pour passer à un autre mode.
Mode utilisateur (mode personnalisé)
Ce mode permet aux utilisateurs de régler une pression personnalisée. Après
avoir sélectionné le mode UTILISATEUR, appuyez brièvement sur le bouton
« + » ou le bouton « - » pour régler la pression souhaitée.
• Pour l'EBP10, la pression peut être réglée entre 0 et 144psi.
• Pour l'EBP10 mini, la pression peut être réglée entre 0 et 120psi.
USB-C Charging Port
Nozzle
OLED Display
Button"+"
Mode Button
Button "
—
"
Produkspesifikasjoner
| Merke: | Nitecore |
| Kategori: | Batterilader |
| Modell: | EBP10 mini |
Trenger du hjelp?
Hvis du trenger hjelp med Nitecore EBP10 mini still et spørsmål nedenfor, og andre brukere vil svare deg
Batterilader Nitecore Manualer
6 Oktober 2025
3 August 2025
3 August 2025
3 August 2025
3 August 2025
3 August 2025

3 August 2025

30 Desember 2025

17 Desember 2024

17 Desember 2024
Batterilader Manualer
- Kenwood
- H-Tronic
- Livoo
- Ventev
- NOCO
- Pro-User
- Celly
- Schwaiger
- Hama
- Hikoki
- Bolt
- MSW
- Silverline
- Tripp Lite
- Savio
Nyeste Batterilader Manualer
16 Oktober 2025
16 Oktober 2025
15 Oktober 2025
15 Oktober 2025
13 Oktober 2025
12 Oktober 2025

12 Oktober 2025
12 Oktober 2025
12 Oktober 2025
12 Oktober 2025