Nitecore izzCool 10 Pro Bruksanvisning
Nitecore
Batterilader
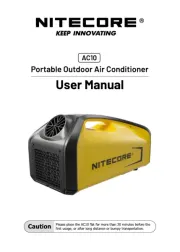
izzCool 10 Pro
Les nedenfor 📖 manual på norsk for Nitecore izzCool 10 Pro (2 sider) i kategorien Batterilader. Denne guiden var nyttig for 33 personer og ble vurdert med 4.7 stjerner i gjennomsnitt av 17 brukere
Side 1/2
(English)
(Deutsch)
Features
Specications
Installing / Detaching the Bottle Adapter
Product Overview
• Cool mist function available for hydrating
• Fan function available with 3 levels of wind speed
• Topwatercompartmentwithalargeopeningforconvenientrelling
• Intelligent Li-ion battery charging circuit with a USB-C charging port
• The izzCool™ 10 includes a built-in 2,600mAh Li-ion battery, providing
up to 7 hours of runtime
• The izzCool™ 10 Pro includes a built-in 4,000mAh Li-ion battery, providing
up to 12.5 hours of runtime
• Bottle adapters included, compatible with common mineral water bottles
on the market
• Made from durable ABS material
• Includes a carry pouch for easy carrying
Model izzCool™ 10
Capacity 2,600mAh
Rated Input 5V 2A⎓
Rated Power 5W (MAX)
Charging Time 1h 30min (5V/2A Adapter)
Moisture Output 80 mL/h
Rotational Speed 10,000 RPM (MAX)
Wind Speed 6.0 m/s (MAX) (13.4 mph)
Runtime
Cool Mist LOW Cool Mist MID Cool Mist HIGH
7h 4h 2.5h
Dimensions
138.0mm x 67.0mm x 60.0mm / 5.43" x 2.64" x 2.36"
(Accessories Not Included)
Weight 139g (4.90 oz) (Accessories Not Included)
Accessories Spare Bottle Adapter, Carry Pouch
Model izzCool™ 10 Pro
Capacity 4,000mAh
Rated Input 5V 2A⎓
Rated Power 5W (MAX)
Charging Time 2h 30min (5V/2A Adapter)
Moisture Output 80 mL/h
Rotational Speed 10,000 RPM (MAX)
Wind Speed 6.0 m/s (MAX) (13.4 mph)
Runtime
Cool Mist LOW Cool Mist MID Cool Mist HIGH
12.5h 7h 4.5h
Dimensions
138.0mm x 67.0mm x 60.0mm / 5.43" x 2.64" x 2.36"
(Accessories Not Included)
Weight 141g / 4.97 oz (Accessories Not Included)
Accessories Spare Bottle Adapter, Carry Pouch
⚠ Warnung
1. Umgebungstemperatur bei Verwendung: -10 ~ 40°C; Temperatur der
Lagerung: -20 ~ 60°C
2. Stecken Sie keine Fremdkörper in das Produkt, um Schäden zu vermeiden.
3. Stecken Sie NICHT Ihre Hände oder irgendwelche Fremdkörper in die
Lüfterabdeckung oder die Laufschaufeln, um Unfälle oder Schäden am
Produkt zu vermeiden.
4. Zerlegen,modizierenoderreparierenSiedasProduktNICHT,dadies
zum Erlöschen der Garantie führt. Vollständige Informationen zur Garantie
ndenSieimAbschnitt"Garantieservice"inderBedienungsanleitung.
5. Bitte laden Sie das Produkt mit der angegebenen Spannung auf.
6. Stellen Sie das Gerät NICHT in die Nähe des Feuers, um Unfälle und
Schäden am Gerät zu vermeiden.
7. Bitte lagern Sie das Produkt an einem kühlen und trockenen Ort.
Bewahren Sie das Produkt außerhalb der Reichweite von Kindern auf.
8. Bitte halten Sie das Gerät sauber, um das Eindringen von Wasser, Insekten
und Fremdkörpern in das Gerät zu verhindern, die zu Funktionsstörungen
führen können.
9. Verdrehen Sie das Ladekabel während des Ladevorgangs NICHT
und ziehen Sie nicht gewaltsam daran, um eine Beschädigung des
Ladekabels und ein Austreten von Strom zu vermeiden.
10. Das Produkt ist für die Verwendung durch Erwachsene vorgesehen.
Kinder unter 18 Jahren müssen bei der Verwendung dieses Produkts von
einem Erwachsenen beaufsichtigt werden, um Unfälle zu vermeiden.
11. Entsorgen Sie das Gerät/die Batterien in Übereinstimmung mit den
geltenden örtlichen Gesetzen und Vorschriften.
⚠ Batteriesicherheit
Die unsachgemäße Verwendung von Geräten mit eingebauten Li-Ionen-
Akkus kann zu schweren Akkuschäden oder Sicherheitsrisiken wie
Verbrennung oder Explosion führen. Verwenden Sie das Gerät NICHT, wenn
es beschädigt ist. Zerlegen, durchstechen, zerschneiden, zerquetschen
oder verbrennen Sie das Gerät NICHT. Wenn Sie ein Leck oder einen
ungewöhnlichen Geruch feststellen, stellen Sie die Verwendung des Geräts
sofort ein. Entsorgen Sie das Gerät/die Batterien in Übereinstimmung mit
den geltenden örtlichen Gesetzen und Vorschriften.
Ladefunktion
• Das Produkt ist mit einer intelligenten Ladefunktion ausgestattet. Bitte
laden Sie das Produkt vor dem ersten Gebrauch auf. Verwenden Sie
ein USB-C-Kabel, um ein externes Netzteil an den USB-C-Anschluss
anzuschließen, und den Ladevorgang zu starten.
• Während des Ladevorgangs blinkt die blaue Anzeige langsam.
• Wenn das Produkt vollständig geladen ist, wird der Ladevorgang automatisch
beendet und die blaue Anzeige leuchtet weiter.
• Das Produkt ist während des Ladevorgangs verfügbar.
Charging Function
The product is equipped with intelligent charging function. Please charge
theproductbeforetherstuse.UseaUSB-Ccabletoconnectanexternal
power supply to the USB-C port to begin the charging process.
• Duringthechargingprocess,theblueindicatorwillashslowlytoinform
the user.
• When the product is fully charged, it will automatically cease the
charging process and the blue indicator will remain on.
• The product is available during the charging process.
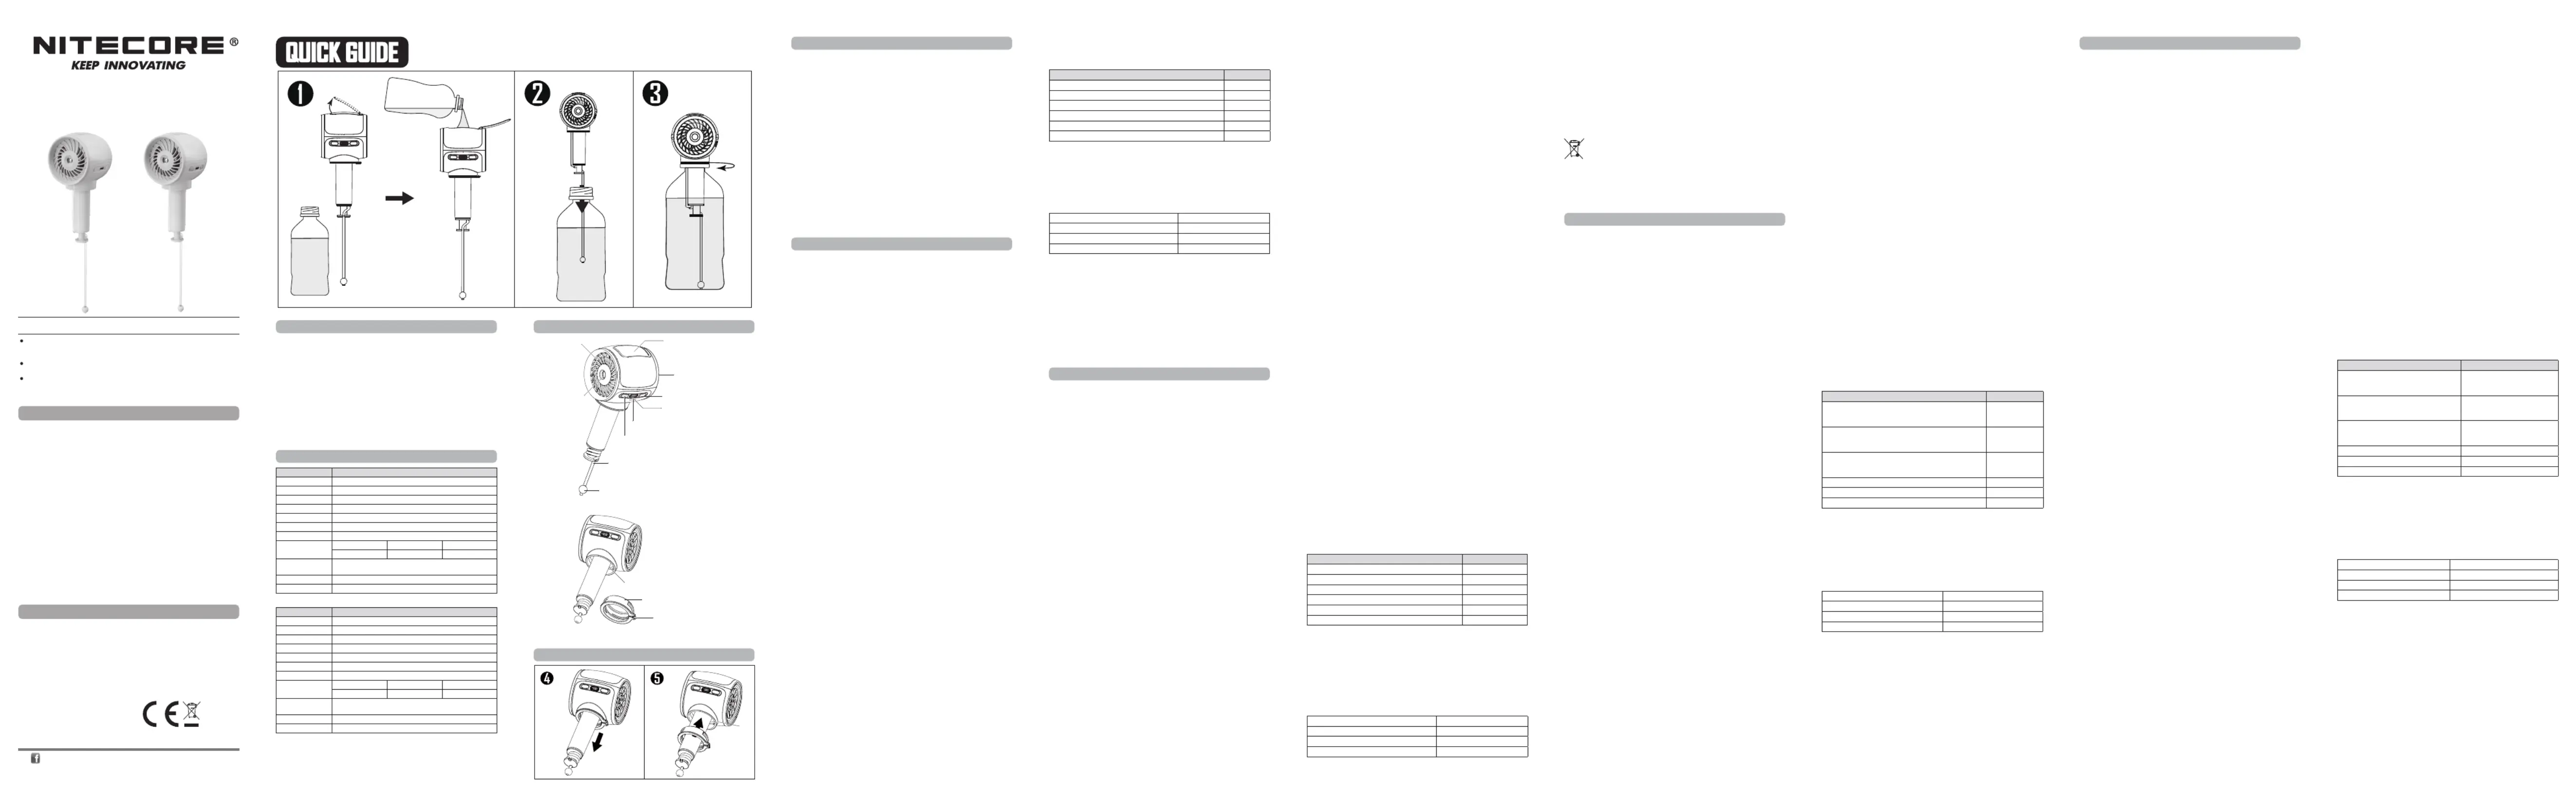
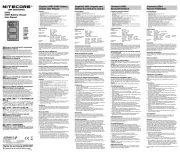
Installing a Water Tank
This product is compatible with common mineral water bottles on the
market, which can serve as water tanks.
(1)Uncoilthewatertube.Openthecoverofthewatercompartment,llthe
compartment with an appropriate amount of water, then close the cover
(Figure 1).
(2) Place the water tube into a water bottle (Figure 2).
(3) Hold the water bottle and rotate the product clockwise until the bottle
adapter and water bottle are tightly sealed to use the mist function
(Figure 3).
Note:Iftheproductdoesnotmistduringuse,rellthewatercompartment
to reactivate the mist function.
Installing / Detaching the Bottle Adapter
This product has a bottle adapter installed at the factory. Please remove the
old bottle adapter before installing the spare bottle adapter.
• Pinch the handle of the old bottle adapter and pull it Detaching:
downward to remove (Figure 4).
• Align the bottle adapter handle below the air inlet cover Installing:
(DirectionA).Insertthesparebottleadapterintotheslotuntilitts
securely(Figure5).Gentlypullthehandletoensuretheadapterisrmly
in place and does not move.
Operating Instructions
Cool Mist
On:Whentheproductiso,shortpresstheFanButton,thenshortpress
the Mist Button to activate Cool Mist LOW (Default).
O: When the cool mist function is on, continuously short press the Fan
Buttonuntilthefanfunctionturnso,thenshortpresstheMistButtonto
turnotheproduct.
Switching: When the cool mist function is on, short press the Fan Button to
cycle through the following sequence: Cool Mist LOW – Cool Mist MID – Cool
Mist HIGH – Mist.
Fan Only
The fan function can be used independently.
• On:Whentheproductiso,shortpresstheFanButtontoactivateFan
LOW (Default).
• O / Switching: When the fan function is on, short press the Fan Button to
cyclethroughthefollowingsequence:FanLOW–FanMID–FanHIGH–O.
Mist Only
The mist function can be used independently.
• On:Whentheproductiso,shortpresstheMistButtontoturnonthe
mist function.
• O:Whenthemistfunctionison,shortpresstheMistButtontoturnito.
Indicators
• When the mist function is on, the blue indicator will remain on. When
themistfunctioniso,theblueindicatorwillturno.
• When adjusting the wind speed setting, the corresponding white
indicators will glow to inform the user. If there is no change in the
setting,thewhiteindicatorswillturnoafter3seconds.
(Francais)
izzCool
TM
10 / izzCool
TM
10 Pro
⚠ IMPORTANT
Thanks for purchasing NITECORE!
Please read this manual carefully before using the product and follow
the instructions.
This manual contains important safety information and operating
instructions. Please keep it for future reference.
In case of updates, please refer to the latest version available on the
ocialwebsite.
User Manual
⚠ Warning
⚠ Battery Safety
1. Ambient Temperature of Usage: -10~40°C (14~104°F);
Temperature of Storage: -20~60°C (-4~140°F)
2. DO NOT put any foreign objects into the product to avoid damage.
3. DO NOT put your hands or any foreign objects into the fan cover or the
running blades to avoid accidents or damage to the product.
4. DO NOT disassemble, modify or repair the product as doing so will
render the product warranty invalid. Please refer to the warranty section
in the manual for complete warranty information.
5. Pleasechargetheproductwithaspeciedvoltage.
6. DONOTplacetheproductclosetotheretoavoidaccidentsanddamage
to the product.
7. Please store the product in cool and dry places. Keep the product out of
reach of children.
8. Please keep the product clean to prevent water, insects, and foreign matters
from entering the product, which may cause the product to fail to work.
9. DO NOT twist the charging cable or pull it forcibly during charging to
avoid damage to the charging cable and prevent electricity leakage.
10. The product is designed to be used by adults. Children under 18 years old
must be under adult supervision when using this product to avoid accidents.
11. Dispose of the device/batteries in accordance with applicable local laws
and regulations.
Improper use of devices with built-in Li-ion batteries may result in severe
battery damage or safety hazards such as combustion or explosion. DO NOT
use the device if it is damaged. DO NOT disassemble, puncture, cut, crush,
or incinerate the device. If any leakage or abnormal odor is noticed, stop
using the device immediately. Dispose of the device/batteries in accordance
with applicable local laws and regulations.
⚠ Avertissements :
1. Température ambiante d'utilisation : -10~40°C (14~104°F) ;
Température de stockage : -20~60°C (-4~140°F)
2. NE PAS introduire d'objets étrangers dans le produit pour éviter de
l'endommager.
3. NE METTEZ PAS vos mains ou des objets étrangers dans le couvercle du
ventilateuroudanslespalesand'évitertoutaccidentoudommageau
produit.
4. NEPASdémonter,modierouréparerleproduitcarcelarendraitla
garantie du produit invalide. Veuillez-vous référer à la section garantie du
manuel pour des informations complètes sur la garantie.
5. Chargez le produit avec une tension appropriée.
6. Ne placez pas le produit près du feu pour éviter les accidents et les
dommages au produit.
7. Conservez le produit dans un endroit frais et sec. Gardez le produit hors
de portée des enfants.
8. Veillezàcequeleproduitrestepropreand'éviterquedel'eau,des
insectes ou des corps étrangers ne pénètrent dans le produit, ce qui
pourrait entraîner un dysfonctionnement de ce dernier.
9. NE TIREZ PAS le câble de charge ou ne le tirez pas de force pendant la
chargeand’éviterd'endommagerlecâbledechargeetdeprovoquerdes
fuites d'électricité.
10. Le produit est conçu pour être utilisé par des adultes. Les enfants de
moins de 18 ans doivent être sous la surveillance d'un adulte lorsqu'ils
utilisentceproduitand'éviterlesaccidents.
11. Mettez l'appareil/les piles au recyclage conformément aux lois et
réglementations locales en vigueur.
⚠ Sécurité de la batterie :
L'utilisation incorrecte d'appareils dotés de batteries Li-ion intégrées peut
entraîner de graves dommages à la batterie ou des risques de sécurité
tels que la combustion ou l'explosion. N'utilisez PAS l'appareil s'il est
endommagé. NE PAS démonter, percer, couper, écraser ou incinérer
l'appareil. En cas de fuite ou d'odeur anormale, cessez immédiatement
d'utiliser l'appareil. Éliminez l'appareil/les piles conformément aux lois et
réglementations locales en vigueur.
Fonction de charge :
Le produit est équipé d'une fonction de charge intelligente. Veuillez charger le
produit avant la première utilisation. Utilisez un câble USB-C pour connecter une
alimentationexterneauportUSB-Candecommencerleprocessusdecharge.
• Pendant le processus de charge, le voyant bleu clignote lentement pour
informer l'utilisateur.
• Lorsque le produit est entièrement chargé, il cesse automatiquement le
processus de charge et le voyant bleu reste allumé.
• Le produit est utilisable pendant le processus de charge.
Installation du réservoir d'eau
Ce produit est compatible avec les bouteilles d'eau minérale courantes sur le
marché, qui peuvent servir de réservoir d'eau.
(1) Déroulez le tuyau d'eau. Ouvrez le couvercle du compartiment à eau,
remplissez le compartiment avec une quantité appropriée d'eau, puis
refermezlecouvercle(gure1).
(2)Placezletuyaudansunebouteilled'eau(gure2).
(3) Tenez la bouteille d'eau et tournez le produit dans le sens des aiguilles
d'une montre jusqu'à ce que l'adaptateur et la bouteille d'eau soient
hermétiquement fermés pour utiliser la fonction de brumisateur (Figure 3).
Remarque : si le produit ne brumise pas pendant l'utilisation, remplissez le
compartiment à eau pour réactiver la fonction brumisateur.
Installation/désinstallation de l'adaptateur
pour bouteille
Un adaptateur pour bouteille est monté en série sur ce produit. Veuillez
retirer l'ancien adaptateur de bouteille avant d'installer l'adaptateur de
bouteille de rechange.
• Désinstallation : Saisissez la poignée de l'ancien adaptateur pour
bouteille et tirez-la vers le bas pour le retirer (Figure 4).
⚠ Меры предосторожности
1. Температураокружающейсредыприиспользовании:-10~40°C
(14~104°F);Температурахранения:-20~60°C(-4~140°F)
2. НЕпомещайтевнутрьустройствапосторонниепредметыво
избежаниеегоповреждения.
3. НЕпомещайтерукиилипосторонниепредметывкрышку
вентилятораилирабочиелопастивоизбежаниенесчастных
случаевилиповрежденияустройства.
4. ЗАПРЕЩЕНОсамостоятельноразбиратьустройствоиливносить
вегоконструкциюкакие-либоизменения,таккакэтоприведет
каннулированиюгарантии.Пожалуйста,обратитеськразделу
гарантийногообслуживаниядляполученияболееподробной
информации.
5. Пожалуйста,заряжайтеустройствовсоответствиисуказанным
напряжением.
6. НЕразмещайтеустройстворядомсогнемвоизбежаниенесчастных
случаевиповрежденияустройства.
7. Пожалуйста,хранитеустройствовпрохладномисухомместе,
недоступномдлядетей.
8. Пожалуйста,держитепродуктвчистоте,атакженедопускайте
попаданиевнеговоды,насекомыхипостороннихпредметов,так
какэтоможетпривестиксбоювработеустройства.
9. НЕперекручивайтезарядныйкабельиНЕтянитеегонасебяс
силойвовремязарядки,чтобынеповредитьзарядныйкабельине
допуститьутечкитока.
10.Продуктпредназначендляиспользованиявзрослыми.Воизбежание
несчастныхслучаевдетидо18летприиспользованииданного
устройствадолжнынаходитьсяподприсмотромвзрослых.
11.Утилизируйтеустройство/элементыпитаниявсоответствиис
действующимзаконодательствомипринятымиправилами.
⚠ Безопасность аккумулятора
Неправильноеиспользованиеустройствсовстроеннымилитий-ионными
аккумуляторамиможетпривестиксерьезномуповреждениюэлемента
питанияилиугрозебезопасности,напримервозгораниюидаже
взрыву.НЕиспользуйтеустройство,еслиаккумуляторповрежден.НЕ
разбирайте,НЕпрокалывайте,НЕрежьте,НЕразбивайтеиНЕподжигайте
устройство.Приобнаружениикаких-либоутечекилинеобычногозапаха
незамедлительнопрекратитеиспользованиеустройства.Утилизируйте
устройство/элементыпитаниявсоответствиисдействующим
законодательствомипринятымиввашемрегионеправилами.
Зарядка
Продуктоснащенинтеллектуальнойфункциейзарядки.Передпервым
использованием,пожалуйста,зарядитеустройство.Подключите
внешнийисточникпитаниякпортуUSB-CспомощьюкабеляUSB-C.
• Вовремязарядкисинийиндикаторбудетмедленномигать,
информируятакимобразомпользователя.
• Послеполнойзарядкиустройствапроцессзарядкипрекратится
автоматически,асинийиндикаторначнетгоретьпостоянно.
• Устройствоможноиспользоватьвовремязарядки.
Установка резервуара для воды
Данныйвентиляторсовместимсостандартнымибутылкамииз-под
минеральнойводы,которыеможноиспользоватьвкачестверезервуаров
дляводы.
(1)Раскрутитеводнуютрубку.Откройтекрышкурезервуарадляводы,
затемвлейтенеобходимоевамколичествоводы,закройтекрышку
(рис.1).
(2)Поместитеводнуютрубкувбутылкусводой(рис.2).
(3)Удерживаябутылкусводой,вращайтеустройствопочасовойстрелке
дотехпор,покаадаптербутылкинебудетплотнозафиксирован.Это
позволитвамвоспользоватьсяфункциейраспыления(рис.3).
Примечание.Есливовремяиспользованияустройствонераспыляет
воду,снованаполнитерезервуардляводы,чтобыактивировать
функциюраспыления.
Установка / отсоединение адаптера для бутылки
Данныйвентиляторпоставляетсясустановленнымадаптеромдля
бутылки.Передустановкойзапасногоадаптераснимитестарый.
• Отсоединение:сожмитеручкустарогоадаптерадлябутылкии
потянитееевниз(см.рис.4).
• Установка:совместитеручкуадаптерадлябутылкиподкрышкой
воздухозаборника(направлениеA).Вставьтезапаснойадаптердля
бутылкивпаздощелчка(см.рис.5).Слегкапотянитезаручку,
чтобыубедиться,чтоадаптернадежнозафиксирован.
Инструкция по эксплуатации
Охлаждающее распыление
Включение: когдаустройствовыключено,кратковременнонажмитена
кнопкуобдува,затемкратковременнонажмитенакнопкураспыления,
чтобыактивировать«Охлаждающеераспыление»наНИЗКОМуровне
интенсивности(поумолчанию).
Выключение: когдафункция«Охлаждающегораспыления»
активирована,кратковременнонажимайтенакнопкуобдува,покаэта
функцияневыключится,затемкратковременнонажмитенакнопку
распыления,чтобывыключитьустройство.
• Alignez la poignée de l'adaptateur pour bouteille sous le Installation :
couvercle de l'entrée d'air (direction A). Insérez l'adaptateur de bouteille
de rechange dans la fente jusqu'à ce qu'il soit bien en place (Figure 5).
Tirez doucement sur la poignée pour vous assurer que l'adaptateur est
bien en place et ne bouge pas.
Instructions d'utilisation
Brumisation rafraîchissante
ON : Lorsque l'appareil est éteint, appuyez brièvement sur le bouton
Ventilateur, puis appuyez brièvement sur le bouton Brume pour activer la
fonction brumisateur LOW (par défaut).
OFF : Lorsque la fonction de brumisateur est activée, appuyez brièvement sur
le bouton du ventilateur jusqu'à ce que la fonction du ventilateur s'éteigne,
puis appuyez brièvement sur le bouton de brume pour éteindre l'appareil.
Changement : lorsque la fonction brumisateur est activée, appuyez
brièvement sur le bouton du ventilateur pour passer de l'un à l'autre dans
l'ordre suivant : Brumisateur LOW - Brumisateur MID - Brumisateur HIGHT
- Brumisateur.
Ventilateur uniquement
La fonction ventilateur peut être utilisée indépendamment.
ON : Lorsque le produit est éteint, appuyez brièvement sur le bouton
Ventilateur pour activer la fonction Ventilateur LOW (par défaut).
OFF / Changement : Lorsque la fonction ventilateur est activée, appuyez
brièvementsurleboutonVentilateurpourfairedélerlaséquencesuivante:
Ventilateur LOW - Ventilateur MID - Ventilateur HIGH – Arrêt.
Brume uniquement
La fonction de brumisation peut être utilisée indépendamment.
ON : Lorsque le produit est éteint, appuyez brièvement sur le bouton Brume
pour activer la fonction brume.
OFF : Lorsque la fonction de brume est activée, appuyez brièvement sur le
bouton Brume pour l'arrêter.
Indicateurs
• Lorsque la fonction brumisateur est activée, le voyant bleu reste allumé.
Lorsque la fonction brumisateur est désactivée, le voyant bleu s'éteint.
• Lors du réglage de la vitesse de ventilation, les indicateurs blancs
correspondants s'allument pour informer l'utilisateur. Si le réglage n'est
pasmodié,lesindicateursblancss'éteignentauboutde3secondes.
Remarque : si le produit cesse de brumiser en cours d'utilisation, la
fonction brumisateur ne s'arrête pas automatiquement et le voyant bleu
resteallumépourinformerl'utilisateur.Veuillezvérierrapidementl'étatde
la fonction brumisateur pour vous assurer qu'elle fonctionne correctement.
Statut des indicateurs Paramètres
Indicateur bleu (en continu)
+
Indicateurs blancs (3 allumés en continu)
Brumisateur HIGH
Indicateur bleu (en continu)
+
Indicateurs blancs (3 allumés en continu)
Brumisateur MID
Indicateur bleu (en continu)
+
Indicateur blanc (1 allumé en continu)
Brumisateur LOW
Indicateurs blancs (3 allumés en continu) Ventilateur HIGH
Indicateurs blancs (2 allumés en continu) Ventilateur MID
Indicateur blanc (1 allumé en continu) Ventilateur LOW
Indication de puissance
Après avoir désactivé la fonction ventilateur, les indicateurs blancs
correspondants s'allument pour indiquer la puissance restante de la batterie
et s'éteignent au bout de 2 secondes.
Indication de faible puissance : Le produit connaîtra une diminution de
la vitesse de ventilation ou sera incapable de régler la vitesse de ventilation
en raison d'une faible puissance, et l'indicateur bleu clignotera pour indiquer
cet état. Dans ce cas, veuillez recharger le produit dès que possible.
Statut des indicateurs blancs Puissance restante
3 Constants
>50%
2 Constants 10% – 50%
1 Constant
<10%
Entretien
• Essuyezleproduitavecunchionpropreetsec.
• Si des gouttelettes d'eau s'accumulent au niveau de la bouche de
pulvérisation, essuyez-les sans tarder.
• Retirez régulièrement la poussière ou les corps étrangers de la sortie d'air.
• Si l'appareil n'est pas utilisé pendant une période prolongée, retirez la
bouteilled'eau,videzlecompartimentàeauetgardezl'appareilausecan
d'éviter la prolifération de bactéries.
• N'utilisezPASdeparfumsoud’autrestypesdeboissons,carilspeuvent
contaminer ou obstruer l'appareil.
( ) Русский
Installieren eines Wassertanks
DiesesProduktistmithandelsüblichenMineralwasseraschenkompatibel,
die als Wassertank dienen können.
(1)WickelnSiedenWasserschlauchab.ÖnenSiedenDeckeldes
Wasserfachs, füllen Sie das Fach mit einer angemessenen Menge
Wasser und schließen Sie dann den Deckel (Abbildung 1).
(2)SteckenSiedenWasserschlauchineineWasserasche(Abbildung2).
(3)HaltenSiedieWasserascheunddrehenSiedasGerätimUhrzeigersinn,
bisderFlaschenadapterunddieWasseraschefestverschlossensind,um
die Nebelfunktion zu nutzen (Abbildung 3).
Hinweis: Wenn das Gerät während des Gebrauchs nicht nebelt, füllen Sie
das Wasserfach nach, um die Nebelfunktion wieder zu aktivieren.
Anbringen / Abnehmen des Flaschenadapters
Dieses Produkt ist werkseitig mit einem Flaschenadapter ausgestattet. Bitte
entfernenSiedenaltenFlaschenadapter,bevorSiedenErsatzaschenadapter
anbringen.
• Abnehmen:DrückenSiedenGridesaltenFlaschenadapterszusammen
und ziehen Sie ihn nach unten, um ihn zu entfernen (Abbildung 4).
• Anbringen:RichtenSiedenFlaschenadaptergriunterder
Lufteinlassabdeckung aus (Richtung A). Setzen Sie den Ersatz-
Flaschenadapter in den Schlitz ein, bis er festsitzt (Abbildung 5).
ZiehenSievorsichtigamGri,umsicherzustellen,dassderAdapter
festsitzt und sich nicht bewegt.
Betriebsanleitung
Kühlnebel
• Wenn das Gerät ausgeschaltet ist, drücken Sie kurz die Gebläse-Ein:
Taste und dann kurz die Nebel-Taste, um Kühlnebel LOW zu aktivieren
(Standard).
• Wenn die Kühlnebelfunktion eingeschaltet ist, drücken Sie kurz die Aus:
Gebläse-Taste, bis die Gebläsefunktion ausgeschaltet ist, und drücken Sie
dann kurz die Nebel-Taste, um das Gerät auszuschalten.
• Wenn die Kühlnebelfunktion eingeschaltet ist, drücken Umschalten:
Sie kurz die Gebläse-Taste, um die folgende Sequenz zu durchlaufen:
“Kühlnebel-LOW” – “Kühlnebel-MID” – “Kühlnebel-HIGH” – “Nebel”.
Nur Gebläse
• Die Gebläse-Funktion kann unabhängig verwendet werden.
• Wenn das Gerät ausgeschaltet ist, drücken Sie kurz auf die Gebläse-Ein:
Taste, um Gebläse LOW zu aktivieren (Standard).
• Wenn die Gebläse-Funktion eingeschaltet ist, Aus: / Umschalten:
drücken Sie kurz die Gebläse-Taste, um die folgende Sequenz zu
durchlaufen: “Gebläse-LOW” – “Gebläse-MID” – “Gebläse-HIGH” – “Aus”.
Nebel
Die Nebelfunktion kann unabhängig genutzt werden.
• Wenn das Gerät ausgeschaltet ist, drücken Sie kurz die Nebeltaste, Ein:
um die Nebelfunktion einzuschalten.
• Wenn die Nebelfunktion eingeschaltet ist, drücken Sie kurz die Aus:
Nebeltaste, um sie auszuschalten.
Anzeigen
• Wenn die Nebelfunktion eingeschaltet ist, leuchtet die blaue Anzeige weiter.
Wenn die Nebelfunktion ausgeschaltet ist, erlischt die blaue Anzeige.
• Wenn Sie die Windgeschwindigkeit einstellen, leuchten die entsprechenden
weißen Anzeigen auf, um den Benutzer zu informieren. Wenn sich die
Einstellung nicht ändert, erlöschen die weißen Anzeigen nach 3 Sekunden.
Hinweis: Wenn das Gerät während des Gebrauchs aufhört zu nebeln,
schaltet sich die Nebelfunktion nicht automatisch ab, und die blaue
Anzeige leuchtet weiter, um den Benutzer zu informieren. Bitte überprüfen
Sie den Betriebsstatus der Nebelfunktion umgehend, um sicherzustellen,
dass sie ordnungsgemäß funktioniert.
Status der Anzeigen Funktion
Blaue LED (Stetig an) + Weiße LED (3 Stetig an) Kühlnebel HIGH
Blaue LED (Stetig an) + Weiße LED (2 Stetig an) Kühlnebel MID
Blaue LED (Stetig an) + Weiße LED (1 Stetig an) Kühlnebel LOW
Weiße LED (3 Stetig an) Gebläse HIGH
Weiße LED (2 Stetig an) Gebläse MID
Weiße LED (1 Stetig an) Gebläse LOW
Anzeige der Stromversorgung
Nach dem Ausschalten der Gebläse-Funktion leuchten die entsprechenden
weißen LEDs auf, um die verbleibende Batterieleistung anzuzeigen, und
erlöschen nach 2 Sekunden.
Anzeige für schwache Leistung: Das Produkt hat nur eine geringere
Luftgeschwindigkeit oder die Luftgeschwindigkeit kann nicht mehr eingestellt
werden, weil die Stromversorgung zu schwach ist. Die blaue LED blinkt, um
diesen Zustand anzuzeigen. Laden Sie das Produkt in solchen Fällen bitte so
schnell wie möglich auf.
Status der weißen LEDs Rest-Energie
3 Stetig an
>50%
2 Stetig an 10% – 50%
1 Stetig an
<10%
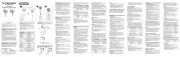
Water Compartment
Water Tube
Air Outlet
Mist Button
USB-C Charging Port
Fan Button
Indicators
Mist Outlet
Air Inlet
Weighted Ball
Bottle Adapter
Bottle Adapter Handle
Slot
A
Water
Note: If the product stops misting during use, the mist function will not shut
oautomatically,andtheblueindicatorwillremainontoinformtheuser.
Please check the running status of the mist function promptly to make sure
it is working properly.
Status of Indicators Setting
Blue Indicator (Constant-on) + White Indicators (3 Constant-on)
Cool Mist HIGH
Blue Indicator (Constant-on) + White Indicators (2 Constant-on)
Cool Mist MID
Blue Indicator (Constant-on) + White Indicator (1 Constant-on)
Cool Mist LOW
White Indicators (3 Constant-on) Fan HIGH
White Indicators (2 Constant-on) Fan MID
White Indicator (1 Constant-on) Fan LOW
Power Indication
Afterturningothefanfunction,thecorrespondingwhiteindicatorswill
glowtoindicatetheremainingbatterypowerandgooafter2seconds.
Low Power Indication: The product will experience reduced wind speed
or become unable to adjust the wind speed due to low power, and the blue
indicatorwillashtoindicatethisstatus.Insuchcases,pleaserechargethe
product as soon as possible.
Status of White Indicators Remaining Power
3 Constant-on
>50%
2 Constant-on 10% – 50%
1 Constant-on
<10%
Maintenance
• Wipe the product with a clean and dry cloth.
• Ifwaterdropletsaccumulateatthemistoutlet,wipethemopromptly.
• Regularly remove dust or foreign matters from the air outlet.
• If the product is left unused for a prolonged time, remove the water
bottle, empty the water compartment, and keep the product dry to
prevent bacterial growth.
• DO NOT use perfumes or beverages as they can contaminate or clog the
product.
Переключение:когдафункция«Охлаждающегораспыления»
активирована,кратковременнонажимайтенакнопкуобдувадля
переключениямеждуследующимирежимамиработы:Охлаждающее
распыление(НИЗКИЙуровеньинтенсивности)–Охлаждающеераспыление
(СРЕДНИЙуровеньинтенсивности)–Охлаждающеераспыление
(ВЫСОКИЙуровеньинтенсивности)–Распыление(безобдува).
Только обдув
Функциюобдуваможноиспользоватьотдельно.
• Включение:когдаустройствовыключено,кратковременно
нажмитенакнопкуобдува,чтобыактивироватьобдувнаНИЗКОМ
уровнеинтенсивности(поумолчанию).
• Выключение / переключение:когдафункцияобдувавключена,
кратковременнонажимайтенакнопкуобдувадляпереключения
междуследующимирежимами:Обдув(НИЗКИЙуровень
интенсивности)–Обдув(СРЕДНИЙуровеньинтенсивности)–Обдув
(ВЫСОКИЙуровеньинтенсивности)–Выключение.
Только распыление
Функциюраспыленияможноиспользоватьотдельно.
• Включение:когдаустройствовыключено,кратковременно
нажмитенакнопкураспыления,чтобыактивироватьеговрежиме
распыления.
• Выключение:когдарежимраспыленияактивирован,
кратковременнонажмитенакнопкураспыления,чтобыего
выключить.
Индикаторы
• Врежимераспылениясинийиндикаторгоритвсегда.При
выключениифункциираспыленияонпогасает.
• Прирегулировкескоростивоздушногопотоканачнутсветиться
соответствующиебелыеиндикаторы,такимобразоминформируя
пользователя.Присохранениинастроекбелыеиндикаторыпогаснут
через3секунды.
Примечание. Автоматическифункцияраспыленияневыключается,
дажееслираспылениевдругпрекращаетсявовремяработыустройства.
Понять,активированалифункцияможнопогорящемусинему
индикатору:вслучаееевыключениягаснетииндикатор.Пожалуйста,
ориентируйтесьнаиндикаторыипроверяйтетекущеесостояниефункции
распыления,чтобыбытьувереннымвправильностиееработы.
Статус индикаторов Текущий режим
Синийиндикатор(постоянногорит)
+
Белыеиндикаторы(3постоянногорят)
Охлаждающеераспыление
(ВЫСОКИЙ)
Синийиндикатор(постоянногорит)
+
Белыеиндикаторы(2постоянногорят)
Охлаждающеераспыление
(СРЕДНИЙ)
Синийиндикатор(постоянногорит)
+
Белыйиндикатор(1постоянногорит)
Охлаждающеераспыление
(НИЗКИЙ)
Белыеиндикаторы(3постоянногорят) Обдув(ВЫСОКИЙ)
Белыеиндикаторы(2постоянногорят) Обдув(СРЕДНИЙ)
Белыйиндикатор(1постоянногорит) Обдув(НИЗКИЙ)
Сообщение уровня заряда
Послевыключенияфункцииобдувана2секундызагораются
соответствующиебелыеиндикаторы,такимобразомсообщая
оставшийсяуровеньзарядааккумулятора.
Сообщение о низком уровне заряда:принизкомзарядеаккумулятора
скоростьвращениявентилятораснижаетсяилиеестановитсяневозможно
регулировать,очемтакжесвидетельствуетмиганиесинегоиндикатора.В
этомслучаекакможноскореезарядитеустройство.
Статус белых индикаторов Оставшийся уровень заряда
3постоянногорят >50%
2постоянногорят 10% – 50%
1постоянногорит <10%
Обслуживание
• Протирайтеустройствочистойсухойтканью.
• Еслинавыпускномотверстиираспылителяскапливаютсякапливоды,
незамедлительноихвытирайте.
• Регулярноочищайтевоздуховыпускноеотверстиеотпылии
постороннихпредметов.
• Есливыпланируетенеиспользоватьустройствовтечение
длительноговремени,отсоединитебутылкусводой,слейтеводу
изрезервуарадляводыихранитеустройствовсухомместе,чтобы
предотвратитьростираспространениебактерий.
• НЕиспользуйтевместоводыдухииликакие-либосмеси,таккакони
могутзагрязнитьизасоритьустройство.
SYSMAX Innovations Co., Ltd.
TEL: +86-20-83862000
FAX: +86-20-83882723
E-mail: info@nitecore.com
Web: www.nitecore.com
Address
:
Unit 6355, 5/F, No.1021 Gaopu Road, Tianhe District, Guangzhou,
510653 Guangdong, China
Please nd us on facebook : Nitecore Outdoor Electronics
Made in China
izzcool19071024
Thanks for purchasing NITECORE!
Warranty Service
All NITECORE
®
products are warranted for quality. Any DOA / defective
product can be exchanged for a replacement through a local distributor /
dealer within 15 days of purchase. After that, all defective/malfunctioning
NITECORE
®
products can be repaired free of charge within 12 months
from the date of purchase. Beyond 12 months, the charge for accessories,
replacement parts and delivery shall be at your own expenses.
Thewarrantywillbenulliedif
1. theproduct(s)is/arebrokendown,reconstructedand/ormodiedby
unauthorized parties.
2. the product(s) is / are damaged due to improper use.
For the latest information on NITECORE
®
products and services, please contact
a local NITECORE
®
distributor or send an email to service@nitecore.com.
※ Thetrademarksandproductimagesspeciedhereinthisusermanual
are for reference purposes only. The copyright belongs to their lawful
holders.
※ Allimages,textsandstatementsspeciedhereinthisusermanualare
for reference purposes only. Should any discrepancy occur between
thismanualandinformationspeciedonwww.nitecore.com,Sysmax
Innovations Co., Ltd. reserves the rights to interpret and amend the
content of this document at any time without prior notice.
Wartung
• Wischen Sie das Gerät mit einem sauberen und trockenen Tuch ab.
• Wenn sich Wassertröpfchen am Nebelauslass ansammeln, wischen Sie
sie sofort ab.
• Entfernen Sie regelmäßig Staub oder Fremdkörper aus dem Luftauslass.
• Wenn das Gerät längere Zeit nicht benutzt wird, nehmen Sie die
Wasserascheheraus,leerenSiedasWasserfachundhaltenSiedas
Gerät trocken, um Bakterienwachstum zu vermeiden.
• Verwenden Sie KEINE Parfüms oder Getränke, da diese das Gerät
verunreinigen oder verstopfen können.
Entsorgung von Elektro- und Elektronikgeräten
Die durchgestrichene Mülltonne bedeutet, dass Sie gesetzlich
verpichtetsind,dieseGeräteeinervomunsortiertenSiedlungsabfall
getrennten Erfassung zuzuführen. Die Entsorgung über die
Restmülltonne oder die gelbe Tonne ist untersagt. Enthalten die Produkte
Batterien oder Akkus, die nicht fest verbaut sind, müssen diese vor der
Entsorgung entnommen und getrennt als Batterie entsorgt werden.
Produkspesifikasjoner
| Merke: | Nitecore |
| Kategori: | Batterilader |
| Modell: | izzCool 10 Pro |
Trenger du hjelp?
Hvis du trenger hjelp med Nitecore izzCool 10 Pro still et spørsmål nedenfor, og andre brukere vil svare deg
Batterilader Nitecore Manualer
6 Oktober 2025
3 August 2025
3 August 2025
3 August 2025
3 August 2025
3 August 2025

3 August 2025

30 Desember 2025

17 Desember 2024

17 Desember 2024
Batterilader Manualer
- Shure
- Husqvarna
- Valcom
- Rocstor
- Scanstrut
- Savio
- Venom
- Techno Line
- Alogic
- Biltema
- Xblitz
- Parkside
- Apa
- Defender
- Twelve South
Nyeste Batterilader Manualer
16 Oktober 2025
16 Oktober 2025
15 Oktober 2025
15 Oktober 2025
13 Oktober 2025
12 Oktober 2025

12 Oktober 2025
12 Oktober 2025
12 Oktober 2025
12 Oktober 2025