Panasonic DMW-EC6 Bruksanvisning
Les nedenfor 📖 manual på norsk for Panasonic DMW-EC6 (2 sider) i kategorien Kamera. Denne guiden var nyttig for 30 personer og ble vurdert med 4.7 stjerner i gjennomsnitt av 15.5 brukere
Side 1/2
このたびは、パナソニック製品をお買い上げいただき、
まことにありがとうございます。
≥
取扱説明書をよくお読みのうえ、正しく安全にお使いください。
≥ご使用前に「安全上のご注意」を必ずお読みください。
≥この取扱説明書は大切に保管してください。
≥対応機種:DC-S1R、DC-S1(2019 年 1 月現在)
–
最新の対応機種に関しては、デジタルカメラの取扱説明書、
カタログもしくはホームページなどをご覧ください。
≥アイカップを装着することで、太陽光などの外光を遮断し、
ファインダーをより見やすくします。
≥取り付けたアイカップは360°回転できます。撮影方法に応
じてアイカップを回してお使いください。
人への危害、財産の損害を防止するため、必ずお守りいただ
くことを説明しています。
∫
∫
∫
∫∫ 誤った使い方をしたときに生じる危害や損害の程度を
説明しています。
∫
∫
∫
∫∫ お守りいただく内容を次の図記号で説明しています。
アイカップは乳幼児の手の届くところ
に置かない
誤って飲み込むと、身体に悪影響を及ぼします。
≥万一、飲み込んだら、すぐ医師にご相談ください。
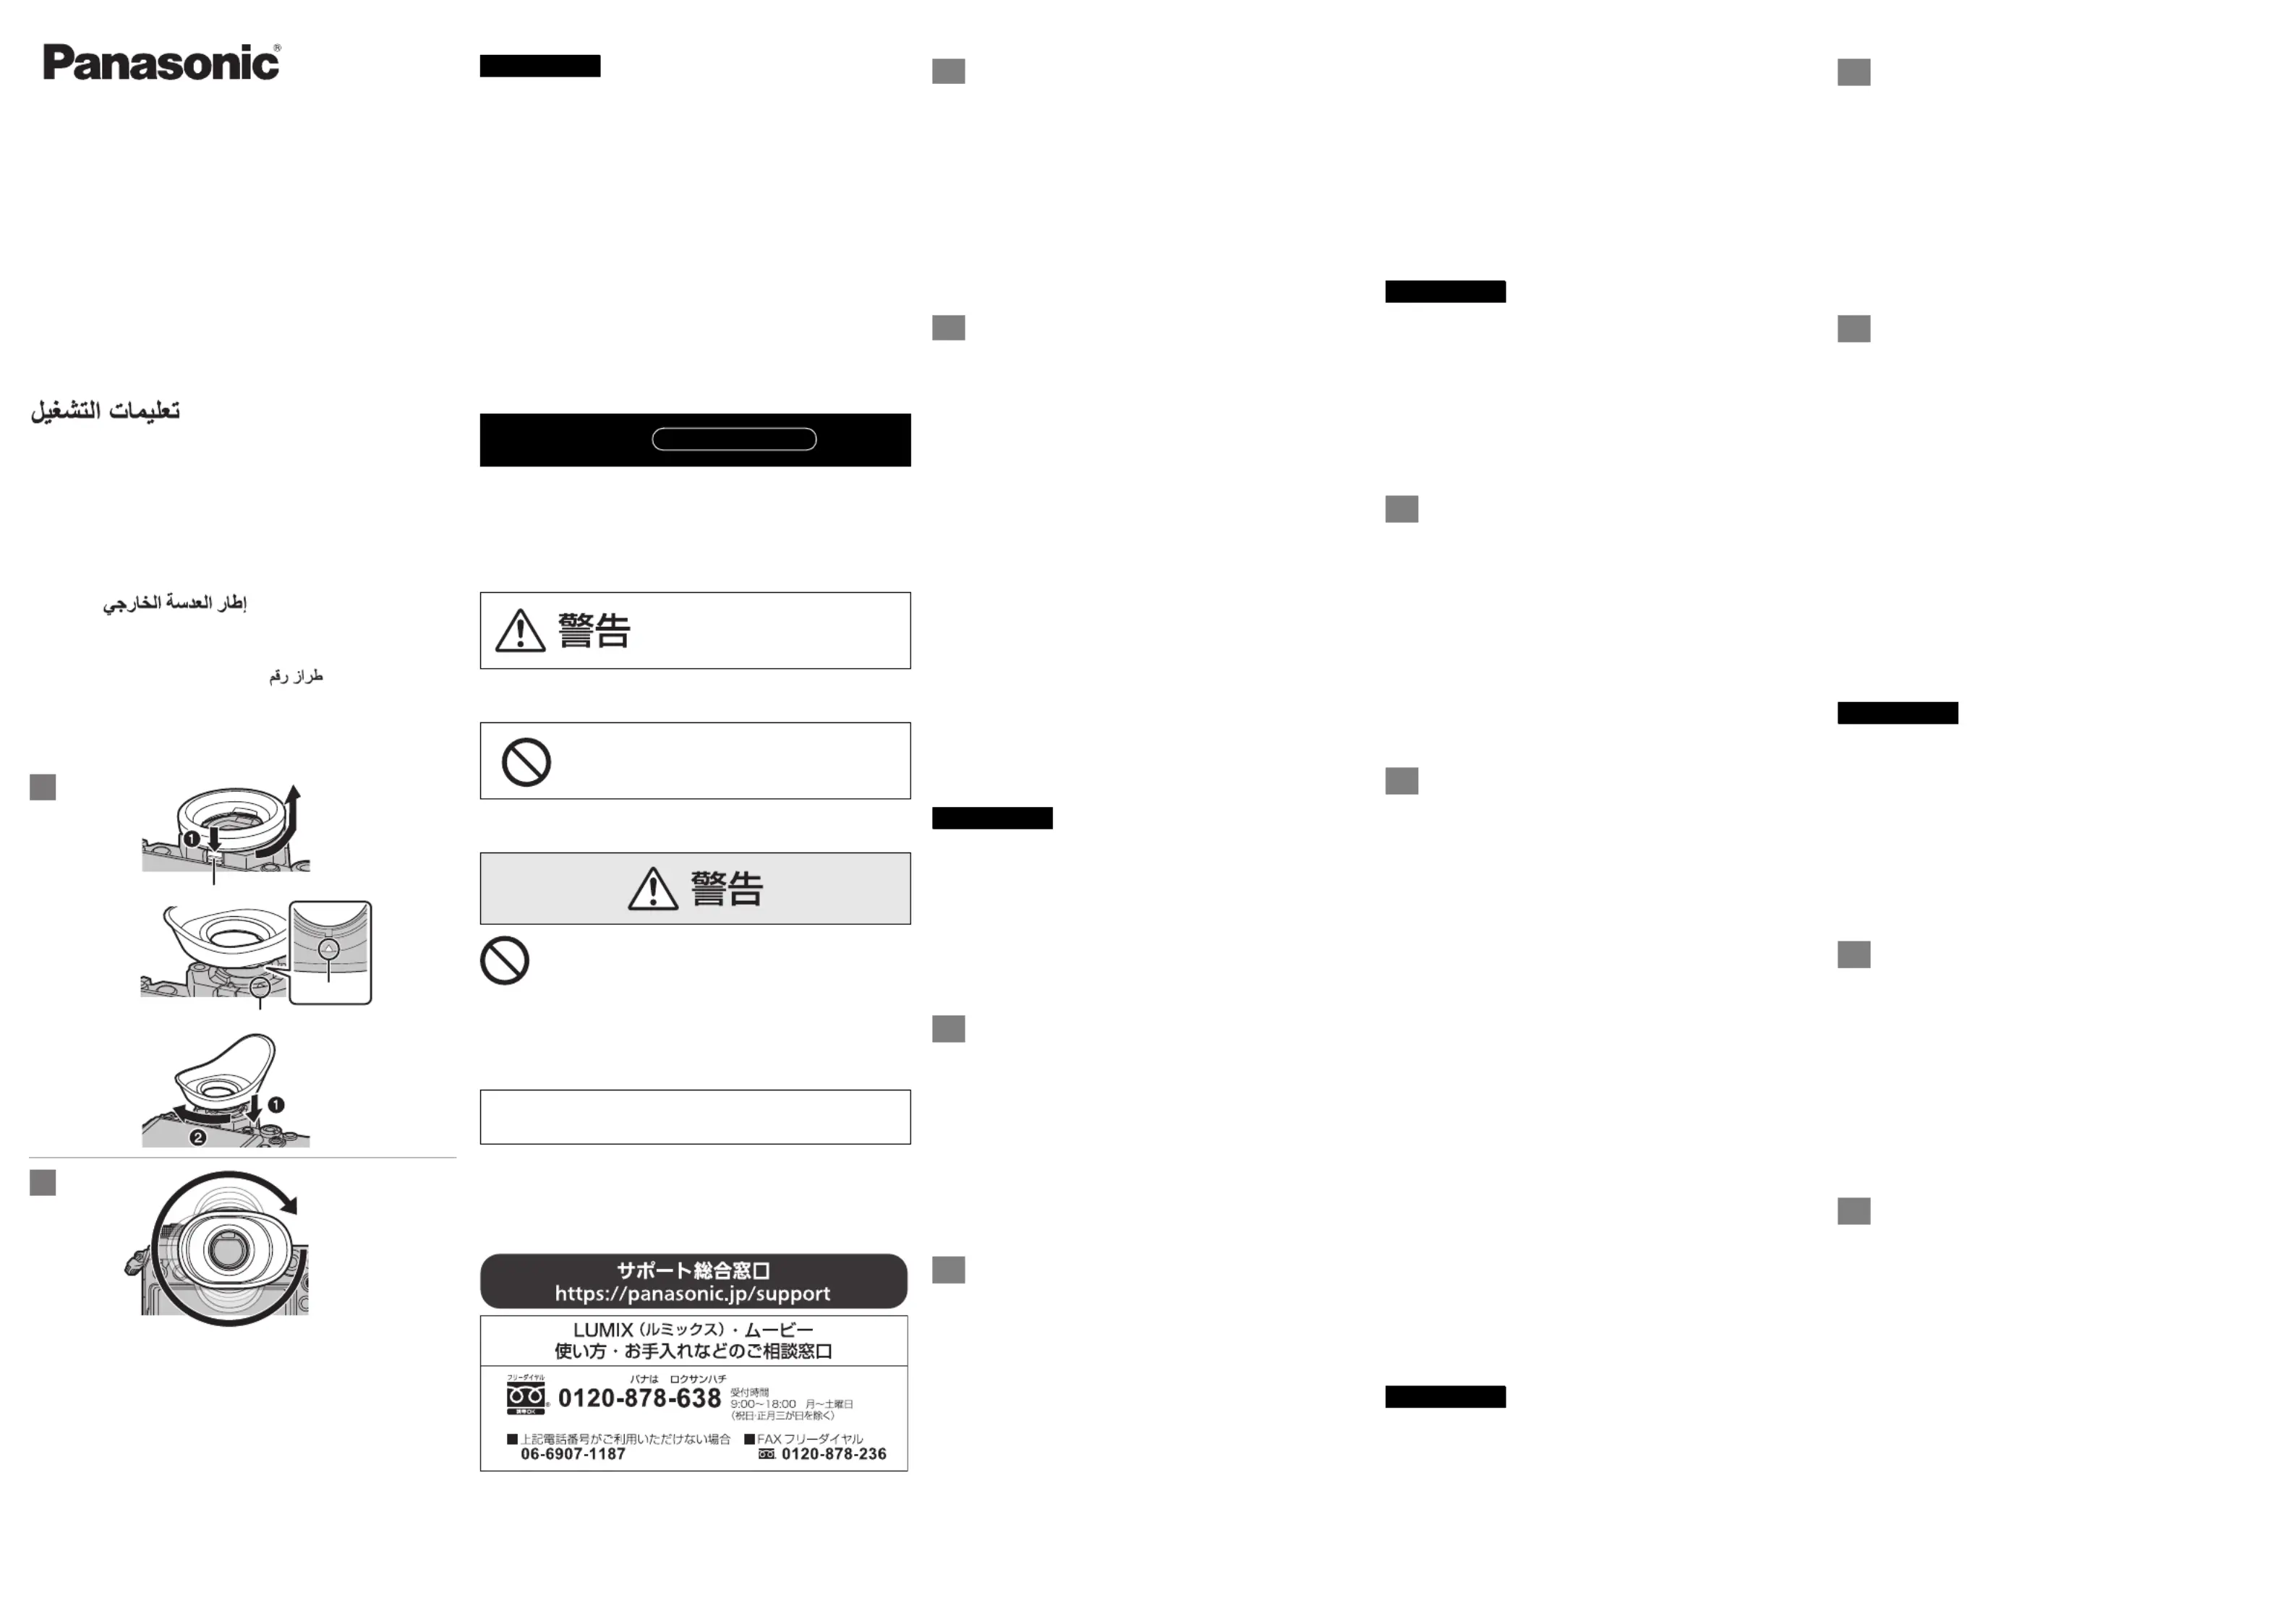
1デジタルカメラのアイカップロックレバー
(
A
)
を押
しながら
( )1
、装着されているアイカップを矢印の
方向に回して取り外す
( )2
2
アイカップとデジタルカメラの
#
の
取り付けマーク
(
B
)
を合わせる
3
矢印
1
の方向に押しながら、矢印
2
の方向に「カチッ」
と音がするまで回す
≥取り外すときは、手順 1 の操作をしてください。
90°ごとにアイカップの位置が固定されます。
∫
∫
∫
∫∫ 使用上のお願い
≥アイカップを持ってデジタルカメラを持ち上げたり、振り回
したりしないでください。
≥直射日光が当たる車の中や、温度や湿度の高いところに放置
しないでください。
≥お手入れの際は、乾いた柔らかい布でふいてください。
–汚れがひどいときは、水に浸した布をよく絞ってから汚れ
をふき取り、そのあと、乾いた布でふいてください。
–
ベンジン、シンナー、アルコール、台所洗剤などの溶剤は、ア
イカップが変質するおそれがありますので使用しないでく
ださい。
≥デジタルカメラの取扱説明書も併せてお読みください。
∫
∫
∫
∫∫ 仕様
本体寸法: 約幅 74.6 mm k高さ50.9 mm k
奥行き 39.2 mm
質量: 約 16 g
Please read these instructions carefully before using this
product, and save this manual for future use.
• Compatible model: DC-S1R/DC-S1 (As of January 2019)
–
For the latest information on compatible models, see the operating
instructions, catalogue or website of the digital camera.
• The Eyecup, when attached to the viewfinder of the camera, makes the
image on the viewfinder easier to see by blocking the sunlight and
other light sources.
• When attached, the Eyecup can be rotated 360°. Rotate the Eyecup to
suit your recording style before use.
1
While pushing the eye cup lock lever
(
A
)
on the
digital camera
(
1
)
, rotate the pre-attached Eyecup
in the direction of the arrow to remove
(
2
)
.
2Align the fitting marks #
(
B)
on the Eyecup and
digital camera.
3While pushing in the direction of the arrow
1
,
rotate in the direction of the arrow
2
until a
clicking sound is heard.
• For removal, perform the operation in Step 1.
The Eyecup locks into place at every 90° position.
∫Cautions for use
•Do not hold the Eyecup to lift up or swing the camera.
•Do not leave the Eyecup in a car exposed to direct sunlight or in a hot
or humid location.
•Before cleaning the Eyecup, wipe the Eyecup with a dry soft cloth.
–
When the Eyecup is soiled badly, it can be cleaned by wiping the dirt off
with a wrung wet cloth, and then with a dry cloth.
–
Do not use benzine, thinner, alcohol, kitchen cleaner or other solvents.
Doing so may damage the Eyecup.
•Keep the Eyecup out of reach of children to prevent swallowing.
•Be sure to read the operating instructions of your digital camera.
∫Specifications
Dimensions:
Approx. 74.6 mm (W)
k
50.9 mm (H)
k
39.2 mm (D)
[2.94
q
(W)
k
2.00
q
(H)
k
1.54
q
(D)]
Mass (Weight):
Approx. 16
g
(0.035 lb)
Only for US and Canada
Limited Warranty:
Panasonic warrants the enclosed Eyecup to the original
purchaser to be free of defects in materials and workmanship
for 90 days from the date of original consumer purchase.
This warranty does not include damages caused by accidents,
misuse or modifications. If the item is defective within the
warranty period, we will repair or replace it, with new or
refurbished parts, without charge or refund your purchase price
at our option, if the Eyecup is sent (postage prepaid) to the
address indicated in the warranty section of the operating
manual enclosed with lens or camera body.
Veuillez lire attentivement les présentes instructions avant d’utiliser
ce produit, et conserver ce manuel pour utilisation ultérieure.
• Modèle compatible : DC-S1R/DC-S1 (à compter de janvier 2019)
–
Pour connaître les toutes dernières informations concernant les modèles
compatibles, consultez le manuel d’utilisation, le catalogue ou visitez le
site Web de l’appareil photo numérique.
•L'œilleton, une fois installé sur le viseur de l’appareil photo, rend
l’image du viseur plus facile à voir en bloquant les rayons du soleil et
autres sources de lumière.
•
Une fois fixé, l'œilleton du viseur peut être pivoté sur 360°. Avant de
l'utiliser, faites pivoter l'œilleton du viseur selon votre type d'enregistrement.
1Tout en poussant le verrouillage de l'œilleton du
viseur
( )A
sur l'appareil photo numérique
( )1
,
tournez l'œilleton du viseur pré-installé dans la
direction de la flèche pour le retirer
( )2
.
2Alignez les repères #
(
B)
sur l'œilleton du
viseur et l'appareil photo numérique.
3Tout en poussant dans la direction de la flèche
1
, faites pivoter dans la direction de la flèche
2
jusqu'à ce qu'un déclic se fasse entendre.
• Pour retirer l’œilleton du viseur, répétez l'étape 1.
L'œilleton du viseur s'enclenche à chaque 90°.
∫Précautions d’utilisation
• Ne vous servez pas de l'œilleton du viseur pour soulever ou déplacer
l’appareil photo.
• Ne laissez pas l'œilleton du viseur dans un véhicule exposé au soleil
ou dans un endroit chaud ou humide.
•
Avant de nettoyer l'œilleton du viseur, essuyez-le avec un chiffon sec doux.
–
Si l'œilleton est très sale, il peut être nettoyé à l’aide d’un chiffon humide
bien essoré, puis d’un chiffon sec.
–
N’utilisez pas de benzine, de diluant, d’alcool, de produit ménager ou
autres solvants. Cela pourrait endommager l'œilleton du viseur.
• Conservez l'œilleton du viseur hors de la portée des enfants pour éviter
qu’ils puissent l’avaler.
•
Assurez-vous de lire le manuel d’utilisation de l’appareil photo numérique.
∫Caractéristiques techniques
Dimensions : Environ 74,6 mm (L)k50,9 mm (H)k39,2 mm (P)
[2,94 po (L)k2,00 po (H) 1,54 po (P)]k
Poids :
Environ 16
g
(0,035 lb)
Pour les États-Unis et le Canada uniquement
Garantie limitée :
Panasonic garantit que l’œilleton fourni à l’acheteur initial ne
comporte aucun défaut de matériau ou de fabrication pour les
90 jours suivant la date de l’achat initial.
Cette garantie ne couvre pas les dommages causés par des
accidents, une mauvaise utilisation ou des modifications. Si l’article
est défectueux au cours de la période de garantie, nous le
réparerons ou le remplacerons, avec des pièces nouvelles ou
recyclées, sans frais, ou nous vous rembourserons le prix d’achat à
notre choix, si l’œilleton est envoyé (port payé) à l’adresse
mentionnée dans la section garantie du manuel de fonctionnement
ci-joint avec l’objectif ou le boîtier de l’appareil.
Lea cuidadosamente estas instrucciones antes de usar este
producto, y guarde este manual para usarlo en el futuro.
• Modelo compatible: DC-S1R/DC-S1 (a partir de Enero de 2019)
–
Para obtener la última información sobre los modelos compatibles, vea las
instrucciones de funcionamiento, el catálogo o el sitio web de la cámara digital.
• Cuando está unido al visor de la cámara, el protector ocular hace que
la imagen del visor sea más fácil de ver al bloquear la luz del sol y otras
fuentes lumínicas.
•
Cuando está colocado, el protector ocular se puede girar 360°. Gire el
protector ocular para adaptarlo a su estilo de grabación antes de usarlo.
1Mientras empuja la palanca de bloqueo del
protector ocular
(
A)
en la cámara digital
( )1
,
gire el protector ocular previamente colocado en
la dirección de la flecha para extraerlo
( )2
.
2Alinee las marcas de ajuste #
(
B)
del protector
ocular y de la cámara digital.
3Mientras empuja en la dirección de la flecha
1
,
gire en la dirección de la flecha
2
hasta que se
oiga un sonido de clic.
• Para extraerlo, realice la operación del paso 1.
El protector ocular se bloquea en su lugar en cada posición de 90°.
∫Precauciones para el uso
• No utilice el protector visual para girar o inclinar la cámara hacia arriba.
• No deje el protector ocular en un coche expuesto a la luz solar directa
ni en lugares húmedos o con temperaturas elevadas.
• Antes de limpiar el protector visual, frótelo con un paño seco y suave.
–
Cuando el protector visual está demasiado sucio, puede limpiarse al quitar
la suciedad con un trapo mojado y escurrido, y luego con un trapo seco.
– No utilice gasolina, diluyente, alcohol, limpiador de cocina u otros
solventes. Hacerlo puede dañar el protector visual.
• Mantenga el protector ocular fuera del alcance de los niños para evitar
que se lo traguen.
• Asegúrese de leer las instrucciones de funcionamiento de su cámara
digital.
∫Especificaciones
Dimensiones:
Aprox. 74,6 mm (An)
k
50,9 mm (Alt)
k
39,2 mm (P)
[2,94
q
(An)
k
2,00
q
(Alt)
k
1,54
q
(P)]
Masa: Aprox. 16 g (0,035 lb)
Bitte lesen Sie diese Anleitung vor der Inbetriebnahme dieses
Produkts aufmerksam durch, und bewahren Sie dieses Handbuch
für spätere Bezugnahme griffbereit auf.
• Kompatibles Modell: DC-S1R/DC-S1 (Stand: Januar 2019)
–
Aktuelle Informationen zu kompatiblen Modellen finden Sie in der
Bedienungsanleitung, im Katalog und auf der Website zur Digital-Kamera.
• Die Augenmuschel wird am Sucher der Kamera angebracht und macht
das Bild im Sucher besser sichtbar, indem das Sonnenlicht und andere
Lichtquellen blockiert werden.
• Nach Anbringen kann die Augenmuschel um 360° gedreht werden.
Drehen Sie die Augenmuschel vor der Benutzung in eine Stellung, die
zu Ihrem Aufnahmestil passt.
1
Um die bereits angebrachte Augenmuschel zu
entfernen, drehen Sie sie in Pfeilrichtung
(
2
)
,
während Sie den Augenmuschel-Verriegelungshebel
(
A
)
auf der Digitalkamera
(
1
)
hinunterdrücken.
2
Richten Sie die Markierungen
#
(
B
)
auf
Augenmuschel und Digitalkamera zueinander aus.
3Halten Sie die Augenmuschel in Pfeilrichtung
1
gedrückt und drehen Sie sie in Pfeilrichtung
2
,
bis ein Klickgeräusch ertönt.
• Zum Abnehmen führen Sie Schritt 1 aus.
Die Augenmuschel rastet in jeder 90°-Stellung ein.
∫Vorsichtsmaßnahmen beim Gebrauch
•Halten Sie die Kamera nicht an der Augenmuschel fest, um sie
anzuheben oder zu schwenken.
•Lassen Sie die Augenmuschel nicht in einem Auto mit direkter
Sonneneinstrahlung oder an einem heißen oder feuchten Ort.
•Wischen Sie die Augenmuschel vor der Reinigung mit einem
trockenen, weichen Tuch ab.
–
Wenn die Augenmuschel stark verschmutzt ist, nehmen Sie die Reinigung
mit einem feuchten, gut ausgewrungenen Tuch vor und trocknen
anschließend mit einem trockenen Tuch nach.
–
Verwenden Sie keine Lösungsmittel wie Waschbenzin, Verdünner, Alkohol
oder Haushaltsreiniger. Ansonsten kann es zu Beschädigungen der
Augenmuschel kommen.
•Bewahren Sie die Augenmuschel außerhalb der Reichweite von
Kindern auf, um ein Verschlucken zu verhindern.
•Lesen Sie die Bedienungsanleitung zu Ihrer Digital-Kamera.
∫Spezifikationen
Abmessungen:
Ca. 74,6 mm (B)
k
50,9 mm (H)
k
39,2 mm (T)
Gewicht:
C
a. 16 g
安全上のご注意
「死亡や重傷を負うおそれがある
内容」です。
してはいけない内容です。
≥デジタルカメラの取扱説明書「安全上のご注意」も併せて
お読みください。
日本語
必ずお守りください
A
取り付け方
B
アイカップを回す
A
How to attach the Eyecup
B
Rotate the Eyecup
ENGLISH
A
Comment installer l'œilleton du viseur
B
Rotation de l'œilleton du viseur
FRANÇAIS
ESPAÑOL
A
Cómo unir el protector ocular
B
Gire el protector ocular
A
Anbringen der Augenmuschel
B
Drehen der Augenmuschel
DEUTSCH
取扱説明書
Operating Instructions
Manuel d’utilisation
Instrucciones de funcionamiento
Bedienungsanleitung
Istruzioni d’uso
Инструкция по эксплуатации
Інструкція з експлуатації
사용설명서
사용설명서
사용설명서
사용설명서사용설명서
使用說明書
使用說明書
使用說明書
使用說明書使用說明書
使用说明书
使用说明书
使用说明书
使用说明书使用说明书
アイカップ /Eyecup/Œilleton du viseur/
Protector ocular/Augenmuschel/
Protezione
del mirino/
Наглазник/
Насадка на окуляр/
아이컵
아이컵
아이컵
아이컵아이컵 / / 眼罩
眼罩
眼罩
眼罩眼罩 /眼罩
眼罩
眼罩
眼罩眼罩
品番/ Model No./Modèle/Modelo N./Model Nr./Modello N./
Модель №./Модель №/모델
모델
모델
모델모델 번호
번호
번호
번호번호 / /型號
型號
型號
型號型號
/型号
DMW-EC6
2
1
A
B
3
DVQX1722ZD
F0119YT3042
Panasonic Entertainment
& Communication Co., Ltd.
Web Site/Site Web: http://www.panasonic.com
C Panasonic Entertainment & Communication Co., Ltd. 2019
∫
∫
∫
∫∫ お問い合わせ先
パナソニック株式会社
パナソニック エンターテインメント
&コミュニケーション株式会社
〒570-0021 大阪府守口市八雲東町1 丁目10番 12 号
Produkspesifikasjoner
| Merke: | Panasonic |
| Kategori: | Kamera |
| Modell: | DMW-EC6 |
Trenger du hjelp?
Hvis du trenger hjelp med Panasonic DMW-EC6 still et spørsmål nedenfor, og andre brukere vil svare deg
Kamera Panasonic Manualer

16 Februar 2025

2 Februar 2025

2 Februar 2025

2 Februar 2025

24 Januar 2025

9 Januar 2025

23 Desember 2024

23 Desember 2024

23 Desember 2024

22 Desember 2024
Kamera Manualer
- Fujifilm
- PatrolEyes
- FIMI
- Ring
- Voigtlander
- Aplic
- Canon
- Vimar
- Aquapix
- Maginon
- Pyle
- Sony
- Philips
- Arlo
- KanDao
Nyeste Kamera Manualer

10 April 2025

9 April 2025

3 April 2025

2 April 2025

29 Mars 2025

29 Mars 2025

28 Mars 2025

28 Mars 2025

27 Mars 2025

13 Mars 2025