Phoenix Gold Ti312D2X Bruksanvisning
Phoenix Gold
Subwoofer
Ti312D2X
Les nedenfor 📖 manual på norsk for Phoenix Gold Ti312D2X (4 sider) i kategorien Subwoofer. Denne guiden var nyttig for 7 personer og ble vurdert med 4.6 stjerner i gjennomsnitt av 4 brukere
Side 1/4

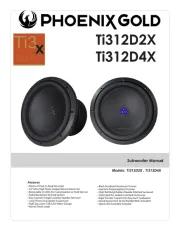
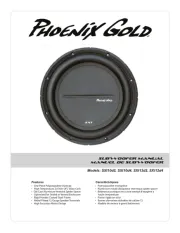
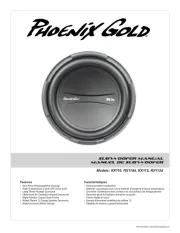
Subwoofer Manual
Features
Models: , Ti312D2X Ti312D4X
• 60mm of Peak to Peak Excursion
• 3.0” Ultra High Temp Copper Wound Voice Coil
• Removable tri-LEDs for Customization or Field Service
• Radial Backplate Venting System
• Easy Connect Single Location Speaker Terminal
• Long Throw Dual Spider Suspension
• High Excursion CAE/CAD Motor Design
• Woven Tinsel Leads
• Black Anodized Aluminum Former
• Injection Polypropylene Dustcap
• High Roll Butyl Rubber Double Stitched Surround
• Optimized for Sealed or Vented Enclosures
• Rigid Powder Coated Anti-Resonant Castbasket
• Quick Disconnect Series/Parallel Wires Included
• Spare LED Assembly Included
Ti312D2X
Ti312D4X
Produkspesifikasjoner
| Merke: | Phoenix Gold |
| Kategori: | Subwoofer |
| Modell: | Ti312D2X |
Trenger du hjelp?
Hvis du trenger hjelp med Phoenix Gold Ti312D2X still et spørsmål nedenfor, og andre brukere vil svare deg
Subwoofer Phoenix Gold Manualer
26 August 2025
26 August 2025
26 August 2025
27 Januar 2025
27 Januar 2025

27 Januar 2025
27 Januar 2025

18 Januar 2025

18 Januar 2025

18 Januar 2025
Subwoofer Manualer
- Bazooka
- Apart
- Cambridge
- Rockville
- Origin Acoustics
- McIntosh
- Kicker
- Denon
- Canton
- Fusion
- Rockford Fosgate
- REL Acoustics
- Elac
- Soundstream
- Metra
Nyeste Subwoofer Manualer
20 Oktober 2025
20 Oktober 2025
20 Oktober 2025
20 Oktober 2025
19 Oktober 2025

19 Oktober 2025
19 Oktober 2025
19 Oktober 2025

19 Oktober 2025
19 Oktober 2025