Pioneer CD-R55 Bruksanvisning
Pioneer
Fjernkontroll
CD-R55
Les nedenfor 📖 manual på norsk for Pioneer CD-R55 (4 sider) i kategorien Fjernkontroll. Denne guiden var nyttig for 19 personer og ble vurdert med 3.8 stjerner i gjennomsnitt av 10 brukere
Side 1/4
Owner’s Manual
Mode d emploi’
Remote control
Télécommande
CD-R55
PIONEER CORPORATION
4-1, MEGURO 1-CHOME, MEGURO-KU
TOKYO 153-8654, JAPAN
PIONEER ELECTRONICS (USA) INC.
P.O. Box 1540, Long Beach, California 90801-1540, U.S.A.
TEL: (800) 421-1404
PIONEER EUROPE NV
Haven 1087, Keetberglaan 1, B-9120 Melsele, Belgium
TEL: (0) 3/570.05.11
PIONEER ELECTRONICS ASIACENTRE PTE. LTD.
253 Alexandra Road, #04-01, Singapore 159936
TEL: 65-6472-7555
PIONEER ELECTRONICS AUSTRALIA PTY. LTD.
178-184 Boundary Road, Braeside, Victoria 3195, Australia
TEL: (03) 9586-6300
PIONEER ELECTRONICS OF CANADA, INC.
300 Allstate Parkway, Markham, Ontario L3R OP2, Canada
TEL: 1-877-283-5901
PIONEER ELECTRONICS DE MEXICO, S.A. de C.V.
Blvd.Manuel Avila Camacho 138 10 piso
Col.Lomas de Chapultepec, Mexico, D.F. 11000
TEL: 55-9178-4270
先 公鋒股份有限司
總公司 台北 北:市中山路二段44 13號樓
電話: (02) 2521-3588
先 公鋒電 限子( )香港有司
香港 港九龍尖沙咀海城世 中界商業心
9 901-6樓室
電話: (0852) 2848-6488
Published by Pioneer Corporation.
Copyright © 2006 by Pioneer Corporation.
All rights reserved.
Publié par Pioneer Corporation. Copyright
© 2006 par Pioneer Corporation. Tous
droits réservés.
Printed in China
Imprimé en Chine
<CZR5072-A> E
<KMMZX> <06K00000>
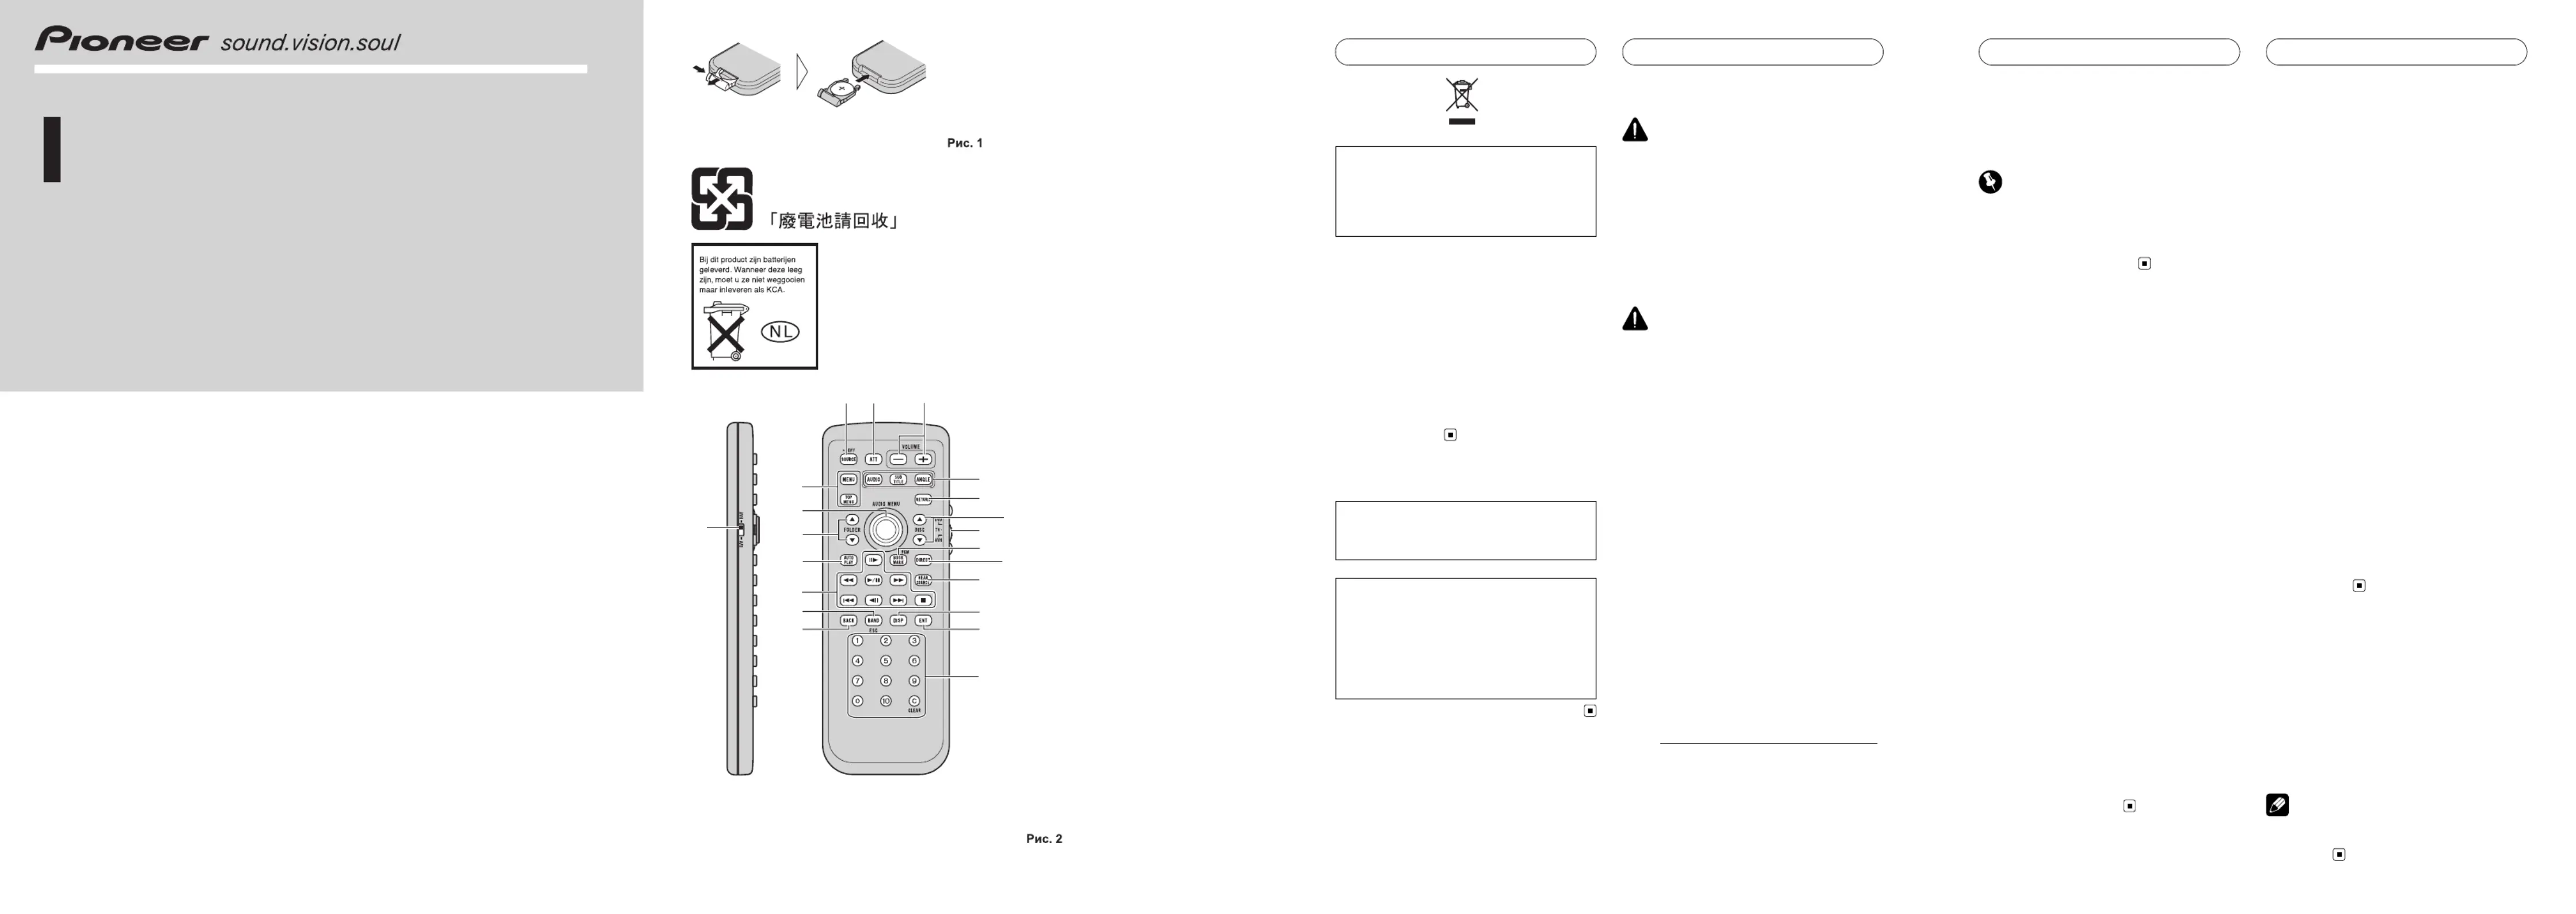
Fi
g
.
1
a
2
3
k
l
j
f
g
h
4
d
e
c
b
8
6
5
7
i
1
9
Fi
g
.
2
En
If you want to dispose this product, do not mix it
with general household waste. There is a sepa-
rate collection system for used electronic pro-
ducts in accordance with legislation that requires
proper treatment, recovery and recycling.
Private households in the 25 member states of
the EU, in Switzerland and Norway may return
their used electronic products free of charge
to designated collection facilities or to a retai-
ler (if you purchase a similar new one).
For countries not mentioned above, please
contact your local authorities for the correct
method of disposal.
By doing so you will ensure that your disposed
product undergoes the necessary treatment,
recovery and recycling and thus prevent po-
tential negative effects on the environment
and human health.
Information to User
Alteration or modifications carried out without
appropriate authorization may invalidate the
user s right to operate the equipment.’
This device complies with part 15 of the FCC
Rules. Operation is subject to the following
two conditions:
(1) This device may not cause harmful interfer-
ence, and (2) this device must accept any inter-
ference received, including interference that
may cause undesired operation.
Use and care of the remote
control
Installing the battery (Fig. 1)
Slide the tray out on the back of the remote con-
trol and insert the battery with the plus (+) and
minus ( ) poles pointing in the proper direction–
.
!When using for the first time, pull out the
film protruding from the tray.
WARNING
!Handling the cord on this product or cords as-
sociated with accessories sold with the pro-
duct may expose you to chemicals listed on
proposition 65 known to the State of California
and other governmental entities to cause can-
cer and birth defects or other reproductive
harm. Wash hands after handling.
!Keep the battery out of the reach of children.
Should the battery be swallowed, immediately
consult a doctor.
CAUTION
!Do not allow this unit to come into contact
with liquids. Electrical shock could result.
Also, this unit damage, smoke, and overheat
could result from contact with liquids.
!Do not disassemble or modify this unit. To do
so may cause a malfunction.
!Always keep the volume low enough so that
you can hear sounds from outside the vehicle.
!Use only one lithium battery.CR2025 (3 V)
!Always check carefully that you are loading
the battery with its plus (+) and minus ( )–
poles facing in the proper directions.
!Remove the battery if the remote control is not
used for a month or longer.
!
Danger of explosion if battery is incorrectly replaced.
Replace only with the same or equivalent type.
!Do not handle the battery with metallic tools.
!
Do not store the battery with metallic materials.
!In the event of battery leakage, wipe the re-
mote control completely clean and install a
new battery.
!When disposing of used batteries, please
comply with governmental regulations or en-
vironmental public institutions rules that’
apply in your country/area.
!
“Perchlorate Material special handling may apply.–
See
www.dtsc.ca.gov/hazardouswaste/perchlorate.
(Applicable to California, U.S.A.)”
Using the remote control
Point the remote control in the direction of the
front panel to operate.
Before You Start
En
!The remote control may not function prop-
erly in direct sunlight.
Important
!Do not store the remote control in high tem-
peratures or direct sunlight.
!Do not let the remote control fall onto the
floor, where it may become jammed under the
brake or accelerator pedal.
Using the remote control
operation mode switch
There are three remote control operation
modes on the remote control.
AVH mode operation
When operating an AV Receiver (e.g., AVH-
P5900DVD) with this remote control, the mode
is normally switched to .AVH
DVD mode operation
When operating a Pioneer DVD player (e.g.,
XDV-P6) with this remote control, the mode is
switched to . If you switch the mode toDVD
DVD 0 10, the joystick and to operations are
changed for DVD player.
TV mode operation
When operating a Pioneer TV tuner (e.g., GEX-
P5700TV (P)) with this remote control, the
mode is switched to . If you switch theTV
mode to TV, the joystick operation is changed
for TV tuner.
In TV
mode, only buttons shown below can be used.
!SOURCE button
!ATT button
!VOLUME buttons
!Joystick
!DIRECT button
!REAR SOURCE button
Setting remote control
code type
When the remote control operation mode switch is
set to , changing the remote control code typeDVD
enables you to operate the Pioneer DVD player with
this remote control. There are three remote codes,
code type , code type and code type .A B AVH
!When operating an AV Receiver (e.g., AVH-
P5900DVD), select code .AVH
!When operating a multi-DVD player (e.g.,
XDV-P6), select code .A
!When operating a DVD navigation unit, se-
lect code .B
1 Set the remote control selection switch
on the left side of the remote control to
the appropriate position with a pen tip or
other pointed instrument .
!If you select mode, there is no need toAVH
take the following procedure.
!If you select / mode, take the followingA B
procedure and change the code type to the
appropriate type.
2 Press 0 and CLEAR on the remote con-
trol simultaneously to change the code
type.
Initially, the code type is set to . Each timeA
you press and simultaneously on the0 CLEAR
remote control the code type switches be-
tween and .A B
Specifications
Power source (Lithium battery;............................. 3 V DC
CR2025)
Dimensions (W × H × D) ... 54 × 149 × 13 mm
(2-1/8 × 5-7/8 × 1/2 in.)
Weight (including bat-.......................................... 59 g (2 oz)
tery)
Infrared remote control
Wavelength ................................. 945 nm
Output typ; 10 mw/sr per Infrared...........................................
LED
Note
Specifications and the design are subject to pos-
sible modifications without notice due to im-
provements.
Before You Start
En
Produkspesifikasjoner
| Merke: | Pioneer |
| Kategori: | Fjernkontroll |
| Modell: | CD-R55 |
| Vekt: | 59 g |
| Kompatibilitet: | AVHP5900DVD, XDV-P6, GEXP5700TV |
| Dimensjoner (B x D x H): | 54 x 13 x 149 mm |
| Produktfarge: | Sort |
| Batterier medfølger: | Ja |
Trenger du hjelp?
Hvis du trenger hjelp med Pioneer CD-R55 still et spørsmål nedenfor, og andre brukere vil svare deg
Fjernkontroll Pioneer Manualer

3 August 2025
Fjernkontroll Manualer
- Metronic
- TELE System
- Telefunken
- Essentiel B
- Conrad
- Aplic
- Neewer
- REV
- PDP
- Libec
- EQ-3
- Profoto
- MKC
- Insignia
- Antelope Audio
Nyeste Fjernkontroll Manualer
20 Oktober 2025
19 Oktober 2025
19 Oktober 2025
18 Oktober 2025
17 Oktober 2025
16 Oktober 2025
16 Oktober 2025
15 Oktober 2025
13 Oktober 2025
10 Oktober 2025