Scott CX 82 Sola Bruksanvisning
Les nedenfor 📖 manual på norsk for Scott CX 82 Sola (4 sider) i kategorien radioer. Denne guiden var nyttig for 13 personer og ble vurdert med 4.7 stjerner i gjennomsnitt av 7 brukere
Side 1/4

Instruction Manual
Dual Alarm Clock Radio with
Digital Display
CX 82
PACKAGE INCLUDES:
1. The unit 2. Instruction manual
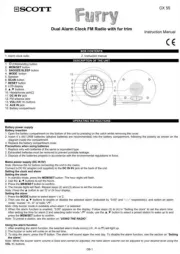
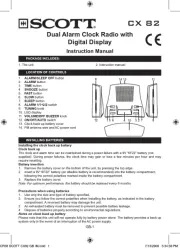
LOCATION OF CONTROLS
234
5
6 7
8
91012
1. ALARM/SLEEP OFF button
2. ALARM button
3. TIME button
4. SNOOZE button
5. FAST button
6. SLOW button
7. SLEEP button
8. ALARM 1/1+2/2 switch
9. TUNING knob
10. LED display
11. VOLUME/OFF BUZZER knob
12. ON/OFF/AUTO switch
13. Clock back up battery cover
14. FM antenna wire and AC power cord
INSTALLING BATTERIES
Installing the clock back up battery
Clock back up
The clock and alarm time can be maintained during a power failure with a 9V “6F22” battery (not
supplied). During power failures, the clock time may gain or lose a few minutes per hour and may
require resetting.
Battery insertion
1. Remove the battery cover on the bottom of the unit, by pressing the top edge.
2. Insert a 9V “6F22” battery (an alkaline battery is recommended) into the battery compartment,
following the correct polarities marked inside the battery compartment.
3. Replace the battery cover.
Note: For optimum performance, the battery should be replaced every 6 months.
Precautions when using batteries
1. Use only the size and type of battery specied.
2. Ensure you follow the correct polarities when installing the battery, as indicated in the battery
compartment. A reversed battery may damage the unit.
3. An exhausted battery must be removed to prevent possible battery leakage.
4. Dispose of batteries properly according to environmental regulations.
Notes on clock back up battery
Please note that this unit will not operate fully by battery power alone. The battery provides a back up
system only in the event of an interruption of the AC power supply.
GB-1
CR38 SCOTT CX82 GB IM.indd 1 7/13/2009 5:34:59 PM
Produkspesifikasjoner
| Merke: | Scott |
| Kategori: | radioer |
| Modell: | CX 82 Sola |
| Vekt: | 198 g |
| Snooze-funksjon: | Ja |
| Innebygde høyttalere: | Ja |
| Radio: | Klokke |
| Dimensjoner (B x D x H): | 720 x 187 x 65 mm |
| Produktfarge: | Grå |
| Skjermtype: | LED |
| Skjermdiagonal: | 0.9 " |
| Batterispenning: | 9 V |
| Innebygd klokke: | Ja |
| Krav til strømforsyning: | AC 230V ~ 50Hz |
| Farge på bakgrunnsbelysning: | Blå |
| Mottakertype: | Analog |
| Støttede radiobånd: | FM |
| Dvalefunksjon: | Ja |
Trenger du hjelp?
Hvis du trenger hjelp med Scott CX 82 Sola still et spørsmål nedenfor, og andre brukere vil svare deg
radioer Scott Manualer
30 September 2025
30 September 2025
30 September 2025
30 September 2025
30 September 2025
radioer Manualer
- Krüger&Matz
- AmpliVox
- Terratec
- Auna
- Technaxx
- Roadstar
- Medion
- Kicker
- JBL
- Tangent
- Kenwood
- Aiwa
- Technisat
- Renkforce
- Audizio
Nyeste radioer Manualer
21 Oktober 2025
21 Oktober 2025
21 Oktober 2025
21 Oktober 2025
21 Oktober 2025
21 Oktober 2025
21 Oktober 2025
20 Oktober 2025
20 Oktober 2025
19 Oktober 2025