SPC Comfort Kaiser 7608N Bruksanvisning
Les nedenfor 📖 manual på norsk for SPC Comfort Kaiser 7608N (4 sider) i kategorien Telefon. Denne guiden var nyttig for 2 personer og ble vurdert med 4.0 stjerner i gjennomsnitt av 1.5 brukere
Side 1/4

Set audio equalizer
The phone has three types of lters to compensate for the limited
sensitivity of the ear in certain frequency ranges. The lters are
called: natural, bass and treble.
To set it, after entering the TELEPHONE submenu, you must perform
the following steps:
− Press the
key until EQUALIZE is selected. Press .
− Press the
key until the desired lter is selected: NATURAL,
BASS or TREBLE. Press
. You will hear a conrmation tone.
The audio equalizer lter is set to NATURAL by default.
Language settings
You can choose from one of the different languages: English,
Deutsch, Français, Italiano, Türkçe, Español, Eλληνικά, Svenska,
Dansk, Norsk, Nederlands, Suomi.
To do this, after entering the TELEPHONE submenu:
− Press the
key to select LANGUAGE. Press .
− Press the
key until you have selected the language of your
choice. Press
. You will hear a conrmation tone.
By default, the language is SPANISH.
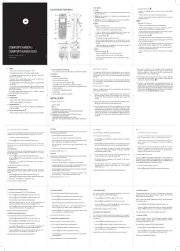
LOCATION OF CONTROLS
COMFORT KAISER /
COMFORT KAISER DUO
Reference 7608N / 7609N
USER MANUAL
Lower part of the key:
- Press it in standby mode to access the list of last dialed
numbers.
- Press it within a menu to go to the previous option.
- Press it in the address book or in one of the lists to scroll to
the previous entry.
8.
Key:
Upper part of the key:
- Press it in menu mode to return to standby mode.
- Press it in any submenu to return to the previous level, or
press and hold it to go directly to standby mode.
- In edit or preset mode, press to delete a letter or digit, or press
and hold to delete all letters or digits at once.
Lower part of the key:
- In standby mode, press and hold the key to turn off the phone.
- When the phone is off in standby mode, press and hold the
button to turn on the phone.
- Press briefly in menu mode or edit mode to return to the
previous menu, or press and hold to return to standby mode.
- During a call, press to answer the call and press again to
activate the speakerphone function.
- Press it during a call to end the call and return to standby
mode.
1. Ear speaker.
2. Screen.
3.
Key: Direct memory 1. In standby mode, long press to dial
the stored number.
4.
Key: Direct memory 2. In standby mode, long press to dial
the stored number.
5.
Key: Press R in standby mode to access the callback
function. Press to access the address book.
6.
Key:
Upper part of the key:
- Press the key in standby mode to enter the main menu.
- Press it in a submenu to conrm your selection.
- Press it during a call to access the options: Internal call,
Address book, Last dialed numbers list and Call list.
Lower part of the key:
- In standby mode, press briefly to pick up.
- Press it in the address book or in one of the lists to access
the selected entry, and press it again to activate the hands-free
function.
- Press it during the call to answer the call, and press it again to
activate the speakerphone function.
7.
Key:
Upper part of the key:
- Press it in standby mode to access the call list.
- Press it within a menu to move to the next option.
- Press it in the address book or in one of the lists to scroll to
the next entry.
9. Keypad.
- Press a key to insert a digit, character, * and #.
- In standby mode, press
to access a stored number.
- In standby mode, press and hold the
key to activate or
deactivate the key lock.
- During a call in pulse dialing mode, press the key to
temporarily switch to tone dialing mode.
- In standby mode, press and hold the
key to enable/disable
the ringtone.
- In any of the lists, if applicable, press
to check the number
associated with the record name or to view the time of the call in
the DETAILS submenu.
- In dialing mode, when preparing to dial or editing a number,
press and hold
to insert a pause, P.
10. Microphone.
11. Indicator light:
- Stays on when the amplication mode is activated.
- Flashes when there is an incoming call.
12. Amplicationkey:
- Press it during a call to activate or deactivate the amplication
of the ear speaker.
13. Key to increase the volume:
- Press it during a call to increase the volume of the ear speaker.
SET THE CLOCK OF THE PHONE
You can set the following clock settings on your phone: the DATE
FORMAT, the TIME FORMAT, the TIME and the DATE. To do this:
- Press the key to enter the menu.
- Press the
key until CLOCK is selected. Press
.
NOTE: Remember that you can press the
key at any time to return to the
previous screen or press and hold the
key for a few seconds to return to
sleep mode.
Set date format
Once you have entered the CLOCK submenu, you can set one of
the following clock formats: DD-MM-YY or MM-DD-YY. To do this,
proceed as follows:
− Press the
key until FT DATE is selected. Press .
− Press the
key until the desired format is selected: DD-MM-YY
or MM-DD-YY.
− Press
, to conrm the date format. You will hear a
conrmation tone.
The day format is DD-MM-YY by default.
Set time format
Once you have entered the CLOCK submenu, you can set one of
the following time formats: 12HR or 24HR. To do this, proceed as
follows:
− Press the
key until FT TIME is selected. Press .
− Press the
key until the desired format is selected 12HR or 24HR.
− Press . You will hear a conrmation tone.
The time format is 24HR by default.
Setting the internal ringing melody
To do this, after entering the TELEPHONE submenu:
− Press the
key until RINGTONE is selected. Press .
− Press the
key until INTERNAL is selected. Press .
− The currently selected ringing melody is played.
- The screen displays ‘MEL: x’ (x = one of the 10 melodies). In
addition, the currently selected melody is marked with a *.
- Press the
key to hear the other melodies. There are 10 in total.
Press
. You will hear a conrmation tone.
By default, the internal call melody is 2.
Setting the external call melody
To do this, after calling the TELEPHONE submenu:
− Press the
key until RING TONE is selected. Press .
− Press the
key until EXTERNAL is selected. Press .
− The currently selected ringing melody is played.
- The screen displays ‘MEL: x’ (x = one of the 10 melodies). In
addition, the currently selected melody is marked with a *.
- Press the
button to hear the other melodies. There are 10 in
total. Press
. You will hear a conrmation tone.
The default setting for the external ring melody is 1.
14. Key to decrease the volume:
- Press it during a call to decrease the volume of the ear speaker.
15. Speaker.
16. Battery cover.
A. Connection power adapter.
B. Connection of the line cable.
C. Key used to search for the phone:
- In standby mode, press this key to locate your phone.
- Press and hold the key for a few seconds in registration mode
to register a phone.
D. Contacts for charging the battery.
E. Cable entry.
F. Power adapter cable input (7609N).
INSTALLATION
SCOPE OF DELIVERY
- Cordless phone.
- Base
- Line cable
- Power supply unit for the base unit
- 2 rechargeable batteries type LR3/AAA 500mAh (Ni-Mh)
- Instruction manual and SAT list
And additionally, if you have purchased the DUO version:
- 1 additional cordless telephone.
- 1 additional phone charger with power supply.
- 2 additional rechargeable batteries type LR3/AAA 500mAh (Ni-
Mh).
Set time
Once you have entered the CLOCK submenu, you can set the time.
To do this, proceed as follows:
− Press the
key until TIME is selected.
− Press
. The rst digit of the hours starts flashing.
− Use the keypad to enter the two digits corresponding to the
hours. Then the minute display starts to flash.
− Use the keypad to enter the two digits corresponding to the
minutes.
− Press
. You will hear a conrmation tone.
By default, the time is 00 - 00.
Set date
Once you have entered the CLOCK submenu, you can set the date.
To do this, proceed as follows:
− Press the
button to select DATE.
− Press
. The rst digit of the day eld starts flashing.
− Use the keypad to enter the two digits corresponding to the day.
After that, the digit in the month eld starts to flash.
− Use the keypad to enter the two digits of the month. The digit in
the year eld then starts to flash.
− Use the keypad to enter the two digits that correspond to the
year. Press
. You will hear a conrmation tone.
By default, the date is 01 – 01 – 11.
Set ringtone volume
To do this, after entering the TELEPHONE submenu:
− Press the
key until RINGTONE is selected. Press .
− Press the
key until VOLUME is selected. Press .
− The melody is played at the currently selected ring volume.
- The display shows ‘VOL x’ (x = one of the 5 volume levels or
mute). In addition, the current volume is marked with a *.
- Press the
button to increase or decrease the volume. Press
. You will hear a conrmation tone.
By default, the ring volume is set to 4.
Settingthekeyconrmationtone
This tone sounds every time a key is pressed.
To do this, after calling the TELEPHONE submenu:
− Press the
key until TONE is selected. Press .
− Press the
key until KEY is selected. Press .
− Press the
key to select ON or OFF. Press . You will hear a
conrmation tone.
The key conrmation tone is activated by default.
BASE UNIT LOCATION
It is important that the base and cordless phone can receive and
transmit a good radio signal. The best location is in the center of
the area you want to cover. If you have poor reception, try relocating
the base.
The indoor range is up to 50 meters. Do not place the device near
TVs, computers or electrical devices as this may affect the range
and sound quality.
INSTALLING THE PHONE
Place the charging station near the telephone line and the power
outlet (power connection).
1. Plug one end of the power adapter into the power connector of
the base unit (A). Connect the power adapter to a 220 V socket.
For the DUO version, proceed in the same way to power the
charger.
2. Plug one end of the power cord into the back of the base station
(B) and the other end into your home phone jack.
3. Insert the batteries into the battery compartment on the back
of the phone. To do this, open the battery compartment (16)
with light pressure and slide the cover down. Insert the batteries,
taking care to observe the correct polarity. Observe the drawings
(+ and -) on the inside of the compartment. Replace the cover.
For the DUO version, proceed in the same way with the additional
telephone.
SET ALARM
To set the alarm on the phone, proceed as follows:
− Press
to enter the menu.
− Press the
key until ALARM is selected. Press to conrm
the selection.
− Press the key until ON is selected to set the alarm (OFF would
be to remove the alarm). Press
, to conrm the selection.
− Set the time at which the alarm is to sound. Use the keypad
to enter the two digits that correspond to the hours. Then the
minute display starts to flash.
− Use the keypad to enter the two digits corresponding to the
minutes. Press
to conrm the alarm time.
− The REPEAT option is displayed on the screen. Press
to
conrm the alarm time.
− Press the key until ON is selected for the alarm to sound
regularly every 7 minutes, or OFF. Press
. You will hear a
conrmation tone.
By default, the alarm is disabled and the default melody is 1.
Low battery setting
This sound is emitted when the battery charge level is low. To do
this, after entering the TELEPHONE submenu:
− Press the
key until TONE is selected. Press .
− Press the
key until LOW BAT is selected. Press .
− Press the
button to select ON (Enabled) or OFF (Disabled).
Press
. You will hear a conrmation tone.
By default, the low battery sound is enabled.
Setting for out of range sound
This tone sounds when the phone has no signal, is not in range or
has no reception. Once you have entered the TELEPHONE submenu,
you can set it:
− Press the
key until TONE is selected. Press .
− Press the
key until NO SIGNAL is selected. Press .
− Press the
key to select ON (Enabled) or OFF (Disabled). Press
. You will hear a conrmation tone.
By default, the sound is activated when the range is exceeded.
4. Then place the phone in the charging cradle to charge the
batteries. Charge the batteries for at least 10 hours during
the rst installation. In the case of the DUO version, place the
additional phone in the charging cradle.
5. If the battery icon on the phone moves, it means that the
batteries are not fully charged. However, when fully charged, the
icon remains stable and shows
.
6. The phone is pre-programmed to automatically connect to the
charging cradle. If it does not, unplug the power cord from the
cradle, remove the batteries from the phone, plug the power cord
back into the cradle, and reinsert the batteries. If the connection
still cannot be established, program the device by following the
instructions in the “Registering a phone” section.
NOTE:
- The alarm duration is approx. 45 seconds.
- The volume of the alarm is equal to the ringtone volume of the phone
itself. And when the phone is muted, the alarm sounds at volume 1.
- To stop the alarm, simply press any key or press and hold the
key for
about 5 seconds to turn it off permanently. In the latter case, the
icon
will disappear.
- During a call, the alarm does not sound, but to warn you, the phone
displays the message ON and the
icon flashes on the screen. In
addition, an audible signal sounds in the phone. If it coincides with the
ringing of a call, the alarm will not be triggered.
PHONE CONFIGURATION
You can congure the following parameters of your phone: the
RINGTONE, the SOUNDS, the EQUALIZER, the LANGUAGE, the
NAME, the SCREEN, the AUTO ANSWER function, the MEMORY and
the ANSWERING MACHINE. Proceed as follows:
− Press the
key to enter the menu.
− Press the
key until TELEPHONE is selected. Press .
2 3
5
9
13
6
10
14
7
11
15
8
12
16
4
SPC. 22/09/1h
1
2
3
6
7
9
10
4
5
8
11
12 13
14
15
16
B
A
E
F
D
C

• HowdoIentercharactersusingthephonekeypad?
- You can enter characters by pressing the number keys. For
example, to type ‘C’ you need to press the digit ‘2’ three times,
for ‘S’ you need to press the digit ‘7’ four times.
- If you want to enter characters that are on the same key, you
must wait until the cursor moves to the next position before
entering the new character.
- If you enter an incorrect character, press
to delete the
last character entered. Repeat the process as many times as
necessary until the desired character is deleted and continue
inserting characters.
- Press the
to conrm. NUMBER is displayed.
- Press the
and enter the number (maximum 20 characters)
using the keypad.
- Press the to conrm. MEL x (where x is one of the 10
melodies) appears on the screen. You can then tell who is calling
you by the ringing melody.
Setting the automatic pickup
When automatic pickup is enabled, you can answer a call by simply
lifting the phone from the base station.
To congure it, you must enter the TELEPHONE submenu:
− Press the
key to select AUTO ANSWER. Press .
− Press the
key to select ON (Enabled) or OFF (Disabled). Press
the
. You will hear a conrmation tone.
In the default setting, automatic pickup is disabled.
Set direct memory
Your phone has 2 direct memories: M1 and M2. You can program a
number with up to 20 digits in each of the memories.
To do this, after entering the TELEPHONE submenu:
− Press the
key to select MEMORY. Press .
− Use the
key to select the memory to be programmed: M1 or
M2. Press
.
-
Enter the desired number using the keypad (maximum 20
digits). If you make a mistake, you can also delete it by pressing
the
. key. Press . You will hear a conrmation tone.
Congurephonename
Each phone can have its own name for identication. It is displayed on
the screen in idle mode and permanently. You can change the name to
a maximum of 6 alphanumeric characters.
To do this, after entering the TELEPHONE submenu:
− Press the
key until NAME is selected. Press .
- Delete the default name using the
key and enter the desired
name for the phone using the keypad (max. 6 characters). Press
. You will hear a conrmation tone.
By default, the name is SPC.
NOTE: In standby or idle mode, the phone displays SPC x (where “x”, from 1
to 5, is the number of the device).
Setting the display information in standby mode
The phone gives you the option to choose what information you
want to be displayed when the phone is in standby or idle mode:
the name or the time.
To do this, after entering the TELEPHONE submenu:
− Press the
key to select SCREEN. Press .
− Press the
key until you select the type of information to
be displayed: NAME or TIME. Press
. You will hear a
conrmation tone.
By default, the following types of information are displayed: NAME.
Set dialing mode
To ensure compatibility with different systems, your phone can be
programmed with either PULSE or TONE DIALING.
To do this, after you have entered the BASE submenu:
− Press the
key until DIALING is selected. Press .
− With the
, key, select one of the two options: TONE or PULSE.
The current dialing mode is marked with an *. To conrm, press
. You will hear a conrmation tone.
By default, the dialing mode is set to TONE.
Setting the redial (R key)
The R key (5) is useful if you want to use the services offered by your
telephone company or switchboard, such as “call forwarding”, “call
waiting”, “answering machine”, etc.
To do this, after you have entered the BASE submenu:
− Press the
key until R time is selected. Press .
− With the
key, select one of the options: SHORT (100 ms),
MEDIUM (300 ms) or LONG (600 ms). The current dialing
mode is marked with *. To conrm, press
. You will hear a
conrmation tone.
By default, the R key (5) has a SHORT time of 100 ms.
NOTE: The R key (5) for Spain is 100ms. If you change this setting, you may
no longer be able to use some of the services offered by your telephone
company.
Congurationofthevoicemailmemory
Your phone also has an additional memory on the key. This key is
usually programmed with your phone company’s voicemail access
number, but you can also record an SOS number such as 112.
To do this, after entering the TELEPHONE submenu:
− Press the
to select VOICEMAIL. Press .
- Enter the desired number using the keypad (maximum 20 digits).
If you make a mistake, you can also delete it using the key.
Press
. You will hear a conrmation tone.
CONFIGURATION OF THE BASE
You can congure the following basic parameters: DIALING, the
R-TIME and the PIN. To do this:
- Press the key to enter the menu.
- Press the
key until BASE is selected. Press . You will hear
a conrmation tone.
Setting the base pin
To restrict access to programming of some important parameters,
your phone is protected with a user PIN. You can change this PIN.
The maximum number of digits is 4.
To do this, after you have entered the BASE submenu:
− Press the
key until PIN is selected. Press .
- The screen will display ‘OLD? ‘. Press
.
- Use the keypad to enter the new PIN again, then press
. You
will hear a conrmation tone.
- The screen displays ‘NEW’? Press .
- Use the keypad to enter the new 4-digit base pin and press
to conrm.
- The phone will ask you to conrm the new PIN and ‘CONFIRM?’
will appear on the screen. Press
.
- Use the keypad to enter the new PIN again, then press
. You
will hear a conrmation tone.
By default, the base pin is 0000.
NOTE: If you change your PIN, choose one that you can easily remember or
write it down in a safe place.
Turbo mode
In this mode, you can quickly dial the most frequently dialed
numbers previously stored in the memories: M1, M2 and the keys
1~ 9.
- Press and hold the M1, M2 keys or the 1-9 keys on the keypad for
a few seconds.
- The phone automatically connects, displays the corresponding
number on the screen and dials it.
NOTE: If the key you press is empty, the phone emits error tones. See the
Conguring Direct Memory section for assigning a number to the M1 and M2
keys (Direct Memory), Conguring Voicemail Memory for assigning it using
the 1 key on the keypad (Voicemail Memory), and Assigning a Number to a
Turbo Memory for assigning it using the 2-9 keys on the keypad.
Receiving a call
When a call comes in, the phone rings, the
icon and the text ‘CALL’
are displayed and the indicator light (11) on the phone starts
flashing.
- When the phone rings, you can answer the call by pressing the
.
- During the call, the screen displays the call time.
- To end the call, press the
key or place the phone on the base
station (or charger for ref. 7609N).
DEFAULT VALUES (RESET)
This function allows you to reset all options to their programmed
default values. It is as if we were turning on the phone for the rst
time. To do this:
- Press the
key to enter the menu.
- Press the
key until RESET is selected. Press .
- The phone prompts you to enter the PIN. PIN? appears on the
screen.
− Use the keypad to enter the new 4-digit base pin and press
to conrm.
− The phone will ask you to conrm the action. The screen will
display CONFIRM?
− Press , to conrm. The phone will display the message WAIT
and when the process is complete, you will hear a conrmation
tone.
NOTE: Remember that you can press the
key at any time to return to the
previous screen or press and hold the
key for a few seconds to return to
sleep mode. It is not recommended to use this function as all congurable
functions of the base will be reset to factory settings.
Call waiting
This phone provides the ability to use the caller ID service while on
hold. Your line has a caller ID service and a call waiting service. If
you receive a call while your line is busy, the number of the caller is
displayed in addition to the call waiting tone in the handset.
- If you receive another call during a telephone conversation,
you will hear a series of short tones in the handset. The phone
displays the number of the party calling you.
- Press the
key and then the digit 2 to put the rst call on hold
and answer the second call.
- Press the
key again and then the number 2 to switch from
one call to another.
NOTE: This function is network dependent. Please contact your telephone
company for more details about the service.
Voicemail
When someone leaves a message in your voice mailbox, the
icon
appears on the screen. After you delete all messages from your
voice mailbox, you will receive a signal from your phone company
without an associated number and the
icon will disappear. For
more information, see the section Deleting the voicemail icon.
NOTE: This function is network dependent. Please contact your telephone
company for more details about the service.
Call time
The phone has a timer that appears on the screen after a few
seconds and shows the approximate duration of your call:
hh:mm:ss.
BASIC FUNCTIONS
TURN THE PHONE ON AND OFF
To turn off the phone, press and hold the key for about 5
seconds. In this state, where no power is consumed, the batteries
retain their charge.
To turn on the phone, press and hold the
key until the screen
lights up and the message ‘SEARCH’ is displayed. Also, when the
phone is turned off, it will automatically turn on when placed in the
charging cradle for charging.
NOTE: The phone is pre-programmed to automatically connect to the base.
If it does not, the
icon will flash on the screen. Then unplug the power
cord from the cradle, remove the batteries from the phone, plug the power
cord back into the cradle, and reinsert the batteries. If the connection still
cannot be established, connect the device by following the instructions in the
Registering a phone section.
STANDBY MODE
The standby mode is the home screen that appears every time you
turn on the phone. When the phone is in standby mode, it is ready
to receive calls and you will see at least the
icon, the battery
status
, the name of the phone or the time and number of the
phone (from 1 to 5). After a few seconds, the phone will enter a
power saving mode where the screen backlight will turn off. The
screen turns on again when you receive a call or press any key on
the phone.
NOTE: The power saving mode extends the runtime and battery life.
Set audio volume
During the call, you can use the
(13) and (14) keys to adjust
the volume of the sound or the speakerphone. You can also do this
with the
and keys. There are 5 levels. The higher the number,
the higher the volume: Vol 5, higher volume; Vol 1, lower volume
(default: Vol 3).
Audioamplication
The phone has an additional amplication (+10dB) of the handset
volume to compensate for the limited hearing sensitivity of some
people. To activate the function during a call, press the
key. The
message “AMPL ON” appears on the screen and the telephone
indicator lamp (11) lights up. Then the ve audio levels are
increased by + 10 dB.
To deactivate the function, press the
key again. “AMPL OFF”
appears on the screen and the telephone indicator light (11) goes
out. The ve audio levels then return to their normal values.
NOTE: The audio amplication function is automatically switched off at the
end of the call. i.e. it is only active during the current call.
Mute the microphone (Mute)
During a call, you can temporarily mute the microphone so that the
person you are talking to cannot hear you. However, during this time
you can still hear them.
To enable or disable the mute microphone function:
- Press the
key during the call. The message “MUTE” is
displayed on the screen.
- Press the same
key again to deactivate the function. The
message “MUTE” disappears.
MAKING AND RECEIVING CALLS
There are several ways to make calls from your phone:
Traditional way
- Press the
key to pick up the line. You will hear the dial tone
and the
icon will appear at the top of the screen.
- Dial the phone number and it will be displayed on the screen.
When the other person answers, start the call.
- To end the call, press the
key or place the phone on the base
(or charging cradle for the DUO version).
Dial Preparation Mode
This mode is very useful when you want to double check and
possibly correct the number before dialing:
- Enter a phone number in standby mode. Check the number on
the screen.
- If you have made a mistake, correct it with the
key.
- If the number is already correct, press the
key to dial it.
The screen will show you the number while the phone dials it
automatically.
- When they pick up, you speak at normal volume. During the call,
the call time (hh:mm:ss) is displayed on the screen.
- To end the call, press the
key or place the phone on the base
(or charging cradle for the DUO version).
NOTE: While dialing the number, you can enter pauses of about 3 seconds by
holding down the
key. The display will show the letter P, which is considered an
additional digit for all purposes.
Hands-freecalling
During a call, you can activate the phone’s speaker. If you then place
the phone on a surface (e.g. the desk), you can have a hands-free
call.
To activate or deactivate the speakerphone, press the
key while
the handset is off-hook.
The
icon is displayed on the screen.
To deactivate the speakerphone and return to the call in normal
mode (ear speaker), press the
. The icon disappears.
On the other hand, if you want to end the call in hands-free mode,
simply press the
key or place the phone on the base.
NOTE: Before holding the phone to your ear, make sure the speaker function
is turned off. To adjust the volume of the speaker, refer to the Adjusting the
Volume section.
Redial on registered, R key
The
key allows you to access the contracted services of your
telephone company or switchboard, such as: “Call Forwarding”,
“Call Waiting”, “Answering Machine”, etc.
To do this, press the
. key while the handset is off-hook. An
R will appear on the screen and the line will be timed to open. The
control center you are connected to will notice this signal and stand
by. Then dial the code for the desired service.
ECO mode
The Eco mode of your phone is characterized by the fact that the
radiation varies depending on the distance of the phone from the
base station. Thus, by controlling the transmission power, you can
extend the life and duration of the battery.
1817 19
21
25
29
22
26
30
23
27
31
24
28
32
20
Out of range
The
icon appears flashing on the screen when the phone loses
connection to the base station. When the connection to the base
station is restored, the
icon stops flashing.
When the phone is out of range of the base, the phone will
repeatedly sound a warning tone. Bring the phone within range of
the base. If you do not bring the phone closer to the base, the call
will be dropped.
Keyboard lock
To lock the keyboard, simply press and hold the key for about
2 seconds in standby mode until the
icon appears. You will hear
a conrmation tone.
If you want to deactivate it now, press the button again for about
2 seconds. The
icon will disappear from the screen and you will
hear the conrmation tone again.
NOTE: If the key lock is activated and you receive a call, you can answer
the call by pressing the
button. At the end of the call, the function is
automatically reactivated.
Do not disturb
This function is very useful when you want to mute the ringtone of
your phone so as not to be disturbed.
To activate the “Do not disturb” function in standby mode, simply
press the
key for about 2 seconds until the symbol appears.
You will hear a conrmation tone.
If you want to deactivate it now, press the
key again for about
2 seconds. The
icon will disappear from the screen and you will
hear the conrmation tone again.
NOTE: In any case, the indicator light (11) on the phone will start flashing
when you receive a call. In addition, the text “CALL” is displayed on the screen.
Phone search
You can search for the phone from the base by ringing it with a
special buzzer. This function is very useful to locate a lost phone or
to call the person who has it.
To send the search signal, briefly press the
key (C), located on
the base. The phone registered to the base will ring for about 60
seconds. In addition, ‘SEARCH’ is displayed on the screen.
To stop the search signal before the 60 seconds have elapsed,
press the search key again or the
key on the phone.
ADDRESS BOOK
This device has 20 address book positions for storing phone
numbers and their associated names. Each position can store
names up to 8 characters and 20 digits for the number. The address
book entries are stored in alphabetical order of the names.
ACCESS THE ADDRESS BOOK AND SEARCH FOR AN ENTRY
To check the entries, you can access the address book from the
menu:
- In standby mode, press the
key to enter the main menu. The
rst option that appears is ADDRESS BOOK.
- Press
. The screen displays the rst entries in the address
book.
- Use the and keys to scroll through the list. Since the
entries are sorted in alphabetical order, you can also use the
alphanumeric keypad to perform a quick search for the rst letter
of the name. And if there are no entries that can be displayed, the
phone will indicate on the screen that the address book is empty.
CHECK AN ENTRY
Once you have searched the address book for the entry you want
to check:
- Press the key to display the address book options on the
screen.
- Press the key until the VIEW option is selected. Press .
- Press the
key to check the name, number and melody of the
selected entry.
NOTE: If the number has more than 8 digits, press the key to display the
digits of the number on the left side; and press the
key to display the
digits on the right side.
ADD A NEW ENTRY
Once you have accessed the address book entries:
- Press
to access the functions of the address book itself.
ADD is displayed.
- Press . NAME is displayed on the screen.
- Press
. Enter the name (max. 8 characters) using the
keypad.
Produkspesifikasjoner
Merke: | SPC |
Kategori: | Telefon |
Modell: | Comfort Kaiser 7608N |
Trenger du hjelp?
Hvis du trenger hjelp med SPC Comfort Kaiser 7608N still et spørsmål nedenfor, og andre brukere vil svare deg
Telefon SPC Manualer
18 Oktober 2025
30 Desember 2025
Telefon Manualer
- Alcatel-Lucent
- CSL
- Yealink
- Grandstream
- Olympia
- AEG
- Doro
- Sonim
- Clarity
- Geemarc
- HMD
- Essentiel B
- Crosley
- Dnake
- Ranex
Nyeste Telefon Manualer
17 Oktober 2025
17 Oktober 2025
17 Oktober 2025
16 Oktober 2025
16 Oktober 2025
16 Oktober 2025
13 Oktober 2025
12 Oktober 2025
12 Oktober 2025
12 Oktober 2025