StarTech.com PIB2S31 Bruksanvisning
StarTech.com
Ikke kategorisert
PIB2S31
Les nedenfor 📖 manual på norsk for StarTech.com PIB2S31 (2 sider) i kategorien Ikke kategorisert. Denne guiden var nyttig for 32 personer og ble vurdert med 4.7 stjerner i gjennomsnitt av 16.5 brukere
Side 1/2
Quick-start guide
FR: Guide de l’utilisateur - fr.startech.com
DE: Bedienungsanleitung - de.startech.com
ES: Guía del usuario - es.startech.com
NL: Gebruiksaanwijzing - nl.startech.com
PT: Guia do usuário - pt.startech.com
IT: Guida per l’uso - it.startech.com
Manual Revision: 08/03/2016
For the latest information, technical specications, and support for
this product, please visit www.StarTech.com/PIB2S31.
Package contents
• 1 x USB to SATA converter
• 1 x USB-A to Micro-B cable
• 2 x standos
• 2 x nuts
• 2 x screws
• 1 x quick-start guide
Requirements
• SATA device with cabling and external power source
• Development board (for example, Raspberry Pi)
This converter is OS independent and doesn’t require any additional
drivers or software.
Requirements are subject to change. For the latest requirements,
please visit www.StarTech.com/PIB2S31.
PIB2S31
USB to SATA Converter for Raspberry Pi and Development Boards
*actual product may vary from photos
Introduction
The PIB2S31 enables you to connect any SATA device to a
development board to increase data storage capacity and
performance. The PIB2S31 supports SATA I, SATA II, and SATA III
drives, and any type of SATA device, including DVD, SSD, CD-ROM,
and more.
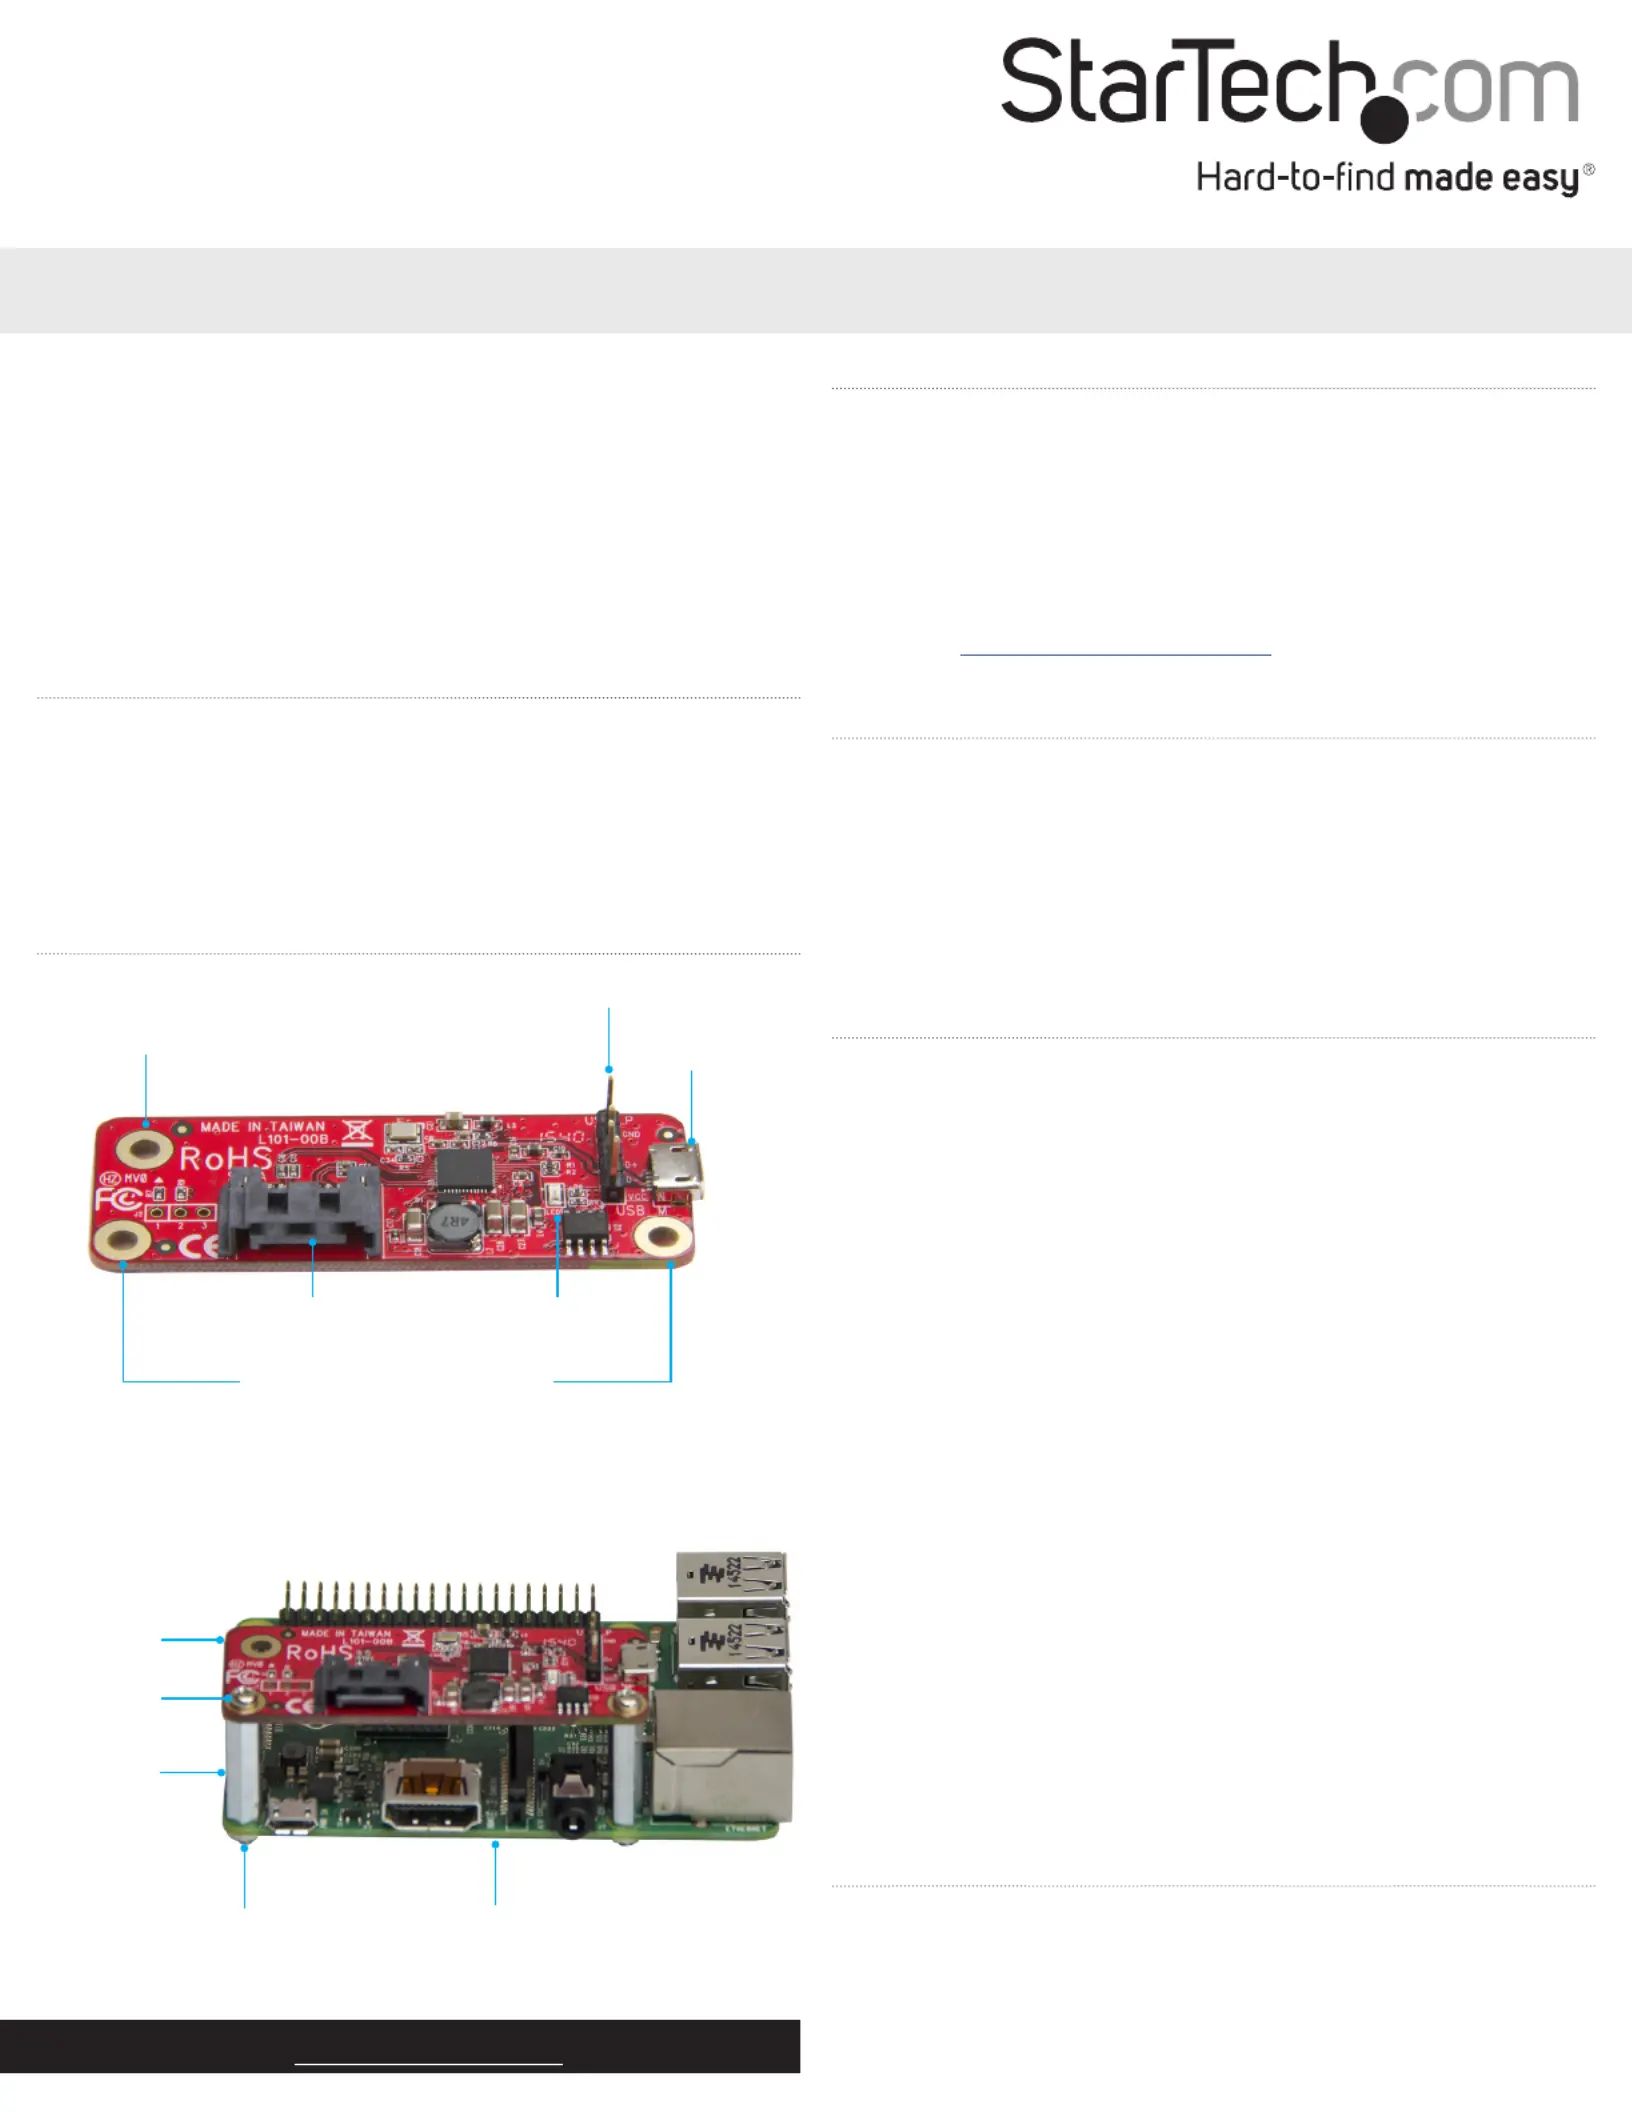
Product diagram
Secondary installation hole
(optional)
Primary installation holes
SATA port
USB 2.0 port
USB 2.0 header
Install the converter
Warning! Drives and converters should be handled carefully,
especially when they’re transported. If you’re not careful with your
drives, you may lose data as a result. Always handle storage devices
with caution. Make sure that you’re properly grounded by wearing
an anti-static strap when you install any computer component. If an
anti-static strap isn’t available, touch a large, grounded metal surface
for several seconds to discharge any built-up static electricity.
1. Place the provided standos into the installation holes on your
development board.
2. To ax the standos in place, screw the provided nuts onto the
stando threads on the reverse side of your development board.
3. Line up the on the converter with the standos Installation holes
axed to your development board.
4. Insert the provided screws into the on the Installation holes
converter and into the standos, and tighten them in place.
5. Connect the provided USB-A to Micro-B cable to the USB 2.0 port
on the converter and to the USB port on your development board.
6. Use a standard 7-pin SATA cable (sold separately) to connect your
SATA drive to the SATA port on the converter.
Note: SATA only provides a data solution, so you will have to use an
additional source (for example, a power supply or external power
adapter) to power your drive.
Converter installed on circuit board
Converter
Standos
Screw
Nut
Development board
LED
About the LED indicator
The PIB2S31 has a green LED indicator that illuminates to indicate
activity.
Produkspesifikasjoner
| Merke: | StarTech.com |
| Kategori: | Ikke kategorisert |
| Modell: | PIB2S31 |
Trenger du hjelp?
Hvis du trenger hjelp med StarTech.com PIB2S31 still et spørsmål nedenfor, og andre brukere vil svare deg
Ikke kategorisert StarTech.com Manualer
14 Oktober 2025
13 September 2025

18 Mars 2025

18 Mars 2025

22 Januar 2025

22 Januar 2025

22 Januar 2025

22 Januar 2025

22 Januar 2025

22 Januar 2025
Ikke kategorisert Manualer
- Turbotronic
- Fantini Cosmi
- TDK-Lambda
- Snow Joe
- Robus
- Starlyf
- Cosi Home
- Black And Decker
- Petkit
- Ventev
- Bulgin
- GE
- Ricoh
- Zanussi
- BRIO
Nyeste Ikke kategorisert Manualer

23 Oktober 2025

23 Oktober 2025

23 Oktober 2025

23 Oktober 2025

23 Oktober 2025

23 Oktober 2025

23 Oktober 2025

23 Oktober 2025

23 Oktober 2025

23 Oktober 2025