Summit CCE213SS Bruksanvisning
Les nedenfor 📖 manual på norsk for Summit CCE213SS (2 sider) i kategorien Komfyr. Denne guiden var nyttig for 4 personer og ble vurdert med 4.5 stjerner i gjennomsnitt av 2 brukere
Side 1/2

Notes:
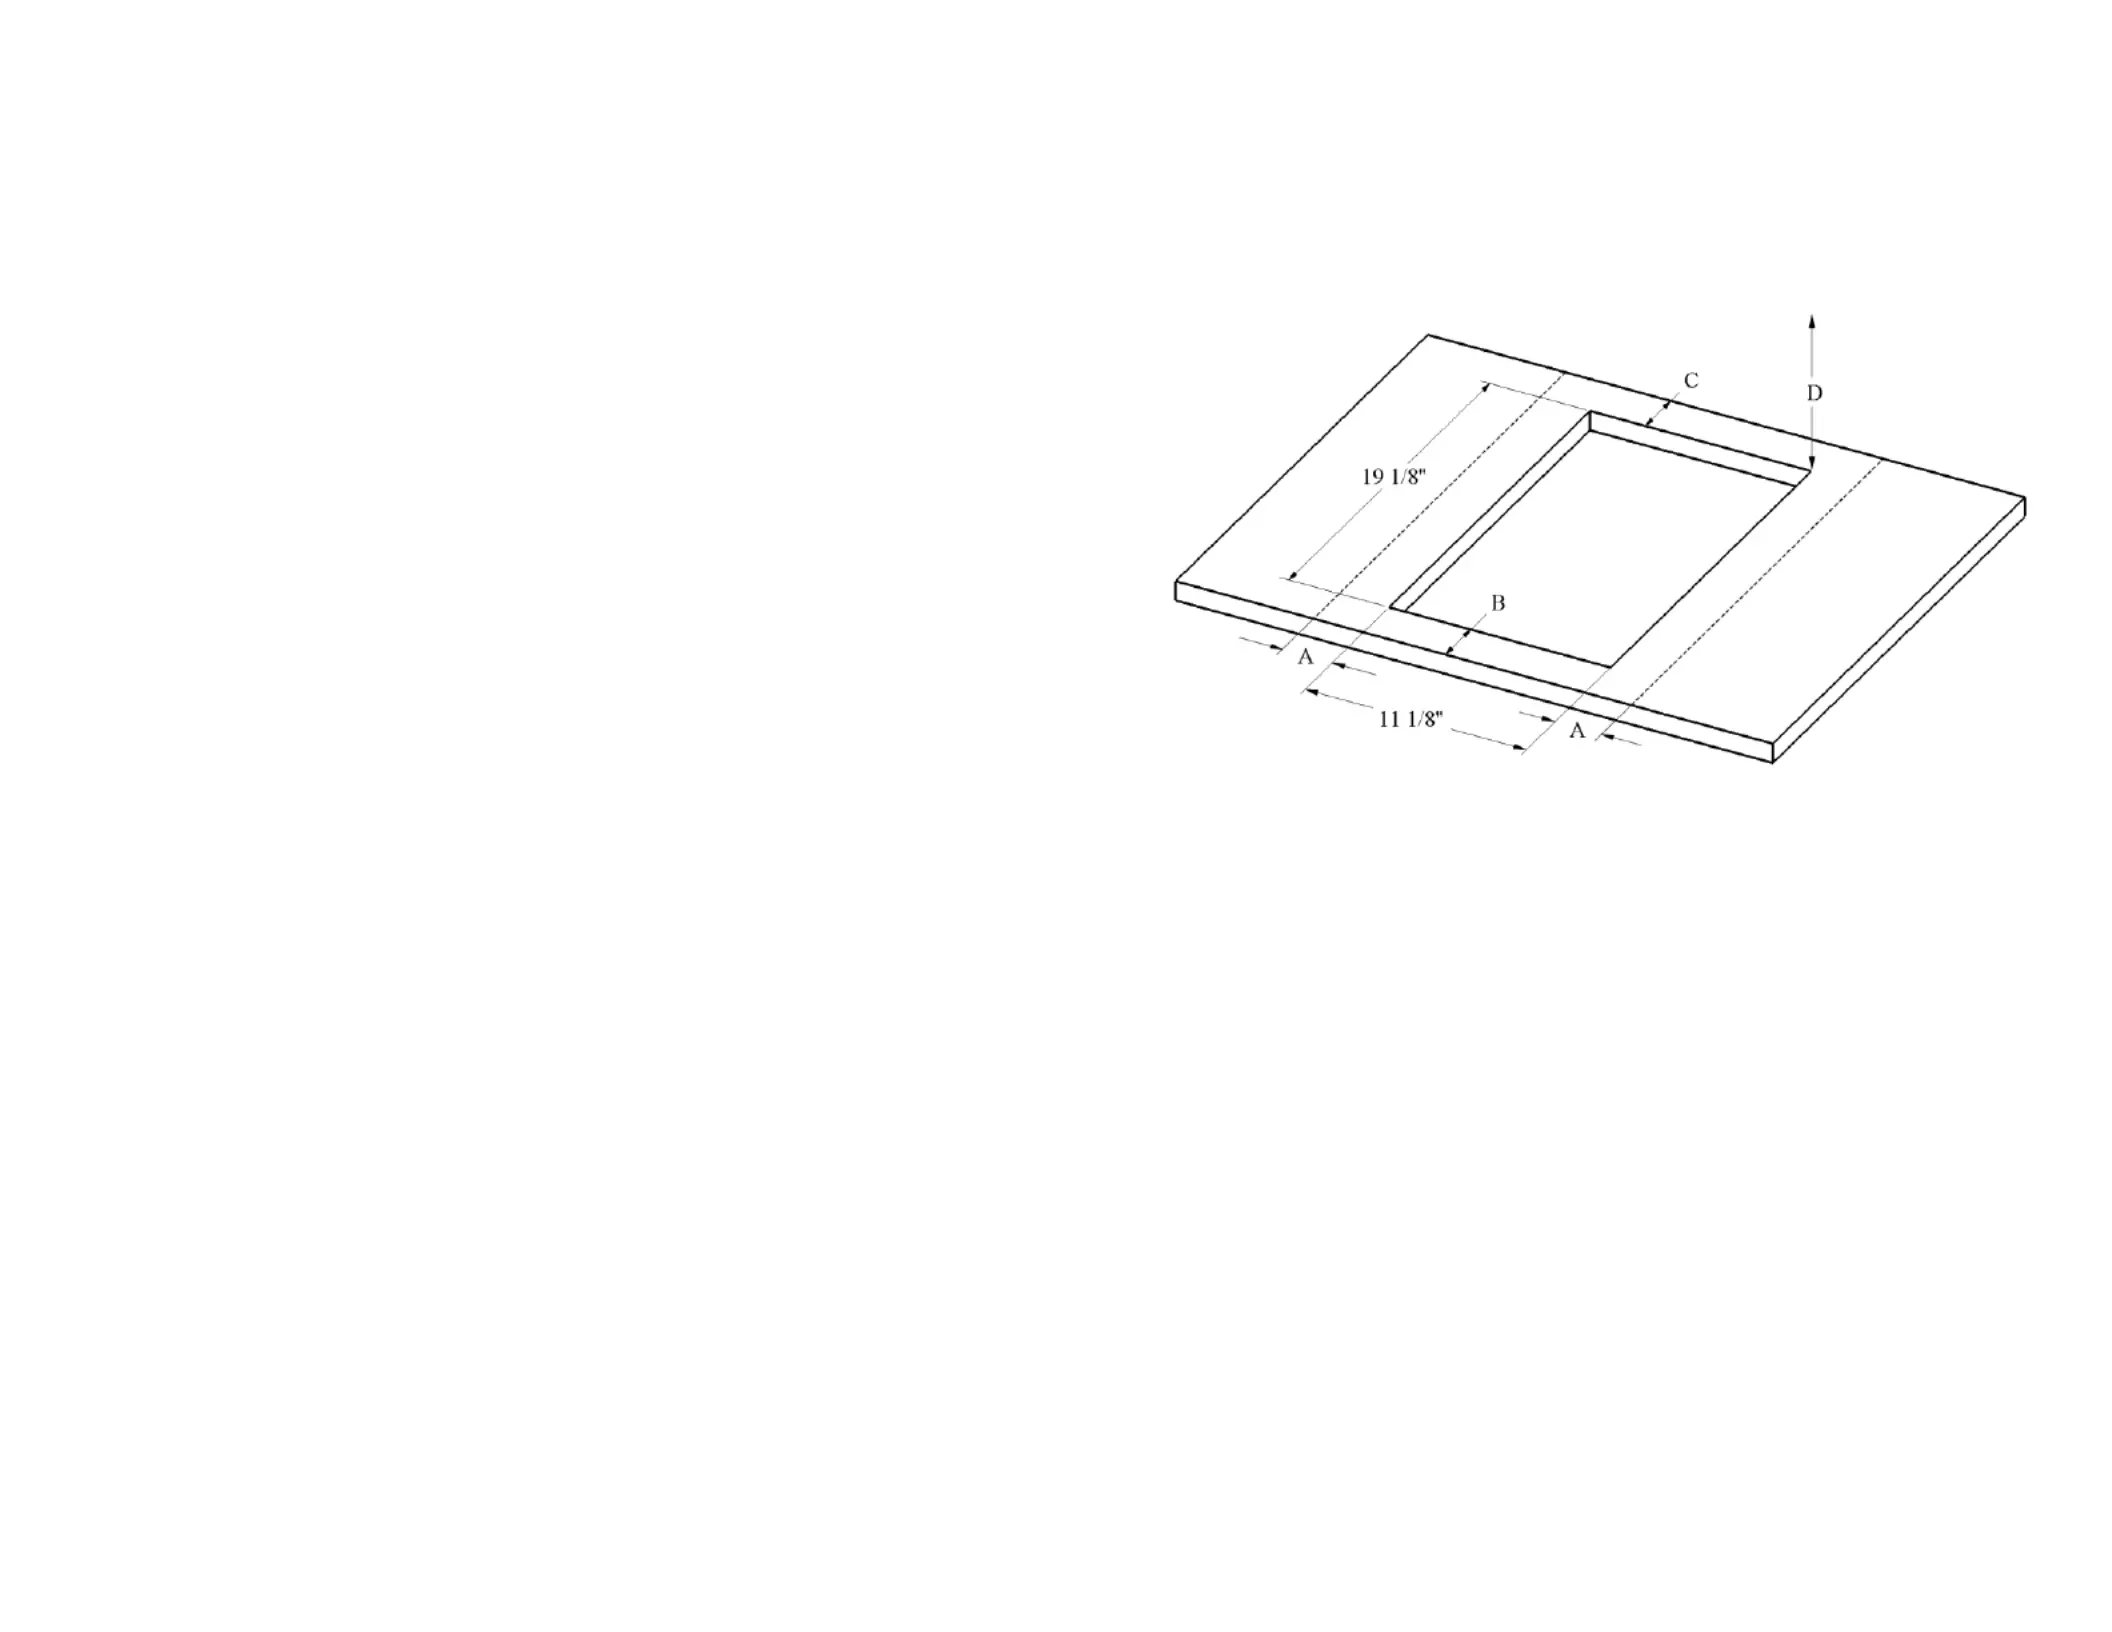
TWO ZONE SURFACE UNIT
INSTALLATION INSTRUCTION GUIDE
CABINET OPENING
Prepare the cabinet accurately so your unit will t properly. Below are cabinet cutout
dimensions. The dimensions are for the unit to be mounted so the knobs are toward
the front.
CAUTION:
To eliminate the hazard of reaching over the heated surface units, cabinet storage
space located above the surface units should be avoided. If cabinet storage is to be
provided, the hazard can be reduced by installing a range hood that projects
horizontally a minimum of 5 inches beyond the bottom of the cabinets.
INSTALLATION:
It is the responsibility of your installer to make certain that your range is properly
installed. Situations caused by improper installation are not covered under the
warranty. Any expenses incurred due to such situations will not be paid by the
manufacturer of the appliance.
This unit is intended to be built-in to a cabinet structure only and
is not intended for attachment to the building structure.
CHECK LOCAL CODES
BEFORE MAKING
CONNECTIONS.
“A” : 2
5
/
8
” To Adjacent Vertical Combustible Surface
3
1
/
4
” To Opening for Adjacent Unit
“B” : 2
7
/
16
” Minimum to Front Edge of Counter Top
“C” : 2” Minimum to Rear Edge or Rear Wall
(2
7
/
16
” If Installed In Standard 24” Deep Counter Top)
“D” : 30” Minimum Clearance To Bottom of Unprotected Wood Cabinet
(24” Minimum When Cabinet Bottom is Protected by Not Less Than
1
/
4
” Millboard Covered By Not Less Than No. 28 MSG Sheet Steel,
0.015” Stainless Steel, 0.024” Aluminum, or 0.020” Copper.

MOUNTING THE BUILT-IN TOP UNIT:
Locate the installation kit containing mounting hardware packaged with the unit.
Place the unit in the cabinet opening so the knobs are toward the front of the unit.
Attach the mounting brackets to the underside of the unit with the screws provided.
Tighten the main bolt up to the underside of the counter top.
POWER CONNECTIONS TO APPLIANCES
We suggest that you have the dealer where you purchased your new cooktop install it
or have him arrange installation by a qualied electrician. Installation must conform
with local codes. In addition, installation must conform with the National Electric
Code NFPA70 latest edition.
WARNING Be sure electric power is OFF at the fuse (breaker) box until the unit is –
installed and ready to operate. See appliance rating label on the underside
of the unit for maximum K.W. and amperage rating.
WARNING
ELECTRICAL GROUNDING INSTRUCTIONS
Appliances with a 120 volt power cord are
equipped with a three prong grounding plug for
your protection against shock hazard and
should be plugged directly into a properly
grounded receptacle. Do not cut or remove the
grounding prong from this plug.
Do not use an extension cord to connect this appliance. If the power supply cord is
too short, have a qualied electrician or serviceman install an outlet near the
appliance.
FOUR-WIRE CONDUIT CONNECTION
1. Remove the access plate to gain access
to the electrical junction box.
2. Install the three-wire range conduit and
an appropriate strain relief clamp
through the hole in the junction box.
3. Use an appropriate insulated wire
connector to connect the red and black
wires from the range conduit to the
corresponding red and black leads from
the branch circuit.
4. Connect the green (ground) wire from
the range conduit to the grounding lead
from the branch circuit in like manner.
5. The white (neutral) lead from the branch
circuit must be properly insulated away
from other all other leads.
5. Secure the strain relief clamp around the
conduit and tighten the nut against the
wall of the junction box.
6. Tuck all wire leads into the junction box
and replace the access plate removed
earlier in step 1.
Eective January 1, 1996 the National
Electrical Code requires that new
construction (not existing) utilize a 4-
conductor connection to an electric range.
NOTE: A 4-conductor connection is to be
used when the appliance is installed in a
mobile home or when local codes do not
permit grounding through the neutral.
240 VAC
JUNCTION BOX
(ACCESS PLATE
REMOVED)
BRANCH
CIRCUIT
BLACK
LEAD
INSULATED
WHITE LEAD
GREEN
(GROU ND
TO UNIT)
RANGE
CONDUIT
INSULATED WIRE
CONNECTORS
STRAIN
RELIEF
CLAMP
& NUT
RED
LEAD
BRANCH
GROUND
LEAD
THREE-WIRE CONDUIT CONNECTION
1. Remove the access plate to gain access
to the electrical junction box.
2. Install the three-wire range conduit and
an appropriate strain relief clamp
through the hole in the junction box.
3. Use an appropriate insulated wire
connector to connect the red and black
wires from the range conduit to the
corresponding red and black leads from
the branch circuit.
4. Connect the green (ground) wire from
the range conduit to the white (neutral)
lead from the branch circuit in like
manner.
5. Secure the strain relief clamp around the
conduit and tighten the nut against the
wall of the junction box.
6. Tuck all wire leads into the junction box
and replace the access plate removed
earlier in step 1.
If local codes do not allow grounding
through the neutral, refer to the
illustration below of FOUR-WIRE
CONDUIT CONNECTION.
JUNCTION BOX
(ACCESS PLATE
REMOVED)
BRANCH
CIRCUIT
STRAIN
RELIEF
CLAMP
& NUT
BLACK
LEAD
RED
LEAD
WHITE
LEAD
RANGE
CONDUIT
INSULATED WIRE
CONNECTORS
GREEN
(GROUND
TO UNIT)
240 VAC
Rating Label
Location
Produkspesifikasjoner
Merke: | Summit |
Kategori: | Komfyr |
Modell: | CCE213SS |
Trenger du hjelp?
Hvis du trenger hjelp med Summit CCE213SS still et spørsmål nedenfor, og andre brukere vil svare deg
Komfyr Summit Manualer
1 September 2025
Komfyr Manualer
- Komfyr MSW
- Komfyr Teka
- Komfyr Thomson
- Komfyr Uniprodo
- Komfyr Miele
- Komfyr Whirlpool
- Komfyr Etna
- Komfyr KitchenAid
- Komfyr Pelgrim
- Komfyr Royal Catering
- Komfyr LG
- Komfyr Bosch
- Komfyr BEKO
- Komfyr Exquisit
- Komfyr Hisense
- Komfyr Café
- Komfyr Balay
- Komfyr Siemens
- Komfyr Arcelik
- Komfyr Danby
- Komfyr Bartscher
- Komfyr Smeg
- Komfyr Hoover
- Komfyr Hotpoint
- Komfyr Nabo
- Komfyr Amica
- Komfyr AEG
- Komfyr Rosieres
- Komfyr Inventum
- Komfyr Artusi
- Komfyr Navitel
- Komfyr Samsung
- Komfyr Neff
- Komfyr Kogan
- Komfyr Caple
- Komfyr Midea
- Komfyr Candy
- Komfyr Kuppersbusch
- Komfyr Gorenje
- Komfyr Gram
- Komfyr Monogram
- Komfyr Vox
- Komfyr Westinghouse
- Komfyr Sencor
- Komfyr Bertazzoni
- Komfyr Bauknecht
- Komfyr Frigidaire
- Komfyr Breville
- Komfyr Euromaid
- Komfyr GE
- Komfyr Caso
- Komfyr Edilkamin
- Komfyr Omega
- Komfyr Fisher Paykel
- Komfyr Fulgor Milano
- Komfyr Tripp Lite
- Komfyr Boretti
- Komfyr Bromic
- Komfyr Indesit
- Komfyr Asko
- Komfyr Blaupunkt
- Komfyr Lamona
- Komfyr Dacor
- Komfyr Respekta
- Komfyr Blaze
- Komfyr Nedis
- Komfyr Philco
- Komfyr Jenn-Air
- Komfyr ATAG
- Komfyr Palazzetti
- Komfyr Cata
- Komfyr Avanti
- Komfyr Jotul
- Komfyr Glem Gas
- Komfyr Wilfa
- Komfyr Hansa
- Komfyr Rommelsbacher
- Komfyr Kenmore
- Komfyr Fagor
- Komfyr Edesa
- Komfyr Cadel
- Komfyr Gaggenau
- Komfyr KKT Kolbe
- Komfyr Duracraft
- Komfyr Wolf
- Komfyr Ilve
- Komfyr Rommer
- Komfyr Corberó
- Komfyr Atosa
- Komfyr Perel
- Komfyr Rangemaster
- Komfyr Harvia
- Komfyr Hestan
- Komfyr Ecotronic
- Komfyr Thermador
- Komfyr Ardes
- Komfyr Honeywell
- Komfyr Econo-Heat
- Komfyr Crosley
- Komfyr Pitsos
- Komfyr Ravanson
- Komfyr Nutrichef
- Komfyr Sogo
- Komfyr Sonnenkonig
- Komfyr JennAir
- Komfyr Yamazen
- Komfyr Kaiser
- Komfyr Blomberg
- Komfyr ZLine
- Komfyr De Dietrich
- Komfyr Orima
- Komfyr Imperial
- Komfyr Hanseatic
- Komfyr Fuave
- Komfyr Rowi
- Komfyr Oranier
- Komfyr APW Wyott
- Komfyr Backyard Pro
- Komfyr Globe
- Komfyr Ariston Thermo
- Komfyr La Nordica
- Komfyr Jøtul
- Komfyr Blumfeldt
- Komfyr Essentiel B
- Komfyr InAlto
- Komfyr Sunfire
- Komfyr BlueStar
- Komfyr Jocca
- Komfyr Vulcan
- Komfyr Livn
- Komfyr Leisure
- Komfyr Cadco
- Komfyr Nemco
- Komfyr Vollrath
- Komfyr Haden
- Komfyr Elvita
- Komfyr Cooking Performance Group
- Komfyr Spring USA
- Komfyr Premier
Nyeste Komfyr Manualer
2 September 2025
2 September 2025
2 September 2025
2 September 2025
2 September 2025
2 September 2025
2 September 2025
2 September 2025
2 September 2025
2 September 2025