TFA 30.5011 Bruksanvisning
TFA
Værstasjon
30.5011
Les nedenfor 📖 manual på norsk for TFA 30.5011 (16 sider) i kategorien Værstasjon. Denne guiden var nyttig for 31 personer og ble vurdert med 4.7 stjerner i gjennomsnitt av 16 brukere
Side 1/16
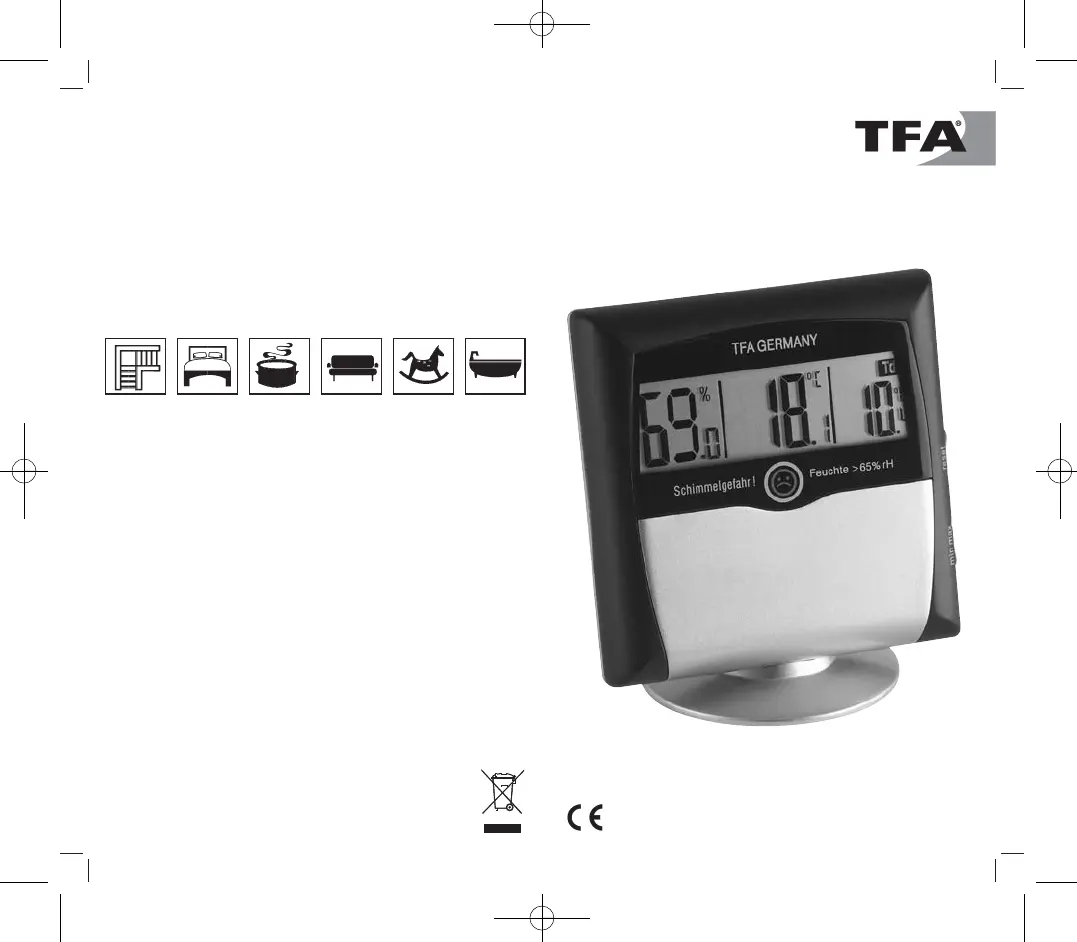
COMFORT CONTROL
Die richtige Temperatur und Luftfeuchtigkeit
The correct temperature and air humidity
La température et l'humidité correcte
La giusta temperatura ed umidità
De juiste temperaturen en luchtvochtigheid
La temperatura y humedad del aire adecuada
15 °C
40 - 60 %
16 - 18 °C
50 - 70 %
18 °C
50 - 70 %
20 °C
40 - 60 %
20 °C
40 - 60 %
23 °C
50 - 70 %
Kat. Nr. 30.5011
Bedienungsanleitung
Operating Instructions
Instrucciones para el manejo
Gebruiksaanwijzing
Mode d’emploi
Istruzioni
TFA No. 30.5011 Anleitung 11/09 17.11.2009 15:10 Uhr Seite 1
Produkspesifikasjoner
| Merke: | TFA |
| Kategori: | Værstasjon |
| Modell: | 30.5011 |
Trenger du hjelp?
Hvis du trenger hjelp med TFA 30.5011 still et spørsmål nedenfor, og andre brukere vil svare deg
Værstasjon TFA Manualer
8 September 2025
31 August 2025
31 August 2025
3 August 2025

6 Februar 2025

8 Januar 2025

8 Januar 2025

31 Desember 2025

31 Desember 2025

31 Desember 2025
Værstasjon Manualer
- Bresser
- Viking
- Baldr
- Renkforce
- Elgato
- Nedis
- Medisana
- GoGEN
- Setti+
- Steinberg
- Biltema
- Essentiel B
- Livoo
- Davis
- EMOS
Nyeste Værstasjon Manualer
20 Oktober 2025
20 Oktober 2025
16 Oktober 2025
15 Oktober 2025
15 Oktober 2025
15 Oktober 2025
14 Oktober 2025
18 September 2025

15 September 2025
15 September 2025