Tristar BQ-6398FT Bruksanvisning
Tristar
Ikke kategorisert
BQ-6398FT
Les nedenfor 📖 manual på norsk for Tristar BQ-6398FT (7 sider) i kategorien Ikke kategorisert. Denne guiden var nyttig for 4 personer og ble vurdert med 4.3 stjerner i gjennomsnitt av 2.5 brukere
Side 1/7

EN Instruction manual
when the gas cylinder is still connected to the barbecue.
• ONLY store the barbecue indoors after closing and removing the gas cylinder. The gas
cylinder must be stored outside, out of reach of children, NEVER store the cylinder in a
building, garage or in other conned space.
GAS CONNECTION
• Check whether your barbecue is installed correctly.
• For a correct functioning of this barbecue, it is important to place the barbecue on an
even surface.
• This barbecue is set up to be used with butane or propane gas bottles from 5kg till
15kg, with an appropriate gas pressure regulator.
300mm
560m
m
• For replacement of the gas pressure regulator and hose please see the rating label for the
correct specications:
• The hose should not be longer than 1.5 meters. Only use approved connections. The gas
pressure regulator must comply with the EN 16129 standard. The gas hose needs to be
adjusted if national circumstances require.
• The hose should comply with the EN 16436 standard.
• The gas hose needs to be adjusted if this is required by national circumstances.
• The gas hose needs to be tted in such a way that it cannot be twisted.
• For appliance category I3B/P (30), the barbecue is set to operate with a 30 mbar gas
pressure regulator with a butane/propane gas mixture and for appliance category I3+
(28-30/37), the barbecue is set to operate with a 28-30 mbar gas pressure regulator with
butane gas or a 37 mbar gas pressure regulator with propane gas. Please consult a gas
dealer for information regarding a suitable gas pressure regulator for the gas cylinder.
• Connect the pressure regulator to your gas cylinder.
VERY IMPORTANT:
• The temperature of the regulator may not exceed 60°C (140
0
F).
• The regulator must be equipped with a safety valve or pressure limiter.
• The opening of the regulator must t on the connection of the gas tap of the cylinder.
• Check whether the gas tap of the tank is completely closed (turn clockwise until the
knob stops).
• Check whether the gas tap of the gas cylinder is provided with suitable outer threads.
• Make sure that all burner knobs are set to position “o”.
• Remove the protective cover from the gas tap of the gas cylinder. Always use the
protective cover supplied with the gas tap.
• Inspect the connection between the gas tap and the pressure regulator. Look for
damage and dirt. Remove any debris. Check the hose for any damage. Never try using
damaged or blocked equipment. Contact your local L.P. gas supplier for repairs.
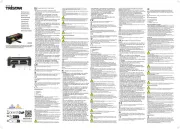
• When connecting the pressure regulator to the gas tap, manually turn the nut clockwise
until it doesn’t go any further. Do not use a wrench to tighten the nut. Using a wrench can
damage the joints, which can be dangerous (as illustrated in the picture below).
OPEN
CLOSE
Rotary knob with overll protection.
• Turn the gas tap of the cylinder fully open (counter-clockwise). Use a solution of water and
soap to check for any leakage before trying to ignite the grill. If you encounter a leak, you must
shut o the gas tap and only use the grill after the leak is repaired by a local L.P. gas supplier.
!!!WARNING!!!
1. Never try to insert objects into the opening of the gas tap. This can damage the gas
tap causing it to start leaking. Leaking gas can cause re, explosions, serious personal
injuries and even death.
2. Do not use this barbecue before performing a leak test.
3. If you have found a gas leak, turn o the gas cylinder immediately. Dismount the gas
pressure regulator from the gas cylinder. Place the gas cylinder in a cool, well ventilated
area. Contact your dealer or gas supplier for further assistance.
4. If you can’t stop the gas leak contact the re department or supplier of the gas cylinder.
!!!DANGER!!!
1. NEVER store an extra gas cylinder underneath or close to the barbecue or in conned spaces.
2. NEVER ll the gas cylinder over 80%. Overlling a gas cylinder is dangerous, because excess
gas can leak out of the safety valve. Gas can escape from the safety valve causing a re.
3. The connection openings of the gas cylinder must be provided with protective covers.
4. In case you discover a gas leak in the extra gas cylinder, immediately keep your
distance and call the re department.
VERY IMPORTANT: DISCONNECT THE GAS CYLINDER WHEN THE barbecue IS NOT IN USE.
DISCONNECTING THE GAS CYLINDER:
• Turn o all knobs.
• Completely close the gas tap of the gas cylinder (turn clockwise until the knob stops).
• Remove the pressure regulator from the gas tap by turning the quick-connect nut
counterclockwise.
• Replace the protective cover on the gas tap of the gas cylinder.
LEAK TEST
GENERAL
All gas connections of the barbecue are tested for leaks in the factory prior to shipment.
Nevertheless, when mounting the device it must be checked entirely for gas leaks,
because of possible damages during transportation or due to exposure to extreme
pressure. Regularly check the device for leakage, or check whether you can smell any gas.
BEFORE CHECKING:
• Make sure to remove all packing materials from the barbecue, including the straps
keeping the burner in its place.
• Do not smoke while checking for leakage.
• Never check for leakage with open re.
• Prepare a solution of water and soap of one part detergent and one part water. Use a
spray can, brush or cloth to apply the solution to the connections. Make sure the gas
cylinder is full before the rst leak test.
• Checking for leaks must be performed outdoors on a well-ventilated spot, away from ignition
sources such as gas or electrical devices and combustible materials.
• Keep the barbecue away from open re and/or sparks during the test.
CHECKING:
• Make sure all control knobs are set to position “OFF”.
• Make sure the pressure regulator is properly connected to the gas cylinder.
• Completely open the gas tap of the gas cylinder by turning the knob counter-
clockwise. In case you hear a hissing sound, IMMEDIATELY turn o the gas; this
indicates a serious leak in the connection. Contact your gas supplier or re department.
• Check each connection of the gas cylinder all the way through to the taps part (the hose
leading to the burner) by spraying or brushing the soap solution on the connections.
• There is a leak when soap bubbles appear. IMMEDIATELY close the gas tap of the gas cylinder
and carefully check all connections. Open the gas tap again and perform a new check.
• Always close the gas tap of the gas cylinder after the leak test by turning the knob clockwise.
• Only use the parts recommended by the manufacturer for this barbeque. The
warranty will become void when using other parts. Do not use the barbeque until all
connections are inspected and you are certain these show no signs of leakage.
SAFETY TIPS:
• Always check for leakage every time you replace the gas cylinder.
• Always check all connections for leakage before each use.
• Use long barbecue tools to prevent burns.
• In case grease or hot objects drop from the barbecue on the gas tap, pressure regulator,
hose or any other part that contains gas, immediately shut o the gas supply.
• Do not remove the drip tray before the barbecue has not suciently cooled down.
• Close all control knobs and the gas tap of the gas cylinder when not using the barbecue
• Push the barbecue forward when moving, never pull it.
• A disconnected gas cylinder being stored or moved must be equipped with a
protective cover. Do not store a gas cylinder in conned spaces such as a carport,
covered patio, veranda, garage or other structures.
SAFETY INSTRUCTIONS
DANGER:
When smelling gas:
• Shut o the gas supply to the barbecue.
• Extinguish any ames.
• If the gas smell doesn’t disappear, keep your distance from the barbecue
and contact your gas supplier or re department straight away.
• Gas leakage can cause re or explosions, which can lead to serious or
fatal injuries or damage of properties.
• An incorrect installation can be dangerous, that’s why all instructions in
this manual must be strictly followed.
• Not paying attention to the dangers, warnings and precautions in this
user manual can lead to serious or fatal injuries, or to re or explosions
causing damage to property.
• Changing the appliance can be extremely dangerous.
WARNINGS:
• Never store or use gasoline or other ammable liquids near this or other
barbecues.
• Check the barbecue rst for leakages according to the instructions in
this manual before starting to use it. Perform these checks also when
the barbecue was mounted at the dealer.
• Do not try to ignite this barbecue without rst having read chapter
“barbecue ignition instructions” in this manual.
• Keep this user manual for future reference.
• Follow the instructions for connecting the gas pressure regulator to
your barbecue.
• Never store a backup gas cylinder or disconnected cylinder underneath
or near this barbecue.
• Never put barbecue covers or other inammable materials on top or in
the storage space of the barbecue.
• After a long period in which the Tristar barbecue has not been used, it
must be checked for gas leaks and obstructions of the burners. Refer to
the instructions in this manual for the correct procedure.
• Never check for gas leaks using a lighter.
• Never use your Tristar barbecue in case of gas leaks at the gas
connections points.
• Keep inammable materials at a minimum distance of 100 cm from the
sides or rear of the barbecue. Don’t store these inammable materials in
the storage space of the barbecue!
• Your Tristar barbecue may not be used by children. The accessible
components of the barbecue can become very hot. Keep young
children away from the barbecue when using your Tristar barbecue.
• Be careful when using your Tristar barbecue. During use or cleaning the
barbecue can still be hot, so always stay near the barbecue and never
move it while in use.
• If one of the burners turns o while preparing a dish, close all gas
valves. Wait ve minutes before you re-ignite the burners, following all
ignition instructions when doing so.
• When preparing food, never lean over the barbecue or put your hands
or ngers on the front edge of the gas cylinder.
• When cleaning the valves or burners, never enlarge the openings or
connections.
• Keep your distance from ignition sources when replacing the gas cylinder.
• A dented or rusty gas cylinder can be dangerous. Have it checked by
your gas supplier. Never use a gas cylinder with a damaged valve.
• The gas cylinder can seemingly be empty, but still contain some gas.
Keep this in mind when moving or storing the cylinder.
• Never disconnect the pressure regulator or any gas connection while
using the barbecue.
• Always wear heat-resistant oven gloves when using the barbecue.
• The fat tray on the front could get hot. Please only take this tray o
when it has cooled down.
NOT SUITABLE FOR COMMERCIAL USE!
SAFETY INFORMATION:
WARNING: Your barbecue is designed for use with gas none other than that
indicated on the type plate. Never use your barbecue with other gasses. Not heeding this
warning can lead to re hazards and personal injuries. Moreover, it will void the warranty.
WARNING: Never store backup gas cylinders underneath or nearby the barbecue. Do not ll
the gas cylinder over 80 percent; and in case this information is not strictly observed, a re
can be the result which can lead to fatal or serious injuries.
WARNING: Keep power cables and the fuel hose away from hot surfaces.
WARNING: Never place the Tristar barbecue under a heat-resistant shelter or sunscreen.
WARNING: This barbecue is not intended for installation or placement in a camper/caravan,
nor is it intended for installation in or on a boat.
WARNING: For your own safety, never store or use gasoline or other combustible fumes
or liquids near this or other barbecues. Non-observance of this warning can lead to re,
explosions and personal injuries.
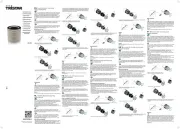
PARTS DESCRIPTION
1. Handle
2. Lid
3. Grillplate
4. Back piece
5. Base unit
6. Sidetable
7. Screw
8. Sidetable support
9. Rear Right leg
10. Front right leg
11. Wheel cover
12. Wheel
13. Bottom piece
14. Axle
15. Side bracket
16. Drip tray
17. Left front leg
18. Left rear leg
19. Front piece
20. Bottom support
ASSEMBLY:
1. Attach the four legs to the bottom piece
2. Attach the front and back piece
3. Now attach the side brackets
4. Assemble the wheels and bottom support
5. Assemble the side table
6. Attach the lid to the handle
7. Place the base unit on the table that you have now assembled
8. Attach the assembled side tables
9. Place the lid on the base unit
10. The device is now completely assembled
CARE AND MAINTENANCE
MAINTENANCE:
• Keep an open space around the barbecue and keep inammable materials, gasoline
and other combustible gasses at a safe distance.
• Make sure that the holes on the bottom side of the device stay open to keep the air
supply and ventilation from being blocked.
In normal conditions of use, in order to ensure correct operation of the installation it is
recommended that this device is changed within 10 years of the date of manufacture.
CLEANING
This barbecue needs to be cleaned regularly. Make sure the barbecue is dry and clean and
grease the metal parts with oil or Vaseline to avoid rust.
Always store the barbecue after use. Don’t use abrasive cleaning agents and/or anti-
corrosion products to clean the control panel with the pictures. Such aggressive cleaning
materials can remove the pictures.
CLEANING THE GRILL SURFACE:
The grill surface can be simply cleaned with a mild detergent, after that clean with hot
water. Food rests can be removed with a ber brush.
CLEANING THE BURNERS:
• Make sure that the gas tap and knobs are set to the position “OFF”. Check whether the
barbecue is cooled down.
• Clean the exterior of the burner with a brush. Remove persisting debris with a metal
scraper. Never use a wooden toothpick as it can break and obstruct the opening.
• Note that you must call our customer service line when the gas supply to the burner is
being blocked by insects or other objects.
VERY IMPORTANT:
The opening of the gas tap must be placed in the center of the burner after you have
removed and cleaned it. If not, this can lead to serious injuries or damage to properties.
Lightly move the burner back and forth after replacing it to make sure it’s in its place. How
often the burner requires cleaning depends on how often you use the barbecue.
CLEANING THE DRIP TRAY:
The drip tray must be emptied and cleaned regularly, it should be washed with water and
a mild detergent. You could put a small amount of sand or cat litter in the bottom of the
drip tray to absorb grease.
• Store the barbecue outdoors on a dry and well-ventilated spot, out of reach of children,
0359/19
:
Gas baking plate - Gasbakplaat - Plancha gaz -
Gasbratplatte - Placa de cocción a gas - Placa a Gás -
Gazowa płyta do smażenia - Piastra di cottura a gas
- Gasolstekbord - Plynová pecici deska - Plynová
doska na pecenie
:
BQ-6398FT
-
:
0359CQ00707
-
I
3B/P G31/30
(30 mbar)
I
3+ G31/30
(28-37/30 mbar)
:
Butane -
Butaan -
Butane -
Butan -
Butano -
Butano -
Butan -
Butano -
Butan -
-
But-
Butane
Butaan
Butane
Butan
Butano
Butano
Butan
Butano
Butan
But
:
30 mbar 28-30 mbar 37 mbar
:
7.2 kW ( 520 gr/h) 7.2 kW (520 gr/h)
:
0.78 mm 0.78 mm
- :
K
• Never leave a gas cylinder behind in a vehicle or boat that can get overheated by the sun.
• Do not store the gas cylinder in or near a place where children play.
FINAL CHECKLIST BEFORE MOUNTING
• There is an open space of at least 100 cm between combustible substances and the
sides and rear of this grill.
• There are no unprotected combustible substances above the grill.
• All internal packing materials are removed.
• The burners t well on the openings.
• The knobs can rotate freely.
• The device has been checked and is free of leakage.
• The user knows the location of the gas tap.
BARBECUE IGNITION INSTRUCTIONS
WARNING: IMPORTANT! BEFORE IGNITING
Check the gas supply hose before turning the gas “ON”. In case of visible damage or rips, the hose
must be replaced before use. The new gas supply hose must be according national regulations.
VERY IMPORTANT: ALWAYS INSPECT THE HOSE BEFORE EACH USE OF THIS BARBECUE.
IGNITING THE MAIN BURNERS OF THE Barbecue:
1. Read all instructions before igniting the burners.
2. Turn all knobs to “OFF” and open the gas tap of the gas cylinder. Keep your
face and body as far as possible from the barbecue when igniting it.
3. Press and turn the control knobs slowly to the
position. The built-in igniter clicks
and simultaneously ignites the pilot ame and burner. If the burner does not ignite
within 5 seconds, IMMEDIATELY turn the control knob to “OFF”, wait for 5 minutes until all
gas has disappeared and repeat the ignition procedure.
CHECK ALL GAS CONNECTIONS BEFORE EACH USE. DO NOT IGNITE THE BARBECUE
WHEN SMELLING ANY GAS.
CHARACTERISTICS OF THE FLAME:
• Check whether the characteristics of the ame are in order. Each burner is preset prior
to shipment, but due to the many variations in local gas supplies, small adjustments
might be required.
• The ames of the burners must be blue and stable, without yellow tips, noise or sudden
increases.
• A yellow ame indicates insucient presence of air. A noisy ame with sudden
increases from the burner means there is too much air present.
• NOTE: small yellow tips are ok.
INSTRUCTIONS FOR USE
!!!BE CAREFUL!!!
1. Regularly clean the barbecue. If the barbecue is not cleaned regularly, the grease can
start burning which can cause damages to the barbecue.
2. NEVER leave the barbecue unattended when in use.
3. Do not use water to extinguish ames when the grease is burning, this can cause injuries.
Turn o all knobs and the gas cylinder in case of burning grease.
4. IMMEDIATELY turn o all knobs and the gas cylinder when grease starts to burn.
!!!WARNING!!!
For safe use of the barbecue:
1. Leave enough free space around the barbecue and keep inammable materials out
of the way.
2. NEVER let children use the barbecue or play near the barbecue.
3. This barbecue is intended for outdoor use ONLY. NEVER use the barbecue in
conned spaces such as a carport, veranda, covered patio, garage, or underneath
inammable materials.
4. Do not obstruct the vents on the bottom side of the barbecue, this could aect the
burning power of the burner due to insucient air supply.
5. Place the barbecue at least 100 cm away from walls or other surfaces. Place the
barbecue at least 100 cm away from objects that could ignite the gas such as
electrical equipment, pilot ames of gas water heaters, etc.
6. Do not use this barbecue on or underneath wooden balconies.
7. This barbecue is designed for use with butane/propane gas, do NOT use lava stone,
briquettes or charcoal with this barbecue.
8. Regularly check the ames of the burners.
9. Shut down the gas supply when the barbecue is not in use.
10. Always shut o the gas cylinder completely and disconnect it from the barbecue
before moving the barbecue.
USING THE BARBECUE
Grilling requires a high temperature for the meat to nicely burn and brown. Most dishes are
constantly grilled on position . However, when grilling large pieces of meat or chicken,
it might be necessary to lower the temperature after the rst browning. This ensures the food
to get well done, without burning the outside. For food requiring long grill times or containing
sugar marinade you might have to lower the temperature nearing the end of the grilling time.
• Make sure the barbecue is checked for leaks and is properly placed.
• Remove all packing materials.
• Ignite the burners according to the instructions in this user manual.
• Turn the control knob to
and preheat the barbecue for 15 minutes.
• Put the food on the grill and grill it until it’s properly prepared.
TEMPERATURE SETTING
The control knobs can be set to any position between
and
.
NOTE: The hot grill will brown the outside of the meat, keeping the juices inside. The longer
the barbecue is preheated, the quicker the meat will brown.
WARRANTY
GAS BARBEQUE
We guarantee the original customer/buyer of any Tristar Gas barbecue that, when used for
normal domestic purposes, this barbecue is free of material and production defects for the
period stipulated below. Grills being rented or used for commercial purposes are excluded
from this warranty. Costs for sending and delivering warranty parts will not be charged.
PART PERIOD
Burners: 2 Years
Grill racks: 2 Years
Taps: 2 Years
Frame, Housing, Cover, Control panel, Igniter and similar parts: 2 Years
All stainless steel parts: 2 Years
Our obligation under this warranty is limited to repair or replacement, according to our
judgment, ofthe product during the warranty period. The scope of our liability under this
warranty is limited to repair and replacement. This warranty does not cover normal wear
and tear of parts, or damage as a result of the following: neglect or misuse of the product,
use with unsuitable fuel/gas supply, use in contradiction with the instructions for use, or
adjustments made by anyone other than the service centre of our factory. The warranty
period will not be extended by the above mentioned repairs or replacements.
FREQUENTLY ASKED QUESTIONS & THE ANSWERS
Where can I purchase a gas cylinder, approved and suitable for this Tristar barbecue?
At your local gas supplier or any large camping shops.
Can the barbecue stay outside in any weather condition?
We recommend storing your barbecue after use in a dry and well-ventilated place. Always
disconnect the gas cylinder according to the instructions in this manual. You can also purchase
a protective cover. These are available at your point of sales.
After opening the packaging, barbecue parts are damaged or missing, what to do now?
Contact Tristar (www.tristar.service.eu) they will help you further.
Can I wash the grill and/or baking trays in the dishwasher?
This is possibly, however, cleaning with a barbecue cleaning agent or soapy water is also sucient.
Grease is leaking from underneath the barbecueand/or on the foundation, what to do now?
Clean the barbecue and foundation. Move your barbecue to a at or straight surface. Also
make sure to regularly empty the grease drip tray.
NL Gebruiksaanwijzing
VEILIGHEIDSVOORSCHRIFTEN
GEVAAR:
• Wanneer u gas ruikt:
1. Sluit het gas naar de barbecue af.
2. Doof eventuele vlammen.
3. Wanneer de gaslucht niet verdwijnt, bewaar dan afstand tot de barbecue
en neem direct contact op met de gasleverancier of de brandweer.
• Lekkend gas kan brand of een explosie veroorzaken, met ernstig of fataal
lichamelijk letsel of beschadigingen van eigendommen tot gevolg.
• Een incorrecte installatie kan gevaarlijk zijn, daarom moeten alle
instructies in deze gebruiksaanwijzing strikt opgevolgd worden.
• Het niet opvolgen van de waarschuwingen en voorzorgsmaatregelen in
deze gebruikershandleiding, kan leiden tot ernstig of fataal lichamelijk
letsel, of tot brand of explosie met schade aan eigendommen als gevolg.
• Het wijzigen van het toestel kan gevaarlijk zijn!
WAARSCHUWINGEN:
• Bewaar of gebruik geen benzine of andere ontvlambare dampen of
vloeistoen in de buurt van deze of andere barbecues.
• Controleer de barbecue eerst zorgvuldig op lekkage aan de hand van de
instructie in deze handleiding voordat u de barbecue gebruikt. Voer deze
controles ook uit wanneer de barbecue bij de dealer gemonteerd is.
• Deze barbecue niet proberen aan te steken zonder het hoofdstuk
“Aanwijzingen aansteken Barbecue” in deze handleiding te hebben gelezen.
• Bewaar deze handleiding voor gebruik in de toekomst.
• Volg de instructies voor het aansluiten van de gasdrukregelaar voor uw
Barbecue op.
• Bewaar geen reserve gascilinder of ontkoppelde cilinder in de
opbergruimte onder de barbecue of in de buurt van deze barbecue.
• Leg geen barbecuehoezen of andere brandbare materialen op of in de
opslagruimte van deze barbecue.
• Wanneer deze barbecue gedurende een langere periode niet gebruikt is,
moet deze gecontroleerd worden op gas lekkage en op belemmeringen
van de brander, voordat de barbecue weer wordt gebruikt. Raadpleeg de
instructies in deze handleiding voor de juiste procedure.
• Zoek niet met een aansteker naar gaslekken.
• Gebruik uw barbecue niet wanneer er sprake is van een gaslek bij de
aansluitingen.
• Houd brandbaar materiaal minimaal 100 cm uit de buurt van de
bovenzijde, onderzijde, achterzijde of zijkanten van de barbecue.
Bewaar dit ook niet in de opbergruimte van de barbecue!
• Uw barbecue mag niet door kinderen worden gebruikt. De toegankelijke
onderdelen van de barbecue kunnen erg heet zijn. Houd jongere
kinderen uit de buurt van de barbecue wanneer u deze gebruikt.
• Wees voorzichtig als u uw barbecue gebruikt. Tijdens het gebruik of
tijdens het schoonmaken kan de barbecue heet zijn. Blijf daarom altijd
in de buurt van de barbecue en verplaats de barbecue niet tijdens het
gebruik of wanneer deze nog heet is.
• Wanneer de branders tijdens het bereiden van de gerechten uitgaan,
draai dan alle gas kleppen dicht en wacht vijf minuten voordat u de
branders weer aansteekt. Neem daarbij de ontstekingsinstructies in acht.
• Buig tijdens het bereiden van eten niet over de barbecue en leg uw
handen of vingers niet op de voorste rand van de lekbak.
• Maak tijdens het reinigen van de kleppen of branders de openingen of
aansluitingen niet groter
• Blijf uit de buurt van ontstekingsbronnen bij het verwisselen van de
gascilinder.
• Een gedeukte of roestige gascilinder kan gevaarlijk zijn. Laat deze
controleren door uw gasleverancier. Gebruik geen gascilinder met een
beschadigde klep.
• De gascilinder kan ogenschijnlijk leeg zijn, maar toch nog wat gas
bevatten. Hiermee dient rekening gehouden te worden bij het
transporteren en opslaan van de cilinder.
• Ontkoppel de gasdrukregelaar of een willekeurige gasaansluiting nooit
wanneer u de barbecue gebruikt.
• Draag tijdens het bedienen van de barbecue hittebestendige wanten of
ovenhandschoenen.
• De lekbak aan de voorzijde kan heet worden. Neem deze lekbak pas af
als deze afgekoeld is.
NIET GESCHIKT VOOR COMMERCIEEL GEBRUIK!
VEILIGHEIDSINFORMATIE:
WAARSCHUWING: Uw barbecue is ontworpen voor gebruik met alleen het gas dat wordt
aangeduid op de rating plaat. Uw barbecue niet gebruiken met andere gassen! Het niet
opvolgen van deze waarschuwing kan leiden tot brandgevaar en lichamelijk letsel. Tevens
wordt de garantie ongeldig.
WAARSCHUWING: Bewaar geen reserve gascilinder onder of in de buurt van de barbecue en
vul de cilinder nooit verder dan 80%. Indien dit niet nauwkeurig wordt opgevolgd, kan er brand
optreden met overlijden of ernstig letsel tot gevolg.
WAARSCHUWING: Houd stroomkabels en de brandstofslang uit de buurt van warme
oppervlakken.
WAARSCHUWING: Plaats de barbecue nooit onder een niet-hittebestendig afdak of
zonnescherm
.
WAARSCHUWING: Deze barbecue is niet bedoeld voor installatie of plaatsing in of op een
boot, camper of caravan.
WAARSCHUWING:
Bewaar of gebruik, voor uw eigen veiligheid, geen benzine of andere ontvlambare dampen
of vloeistoen in de buurt van deze of andere barbecues. Het niet opvolgen van deze
waarschuwing kan leiden tot brand, explosie en lichamelijk letsel.
ONDERDELENBESCHRIJVING
1. Handvat
2. Deksel
3. Grillrooster
4. Achterzijde
5. Basiseenheid
6. Zijtafel
7. Schroef
8. Steun zijtafel
9. Poot rechtsachter
10. Poot rechtsvoor
11. Wielbeschermer
12. Wiel
13. Bodemplaat
14. As
15. Zijbeugel
16. Lekbak
17. Poot linksvoor
18. Poot linksachter
19. Voorzijde
20. Bodemondersteuning
MONTAGE
1. Monteer de vier poten aan de bodemplaat
2. Monteer de voor- en achterzijde
3. Maak er nu de zijbeugels aan vast
4. Monteer de wielen en de bodemondersteuning
5. Zet de zijtafel in elkaar
6. Maak de deksel aan het handvast vast
7. Plaats de basiseenheid op de tafel die u al in elkaar heeft gezet
8. Monteer de in elkaar gezette zijtafels
9. Plaats de deksel op de basiseenheid
10. Het apparaat is nu volledig in elkaar gezet
VERZORGING EN ONDERHOUD
ONDERHOUD:
• Houd de ruimte rond de barbecue vrij en houd brandbare materialen, benzine en
andere ontvlambare gassen en vloeistoen uit de buurt.
• Zorg ervoor dat de gaten aan de onderkant standaard open blijven, zodat de
luchttoevoer voor verbranding en ventilatie niet geblokkeerd wordt.
Bij normale gebruiksomstandigheden wordt aanbevolen dat dit apparaat binnen 10 jaar
na de fabricagedatum wordt vervangen om ervoor te zorgen dat de installatie correct
functioneert.
REINIGING
Deze barbecue dient regelmatig schoongemaakt te worden.
Zorg dat de barbecue droog en schoon is en vet de metalen delen regelmatig in met een olie of
vaseline om eventuele roestvorming te voorkomen. Berg de barbecue na gebruik altijd droog op.
Gebruik geen bijtende schoonmaakmiddelen en/of antiroest middelen om het
bedieningspaneel met de afbeeldingen te reinigen. Zulke sterke schoonmaakmiddelen
kunnen de afbeeldingen verwijderen.
REINIGEN VAN HET GRILLOPPERVLAK:
De bakplaat is eenvoudig te reinigen met behulp van een mild afwasmiddel, waarna deze
goed afgespoeld moet worden met heet water. Gebruik voor hardnekkige etensresten
een ber borstel.
REINIGEN VAN DE BRANDERS:
• Zorg ervoor dat de gaskraan en de knoppen op de "UIT"-stand staan. Controleer of de
barbecue koel is.
• Reinig de buitenkant van de brander met een borstel. Verwijder hardnekkig vuil met
een metalen schraper. Open verstopte openingen met een rechtgebogen paperclip.
Gebruik nooit een houten tandenstoker, deze kan afbreken en de opening verstoppen.
• Bel onze klantenservicelijn als de gastoevoer door de brander geblokkeerd wordt door
insecten of andere voorwerpen.
ZEER BELANGRIJK:
De opening van de gaskraan moet in het midden van de brander geplaatst worden
nadat u deze afgenomen en gereinigd heeft. Anders kan deze ernstige lichamelijke
verwondingen en schade aan eigendommen veroorzaken. Beweeg de brander licht heen
en weer nadat u hem teruggezet heeft om te kijken of hij goed op zijn plaats zit. Hoe vaak
de brander schoongemaakt moet worden, hangt af van hoe vaak u de barbecue gebruikt.
REINIGING VAN DE LEKBAK:
De lekbak moet regelmatig geleegd en schoongeveegd worden en afgewassen met water
en een mild afwasmiddel. U kunt een kleine hoeveelheid zand of kattengrit op de bodem
van de lekbak leggen om het vet op te nemen.
• Sla de grill buitenshuis op in een droge, goed geventileerde plaats buiten bereik van
kinderen, wanneer de gases nog aan de barbecue bevestigd is.
17
18
09
10
13
04
19
08
15
20
11
12
14
08
06
01
02
01
02
03
04
06
05
07
08
09
10
11
12
13
14
16
17
18
19
20
15
• Sla de barbecue ALLEEN binnenshuis op nadat de gases dichtgedraaid en verwijderd is. De
gases moet buitenshuis opgeslagen worden buiten bereik van kinderen. Sla de es NOOIT
op in een gebouw, garage of andere gesloten ruimte.
AANSLUITING GAS
• Controleer of uw barbecue goed is gemonteerd. In deze handleiding is een
gedetailleerde montage-instructie opgenomen waarin specieke montageprocedures
worden vermeld. Volg deze instructies nauwgezet op om een juiste en veilige montage
van de barbecue te waarborgen.
• Voor een goede werking van de barbecue is het noodzakelijk dat de barbecue op een
vlakke ondergrond staat.
• Dit toestel is ontwikkeld om gebruikt te worden in combinatie met butagas- of
propaangasessen van 5kg tot 15kg, voorzien van een geschikte drukregelaar.
300mm
560m
m
• Bij vervanging van de gasdrukregelaar of gasslang zie het ratinglabel voor gas en druk.
• De slang dient niet langer te zijn dan 1,5 meter. Slechts goedgekeurde aansluitingen
gebruiken. De gasdrukregelaar moet voldoen aan de EN 16129 norm. De gasslang
dient gewijzigd te worden indiende nationale omstandigheden dit vereisen.
• De slang moet voldoen aan de norm EN 16436.
• De gasslang dient op een dergelijke wijze geplaatst te worden, dat ze niet verwrongen
kan worden.
• Voor toestelcategorie I3B/P (30) is de barbecue ingesteld om te werken met een 30
mbar gasdrukregelaar met een butaan/propaan mengsel en voor toestelcategorie I3+
(28-30/37) is de barbecue ingesteld om te werken met een 28-30 mbar gasdrukregelaar
met butaan of een 37 mbar gasdrukregelaar met propaan. Raadpleeg een gasdealer
voor informatie over een geschikte gasdrukregelaar voor de gases.
• Sluit de drukregelaar aan op uw gases.
ZEER BELANGRIJK:
• De temperatuur van de regelaar mag niet boven de 60°C (140
0
F) stijgen.
• De regelaar moet voorzien zijn van een veiligheidsklep of drukbeveiliging.
• De opening van de drukregelaar moet passen op de aansluiting van de gaskraan van de es.
• Controleer dat de gaskraan van de tank helemaal dicht staat (draai met de klok mee
totdat de knop stopt).
• Controleer of de gaskraan van de gases geschikte uitwendige schroefdraden heeft.
• Zorg ervoor dat alle branderknoppen op de uit-stand staan.
• Verwijder de beschermkap van de gaskraan van de gases. Gebruik altijd de
bijgeleverde beschermkap met de gaskraan.
• Inspecteer de aansluiting van de gaskraan, drukregelaar en de slang. Controleer
op beschadigingen of vuil, verwijder eventueel vuil. Controleer de slang op
beschadigingen. Probeer nooit beschadigd of geblokkeerde uitrustingsstukken. Neem
contact op met uw plaatselijke gasleverancier voor vervanging of reparatie.
• Bij het aansluiten van de drukregelaar aan de gaskraan draait u de moer handmatig
met de klok mee totdat hij niet verder kan. Gebruik geen sleutel om de moer aan te
draaien. Met het gebruik van een sleutel kunt u de snelkoppeling beschadigen, wat
gevaarlijk kan zijn. (zoals aangegeven op de volgende afbeelding).
OPEN
CLOSE
Draaiknop met overvulbeveiliging
• Draai de gaskraan van de es helemaal open (tegen de klok in). Gebruik een water-
en-zeepoplossing om alle aansluitingen te controleren op lekken, voordat u de grill
probeert aan te steken. Als u een lek vindt moet u de gaskraan dichtdraaien en de grill
niet gebruiken, totdat het lek gerepareerd is door uw dealer of gasleverancier.
!!!WAARSCHUWING!!!
1. Probeer nooit voorwerpen in de opening van de gaskraan te duwen. Hierdoor kan de
gaskraan beschadigd raken en gaan lekken. Lekkend gas kan brand, explosie, zware
lichamelijke verwonding en zelfs dood veroorzaken.
2. Gebruik de barbecue niet, totdat u op lekken getest heeft.
3. Als er een lekkage gevonden is, schakel dan ONMIDDELLIJK de gases uit (met de klok
mee) en ontkoppel de regelaar van de gases. Plaats de gases in een koele, goed
geventileerde ruimte. Neem contact op met uw dealer of gasleverancier voor assistentie.
4. Als u een gaslek niet kunt stoppen bel dan meteen uw gases leverancier of de
brandweer.
!!!GEVAAR!!!
1. Bewaar NOOIT een extra gases onder of vlakbij de barbecue of in een gesloten ruimte.
2. Vul de gases NOOIT voor meer dan 80%. Een overvolle extra gases is gevaarlijk,
omdat erovertollig gas uit de veiligheidsklep kan lekken. Er kan gas ontsnappen uit de
veiligheidsklep op de gases, wat brand kan veroorzaken.
3. Er moeten beschermkappen zitten op de aansluitingsopening van de extra gases.
4. Als u een gaslek vindt in de extra gases, ga er dan onmiddellijk uit de buurt en bel
de brandweer.
ZEER BELANGRIJK: ONTKOPPEL DE GASFLES WANNEER DE BARBECUE NIET IN GEBRUIK IS.
HET ONTKOPPELEN VAN DE GASFLES:
• Draai alle knoppen uit.
• Draai de gaskraan van de gases helemaal dicht (draai met de klok mee totdat de knop
stopt).
• Haal de drukregelaar van de gaskraan af door de snelkoppelingsmoer tegen de klok in
te draaien.
• Plaats de beschermkap terug op de gaskraan van de gases.
CONTROLE OP LEKKEN
ALGEMEEN
Alle gasaansluitingen van de barbecue worden getest op lekken in de fabriek voordat ze
verzonden worden, maar bij montage moet het apparaat toch helemaal op gaslekken
worden gecontroleerd. Er kan schade ontstaan zijn tijdens het verzenden of het apparaat kan
blootgesteld zijn aan extreme druk. Controleer het apparaat regelmatig op lekken en controleer
of u de geur van gas kunt waarnemen.
VOOR DE CONTROLE:
• Zorg ervoor dat alle verpakkingsmateriaal van de barbecue verwijderd is, ook de
riemen die de branders op zijn plaats houden.
• Rook niet terwijl u op lekken controleert.
• Controleer nooit op lekken met open vuur.
• Maak een water-en-zeepoplossing van één deel afwasmiddel en één deel water. Gebruik
een spuites, borstel, of doek om de oplossing op de aansluitingen aan te brengen. Zorg
dat de gases vol is voor de eerste lekcontrole.
• Het controleren op lekken moet buitenshuis gebeuren op een goed geventileerde
plaats, uit de buurt van ontstekingsbronnen zoals gas- of elektrische apparaten en
brandbaar materiaal.
• Houd de grill uit de buurt van open vuur en/of vonken tijdens de controle.
HET CONTROLEREN:
• Zorg ervoor dat alle regelknoppen in de “UIT”-stand staan.
• Zorg ervoor dat de drukregelaar goed aangesloten is op de gases.
• Open de gaskraan van de gases helemaal door de knop tegen de klok in te draaien. Als
u een sissend geluid hoort, draai dan het gas ONMIDDELLIJK UIT; dit geeft een lek in de
aansluiting aan. Bel uw gasleverancier of de brandweer.
Controleer elke aansluiting van de gases tot en met de aansluiting van het
kranengedeelte (de slang die naar de brander loopt) door de zeepoplossing op de
aansluitingen te spuiten of te borstelen.
• Als er zeepbelletjes ontstaan is er een lek. Draai de gaskraan van de gases
ONMIDDELLIJK dicht en kijk alle aansluitingen goed na. Open dan de gaskraan weer en
controleer opnieuw.
• Sluit altijd de gaskraan van de gases na de lekcontrole door de knop met de klok mee
BQ-6398FT
Produkspesifikasjoner
| Merke: | Tristar |
| Kategori: | Ikke kategorisert |
| Modell: | BQ-6398FT |
Trenger du hjelp?
Hvis du trenger hjelp med Tristar BQ-6398FT still et spørsmål nedenfor, og andre brukere vil svare deg
Ikke kategorisert Tristar Manualer

19 September 2025

19 September 2025

18 September 2025

18 September 2025
18 September 2025

17 September 2025
17 September 2025

17 September 2025
17 September 2025
17 September 2025
Ikke kategorisert Manualer
- Husqvarna
- Lynx
- Elmo
- SWIT
- Sekonic
- Proficare
- Intermatic
- CatSynth
- Therm-a-Rest
- Tracer
- Extech
- Seaward
- Blind Spot
- Mtx Audio
- Bahr
Nyeste Ikke kategorisert Manualer

23 Oktober 2025

23 Oktober 2025

23 Oktober 2025

23 Oktober 2025

23 Oktober 2025

23 Oktober 2025

23 Oktober 2025

23 Oktober 2025

23 Oktober 2025

23 Oktober 2025