Viking VBO181SS Bruksanvisning

Viking Grille VBO181SS

Les nedenfor 📖 manual på norsk for Viking VBO181SS (4 sider) i kategorien Grille. Denne guiden var nyttig for 3 personer og ble vurdert med 4.5 stjerner i gjennomsnitt av 2 brukere

Side 1/4
F20402B EN (032708J)
Viking Range Corporation
111 Front Street
Greenwood, Mississippi 38930 USA
(662) 455-1200
For product information,
call 1-888-VIKING1 (845-4641)
or visit the Viking Web site at
vikingrange.com
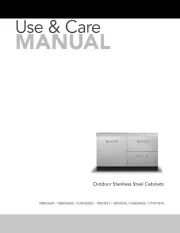
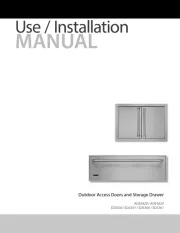
Viking Use/Installation Guide
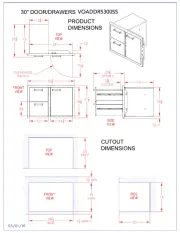
Outdoor Cabinets
3
Illustration #3
Illustration #4
Install 4 Tinnerman clips (provided)
before fastening cabinets together
Mount cabinets
with #10 x 1/2”
screws provided
Use #8 x 3/8” machine screw and
locknut to fasten hole cover to
inside door panel
Use #8 x 3/8” flat
head M.S. and
locknut to attach
hinge bracket to
the inside door.
7. Cabinet doors must be adjusted when cabinets are
level in final position. There are two adjustment
screws on the hinge receiver. (See Illustration #5)
•The front screw is used to center the door in
the opening. Turning the front screws in or
out will center the door over the cabinet
opening.
•The back screw is used to align the front of
the door with the cabinet frame and secure
the door to the cabinet. Slightly loosen the
screw and slide door in or out. Retighten the
screw to secure the door.
Illustration #5
Front Screw
5. Place cabinet(s) in approximate final position.
Level cabinets using leveling legs. Use 1/2"
SMS screws provided to screw cabinets
together. (See illustration #3).
6. Determine appropriate hinge side for cabinets
with interchangeable doors. Remove outside
door panel. Install hinges by placing plate in
hole in door and fasten in place with hardware
provided. Screw hinge plates in appropriate
pre-drilled holes in cabinet side. Fasten hole
covers with hardware provided. (See
Illustration #4).
Back Screw
2
IMPORTANT - PLEASE READ AND FOLLOW
•Before beginning, please read these instructions completely and carefully.
•Do not remove permanently affixed labels, warnings, or plates from product. This may void the warranty.
•Viking outdoor stainless steel cabinets are not designed to be water tight. Water may enter cabinetry under certain
conditions
•The installer should leave instructions with the consumer who should retain for future reference
NEVER use LP tanks inside any stainless steel cabinetry. Tanks must be located outside of the cabinetry at all times.
TO INSTALL CABINETS:
1. Verify cabinet product number(s) on
box(es) to list of cabinets ordered.
2. Carefully unpack cabinets making sure
not to scratch fronts. Front panels are
protected by plastic coating (that must
be removed after setup). Cabinets with
interchangeable doors are shipped from
the factory with opening from left to
right as shown (See illustration #1).
3. In cabinets with interchangeable doors,
hardware package will contain hole
covers and hardware to install.
4. Install 4 legs in the leg plates attached to
bottom of each cabinet. Screw in place.
(See illustration #2).
Illustration #1
Illustration #2
Cabinet box ready
for assembly
5
10. BACK PANEL INSTALLATION
•Remove all protective covering from panel and install using the #10 x 1/2” tek screws provided. (See
Illustration #8).
•Attach rear toe kick to legs. (See illustration #8).
NOTE: For end of the run panels, the rear, front, and side toe kicks must be modified. (See illustrations #7 & #8)
2. Fasten from inside with (4) 1/2” tek screws provided
Back panel
1. Place back panel onto cabinet area
3. After modifying rear toe kick (See dimension
chart at the bottom of page 4) - snap toe
kick into place
Rear toe kick
11. INSTALL LOCALLY SUPPLIED COUNTERTOP
Viking outdoor cabinets are designed for a minimum countertop thickness of 1 1/8” (2.9 cm) such as you would
find with granite or quartz material. If a countertop material thicker than 1 1/2” (3.8 cm) is used, the appliances
should be shimmed to the proper height. For examples of common installations, see the Viking Stainless Steel
Planning Guide.
12. Install Viking appliances per each appliance's installation instructions.
Complete Cabinet
Illustration #8
4
8. If desired, snap toe kick
included with each unit to
front legs. (See illustration
#6).
Illustration #6
Illustration #7
Snap toe kick to front
legs
9. SIDE PANEL INSTALLATION (End of Run Only)
•Remove all drawers. (If applicable)
•Remove all protective covering from panel and install using the #10 x 1/2” tek screws provided. (See
Illustration #7)
•Attach toe kick to legs (See Illustration #6).
NOTE:
FOR WALL INSTALLATIONS:
The front portion of the side toe kick must be shortened to match the front toe kick. (See Illustration #7).
The plastic material can be cut with any common type wood saw blade.
FOR ISLAND INSTALLATIONS:
The side, front, and rear toe kick must be modified (See Illustration #7)
2. Attach from inside (front and rear)
1. Place side panel into area of
the cabinet
Side toe kick (B)Front toe kick (A)
LH Side Panel Installation
(RH installs the same way)
Toe Kick Dimensions
Wall Installation Island Installation
Front Toe Kick (A)16 3/4” (42.5 cm) 16 3/4” (42.5 cm)
Side Toe Kick (B) 27 1/4” (61.6 cm) 25 1/2” (64.8 cm)
Rear Toe Kick (C) N/A 16 3/4” (42.5 cm)

Produkspesifikasjoner

Merke: Viking
Kategori: Grille
Modell: VBO181SS

Trenger du hjelp?

Hvis du trenger hjelp med Viking VBO181SS still et spørsmål nedenfor, og andre brukere vil svare deg


Grille Viking Manualer

Grille Manualer

Nyeste Grille Manualer