Wahoo Kickr Move Bruksanvisning
Wahoo
Treningsutstyr
Kickr Move
Les nedenfor 📖 manual på norsk for Wahoo Kickr Move (60 sider) i kategorien Treningsutstyr. Denne guiden var nyttig for 26 personer og ble vurdert med 4.5 stjerner i gjennomsnitt av 2 brukere
Side 1/60

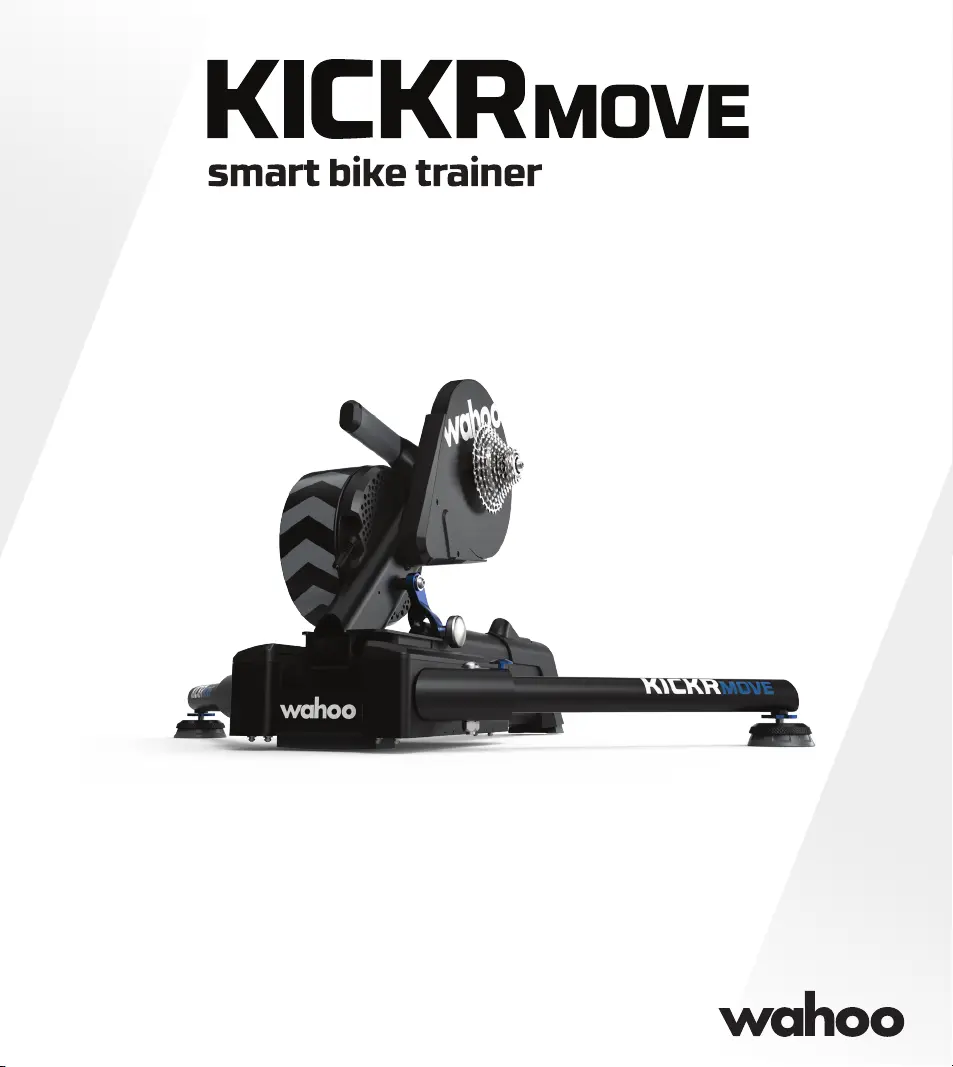
QUICK START GUIDE AND INSTRUCTIONS


KICKR MOVE Quick Start Guide See full instructions for complete setup.
Español: Ver las instrucciones completas
para completar la conguración
Français: Pour une installation complète,
consulter le mode d’emploi.
Italiano: Vedi istruzioni dettagliate per una congurazione completa
Korean: 완전 한 설치에 대 한 전체 지침을 참조 하십시오
Deutsche: Für die komplette Einrichtung lesen Sie bitte die vollständige
Anleitung
Simplied Chinese: 查看完整设置的全面操作说明
Traditional Chinese: 檢視完整設定的全面操作說明
Japanese: 完全なセットアップについての完全な説明を参照
Polish: Zobacz pełne instrukcje dotyczące pełnej konguracji.
Scan the QR Code to to get started with assembly and setup
IMPORTANT NOTICE
Read this manual and all safety information thoroughly before assembly and use. Failure to
follow the warnings and instructions could cause personal injury and/or physical damage to equipment
or surroundings.
• Assemble the KICKR MOVE only as stated in the information contained in this manual.
• Do not modify the KICKR MOVE.
• All instructions can be viewed on our website: www.wahootness.com/instructions.
• Images may not reect nal product exactly.
The instructions below are classied according to the degree of danger or damage which may occur if
the product is used incorrectly:
Failure to follow the instructions will result in death or serious injury.
Failure to follow the instructions could result in death or serious injury.
Failure to follow the instructions could cause personal injury and/or physical damage to
equipment or surroundings.
CAUTION


2
Thank you for purchasing the Wahoo KICKR MOVE!
LEARN MORE:
For more information or to submit a support request, visit www.wahootness.com/support
CONTACT US:
Wahoo Fitness
90 W. Wieuca Rd NE
Suite 110
Atlanta, GA 30342 United States
TELEPHONE:
United States: 1-877-978-1112
United Kingdom: +44-800-808-5773
ENGLISH
GENERAL SAFETY INFORMATION
• Improper or excessive exercise can result in serious
injury. Always consult your physician before
beginning or modifying any exercise program.
• Contact with the moving parts of the KICKR MOVE
could result in serious injury.
• Do not put hands or objects near moving parts of the
KICKR MOVE.
• Keep children and pets away from the KICKR MOVE.
• Do not wear loose clothing or shoes with loose laces
that could result in unintended contact with moving
parts.
• Do not exceed the maximum rider weight of 250 lbs
(113.5 KG).
• Instability of the KICKR MOVE could result in serious
injury. Only use the KICKR MOVE on stable, level
surfaces.
• The KICKR MOVE is intended for indoor use only. Do
not store outdoors or near water.
• The KICKR MOVE may become hot to the touch
when used for extended periods of time. Allow
components to cool before touching.
• To avoid risk of re or electric shock, only use the
included power adapter with the KICKR MOVE.
• During your peak training season, keep the KICKR
MOVE plugged in for automatic updates via Wi-Fi.
Unplug your KICKR MOVE prior to cleaning and
maintenance or if le unused for extended periods
of time.
• Device alterations, improper and/or incomplete use,
assembly or operation can result in serious injury.
• Keep the KICKR MOVE in the locked position when
not in use.
• If you use the KICKR CLIMB and KICKR MOVE
together, you must use the KICKR CLIMB base
adapter to avoid damage to the KICKR CLIMB while
in use.
• To avoid damage to your bike or accessories, do
not put anything under your front wheel, or attach
your fork to any other climbing or steering accessory
while using the KICKR MOVE.
US Phone Hours:
Monday - Friday
9 AM - 5 PM ET
UK Phone Hours:
Monday - Friday
2 PM - 10PM GMT


(2)
(1)
(1a)
(11b)
(11b)
* These items come preinstalled on the KICKR MOVE
PROTIP: Save all packaging and protective material for transportation and storage.
P
(3)*
(4) (5) (6)* (7)* (8) (9) (10)
UNPACKING
(1) KICKR MOVE
(1a) KICKR MOVE Lock Lever
(2) AC Power Adapter
(3) Quick Release Skewer
(4) Disc Brake Spacer
(5) 1.8mm Spacer
(6) Adapter A – For 130mm and 135mm Quick Release
(7) Adapter B - Reversible hub spacer for 130mm and
135mm Quick Release
(8) Adapter C – For 12x142 and 12x148 Thru Axle
(9) Adapter D - 12x142 Thru Axle
(10) Adapter E - 12x148 Thru Axle
(11a) Axis Feet - Small
(11b) Axis Feet - Medium *Pre-installed
(11c) Axis Feet - Large
ENGLISH
(11a) (11c)

4
(2)
Place your KICKR MOVE on a stable, level surface and open the legs by (1) pressing down on the blue leg-lock tabs and (2)
pivoting the legs outward until they snap in place.
(NOTE: Ensure the leg-lock tabs have popped back up and secured the legs in an open position.)
KICKR MOVE SETUP
(3) Use the included AC power adapter to connect the trainer to a standard wall outlet.
To stabilize the trainer, adjust the two leveling feet (4a) by twisting them left or right until the trainer is level and (4b) lock
them into place by tightening the blue locknuts against the KICKR MOVE leg frame.
Adjust the height of the trainer to fit your specific wheel size by (5) relocating the height adjustment knob on the
center leg to the appropriate setting. If you are unsure of your wheel size, check the tire sidewall or consult your local
bike shop.
(1)
(5)(4)
(a)
(b)
(3) Check that your trainer is stable
before every ride; if needed re-adjust the
leveling feet.
Pinch Point Hazard. To prevent
serious injury:
•ALWAYS keep your hand away from moving
parts.
•NEVER reach into KICKR MOVE.
•ALWAYS lock KICKR MOVE when not in use.
Prior to setting up your KICKR MOVE, ensure the lock lever is securely locked to avoid risk of injury.


FOR 142MM OR 148MM THRU AXLE
Adapters Needed: C and D or E
To be used with the 12mm thru
axle supplied with bicycle.
(1)
(2)
ATTACHING YOUR BICYCLE
Shift your bicycle chain into the smallest sprocket in the front and rear, then remove your rear
wheel. Install your bicycle on the KICKR MOVE by aligning the chain with the smallest sprocket
on the KICKR MOVE and pressing down to fully seat the dropouts on the KICKR MOVE’s axle.
For bicycles with quick release - Secure your bicycle by tightening
the quick release acorn nut and clamping the quick release lever
shut. The quick release lever is “open” when it curves away from the
bicycle frame (1); the lever is “closed” when it curves towards the
bicycle frame (2). The handle of the quick release skewer is always
on the non-drive (non cassette) side of the KICKR MOVE. Only use the
provided quick release skewer while using the KICKR MOVE.
For bicycles with thru axle - Secure your bicycle by reinstalling
your bicycle’s thru axle (3) and tightening to manufacturer
specifications (4).
Failure to properly tighten the quick release skewer or thru axle may result in property damage, including
damage to the attached bicycle, or personal injury. If you are unsure of the proper tension, please consult your local bike
shop or contact Wahoo Fitness for assistance.
Do NOT ride the KICKR MOVE until the quick release skewer or thru axle is properly tightened.
P
(3) (4)
Adapter A 130mm Configuration (Adapter B)
135mm Configuration (Adapter B)
FOR 130MM OR 135MM QUICK RELEASE
Adapters Needed: A and B
KICKR MOVE comes pre-configured out of the box for bicycles with 130mm quick release spacing. If you have a bicycle
with 130mm spacing proceed to “Attaching your Bicycle”. For 135mm spacing, remove quick release skewer, reverse
Adapter B and reinstall quick release skewer.
ENGLISH
Adapter C
12x142mm Configuration
(Adapter D)
12x148mm Configuration
(Adapter E)
PROTIP: Lift the front wheel up while pressing down on the saddle to ensure
the bicycle is fully seated on the trainer.
Prior to attaching your bicycle, ensure the lock lever is securely
locked to avoid risk of injury.


6
COMPATIBILITY
• ELEMNT GPS Bike Computers.
• Apple Devices running iOS 15 or newer.
• Android devices with Android 11 or newer.
• Windows or MacOS computer with Bluetooth, ANT+, a Wi-Fi network or Direct Connect Ethernet accessory.
AXIS FEET ADJUSTMENT
KICKR MOVE’s integrated AXIS feet let cyclists of all types customize ride feel to match their
unique riding style, enhance feedback and offer a more realistic training experience.
Step 1: Unthread ”outrigger” feet
Step 2: Remove top cap (part between
blue locknut and base of the foot)
Step 3: Install desired top cap
COMPLETE YOUR SETUP USING THE WAHOO FITNESS APP
Download the Wahoo App for free from the Apple App Store or Android Google Play Store. Use this app to complete your
device registration, complete your prole, perform necessary rmware updates, and pair your sensors.
START A WORKOUT: From the workout screen select the green “start” button to begin the workout. Swipe right to view
the KICKR MOVE page. This page enables you to view your workout and control the KICKR MOVE.
KICKR MOVE WORKOUT MODES:
The Wahoo Fitness App has the following workout modes that you can use to control your KICKR MOVE:
LEVEL: Just like riding on
a fluid or wind trainer, the
faster you go, the harder it
gets. The level you select
determines the progression
of your power curve.
RESISTANCE: This allows
you to set the resistance
of the brake anywhere
from 0 to 100%. Regardless
of speed, the brake will
remain set until you decide
to change it.
ERG: Set your desired
power, the KICKR MOVE
will increase or decrease
the resistance to maintain
a constant power output,
regardless of speed.
SIM: Enter your weight,
bike type, riding position,
headwind, and grade
and the KICKR MOVE will
accurately model the
power curve just as if you
were riding outdoors.
0-140 lbs (0 – 63 kg) Use smallest diameter cap
141-180 lbs (63 – 81 kg) Use middle cap (installed by default)
181 lbs + (81kg +) Use largest diameter cap
WARNING: Failure
to select the
appropriate top cap
for your weight may
result in property
damage or personal
injury. Do NOT ride
the KICKR MOVE until
the appropriate top
cap is installed.


8
CE STATEMENT
Hereby, Wahoo Fitness declares that this product is in compliance with:
The essential requirements and essential relevant provisions of directive 2014/53/EU
The full text of EU declaration of conformity (DoC) is available at the following internet address: www.wahootness.com/regulatory-notices. The object of the dec-
laration described above is in conformity with the relevant European Union harmonization Legislation: Directive 2014/53/EU and any other applicable directives.
This declaration is issued under the sole responsibility of Wahoo Fitness, LLC.
All listed Wahoo products operate within the 2402-2480MHz frequency band and below the maximum output power threshold of 100mW (20dBm).
Regulatory authorities within the EU may obtain compliance information by writing to:
Wahoo Fitness LLC
90 W. Wieuca Road 110
Atlanta, GA 30342
Before beginning or modifying any exercise program, please consult your physician. If you have a pacemaker or other implanted electronic device, consult your
physician before using a heart rate sensor. This product is intended for recreational use only and is not intended for medical purposes. Heart rate and other read-
ings could be inuenced by interference from external sources. If you use this product with navigation soware, always be aware of your surroundings and do not
xate on the screen. Moreover, set destinations and other user inputs prior to your departure to ensure your attention stays on task and your facilities are directed
to your activity and not the device. The device contains no user user serviceable parts and repairs / modications should only be made by a technician authorized
by Wahoo Fitness. Any unauthorized modications or repairs will void your warranty. Do not leave devices exposed to excessive heat or cold.
CALIFORNIA PROPOSITION 65
The enclosed hardware and its packaging contain chemicals the State of California has found to cause cancer, birth defects or reproductive harm.
FCC RULES PART 15
The enclosed hardware device complies with part 15 of the FCC Rules. Operation is subject to the following two conditions: (1) This device may not cause harmful
interference and (2) it must accept any interference received, including interference that may cause undesired operation.
FCC COMPLIANCE STATEMENT:
This equipment has been tested and found to comply with limits for a Class B digital device, pursuant to Part 15 of the FCC rules. These limits are designed to
provide reasonable protection against harmful interference in residential installations. The equipment generates, uses, and can radiate radio frequency energy,
and if not installed and used in accordance with the instructions, may cause harmful interference to radio communications. However, there is no guarantee that
interference will occur in a particular installation.
If this equipment does cause interference to radio or television equipment reception, which can be determined by turning the equipment o and on, the user in
encouraged to try to correct the interference by one or more of the following measures:
-Reorient or relocate the receiving antenna
wahootness.com


KICKR MOVE Quick Start Guide Ver las instrucciones completas para completar la configuración.
Escanear el código QR para empezar con el montaje y la conguración
IMPORTANT NOTICE
Lea este manual y toda la información de seguridad a fondo antes del ensamblaje y uso. No seguir
las advertencias e instrucciones podría causar lesiones personales y/o daños físicos a equipos o alrededores.
• Ensamble el KICKR MOVE solo como se indica en la información contenida en este manual.
• No modique el KICKR MOVE.
• Todas las instrucciones se pueden ver en nuestro sitio web: www.wahootness.com/instructions.
• Las imágenes pueden no reejar exactamente el producto nal.
Las instrucciones a continuación se clasican de acuerdo con el grado de peligro o daño que puede ocurrir si
el producto se usa incorrectamente:
El incumplimiento de las instrucciones dará como resultado la muerte o lesiones graves.
No seguir las instrucciones podría resultar en la muerte o lesiones graves.
No seguir las instrucciones puede causar lesiones personales y/o daños físicos al equipo o al entorno.
PELIGRO
PRECAUCIÓN
Español: Ver las instrucciones completas
para completar la conguración
Français: Pour une installation complète,
consulter le mode d’emploi.
Italiano: Vedi istruzioni dettagliate per una congurazione completa
Korean: 완전 한 설치에 대 한 전체 지침을 참조 하십시오
Deutsche: Für die komplette Einrichtung lesen Sie bitte die vollständige
Anleitung
Simplied Chinese: 查看完整设置的全面操作说明
Traditional Chinese: 檢視完整設定的全面操作說明
Japanese: 完全なセットアップについての完全な説明を参照
Polish: Zobacz pełne instrukcje dotyczące pełnej konguracji.


* Estos elementos vienen preinstalados en la KICKR MOVE
PIEZAS PEQUEÑAS: GUARDE TODO EL MATERIAL DE EMBALAJE Y DE PROTECCIÓN
PARA TRANSPORTE Y ALMACENAMIENTO.
P
DESEMBALAJE
(1) KICKR MOVE
(1a) KICKR MOVE palanca de bloqueo
(2) Adaptador de corriente AC
(3) Palanca de liberación rápida
(4) Espaciador calibrador de freno de disco
(5) Espaciador de 1.8mm
(6) Adapter A – Para liberación rápida de 130mm y 135mm
(7) Adapter B - Espaciador de eje reversible para liberación
rápida de 130mm y 135mm
(8) Adapter C – Para 12x142 y 12x148 a través del eje
(9) Adapter D - 12x142 Thru Axle
(10) Adapter E - 12x148 Thru Axle
(11a) Axis Feet - Small
(11b) Axis Feet - Medium *PreInstalled
(11c) Axis Feet - Large
ESPA OLÑ
(2)
(1)
(1a)
(11b)
(11b)
(3)*
(4) (5) (6)* (7)* (8) (9) (10)
(11a) (11c)


12
(2)
Sitúe su KICKR MOVE sobre una superficie estable y plana, abra las patas (1) presionando las pestañas azules de bloqueo
de las patas y (2) girando las patas exteriores hasta que queden en su lugar.
(NOTA: asegúrese que las pestañas de bloqueo han botado hacia arriba y manti patas en la posición de abierto.)
KICKR MOVE INSTALACIÓN
(3) Utilice el adaptador AC proporcionado para conectar el entrenador a la toma de corriente estándar.
Para estabilizar el entrenador, ajuste las dos patas niveladoras (4a) girándolas hacia la izquierda o hacia la derecha, hasta
que el entrenador esté nivelado y (4b) asegúrelas en su posición apretando las tuercas azules contra la montura de la pata
de la KICKR MOVE.
Ajuste la altura del entrenador al tamaño de rueda específica (6) reubicando la perilla de ajuste de altura en la pata
central a la altura correcta. Si no está seguro de cuál es el tamaño de su rueda, revise la pared lateral de la rueda o
consulte en su tienda de bicicletas más cercana.
(1)
(5)(4)
(a)
(b)
(3) Asegúrese que su entrenador
esté estable antes de cada uso; en caso de ser
necesario, reajuste las patas niveladoras.
Peligro de punto de pellizco.
Para evitar lesiones graves:
•Mantenga SIEMPRE la mano alejada de las
piezas móviles.
•NUNCA meta la mano en el KICKR MOVE.
•SIEMPRE bloquee KICKR MOVE cuando no
esté en uso.
Antes de configurar su KICKR MOVE, asegúrese de que la palanca de bloqueo esté bien bloqueada para evitar el
riesgo de lesiones.


14
COMPATIBILIDAD
• Computadoras de bicicleta GPS Elemnt.
• Dispositivos de Apple que ejecutan iOS 15 o más nuevos.
• Dispositivos de Android con Android 11 o más nuevo.
• Computadora de Windows o MacOS con Bluetooth, Ant+, una red Wi-Fi o accesorio de Ethernet Direct Connect.
AJUSTE DE PIES DE AXIS
Los pies AXIS integrados de KICKR MOVE permiten a los ciclistas de todo tipo personalizar la sensación de conducción
para que coincida con su estilo de conducción único, mejorar la retroalimentación y ofrecer una experiencia de
entrenamiento más realista.
Paso 1: Desenrosque los pies “estabilizadores”
Paso 2: Retire la tapa superior (parte entre la
cerradura azul derecha y la base del pie)
Paso 3: Instale la tapa superior deseada
COMPLETE LA INSTALACIÓN USANDO LA APLICACIÓN WAHOO
Descargue la aplicación Wahoo gratis desde el Apple App Store o Android Google Play Store. Use esta aplicación para
completar el registro de su dispositivo, completar su perl, realizar las actualizaciones de rmware necesarias y empare-
jar sus sensores.
INICIO DEL ENTRENAMIENTO: Desde la pantalla de entrenamiento seleccione el botón verde “Iniciar” para comenzar
el entrenamiento. Deslice hacia la derecha para ver la página KICKR MOVE. Esta página permite ver su entrenamiento y
controlar el KICKR MOVE.
KICKR MOVE WORKOUT MODES: La aplicación Wahoo Fitness cuenta con los siguientes modos de entrenamiento que
puede usar para controlar su KICKR MOVE:
LEVEL: Al igual que cuando
se usa un equipo de
entrenamiento hidráulico
o de viento, mientras más
rápido se realiza el ejercicio,
más difícil se vuelve. El nivel
que seleccione determinará
el progreso de su curva de
potencia.
RESISTANCE: Esto le permite
ajustar la resistencia del freno
en cualquier parte desde
0 a 100%. Independiente-
mente de la velocidad, el
freno conservará su valor de
ajuste hasta que usted decida
cambiarlo.
ERG: Establezca la potencia
deseada, KICKR MOVE
aumentará o disminuirá la
resistencia para mantener una
salida de potencia constante,
independiente- mente de la
velocidad.
SIM: Introduzca su peso, tipo
de bicicleta, posición, viento
en contra y grado, y el KICKR
MOVE ajustará con precisión
la curva de potencia como si
usted estuviera andando en el
exterior.
0-140 lbs (0 – 63 kg) Use la tapa de diámetro más pequeño
141-180 lbs (63 – 81 kg) Use la tapa media (instalada por defecto)
181 lbs + (81kg +) Use la tapa de mayor diámetro
ADVERTENCIA! Si no
selecciona la tapa
superior adecuada
para su peso, puede
sufrir daños a la
propiedad o lesiones
personales. NO
monte el KICKR
MOVE hasta que esté
instalada la tapa


Wahoo Fitness garantiza que este producto esté libre de defectos en material y mano de obra, bajo uso normal, durante un año a partir de la fecha de la compra
original. Los defectos que han resultado del uso o mantenimiento incorrecto o irracional, accidentes, exceso de humedad, insectos, empaques inadecuados,
rayos, sobretensiones o manipulación no autorizada, alteración o modicación no se cubrirán. Wahoo Fitness, a su discreción, reparará o reemplazará con un
producto comparable, sin cargo al cliente por piezas o mano de obra, siempre que el cliente sea responsable de los costos de envío. Los productos pueden ser
nuevos, restaurados o reacondicionados y están justicados para el período no vencido de la compra original o 60 días desde el rendimiento, lo que sea mayor.
Cualquier producto reemplazado se convierte en propiedad de Wahoo Fitness.
Cuando se lo permita, las disposiciones de esta garantía limitada están en lugar de cualquier otra garantía escrita, p16-ya sea expresada o implícita, escrita u oral,
incluida cualquier garantía de comerciabilidad o idoneidad para un propósito particular. En ningún caso, Wahoo Fitness será responsable de daños especiales,
incidentales, consecuentes o indirectos. Algunos lugares no permiten limitaciones en la exclusión o limitación de la responsabilidad a los montos especicados,
por lo que las limitaciones o exclusiones anteriores pueden no aplicarse a usted.
Para obtener servicios de garantía, comuníquese con Wahoo Fitness para obtener instrucciones de envío y un número de seguimiento de RMA. Devuelva su dispos-
itivo, el ete prepaga, junto con el recibo de ventas original, que es un comprobante de compra requerido para las reparaciones de la garantía, con el número de
seguimiento de RPM escrito en el exterior del paquete, y envíelo por correo a Wahoo Fitness.
WFBKTR123
FCC: PAD147
IC: 10563A-WF147
¡Precaución!
El fabricante no se hace responsable de ninguna interferencia de radio o tv causada por modicaciones no autorizada a este equipo. Dichas modicaciones
pueden causar la cancelación del permiso para operar el equipo.
DECLARACIÓN DE CE
Por la presente, Wahoo Fitness declara que este producto cumple con:
Los requisitos esenciales y las disposiciones relevantes esenciales de la Directiva 2014/53/UE
El texto completo de la declaración de conformidad de la UE (DOC) está disponible en la siguiente dirección de Internet: www.wahootness.com/regulatory-notic-
es. El objeto de la declaración descrita anteriormente está en conformidad con la legislación de armonización de la Unión Europea pertinente: Directiva 2014/53/
EU y cualquier otra directiva aplicable. Esta declaración se emite bajo la responsabilidad exclusiva de Wahoo Fitness, LLC.
Todos los productos Wahoo enumerados funcionan dentro de la banda de frecuencia de 2402-2480MHz y por debajo del umbral de potencia de salida máxima de
100MW (20dbm).
Las autoridades reguladoras dentro de la UE pueden obtener información de cumplimiento escribiendo a:
Wahoo Fitness LLC
90 W. Wieuca Road 110
Atlanta, GA 30342
GARANTÍA LIMITADA
wahootness.com


16

KICKR MOVE Quick Start Guide Pour une installation complète, consulter le mode d’emploi.
Scanner le code QR pour commencer l’assemblage et la conguration
INFORMATIONS IMPORTANTES
Pour votre sécurité, lisez attentivement ce manuel et toutes les informations de sécurité avant
l'assemblage et l'utilisation de l'appareil.
• Assemblez uniquement le KICKR MOVE en suivant précisément les informa- tions contenues dans ce manuel.
• N'apportez aucune modication au KICKR MOVE.
• Vous pouvez retrouver toutes les instructions sur notre site: www.wahootness.com/instructions.
• Les images peuvent ne pas reèter exactement le produit nal.
Les instructions suivantes doivent être respectées en toute circonstance, an d’éviter des blessures et
dommages matériels aux équipements et installa- tions. Les instructions sont classées en fonction du
niveau de danger ou de dommages pouvant survenir si le produit n'est pas utilisé correctement :
Ne pas suivre les instructions peut causer la mort ou des blessures graves.
DANGER
ATTENTION
ATTENTION
PRECAUTION
Español: Ver las instrucciones completas
para completar la conguración
Français: Pour une installation complète,
consulter le mode d’emploi.
Italiano: Vedi istruzioni dettagliate per una congurazione completa
Korean: 완전 한 설치에 대 한 전체 지침을 참조 하십시오
Deutsche: Für die komplette Einrichtung lesen Sie bitte die vollständige
Anleitung
Simplied Chinese: 查看完整设置的全面操作说明
Traditional Chinese: 檢視完整設定的全面操作說明
Japanese: 完全なセットアップについての完全な説明を参照
Polish: Zobacz pełne instrukcje dotyczące pełnej konguracji.


18
FRAN AISÇ
INFORMATIONS IMPORTANTES DE SECURITÉ
• Une utilisation excessive ou inappropriée du produit
peut causer de sérieuses blessures. Consultez
toujours un professionnel avant de modier tout
programme d'exercice.
• Un contact avec les parties en mouvement du KICKR
MOVE peut causer de sérieuses blessures.
• Ne pas mettre les mains ou des objets à proximité
des parties en mouvement du KICKR MOVE.
• Garder les enfant et les animaux éloignés de votre
KICKR MOVE.
• Ne pas porter d'habits amples ou de chaussures à
lacets qui pourraient s'enrouler autour des parties
en mouvement du KICKR MOVE.
• Le poids maximal autorisé sur l'appareil est de
113,5kg.
• Un KICKR MOVE instable pourrait vous causer de
sérieux dommages. Bien veiller à l'utiliser sur une
surface plane et stable.
• Le KICKR MOVE est destiné à une utilisation en
intérieur. Ne pas le stocker à l'extérieur ou près d'un
point d'eau.
• Certaines parties du KICKR MOVE peuvent devenir
chaudes après une utilisation prolongée. Bien veiller
à ce qu'elles refroidissent avant de les toucher.
• Pour éviter tout risque d'éléctrocution, n'utilisez
que la prise et le transformateur fournis avec votre
KICKRBIKE SHIFT.
• Durant vos périodes d'entraînement, vous pouvez
laisser votre KICK BIKE SHIFT branché, an que les
mises à jour puissent se faire par WIFI. Débranchez-
le avant de le nettoyer ou si vous ne l'utilisez pas
pendant une longue période.
• Une altération des composants, une utilisation mal
appropriée, ou un mauvais assemblage, peuvent
causer de sérieux dommages.
• Garder le KICKR MOVE en position verrouillée
lorsqu’il n’est pas utilisé.
• Si vous utilisez le KICKR CLIMB et le KICKR MOVE
ensemble, vous devez utiliser l’adaptateur de base
KICKR CLIMB pour éviter d’endommager le KICKR
CLIMB pendant l’utilisation.
• Pour éviter d’endommager votre vélo ou vos
accessoires, ne mettez rien sous votre roue avant
ou attachez votre fourche à tout autre accessoire
d’escalade ou de direction lorsque vous utilisez le
KICKR MOVE.
Merci d'avoir fait l'acquisition de Wahoo KICKR MOVE!
EN SAVOIR PLUS:
Pour les vidéos explicatives, les applis compatibles, les FAQ ou pour soumettre une demande d’assistance,
veuillez consulter: www.wahootness.com/support
FAITES NOUS PARVENIR VOS QUESTIONS
OU PRÉOCCUPATIONS À L’ADRESSE:
Wahoo Fitness
90 W. Wieuca Rd NE
Suite 110
Atlanta, GA 30342 United States
TÉLÉPHONE:
États-Unis: 1-877-978-1112
Royaume-Uni: +44-800-808-5773
Heures de service:
du lundi au vendredi de 9 h à 17 h,
fuseau horaire de l’Est
Heures de service:
du lundi au vendredi de 14 h à 20 h,
fuseau horaire de GMT
ATTENTION


* Ces éléments sont livrés préinstallés sur KICKR MOVE
ASTUCE DE PRO: CONSERVEZ TOUS LES MATÉRIAUX D’EMBALLAGE ET DE PROTECTION
POUR LE TRANSPORT ET LE STOCKAGE.
P
DÉBALLAGE
(1) KICKR MOVE
(1a) KICRK MOVE levier de blocage
(2) Adaptateur de courant alternatif
(3) Attache rapide
(4) Entretoise de l’étrier de frein à disque
(5) Entretoise de 1,8 mm
(6) Adapter A – Adapter A - Pour attache rapide de 130 mm
et 135 mm
(7) Adapter B - Entretoise de moyeu réversible pour attache
rapide de 130 mm et 135 mm
(8) Adapter C – Pour axe traversant de 12x142 et 12x148
(9) Adapter D - 12x142 Thru Axle
(10) Adapter E - 12x148 Thru Axle
(11a) Axis Feet - Small
(11b) Axis Feet - Medium *Preinstalled
(11c) Axis Feet - Large
FRAN AISÇ
(2)
(1)
(1a)
(11b)
(11b)
(3)*
(4) (5) (6)* (7)* (8) (9) (10)
(11a) (11c)


20
(2)
Placez votre KICKR MOVE sur une surface stable et plane et ouvrez les pieds (1) en appuyant sur les pattes bleues de
verrouillage des pieds et (2) en pivotant les pieds vers l’extérieur jusqu’à ce qu’elles s’enclenchent en position.
(REMARQUE: assurez-vous que les pattes de verrouillage des pieds sont ressorties et ont fixé les pieds en position ouverte).
INSTALLATION DE KICKR MOVE
(3) Utilisez l’adaptateur de courant alternatif (3) fourni pour brancher le vélo d’entraînement à une prise murale standard.
Pour stabiliser le vélo d’entraînement, ajustez les deux pieds de nivellement (4a) en les tournant vers la gauche ou la
droite jusqu’à ce que le vélo soit à niveau et (4b) verrouillez-les en place en serrant les écrous de blocage bleus contre le
KICKR MOVE cadre du pied.
Réglez la hauteur du vélo d’entraînement en fonction de la taille spécifique de votre roue (5) en déplaçant le bouton
de réglage de la hauteur sur le pied central au niveau approprié. Si vous n’êtes pas sûr de la taille de votre roue, vérifiez
le flanc du pneu ou consultez votre magasin de vélos local.
(1)
(5)(4)
(a)
(b)
(3) Vérifiez que votre vélo
d’entraînement est stable avant chaque
course, et réajustez les pieds de nivellement,
si nécessaire
AVERTISSEMENT : Risque de
pincement. Pour éviter des blessures graves :
•Gardez TOUJOURS votre main à l'écart des
pièces mobiles.
•NE JAMAIS atteindre le KICKR MOVE.
• Verrouillez TOUJOURS le KICKR MOVE lorsqu'il
n'est pas utilisé.
Avant de configurer votre KICKR MOVE, assurez-vous que le levier de verrouillage est bien verrouillé pour éviter
tout risque de blessure.
ATTENTION
ATTENTION
ATTENTION


(1)
(2)
ATTACHER VOTRE VÉLO
Déplacez la chaîne de votre vélo vers le plus petit pignon à l’avant et à l’arrière, puis retirez la roue
arrière. Installez votre vélo sur KICKR MOVE en alignant la chaîne avec le plus petit pignon sur KICKR
MOVE et en appuyant vers le bas pour loger complètement les pattes sur l’axe du KICKR MOVE’s.
Pour les vélos à attache rapide - Fixez votre vélo en serrant l’écrou
borgne de l’attache rapide et en fermant le levier d’attache rapide. Le
levier d’attache rapide est “ouvert” lorsqu’il s’incurve en s’éloignant
du cadre du vélo (1) ; le levier est “fermé” lorsqu’il s’incurve vers le
cadre du vélo (2). La poignée de l’attache rapide est toujours du côté
sans entraînement (sans cassette) du KICKR MOVE. N’utilisez que
l’attache rapide fournie lorsque vous utilisez KICKR MOVE.
Pour les vélo à axe traversant - Fixez votre vélo en réinstallant
l’axe traversant de votre vélo (3) et en serrant conformément aux
spécifications du fabricant (4).
Le fait de ne pas serrer correctement la brochette à dégagement rapide ou l’axe traversant peut entraîner
des dommages matériels, y compris des dommages au vélo attaché, ou des blessures corporelles. Si vous n’êtes pas sûr
de la bonne tension, veuillez consulter votre magasin de vélos local ou contacter Wahoo Fitness pour obtenir de l’aide. Ne
montez PAS sur le KICKR MOVE tant que la broche à dégagement rapide ou l’axe traversant n’est pas correctement serré.
P
(3) (4)
Adapter A 130mm Configuration (Adapter B)
135mm Configuration (Adapter B)
POUR UNE ATTACHE RAPIDE DE 130 MM OU 135 MM
Adapters Needed: A and B
KICKR MOVE est préconfiguré pour les vélos avec un écartement à attache rapide de 130 mm. Si vous avez un vélo avec
un espacement de 130 mm, passez à la section “Attacher votre vélo”. Pour un espacement de 135 mm, retirez l’attache
rapide, inversez Adapter B puis réinstallez-la.
FRAN AISÇ
Adapter C
12x142mm Configuration
(Adapter D)
12x148mm Configuration
(Adapter E)
ASTUCE DE PRO: SOULEVEZ LA ROUE AVANT TOUT EN APPUYANT SUR LA SELLE
POUR VOUS ASSURER QUE LE VÉLO EST FERMEMENT LOGÉ SUR LE SUPPORT.
Avant de fixer votre vélo, assurez-vous que le levier de verrouillage est bien
verrouillé pour éviter les risques de blessures
POUR UN AXE TRAVERSANT DE 142 MM
OU 148 MM
Adapters Needed: C and D or E
À utiliser avec l’axe traversant de
12 mm fourni avec le vélo.
ATTENTION
ATTENTION
Produkspesifikasjoner
Merke: | Wahoo |
Kategori: | Treningsutstyr |
Modell: | Kickr Move |
Trenger du hjelp?
Hvis du trenger hjelp med Wahoo Kickr Move still et spørsmål nedenfor, og andre brukere vil svare deg
Treningsutstyr Wahoo Manualer
31 Desember 2025
Treningsutstyr Manualer
- Treningsutstyr Cecotec
- Treningsutstyr Taurus
- Treningsutstyr Precor
- Treningsutstyr Costway
- Treningsutstyr Body Solid
- Treningsutstyr Best Fitness
- Treningsutstyr VirtuFit
- Treningsutstyr True
- Treningsutstyr Tunturi
- Treningsutstyr BodyCraft
- Treningsutstyr Inspire
- Treningsutstyr Marbo Sport
- Treningsutstyr HMS Premium
- Treningsutstyr Sole Fitness
- Treningsutstyr Pure
- Treningsutstyr Maxxus
- Treningsutstyr Bowflex
- Treningsutstyr Capital Sports
- Treningsutstyr Fitness Reality
- Treningsutstyr Weider
- Treningsutstyr Hacienda
- Treningsutstyr STEPR
- Treningsutstyr Spirit Fitness
- Treningsutstyr Toorx
- Treningsutstyr Cortex
- Treningsutstyr Sportstech
Nyeste Treningsutstyr Manualer
10 April 2025
8 April 2025
30 Mars 2025
30 Mars 2025
30 Mars 2025
28 Mars 2025
5 Mars 2025
20 Februar 2025
20 Februar 2025
19 Februar 2025