Wilbur Curtis GSG-3BLK Bruksanvisning
Wilbur Curtis
kaffemaskin
GSG-3BLK
Les nedenfor 📖 manual på norsk for Wilbur Curtis GSG-3BLK (4 sider) i kategorien kaffemaskin. Denne guiden var nyttig for 17 personer og ble vurdert med 4.4 stjerner i gjennomsnitt av 9 brukere
Side 1/4
F IND OUT MORE
ON
.THE WEB
WILBURCURTIS.COM
1
WILBUR CURTIS COMPANY
Montebello, CA 90640
CAUTION: CAUTION:
CAUTION: CAUTION:
CAUTION: Please use
this setup procedure
before attempting to use
this grinder. Failure to follow the
instructions can result in injury or
the voiding of the warranty.
ISO 9001 REGISTERED
Gourmet Coffee Grinders - Instructions
FOR THE LATEST SPECIFICATIONS AND INFORMATION GO TO
WWW.WILBURCURTIS.COM
This appliance is designed for commercial use. Any servicing other than cleaning and maintenance should be performed by an
authorized Wilbur Curtis service center.
• Do NOT immerse the unit in water or any other liquid
• To reduce the risk of fire or electric shock, do NOT open top panel. No user serviceable parts inside. Repair should be done
only by authorized service personnel.
• Keep hands and other items away from hot parts of unit during operation.
• Never clean with scouring powders or harsh implements.
Important Safeguards/Conventions
ConventionsConventions
ConventionsConventions
Conventions
WW
WW
W
ARNINGS – ARNINGS –
ARNINGS – ARNINGS –
ARNINGS –
TT
TT
T
o help ao help a
o help ao help a
o help a
void personal injurvoid personal injur
void personal injurvoid personal injur
void personal injur
yy
yy
y
Important Notes/Cautions – from the factorImportant Notes/Cautions – from the factor
Important Notes/Cautions – from the factorImportant Notes/Cautions – from the factor
Important Notes/Cautions – from the factor
yy
yy
y
Quick Start & SetupQuick Start & Setup
Quick Start & SetupQuick Start & Setup
Quick Start & Setup
S E T U PS E T U P
S E T U PS E T U P
S E T U P
1. Read this manual before attempting to operate the GSG coffee grinder.
2. Unpack the carton contents carefully. Inspect the container at the time of delivery for visual or concealed
damage. The carrier must be notified immediately in case of punctured or damaged cartons.
3. Install the grinder on a firm, level base in a location where it can be connected to a grounded electrical outlet of 120VAC,
rated at 15 amps.
4. Test the unit by running some whole bean coffee through the grinder. If any problems are encountered, refer to the
troubleshooting section complete at www.wilburcurtis.com or call Technical Service at 800-995-0417.
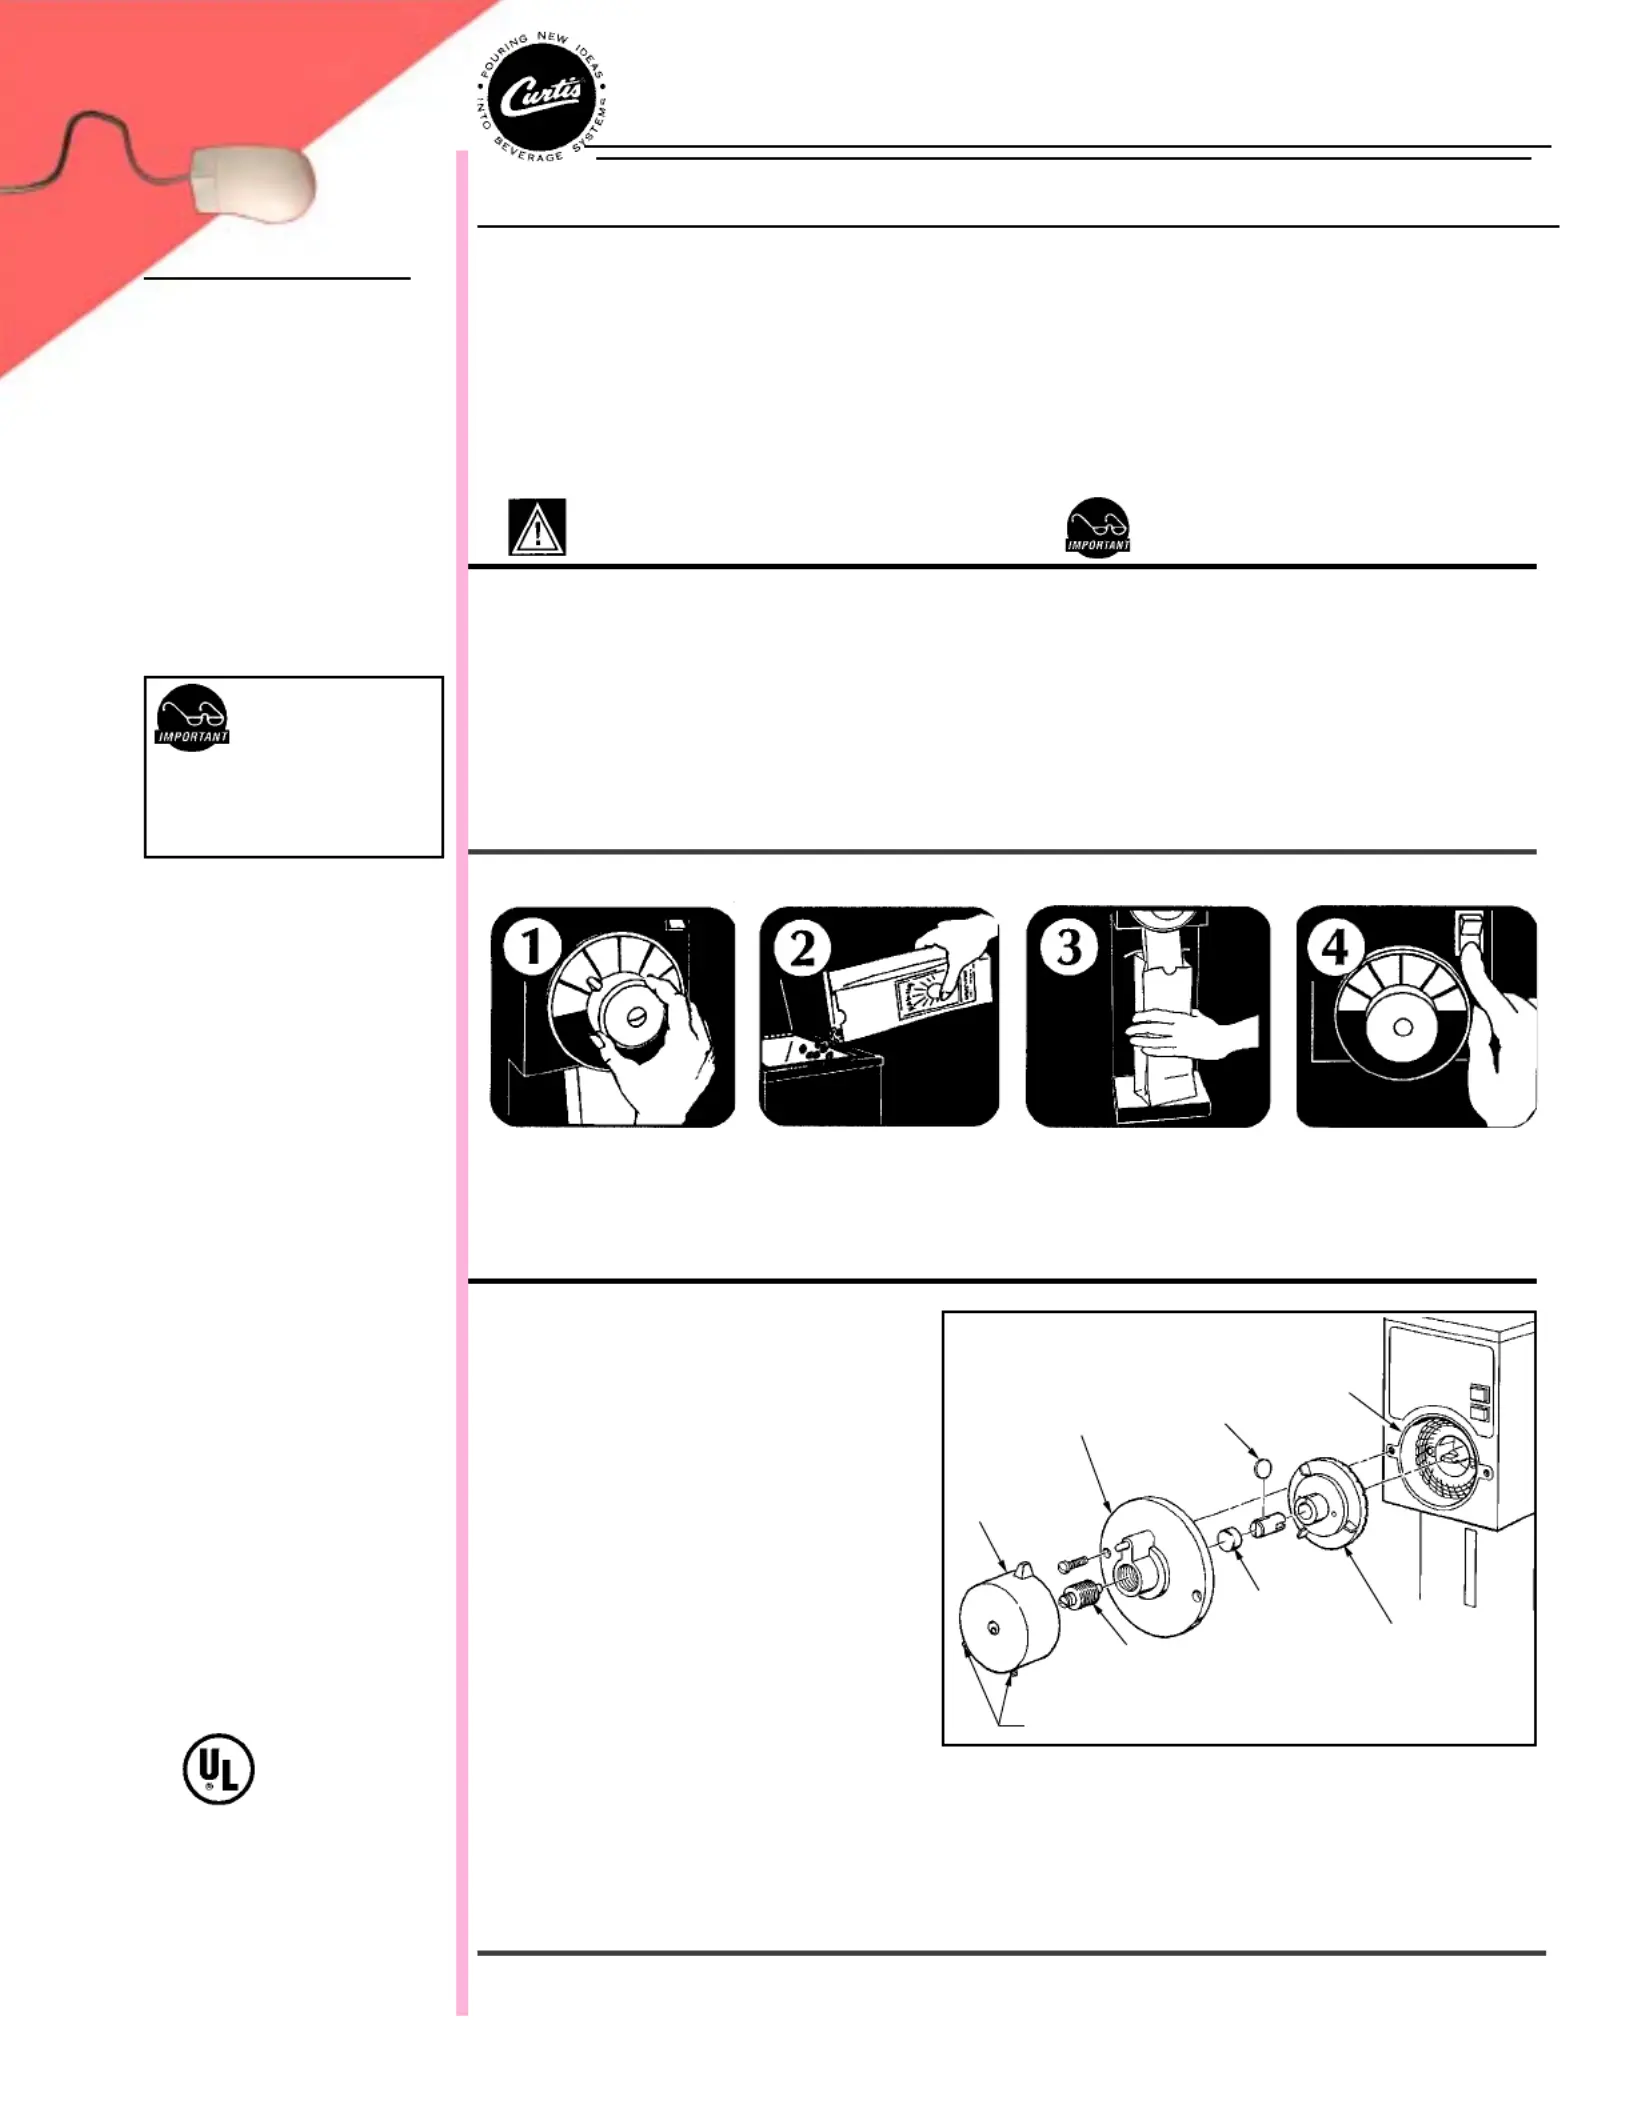
Changing a Broken Shear DiskChanging a Broken Shear Disk
Changing a Broken Shear DiskChanging a Broken Shear Disk
Changing a Broken Shear Disk
1. Unplug the power cord.
2. Empty the hopper of beans.
3. Remove the housing cover, held in place by two
slotted screws.
4. Take off the shear cap. Pull out the feed worm/
grinding burr assembly. These parts are slipped
together and usually come out in one piece.
5. Discard the broken shear disk.
6. Clean out the housing. Look for and remove any
debris that may have caused the shear disk to snap.
7. Reinsert the feed worm/grinding burr assembly on
the motor shaft.
8. Slide the shear drive through the center hole on the
feed worm/grinding burr assembly. The end with the
large slot goes in first. Align this slot with the
tongue on the motor shaft as you push in the shear
drive.
9. Rotate feed worm/grinding burr assembly to align the narrow slot with the narrow slot on the shear drive.
10. Insert a new shear disk into this slot and cover with the shear cap.
11. Clean off the inside surfaces of the housing cover. Replace the housing cover. If the housing cover doesn't seat properly, the
shear drive is probably not aligning with the motor shaft (repeat step 8).
12. Plug in the power cord.
WW
WW
W
ILBURILBUR
ILBURILBUR
ILBUR
C C
C C
C
URTISURTIS
URTISURTIS
URTIS
C C
C C
C
OMPOMP
OMPOMP
OMP
ANYANY
ANYANY
ANY
, I, I
, I, I
, I
NCNC
NCNC
NC
..
..
.
Models Included
••
••
• GSG-3BLK
••
••
• GSG-3RED
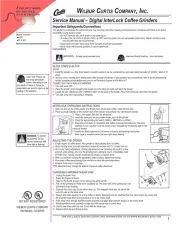
Operating the GSG GrinderOperating the GSG Grinder
Operating the GSG GrinderOperating the GSG Grinder
Operating the GSG Grinder
Select the kind of grind
desired by turning the
selector knob on the face of
the grinder.
Pour whole bean coffee
through the door on top of
the grinder.
Place your coffee bag under
the spout. Lift the bag
upward.
Push the start switch. When
coffee beans are finished
grinding, lowering the bag
will stop the motor.
SELECTOR
KNOB
HOUSING
COVER
SHEAR
DISK
GRIND
HOUSING
SHEAR
CAP
GRINDING
BURR
ADJUSTMENT
SCREW
SET SCREWS
Produkspesifikasjoner
| Merke: | Wilbur Curtis |
| Kategori: | kaffemaskin |
| Modell: | GSG-3BLK |
Trenger du hjelp?
Hvis du trenger hjelp med Wilbur Curtis GSG-3BLK still et spørsmål nedenfor, og andre brukere vil svare deg
kaffemaskin Wilbur Curtis Manualer

25 August 2025
24 August 2025

24 August 2025

23 August 2025

23 August 2025
23 August 2025
23 August 2025
23 August 2025
23 August 2025
23 August 2025
kaffemaskin Manualer
- Clatronic
- Fakir
- Electrolux
- Eureka
- Maestro
- Rowenta
- Gaggia
- Hanseatic
- Siemens
- Steba
- Butler
- Proctor Silex
- Avantco
- N8WERK
- Delonghi
Nyeste kaffemaskin Manualer

19 Oktober 2025

19 Oktober 2025

17 Oktober 2025

16 Oktober 2025

15 Oktober 2025
13 Oktober 2025

13 Oktober 2025

13 Oktober 2025

13 Oktober 2025

13 Oktober 2025