American Standard 7075.100.002 Bruksanvisning
American Standard
Kran
7075.100.002
Les nedenfor 📖 manual på norsk for American Standard 7075.100.002 (4 sider) i kategorien Kran. Denne guiden var nyttig for 21 personer og ble vurdert med 4.7 stjerner i gjennomsnitt av 11 brukere
Side 1/4

- 1 -
Product names listed herein are trademarks of AS America, Inc.
© AS America, Inc. 2016
Thank you for selecting American Standard...
the benchmark of fine quality for over 100 years.
To ensure that your installation proceeds smoothly-please read
these instructions carefully before you begin.
RECOMMENDED TOOLS
1
M965764 (8/16)
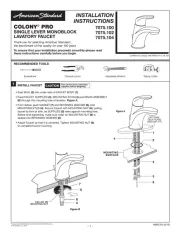
INSTALL FAUCET
COLONY
®
PRO
SINGLE LEVER MONOBLOCK
LAVATORY FAUCET
INSTALLATION
INSTRUCTIONS
7075.100
7075.102
7075.104
Screwdriver Adjustable Wrench Tubing CutterChannel Locks
Certied to comply with ANSI A112.18.1M
2
5
8
4
MOUNTING
SURFACE
3
Figure A
(OPTIONAL
DECK PLATE)
2000102P-YYY
1
CAUTION
Turn off hot and cold water
supplies before begining.
• Seat SEAL (2) into under side of FAUCET BODY (1).
• Feed FAUCET SUPPLIES (3), MOUNTING STUD (4) and DRAIN ASSEMBLY
(8) through the mounting hole of lavatory. Figure A.
• From below, push GASKET (7) and RETAINING WASHER (5) onto
MOUNTING STUD (4). Secure Faucet with MOUNTING NUT (6), pulling
faucet to front of sink, so SUPPLIES (3) rests against mounting hole.
Before nal tightening, make sure collar on MOUNTING NUT (6) is
seated into RETAINING WASHER (5).
• Adjust Faucet so that it is centered. Tighten MOUNTING NUT (6)
to complete faucet mounting.
6
4
COLLAR ON
MOUNTING NUT
7
5
Figure B
Produkspesifikasjoner
| Merke: | American Standard |
| Kategori: | Kran |
| Modell: | 7075.100.002 |
Trenger du hjelp?
Hvis du trenger hjelp med American Standard 7075.100.002 still et spørsmål nedenfor, og andre brukere vil svare deg
Kran American Standard Manualer
12 Oktober 2025

3 Januar 2025

3 Januar 2025
Kran Manualer
- BTI Aqua-Solutions
- Puretec
- Eversteel
- Shaws
- Omnires
- Blanco
- Rogerseller
- InSinkErator
- Franke
- Delta
- Sloan
- Sussex
- T&S
- Teka
- Moen
Nyeste Kran Manualer

13 Oktober 2025

13 Oktober 2025

13 Oktober 2025

13 Oktober 2025

13 Oktober 2025

13 Oktober 2025

13 Oktober 2025

13 Oktober 2025

13 Oktober 2025

13 Oktober 2025