AMX NMX-ENC-N2315-WP Bruksanvisning
AMX
Ikke kategorisert
NMX-ENC-N2315-WP
Les nedenfor 📖 manual på norsk for AMX NMX-ENC-N2315-WP (2 sider) i kategorien Ikke kategorisert. Denne guiden var nyttig for 41 personer og ble vurdert med 4.9 stjerner i gjennomsnitt av 21 brukere
Side 1/2
QUICK START GUIDE
N2315 4K Series Wallplate Encoder
Overview
The SVSI N2315 Decor Style Wallplate Encoder is part of the N2300 Series and used in
conjunction with N2322 Series Decoders for transmission of HDMI or analog video over
Ethernet. All Encoders and Decoders of the N2300 Series feature balanced audio, HDMI
video connection, and Power-over-Ethernet (PoE). The N2322 Decoder supports
output scaling and limited output downscaling options.
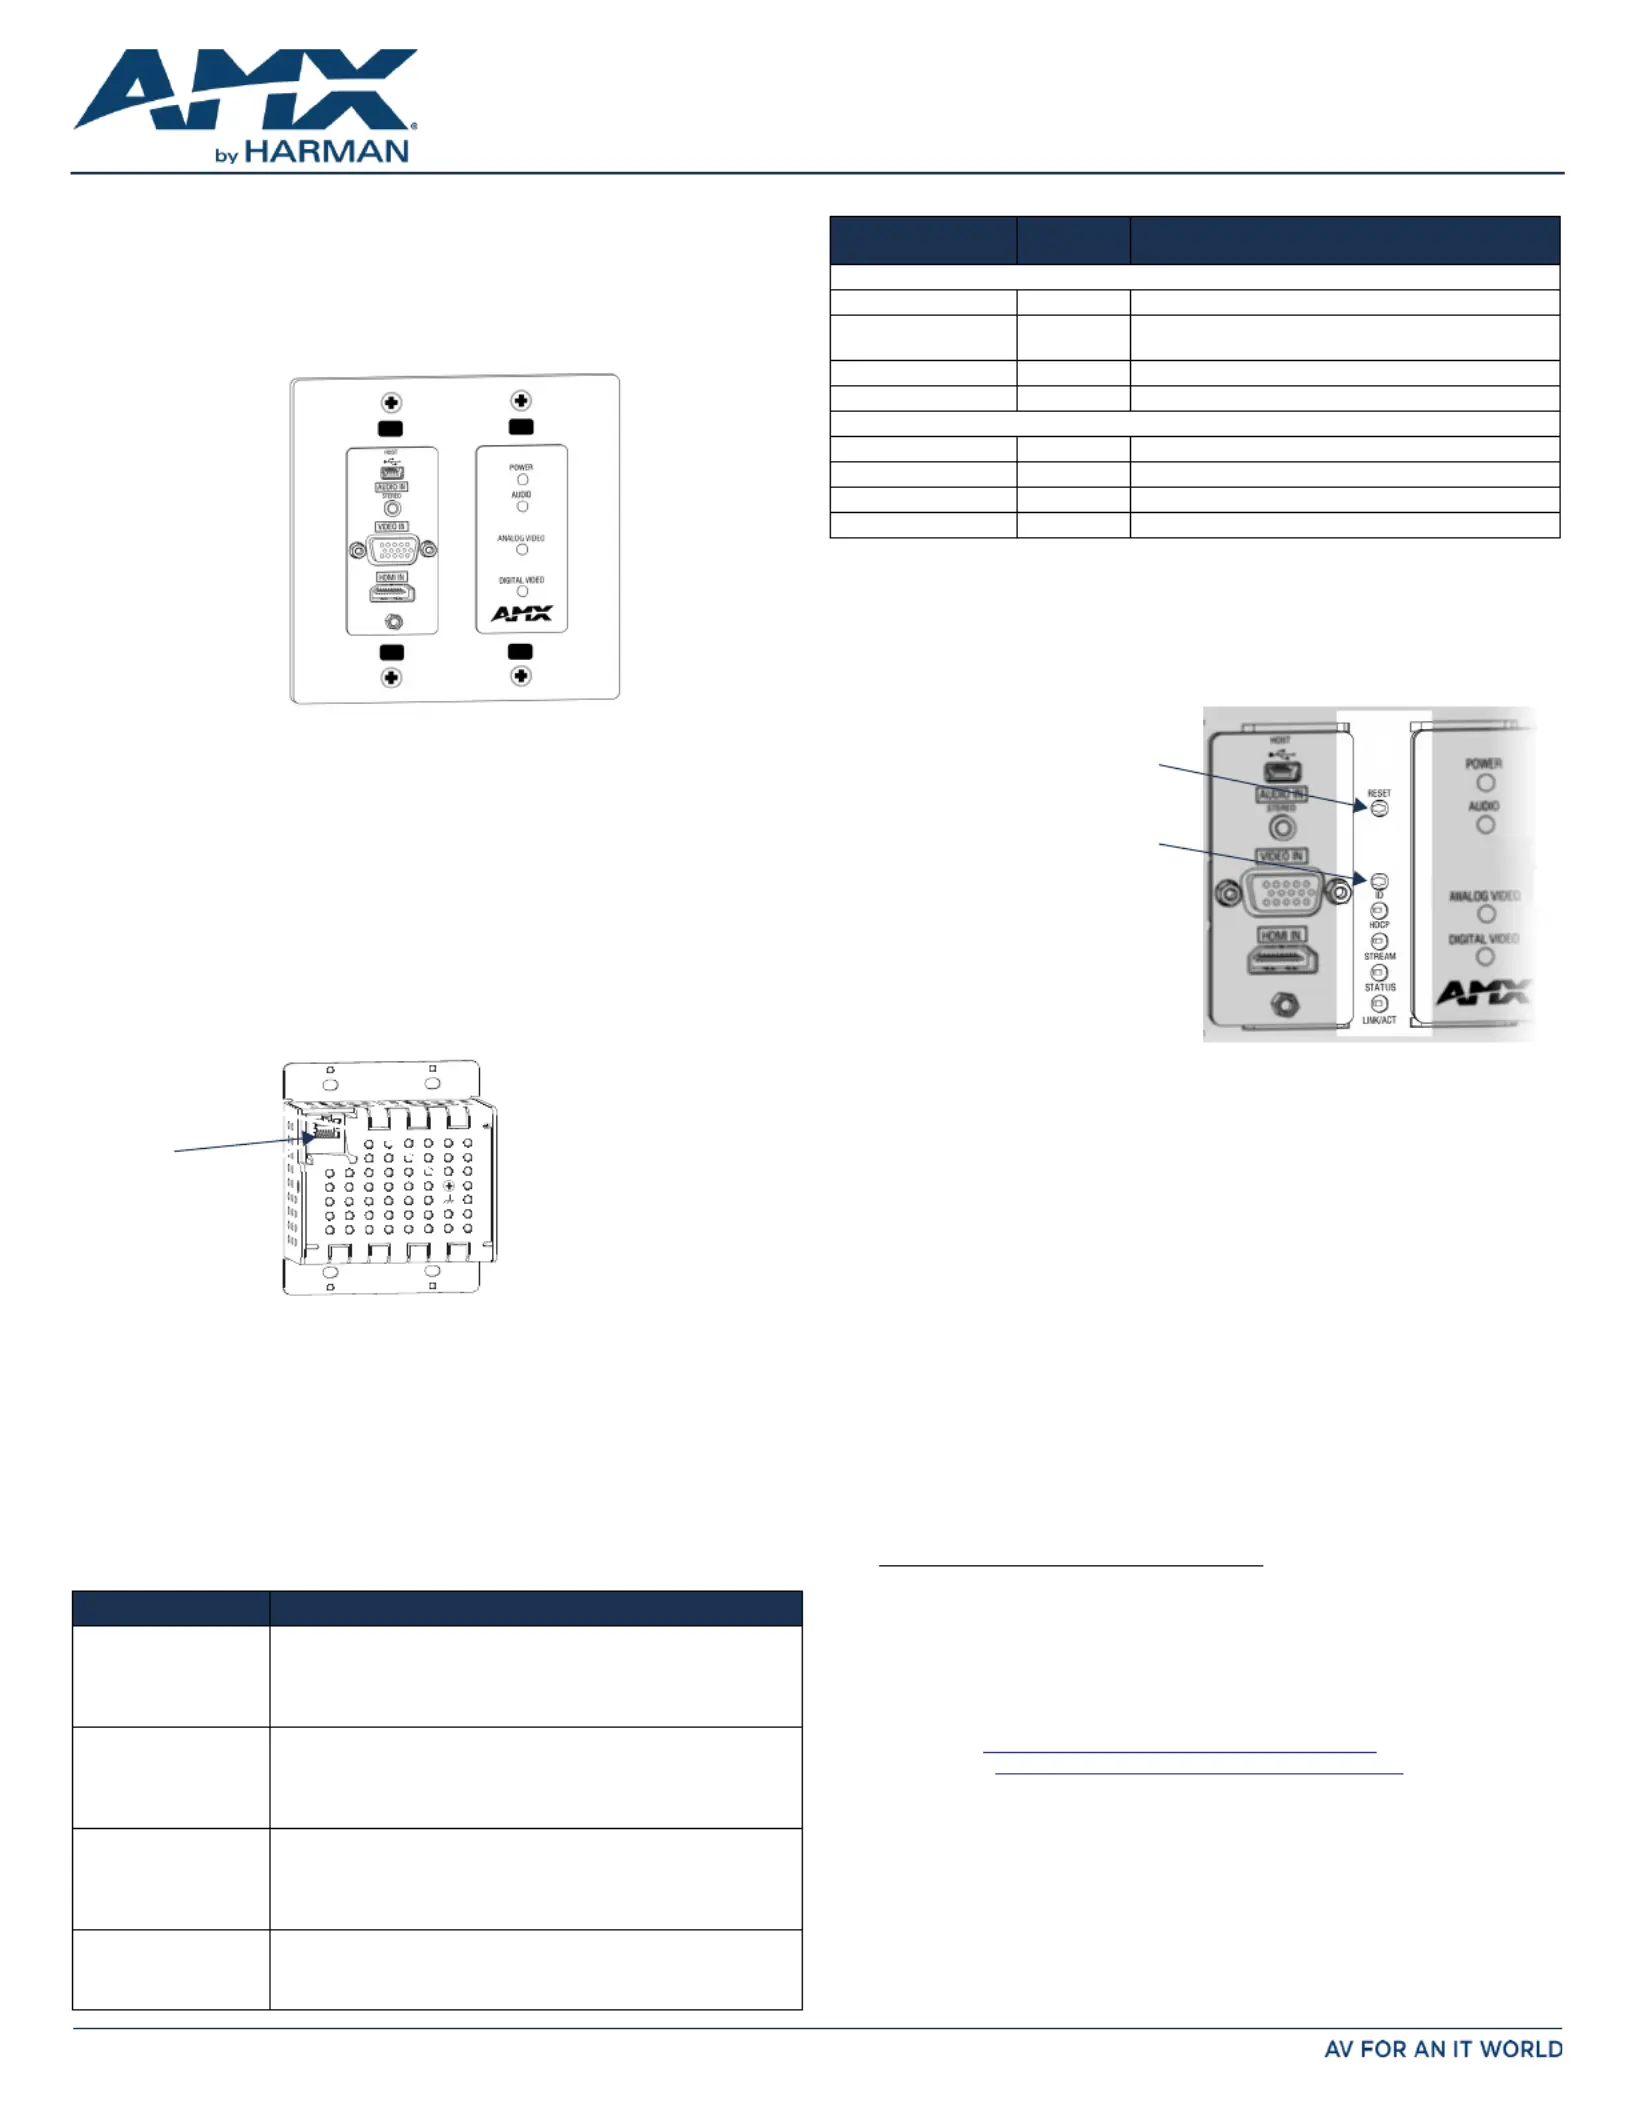
FIG. 1
N2315 WALLPLATE ENCODER
Installing the N2315 Wallplate Encoder:
Follow the steps below to mount your new N2315 4K Encoder into an existing dual gang
electrical box.The instructions given assume the box is already installed with Ethernet
access running to it.
1. Connect the PoE-enabled Ethernet cable to the rear connector of the N2315 4K
Encoder. This provides both network and power connection to the Encoder.
2. Place the N2315 4K Encoder display into the box and secure it with four screws
(included in shipment).
3. Check LEDs for normal display (see the LED table at right).
4. Attach the (customer-provided) front cover plate to the unit to complete
installation.
Attaching Signal and Control Cables
The following table explains how to attach cables to the front of the Encoder.
IMPORTANT: Encoders must be securely mounted and connected to the switch before
attaching the remaining cables.
NOTE: Any switch handling the N2315 4K Encoder video streams must be configured to
support jumbo frames.Disable the wireless adapter on your computer (it must be hard-
wired to the switch).
Basic Cabling Guidelines
This table shows LED states on initial power up. If not normal, check connections.
* The LEDs for DIGITAL VIDEO ANALOG VIDEO AUDIO , , and each indicate the
configured state of the connectors (not necessarily the presence of signals through the
Encoder).
Additional Buttons
The front-center section of the unit is shown in FIG. 3. This section is covered by the
cover plate once it has been installed.
Establishing Connection
N2315 4K Encoders are shipped with DHCP as their default IP mode. The IP address is
assigned automatically based on the network DHCP server. If no DHCP server is found,
the unit will use mode instead (with a default IP address of 169.254.xxx.xxx).Auto IP
Before using your N2315 4K Encoder unit, it must be configured using the free N-Able
device management software. However, you will not be able to configure units until they
are in the same subnet as the host computer. The sample steps below show how the
required changes (to the host computer’s IP settings) are made in a Windows
environment.
Steps for IP address configuration:
1. From the dialog box, select Control Panel > Network and Internet Network and
Sharing Center.
2. Select .Change adapter settings
3. Select the wired interface connected to your AV network.
4. Click the button.Properties
5. Scroll down in the list to the Internet Protocol Version 4 (TCP/IPv4) option.
Highlight it and click the button.Properties
6. Enable the option, and enter the static IP addressUse the following IP address
provided to you by your network administrator.
NOTE: If the computer does not need Internet access, you can simply enter a unique
169.254.xxx.xxx IP address with a 255.255.0.0 Subnet mask. Please contact your
network administrator if you are unsure of how to configure the existing interface. If the
computer has a statically-assigned IP address, click on the Advanced button. Then click
Add to enter a unique 169.254.xxx.xxx address with a subnet of 255.255.0.0.
Steps for auto discovering devices on the network:
1. Use the host computer to download and install the latest version of N-Able:
PC version -
http://www.amx.com/products/N-ABLE-PC.asp
Mac version -
http://www.amx.com/products/N-ABLE-MAC.asp
2. Attach your N2315 4K Encoder unit(s) to the layer-3 network switch.
3. Connect the host computer to the layer-3 network switch.
4. Open the N-Able application.
If all devices do not appear automatically, click the button on the Auto Discover
Unit Management tab. This issues a broadcast command that will discover all units
even if they are not in the same IP subnet.
FIG. 2
CONNECT ETHERNET TO ENCODER
Connector Description
HDMI IN Digital Video Connection
For video encoding of a source, connect from the digital
source to the Encoder’s connector using a video HDMI IN
cable with an HDMI connector (or adapter).
VIDEO IN Analog Video Connection
For video encoding of an source, connect the source analog
to the Encoder’s VIDEO IN VGA port using a video cable with a
VGA connector (or component adapter).
AUDIO IN - STEREO Audio Encoding
Insert an analog audio cable from the source into the AUDIO
IN STEREO jack (optional), OR use the embedded audio from
the video source.
HOST USB Control (optional)
Attach a USB cable from the PC to the Encoder’s USB mini-B
port.
Wallplate is available
in white (WH) and
black (BL)
RJ45 PoE
connector
Indicator LEDs Normal
power up
Indicates
Front-Right LEDs
POWER Green PoE power is applied.
AUDIO* Green Configured to pass analog audio
(coupled with digital or analog video path).
ANALOG VIDEO* Green Configured to pass analog video:
DIGITAL VIDEO * Green Configured to pass HDMI with embedded audio.
Front-Center LEDs (located under customer-provided cover plate, if installed)
HDCP Yellow On when HDCP is active.
STREAM Green On when the unit is streaming video to the network.
STATUS Green On flashing (green) when there is software activity.
LINK/ACT Green On when there is Ethernet activity.
FIG. 3 BUTTONS LOCATED ON FRONT-CENTER OF UNIT
RESET button - Resets Encoder’s CPU.
ID button - Identifies the unit in N-Able.
Can also set Encoder back to factory
defaults ( ).press and hold 30 seconds
Produkspesifikasjoner
| Merke: | AMX |
| Kategori: | Ikke kategorisert |
| Modell: | NMX-ENC-N2315-WP |
Trenger du hjelp?
Hvis du trenger hjelp med AMX NMX-ENC-N2315-WP still et spørsmål nedenfor, og andre brukere vil svare deg
Ikke kategorisert AMX Manualer

2 Januar 2025

2 Januar 2025

2 Januar 2025

2 Januar 2025

2 Januar 2025

27 Desember 2024

7 Desember 2024

19 Oktober 2024

19 Oktober 2024

19 Oktober 2024
Ikke kategorisert Manualer
- EarthQuaker Devices
- Ionmax
- Intermatic
- Tach-It
- T-Rex
- Easyrig
- Lego
- HTW
- FSR
- Xplora
- Becken
- Olympia
- EVE
- Elation
- PCE Instruments
Nyeste Ikke kategorisert Manualer

23 Oktober 2025

23 Oktober 2025

23 Oktober 2025

23 Oktober 2025

23 Oktober 2025

23 Oktober 2025

23 Oktober 2025

23 Oktober 2025

23 Oktober 2025

23 Oktober 2025