Canarm CBFI700 Bruksanvisning
Canarm
Ikke kategorisert
CBFI700
Les nedenfor 📖 manual på norsk for Canarm CBFI700 (10 sider) i kategorien Ikke kategorisert. Denne guiden var nyttig for 12 personer og ble vurdert med 5.0 stjerner i gjennomsnitt av 6.5 brukere
Side 1/10
M-CBFI-L 08/24 Page 1 of 5
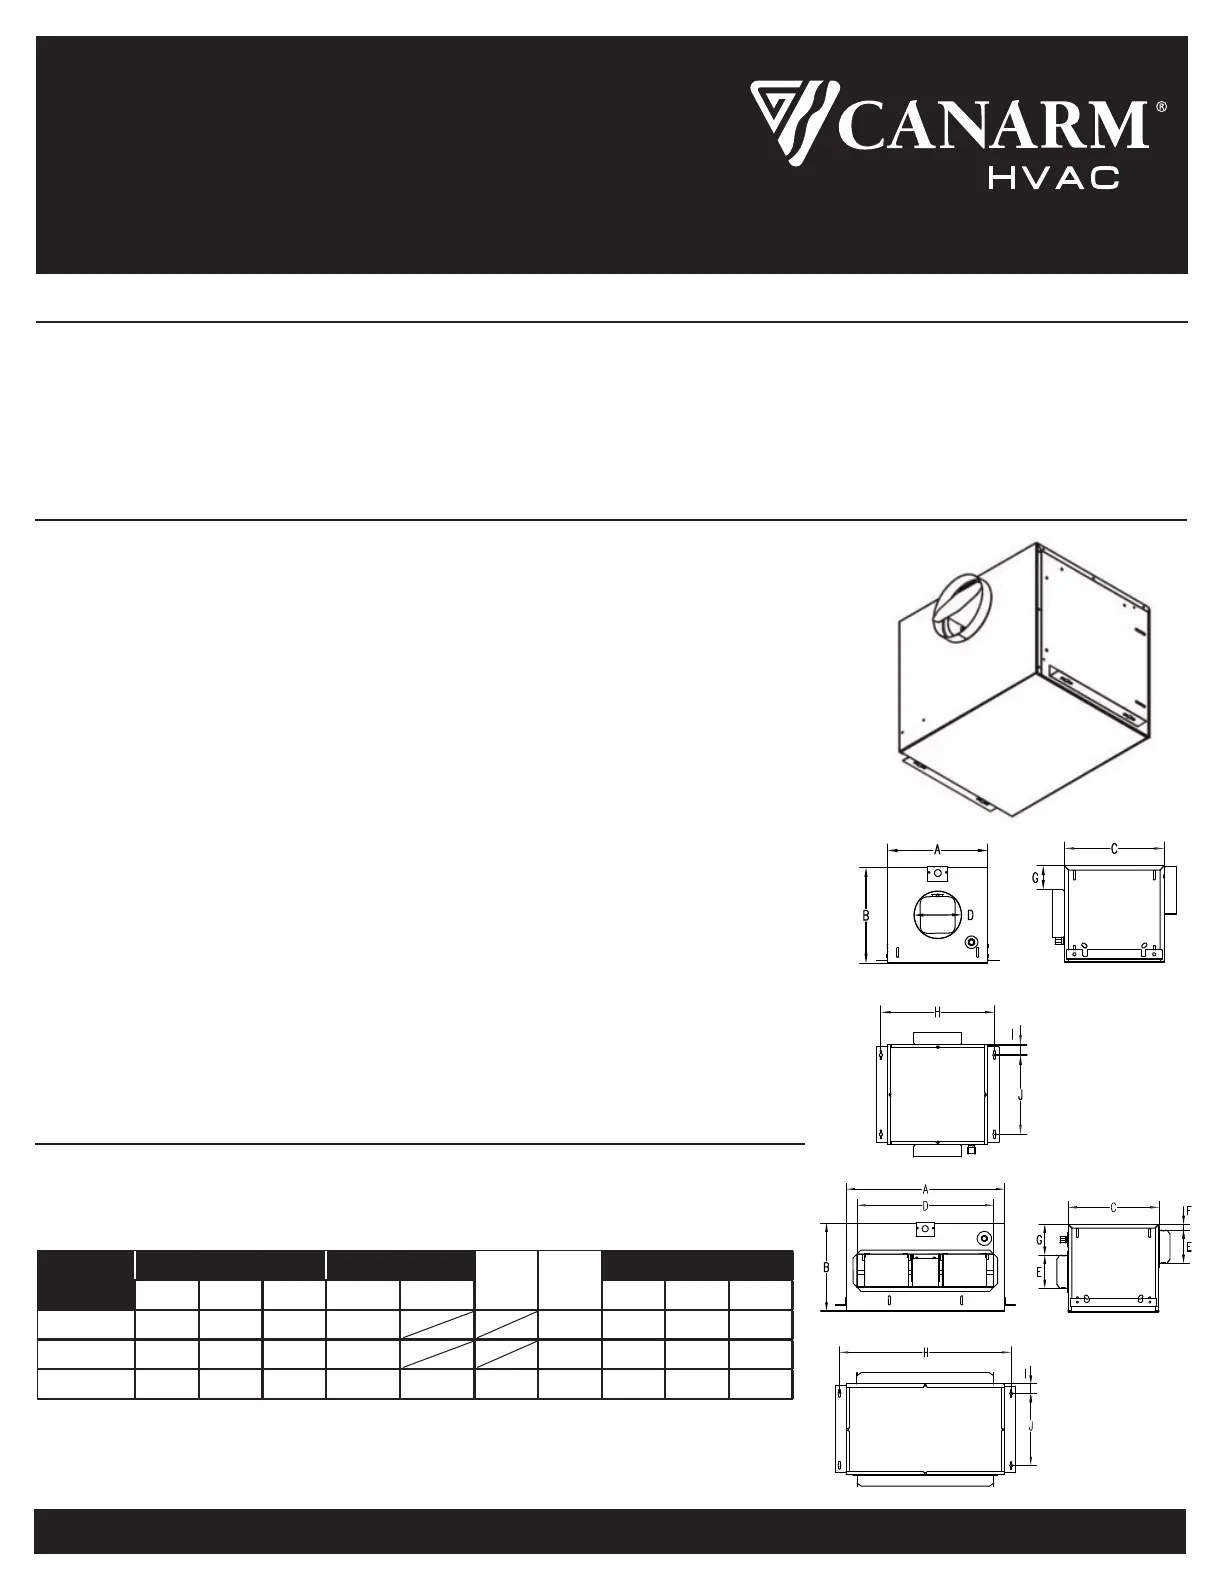
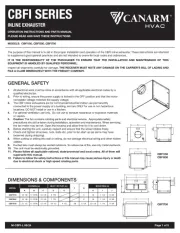
CBFI SERIES
INLINE EXHAUSTER
MODELS: CBFI150, CBFI300, CBFI700
GENERAL SAFETY
DIMENSIONS & COMPONENTS
The purpose of this manual is to aid in the proper installation and operation of the CBFI inline exhauster. These instructions are intended
to supplement good general practices and are not intended to overwrite local codes and ordinances.
IT IS THE RESPONSIBILITY OF THE PURCHASER TO ENSURE THAT THE INSTALLATION AND MAINTENANCE OF THIS
EQUIPMENT IS HANDLED BY QUALIFIED PERSONNEL.
Inspect all shipments carefully for damage. THE RECEIVER MUST NOTE ANY DAMAGE ON THE CARRIER’S BILL OF LADING AND
FILE A CLAIM IMMEDIATELY WITH THE FREIGHT COMPANY.
1. All electrical work must be done in accordance with all applicable electrical codes by a
qualified electrician.
2. Prior to wiring, ensure the power supply is locked in the OFF position and that the motor
nameplate voltage matches the supply voltage.
3. The CBFI inline exhausters are for commercial/industrial indoor use permanently
connected to the power supply of a building, and are ONLY for use in non hazardous
locations. DO NOT install or use in a kitchen.
4. For general ventilation use only. Do not use to exhaust hazardous or explosive materials
or vapors.
5. Caution: The fan contains rotating parts and electrical service. Appropriate safety
precautions should be taken during installation, operation and maintenance. When servicing,
the fan motor may be hot. Open the housing and allow time for it to cool down.
6. Before starting the unit, carefully inspect and ensure that the wheel rotates freely.
7. Check and tighten all screws, nuts, bolts etc. prior to fan start up (as some may have
loosened during shipping).
8. When cutting or drilling into wall or ceiling, do not damage electrical wiring and other hidden
utilities.
9. Ducted fans must always be vented outdoors. To reduce risk of fire, use only metal ductwork.
10. This unit must be electrically grounded.
11. Please follow all applicable national, state/provincial and local codes. All of them will
supersede this manual.
12. Failure to follow the safety instructions in this manual may cause serious injury or death
due to electrical shock or high speed rotating parts.
!"# $ % & ' (
#")'*+, !"##!$%# !!#!&$!' !"##!$%# (##)$*# &###### !%###### !##!$%# +##&$%#
#")'-,, !"##!$%# !!#!&$!' !"##!$%# )##)$*# "###### !%###### !##!$%# +##&$%#
#")'.,, "!##!$"# !!#!&$!' !"##!$%# !*##!$"# %##!$"# ##&$%# %##!$%# "&##!$%# !##!$%# +##&$%#
'/0%12324510%126789
):;4$%0
&45<'/:26789 ;45/1'/:26789
OPERATION INSTRUCTIONS AND PARTS MANUAL
PLEASE READ AND SAVE THESE INSTRUCTIONS
CBFI150
CBFI300
CBFI700
Produkspesifikasjoner
| Merke: | Canarm |
| Kategori: | Ikke kategorisert |
| Modell: | CBFI700 |
Trenger du hjelp?
Hvis du trenger hjelp med Canarm CBFI700 still et spørsmål nedenfor, og andre brukere vil svare deg
Ikke kategorisert Canarm Manualer
22 September 2025

22 September 2025
22 September 2025
21 September 2025

21 September 2025
Ikke kategorisert Manualer
- Evga
- AudioQuest
- Subaru
- Origin Storage
- Cramer
- OKAY
- K&M
- VAVA
- Summit
- Antelope
- Strymon
- Mr Steam
- Audac
- NuPrime
- Tesseract Modular
Nyeste Ikke kategorisert Manualer

23 Oktober 2025

23 Oktober 2025

23 Oktober 2025

23 Oktober 2025

23 Oktober 2025

23 Oktober 2025

23 Oktober 2025

23 Oktober 2025

23 Oktober 2025

23 Oktober 2025