Chamberlain MYQ-SGC1WCH Bruksanvisning
Chamberlain
Ikke kategorisert
MYQ-SGC1WCH
Les nedenfor 📖 manual på norsk for Chamberlain MYQ-SGC1WCH (4 sider) i kategorien Ikke kategorisert. Denne guiden var nyttig for 15 personer og ble vurdert med 4.5 stjerner i gjennomsnitt av 8 brukere
Side 1/4

MYQ-SGC1WCH
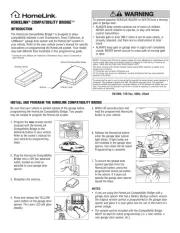
Smart Garage Camera™
Installation Guide
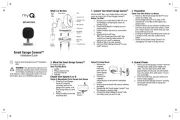
What's In the Box
Power
Adapter
Micro
USB
Cable
Reset Button
LED
Camera Lens
Ambient Light
Sensor
Microphone
USB Input
Mounting
Screws
Magnet
Mounting
Base
Drywall Anchor
1. Connect Your Smart Garage Camera
™
Use the myQ
®
App, your mobile device, and your
router to control your Smart Garage Camera™.
Before You Start:
1. Be sure your mobile device's Wi-Fi
®
is on
and displays a strong signal where the
camera will sit.
2. Check that Bluetooth is enabled on your
mobile device.
3. Enable Location Services on your mobile
device.
4. Download the myQ
®
App.
TIP: If you already have the myQ
®
App,
confirm you have the latest version to
optimize your myQ
®
experience.
5. Create or sign in to your account.
6. Add your Smart Garage Camera™ to your
myQ
®
account.
2. Preparation
Check Your View Before You Mount:
lPower up the Smart Garage Camera™ in your
chosen mounting area.
lSmart Garage Camera™ is in reach of the
included 10' (3 m) Micro-USB cable and a
power outlet.
lHold the camera at your chosen mounting area,
free from visual and metal obstructions. Check
your mobile device view shows what you want
to see before you mount.
lIf using the magnetic mounting base screws for
a surface mount, mark the surface area to
install.
lPower off the Smart Garage Camera™ by
unplugging it to begin a surface mount.
See the Smart Garage Camera™ installation
video.
WARNING: This product can expose you to
chemicals including lead, which are known
to the State of California to cause cancer or
birth defects or other reproductive harm. For more
information go to www.P65Warnings.ca.gov
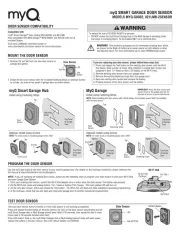
3. Mount the Smart Garage Camera™
For Indoor Use Only
Items You May Need:
lLadder
lPhilips Screw Driver
lDrill and Drill Bit
lHammer
Choose from Options A or B:
Option A: Magnetically Set to Garage Door Opener
Smart
Garage
Camera™
1. Place the Smart Garage
Camera™ magnetic
mounting base on the
garage door opener, with
lens facing what you want
to see.
2. Wrap the cable around the
mounting base.
Option B: Surface Mount
1. Remove the
magnetic
mounting
base from the
Smart Garage
Camera™.
2. Position the
magnetic
mounting base at the desired installation
surface.
3. Insert screws provided with drywall anchors,
as needed.
4. Reassemble the Smart Garage Camera™ over
the magnetic mounting base.
5. Position the Smart Garage Camera™ with
lens facing what you want to see.
4. Connect Power
1. Power your Smart Garage Camera™ with the
included micro-USB power adapter and
cable. The LED lights solid white. After
approximately 40 seconds, the LED flashes
blue, blue-green, then solid green. You are
now connected.
2. From the myQ
®
App, tap your camera and
the live video displays.
3. Adjust the Smart Garage Camera™, twisting
the posable camera head to change the
viewing angle.
Produkspesifikasjoner
| Merke: | Chamberlain |
| Kategori: | Ikke kategorisert |
| Modell: | MYQ-SGC1WCH |
Trenger du hjelp?
Hvis du trenger hjelp med Chamberlain MYQ-SGC1WCH still et spørsmål nedenfor, og andre brukere vil svare deg
Ikke kategorisert Chamberlain Manualer
11 August 2025
11 August 2025
11 August 2025
11 August 2025
11 August 2025
11 August 2025
11 August 2025

2 Januar 2025

27 Oktober 2024

23 Oktober 2024
Ikke kategorisert Manualer
- Huawei
- Alphatronics
- Lindell Audio
- Rohl
- Plasma Cloud
- Njoy
- Karma
- Telycam
- Lava
- Casr
- Gourmetmaxx
- Kern
- Blomberg
- OmniMount
- Blackburn
Nyeste Ikke kategorisert Manualer

23 Oktober 2025

23 Oktober 2025

23 Oktober 2025

23 Oktober 2025

23 Oktober 2025

23 Oktober 2025

23 Oktober 2025

23 Oktober 2025

23 Oktober 2025

23 Oktober 2025