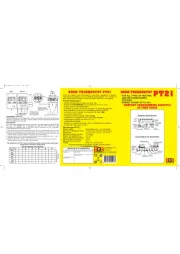
Emko Eco Light Bruksanvisning
Les nedenfor 📖 manual på norsk for Emko Eco Light (4 sider) i kategorien Termostat. Denne guiden var nyttig for 40 personer og ble vurdert med 4.8 stjerner i gjennomsnitt av 20.5 brukere
Side 1/4

3
2
1
PO1
PO2
°C
°F
/
LITE
Eco
AL1
4
5
6
PO1
PO2
°C
°F
/
LITE
Eco
AL1
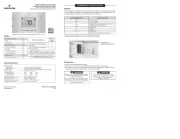
1- Before mount�ng the dev�ce �n your
panel, make sure that the cutout �s of
the r�ght s�ze.
2- Check front panel gasket pos�t�on.
3- Insert the dev�ce through the cutout.
If the mount�ng clamps are on the un�t,
put out them before �nsert�ng the un�t to
the panel.
4- Insert the mount�ng clamps to the two
of des�gnated holes that located four
s�des of dev�ce.
5- Drag the mount�ng clamps �n
d�rect�on 5 unt�l the dev�ce completely
�mmob�le w�th�n the panel.
6- In order to remove dev�ce push on
the mount�ng clamp as shown w�th
arrow 6 and pull back.
Introduct�on Brochure. ENG EcoLITE 01 V06 10/19
DISPLAY
Process D�splay: 16 mm Red 3 d�g�t LED D�splay
Set Value D�splay: 9 mm Orange 4 d�g�t LED D�splay
Led Ind�cators: PO1 (Process Output-1 Status Led), PO2 (Process
Output-2 Status Led), ºC, ºF LEDs
ENVIRONMENTAL RATINGS and PHYSICAL SPECIFICATIONS
Operat�ng Temperature: 0...50ºC
Hum�d�ty: 0-90%RH (none condens�ng)
Protect�on Class: IP65 at front, IP20 at rear
We�ght: 150 gr.
D�mens�on: 48 x 48 mm, Depth: 86,5 mm
Panel CutOut: 46 x 46 mm
Access and Change Set Values
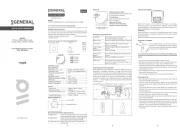
Eco LITE, On/Off Temperature Control Un�t
- 3 d�g�t process (PV) and 4 d�g�t set (SV) d�splay
- Process �nput (TC,RTD)
- ON/OFF control form
- Selectable heat�ng and cool�ng funct�on
- Operat�ng type select�on w�th hysteres�s
- Adjustment of temperature offset value
- M�n�mum pull�ng t�me adjustment for control outputs
- Password protect�on for programm�ng mode
Eco ser�es temperature controllers are des�gned for measur�ng and
controll�ng temperature. They can be used �n many appl�cat�ons w�th
the�r TC and RTD temperature measurement �nput, On/Off control form
and heat�ng and cool�ng select�on.
They are ma�nly used �n glass, plast�c, petro-chem�stry, text�le,
automot�ve and mach�ne product�on �ndustr�es.
SPECIFICATIONS
Process Input: TC, RTD
Thermocouple (TC): J, K, R, S, T and L (IEC584.1)(ITS90)
Termores�stance (RTD): Cu-50 and PT-100 (IEC751)(ITS90)
Measurement Range: Please refer to process �nput type select�on �n
process menu parameters sect�on.
Accuracy:
Thermocouple (TC):( ± 0.25% of full scale or ± 3ºC, wh�ch one �s
greater) ±1 d�g�t max.
Thermores�stance (RTD):( ± 0.25% of full scale or ± 2ºC, wh�ch one �s
greater) ±1 d�g�t max.
Cold Junct�on Compensat�on: Automat�cally ±0.1°C/1°C
L�ne Compensat�on: Max�mum 10 Ohm
Sensor Break Protect�on: Upscale
Sampl�ng Cycle: 0.1 second
Input F�lter: Programmable
Control Form: ON/OFF
ON/OFF Hysteres�s: It can be conf�gured for two control outputs
OUTPUT
Process Output - 1: Relay (5A@250VV at res�st�ve load)
Process Output - 2: Relay (5A@250VVat res�st�ve load)
ON/OFF TEMPERATURE CONTROL UNIT
LITE
Eco
SUPPLY VOLTAGE (It must be determ�ned �n order)
230VV (±15%) 50/60Hz - 2VA
115VV (±15%) 50/60Hz - 2VA
100-240VV 50/60Hz - 2VA
24VV(±%15) 50/60Hz - 2VA
24VW (±%15) 50/60Hz - 2VA
10...30VZ - 2W
Electr�cal W�r�ngs
The Dev�ce w�th One Relay:
The Dev�ce w�th Two Relays:
To reduce the effect of electr�cal no�se on dev�ce, low voltage l�ne (espec�ally sensor
�nput cable) w�r�ng must be separetely from h�gh current and voltage l�ne. If poss�ble,
use sh�elded cable and sh�eld must be connected to ground only one s�de.
c
LITE
Eco
1
2
3
4
5
6
7
8
9
10
11
12
13
14
C
NO
Process
Input
5A@250V
PT-100
TC
Supply
Sw�tch
L
N
Supply
Voltage
1A T
Fuse
PO1
(Process Output 1)
1
2
3
4
5
6
7
8
9
10
11
12
13
14
C
NO
NO
PO1
(Process Output 1)
PO2 / AL1
(Process Output 2 or
Alarm Output 1)
Process
Input
5A@250V
5A@250V
PT-100
TC
Supply
Sw�tch
L
N
Supply
Voltage
1A T
Fuse
LITE
Eco
D�mens�ons
6 mm / 0.24 �nch
80,52 mm / 3.17 �nch
Max�mum 9 mm / 0.35 �nch
48 mm / 1.89 �nch
48 mm / 1.89 �nch
PO1
PO2
°C
°F
/
LITE
Eco
AL1
Panel Mount�ng
PO2
PO1
AL1
AL2
°C
°F
/
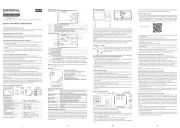
Press �ncrement or decrement
button to change Set1 value.
Press Enter button to save new
Set1 value and open Set2 screen.
Ma�n Screen
PO2
PO1
AL1
AL2
°C
°F
/ PO2
PO1
AL1
AL2
°C
°F
/
Ma�n Screen
PO2
PO1
AL1
AL2
°C
°F
/
PO2
PO1
AL1
AL2
°C
°F
/ PO2
PO1
AL1
AL2
°C
°F
/
Press �ncrement or decrement
button to change Set2 value.
Press Enter button to save new
Set2 value and return ma�n screen.
Note1: User can ex�t from set value sect�on w�thout sav�ng the values by press�ng
button. If no operat�on for 120 seconds, dev�ce automat�cally ex�ts from Set Value
sect�on.
Note2: D�splayed set value at ma�n screen could be changed accord�ng to
parameter
Note3: Set values can be adjusted between Set Value Low and H�gh L�m�ts.
PO2
PO1
AL1
AL2
°C
°F
/
Ma�n Screen
PO2
PO1
AL1
AL2
°C
°F
/PO2
PO1
AL1
AL2
°C
°F
/
Password Screen
PO2
PO1
AL1
AL2
°C
°F
/
PO2
PO1
AL1
AL2
°C
°F
/
*1
PO2
PO1
AL1
AL2
°C
°F
/
PO2
PO1
AL1
AL2
°C
°F
/
*5
PO2
PO1
AL1
AL2
°C
°F
/
PO2
PO1
AL1
AL2
°C
°F
/
PO2
PO1
AL1
AL2
°C
°F
/
PO2
PO1
AL1
AL2
°C
°F
/
PO2
PO1
AL1
AL2
°C
°F
/
PO2
PO1
AL1
AL2
°C
°F
/
PO2
PO1
AL1
AL2
°C
°F
/
PO2
PO1
AL1
AL2
°C
°F
/
PO2
PO1
AL1
AL2
°C
°F
/
PO2
PO1
AL1
AL2
°C
°F
/
PO2
PO1
AL1
AL2
°C
°F
/
PO2
PO1
AL1
AL2
°C
°F
/
PO2
PO1
AL1
AL2
°C
°F
/
*4
PO2
PO1
AL1
AL2
°C
°F
/
PO2
PO1
AL1
AL2
°C
°F
/
PO2
PO1
AL1
AL2
°C
°F
/
*2
PO2
PO1
AL1
AL2
°C
°F
/ PO2
PO1
AL1
AL2
°C
°F
/
PO2
PO1
AL1
AL2
°C
°F
/ PO2
PO1
AL1
AL2
°C
°F
/
PO2
PO1
AL1
AL2
°C
°F
/
*3
PO2
PO1
AL1
AL2
°C
°F
/
PO2
PO1
AL1
AL2
°C
°F
/
*3
*3
To enter program menu
press button
Enter Password w�th
�ncrement or decrement buttons.
Approve password
w�th Enter button
*1 - M�n�mum pull�ng t�me parameter for Output-1( ) �s not seen unless operat�on
type select�on for output-1 parameter( ) �s set as .
*2 - Out-2( ) parameters are not seen on dev�ces w�th one relay.
*3 - Alarm parameters( , and ) are not seen unless operat�on type
select�on for output-2 parameter( ) �s set as .
*4 - M�n�mum pull�ng t�me parameter for Output-2( ) �s not seen unless operat�on
type select�on for output-2 parameter( ) �s set as .
*5 - If �s d�fferent from 0 and user enters to program menu w�thout enter�ng the
password menu �s not seen.
Note: User can ex�t from any parameter screen w�thout sav�ng the values by
press�ng button. If no operat�on for 120 seconds, dev�ce automat�cally return to
the ma�n screen.
Easy Access D�agram For Program Parameters
: Output-1 Parameters
: Operat�on Type Select�on for Output-1. It can be or .
(Default: )
: Hysteres�s Value for Output-1. It can be adjusted from %0 to %50 of
the Operat�on Scale ( - ). (Default: 3)
: Set1 Value Low L�m�t. M�n�mum Set1 value �s def�ned w�th th�s
parameter. It can be adjusted from Operat�on Scale Low L�m�t( ) to
Set1 H�gh L�m�t( ). (Default: 0)
: Set1 Value H�gh L�m�t. Max�mum Set1 value �s def�ned w�th th�s
parameter. It can be adjusted from Set1 Low L�m�t( ) to Operat�on
Scale H�gh L�m�t( ). (Default: 500)
: M�n�mum Pull�ng T�me for Output-1. When Output-1 �s �nact�ve th�s
t�me must be exp�red for Output-1 to become act�ve aga�n. It can be
adjusted from 0 to 100 seconds. (Default: 0)
: Output-2 Parameters (Only for dev�ces w�th two relays)
: Operat�on Type Select�on for Output-2. It can be , or .
(Default: )
: Hysteres�s Value for Output-2. It can be adjusted from %0 to %50 of
the Operat�on Scale ( - ). (Default: 3)
: Alarm type select�on. See "Alarm Types" sect�on. (Default: )
: Set2 Value Low L�m�t. M�n�mum Set2 value �s def�ned w�th th�s
parameter. It can be adjusted from Operat�on Scale Low L�m�t( ) to
Set1 H�gh L�m�t( ). (Default: 0)
: Set2 Value H�gh L�m�t. Max�mum Set2 value �s def�ned w�th th�s
parameter. It can be adjusted from Set2 Low L�m�t( ) to Operat�on
Scale H�gh L�m�t( ). (Default: 500)
: M�n�mum Pull�ng T�me for Output-2. When Output-2 �s �nact�ve th�s
t�me must be exp�red for Output-2 to become act�ve aga�n. It can be
adjusted from 0 to 100 seconds. (Default: 0)
: Alarm on Delay T�me. It can be adjusted from 0 to 9999 seconds.
(Default: 0)
: Alarm off Delay T�me. It can be adjusted from 0 to 9998 seconds. If
�t �s h�gher than 9998, �s seen on the screen and alarm latch�ng
output �s selected. In alarm latch�ng output mode �n order to make
pass�ve alarm outputs, press enter button at ma�n screen. (Default: 0)
: Protec�on Menu Parameters
: Password for access�ng to the programm�ng sect�on. It can be
adjusted from 0 to 9999.If �s 0, password screen �s not seen. If
�s d�fferent from 0 and user enters to the menu pages w�thout enter�ng the
password, all menus can be seen except protect�on menu . But
dev�ce does not allow to do any changes �n parameters. (Default: 0)
: User default parameters. Th�s parameter �s used for sav�ng all
parameters to restore later or restore all parameters saved before. If
�s chosen, all parameters saved before are restored. If �s chosen, all
parameters saved to restore later. If �s chosen, noth�ng �s changed.
(Default: )
: Th�s parameter �s used for restore factory defaults. If �s chosen,
factory defaults parameters restored. If �s chosen, noth�ng �s changed.
(Default: )
Remove all �nput/output connect�ons on term�nals before
restor�ng parameters to user/factory defaults.
c
: Process �nput type select�on. (Default: )
: J type (Fe,Cu,N�) Thermocouple , -199ºC,900ºC ; -199ºF,999ºF
: J type (Fe,Cu,N�) Thermocouple , -19.9ºC,99.9ºC ; -19.9ºF,99.9ºF
: K type (N�,Cr,N�) Thermocouple , -199ºC,999ºC ; -199ºF,999ºF
: K type (N�,Cr,N�) Thermocouple , -19.9ºC,99.9ºC ; -19.9ºF,99.9ºF
: R type (Pt13%RhPt) Thermocouple , 0ºC,999ºC ; 32ºF,999ºF
: R type (Pt13%RhPt) Thermocouple , 0.0ºC,99.9ºC ; 32.0ºF,99.9ºF
: S type (Pt10%RhPt) Thermocouple , 0ºC,999ºC ; 32ºF,999ºF
: S type (Pt10%RhPt) Thermocouple , 0.0ºC,99.9ºC ; 32.0ºF,99.9ºF
: T type (Cu,Cu,N�) Thermocouple , -199ºC,400ºC ; -199ºF,752ºF
: T type (Cu,Cu,N�) Thermocouple , -19.9ºC,99.9ºC ; -19.9ºF,99.9
: L type (N�,Cr,Co / N�,Fe,Mn,Cu) Thermocouple , -150ºC,800ºC ;
-199ºF,999ºF
: L type (N�,Cr,Co / N�,Fe,Mn,Cu) Thermocouple , -19.9ºC,99.9ºC ;
-19.9ºF,99.9ºF
: Cu-50 , -199ºC,200ºC ; -199ºF,392ºF
: Cu-50 , -19.9ºC,99.9ºC ; -19.9ºF,99.9ºF
: Pt-100 , -199ºC,650ºC ; -199ºF,999ºF
: Pt-100 , -19.9ºC,99.9ºC ; -19.9ºF,99.9ºF
: Un�t Select�on. or can be chosen. (Default: )
: Operat�on Scale m�n�mum (Low L�m�t) value. It changes accord�ng
to the process �nput type and scale. (Default: -199)
: Operat�on Scale max�mum (H�gh L�m�t) value. It changes accord�ng
to the process �nput type and scale. (Default: 900)
: D�splay offset for process value. It can be adjusted from -10% of
scale to 10% ofscale. It �s added to the process d�splay value. (Default: 0)
: Def�ne f�lter t�me(sec) for d�splayed value. (Default: 1.0)
: Select�on of wh�ch set value d�splayed at ma�n screen.
(Default: )
: Process Menu Parameters
Produkspesifikasjoner
| Merke: | Emko |
| Kategori: | Termostat |
| Modell: | Eco Light |
Trenger du hjelp?
Hvis du trenger hjelp med Emko Eco Light still et spørsmål nedenfor, og andre brukere vil svare deg
Termostat Emko Manualer

27 Oktober 2024

27 Oktober 2024

27 Oktober 2024

27 Oktober 2024

27 Oktober 2024

27 Oktober 2024

22 Oktober 2024
Termostat Manualer
- AEG
- Yokis
- Conrad
- Sorel
- Orbis
- Junkers
- Tado
- Truma
- Salus
- Easy Timer
- IR-V
- Tru Components
- Elektrobock
- ChiliTec
- Brennenstuhl
Nyeste Termostat Manualer
19 Oktober 2025
19 Oktober 2025

9 Oktober 2025
8 Oktober 2025

6 Oktober 2025
6 Oktober 2025
6 Oktober 2025
24 September 2025

24 September 2025
24 September 2025