Fusion EL-F653B Bruksanvisning
Les nedenfor 📖 manual på norsk for Fusion EL-F653B (14 sider) i kategorien Høyttaler. Denne guiden var nyttig for 17 personer og ble vurdert med 5.0 stjerner i gjennomsnitt av 9 brukere
Side 1/14
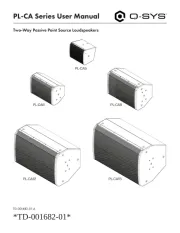
EL SERIES SPEAKERS
INSTALLATION INSTRUCTIONS
Important Safety Information
WARNING
See the Important Safety and Product Information guide in the product box for product warnings and other
important information.
This device must be installed according to these instructions to avoid serious personal injury or possible
property damage.
Disconnect the vessel's power supply before beginning to install this device to avoid serious personal injury or
possible property damage.
CAUTION
It is strongly recommended that you have your audio system installed by a professional installer to ensure
optimum performance and to avoid personal injury or property damage.
Continuous exposure to sound pressure levels over 100dBA may cause permanent hearing loss. The volume
is typically too loud if you cannot hear people speaking around you. Limit the amount of time you listen at high
volume. If you experience ringing in your ears or muffled speech, stop listening and have your hearing checked.
To avoid possible personal injury, always wear safety goggles, ear protection, and a dust mask when drilling,
cutting, or sanding.
NOTICE
When drilling or cutting, always check what is on the opposite side of the surface to avoid damaging the vessel.
You must read all installation instructions before beginning the installation. If you experience difficulty during
the installation, go to support.garmin.com for product support.
GUID-FF67D738-0427-418B-829A-44F0C22D890C v5April 2024
ruS
�
G
n
EL SERIES SPEAKERS
INSTALLATION INSTRUCTIONS
Important Safety Information
Important Safety and Product Information
April 2024 GUID-FF67D738-0427-418B-829A-44F0C22D890C v5
Produkspesifikasjoner
| Merke: | Fusion |
| Kategori: | Høyttaler |
| Modell: | EL-F653B |
Trenger du hjelp?
Hvis du trenger hjelp med Fusion EL-F653B still et spørsmål nedenfor, og andre brukere vil svare deg
Høyttaler Fusion Manualer
4 September 2025
4 September 2025
3 September 2025

3 September 2025
3 September 2025
3 September 2025
3 September 2025

3 September 2025

3 September 2025
3 September 2025
Høyttaler Manualer
- Mac Audio
- Draper
- Lexibook
- Monster
- Peavey
- McIntosh
- Elac
- Exagerate
- Transparent
- Orava
- M-Audio
- Marshall
- August
- Bauhn
- Sencor
Nyeste Høyttaler Manualer

23 Oktober 2025

21 Oktober 2025
21 Oktober 2025

20 Oktober 2025
20 Oktober 2025
20 Oktober 2025
20 Oktober 2025
20 Oktober 2025
20 Oktober 2025
20 Oktober 2025