Fusion SG-F77W Bruksanvisning
Les nedenfor 📖 manual på norsk for Fusion SG-F77W (34 sider) i kategorien Høyttaler. Denne guiden var nyttig for 2 personer og ble vurdert med 4.5 stjerner i gjennomsnitt av 2 brukere
Side 1/34

®
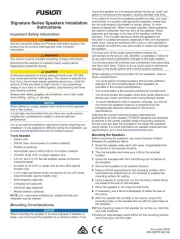
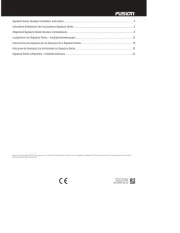
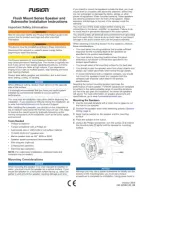
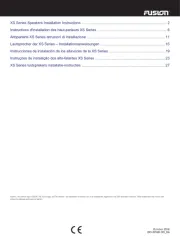
Signature Series Subwoofer Installation Instructions ........................................................................2
Instructions d'installation du caisson de basse Signature Series ......................................................6
Subwoofer Signature Series Istruzioni di installazione ................................................................... 11
Subwoofer der Signature Series – Installationsanweisungen ......................................................... 15
Instrucciones de instalación del subwoofer de la Signature Series ................................................ 20
Signature Series da série esportiva da marca ................................................................................ 25
Signature Series subwooferinstallatie-instructies ........................................................................... 30
Garmin
®
, the Garmin logo, and the Fusion
™
logo are trademarks of Garmin Ltd. or its subsidiaries, registered in the USA and other countries. Fusion and True-Marine
™
are trademarks of Garmin Ltd. or its
subsidiaries. These trademarks may not be used without the express permission of Garmin.
December 2014 190-01845-90_0APrinted in China

Signature Series Subwoofer
Installation Instructions
Important Safety Information
WARNING
Failure to follow these warnings and cautions could result in
personal injury, damage to the vessel, or poor product
performance.
See the Important Safety and Product Information guide in the
product box for product warnings and other important
information.
This device must be installed according to these instructions.
Disconnect the vessel's power supply before beginning to install
this product.
CAUTION
Audio systems can produce sound pressure levels exceeding
135 dB. Continuous exposure to sound pressure levels over
100 dB may cause permanent hearing loss. The volume is
typically too loud if you cannot hear people speaking around
you. Limit the amount of time you listen at high volume. If you
experience ringing in your ears or muffled speech, stop listening
and have your hearing checked.
Always wear safety goggles, ear protection, and a dust mask
when drilling, cutting, or sanding.
NOTICE
When drilling or cutting, always check what is on the opposite
side of the surface.
It is strongly recommended that you have your audio system
installed by a professional installer to ensure optimum
performance.
You must read all installation instructions before beginning the
installation. If you experience difficulty during the installation, go
to www.fusionentertainment.com for product support.
After installing the subwoofer, you should run the subwoofer at
low to medium volumes for the first few hours of use. This helps
to improve the overall sound by gradually loosening up the
moving components of the subwoofer, such as the cone, spider,
and surround
What's In the Box
• 1 subwoofer
• 6 Phillips stainless steel, 4.8 mm x 50 mm (10 gauge x 2 in.)
mounting screws
• Mounting template
• Grille (Classic models only)
• 1 tinned LED connection cable (6 m) (Sports models only)
• Hex key (Sports models only)
Tools Needed
• Electric drill
• Drill bit (size varies based on surface material)
• Phillips screwdriver
• Wire strippers
• Crimping tool
• Electrical tape
• Appropriate saw or utility knife to cut surface material
• Suitable gauge speaker wire for the length required
NOTE: For customized installations, additional tools and
materials may be needed.
Mounting Considerations
Selecting the correct mounting location is critical to optimize the
performance of the audio system. Fusion
™
subwoofer is
designed to perform in the widest possible range of mounting
locations, but the more you plan the installation, the better the
subwoofer's sound will be.
• The audio system must be turned off before making any
connections. Failure to do so could result in permanent
damage to the audio system.
• You should protect all terminals and connections from
grounding and from each other. Failure to do so could result
in permanent damage to the audio system and voids the
product warranty.
• You should protect the wires from sharp objects and always
use rubber grommets when wiring through panels.
• The mounting location must avoid potential obstacles, such
as fuel and hydraulic lines and wiring.
• The mounting location must provide sufficient clearance for
the mounting depth of the subwoofer as specified in the side
view drawings and the specifications.
• When possible, the area behind each subwoofer should be
enclosed.
• To avoid interference with a magnetic compass, the
subwoofer should not be installed closer to a compass than
the compass-safe distance value listed in the product
specifications.
• You should select a flat mounting surface for the best seal.
• For better bass performance, the subwoofer should be
mounted in an area that provides just enough room behind
the subwoofer. Too small an area restricts bass, and too
large an area compromises bass performance. Placing a
subwoofer close to an open area produces the least bass.
• When a subwoofer is not exposed to the outside
environment, a better bass performance can be achieved
using an enclosure that has a ported design. See the
optimum enclosure design recommendations. Those
recommendations specify volume only, and for the ported
option, an optimum port size and length are also provided.
• If you intend to mount the subwoofer outside the boat, follow
these considerations.
◦ When mounted correctly, the subwoofer is rated IP65 for
protection in the harsh marine environment from the front
of the subwoofer. Water exposure and damage to the rear
of the subwoofer voids the warranty.
◦ The subwoofer must be mounted in a location well above
the waterline, where it is not submerged.
◦ The subwoofer must be mounted in a location where it
cannot be damaged by docks, pilings, or other pieces of
equipment.
◦ The subwoofer should be mounted in a sealed enclosure,
especially if it is exposed to wash down. A port or vent
may allow water to collect in the enclosure and damage
the subwoofer.
Mounting the Subwoofer
Before mounting the subwoofer, you must choose a location
where there is enough clearance behind the mounting surface.
Refer to the side view drawing and the specifications for
clearance information.
Before mounting the subwoofer, you must choose a location
following the mounting considerations.
If you are replacing a Fusion MS-SW10 10" subwoofer with the
Signature Series Classic model 10" subwoofer, see Replacing a
Fusion MS-SW10 10" Subwoofer.
1
Route the wires from the source to the mounting location,
away from sources of electrical interference.
2

2
Trim the template and make sure it fits in the selected
location.
3
Orient the template with the Fusion logo at the bottom of the
template.
4
Secure the template to the selected location.
5
Using a drill bit appropriate for the mounting surface, drill a
hole inside the dashed line on the template to prepare the
mounting surface for cutting.
6
Using a jigsaw or rotary tool, cut the mounting surface along
the inside of the line on the template.
7
Place the subwoofer in the cutout to test the fit.
8
If necessary, use a file and sandpaper to refine the size of
the cutout.
9
After the subwoofer fits correctly in the cutout, ensure the
mounting holes on the subwoofer line up with the pilot holes
on the template.
10
If the mounting holes do not line up, mark the new hole
locations.
11
Using an appropriately sized drill bit for the mounting surface
and screw type, drill the holes.
12
Remove the template from the mounting surface.
13
Connect the subwoofer wires while observing polarity.
For more information on wiring polarity, see Subwoofer
Sound Optimization
14
If necessary, connect the LED wires to the Sports model
subwoofer (see Sports Model LED Wiring).
15
Place the subwoofer in the cutout.
16
Secure the subwoofer to the mounting surface using the
included screws.
NOTE: Do not over tighten the screws, especially if the
mounting surface is not flat.
For the Classic model subwoofer, you should attach the grille to
the front (see Attaching the grille to the Classic Model
Subwoofer).
Replacing a Fusion MS-SW10 10" Subwoofer
You can replace a Fusion MS-SW10 10" subwoofer with the
Signature Series Classic model 10" subwoofer. You do not need
to cut or drill new holes.
1
Remove the MS-SW10 from the mounting surface.
2
Remove each oblong washer from the front of the subwoofer.
3
Turn each washer
À
so the hole is oriented toward the center
of the subwoofer.
4
Replace each washer.
5
Continue mounting the subwoofer, starting at step 13 in
Mounting the Subwoofer.
Sports Model LED Wiring
Connecting the LED Wires to the Sports Model Subwoofer
NOTE: This feature is available only on the Sports model
subwoofer.
You can control the color of the LEDs by the polarity of the LED
wires.
1
Using the hex key, loosen the screws on the wiring terminals
on the back of the subwoofer.
2
Connect the black and red wires to the terminal according to
the preferred LED color.
Blue LED Black to negative (-)
Red to positive (+)
White LED Black to positive (+)
Red to negative (-)
3
Using the hex key, tighten the screws on the wiring terminals.
Connecting the Sports Model Subwoofer LED Wires to
Power
NOTE: This feature is available only on the Sports model
subwoofer.
All 12 Vdc wiring to the LEDs must be fused at the power-source
end of your cable using a 3 A fuse. The red power (+) wire
should be connected to a 12 Vdc source through an isolator
switch or circuit breaker to turn the LEDs on and off. You can
use the same isolator or circuit breaker controlling the supply to
your stereo, which allows you to turn the LEDs and the stereo
on and off at the same time.
If it is necessary to extend the red and black wires, you should
use 20 AWG (0.5 mm
2
) or thicker wire.
1
Route the red power (+) and black ground (-) wires to the
battery and subwoofer.
2
Connect the black wire to the negative (-) battery terminal.
3
Connect the red wire to the positive (+) battery terminal
through a 3 A fuse and isolator switch or circuit breaker.
Attaching the grille to the Classic Model Subwoofer
NOTE: This feature is available only on the Classic model
subwoofer.
1
With the subwoofer mounted, hold the grille with the Fusion
logo at the bottom, at the 6 o'clock position.
2
Turn the grille counter-clockwise about 10°, so the Fusion
logo is at the 5 o'clock position.
3
Place the grille on the rim of the subwoofer.
4
Twist the grille clockwise to secure it.
Subwoofer Sound Optimization
While installing the subwoofer, you can ensure the sound from
the subwoofer is optimized by running the subwoofer out of
phase. You can switch the positive and negative wires on the
subwoofer to run them out of phase.
Running the subwoofer out of phase from the speakers allows
you to hear if the perception of bass is more from the location of
3
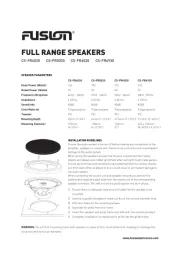
Produkspesifikasjoner
Merke: | Fusion |
Kategori: | Høyttaler |
Modell: | SG-F77W |
Trenger du hjelp?
Hvis du trenger hjelp med Fusion SG-F77W still et spørsmål nedenfor, og andre brukere vil svare deg
Høyttaler Fusion Manualer
3 September 2025
3 September 2025
3 September 2025
3 September 2025
3 September 2025
3 September 2025
3 September 2025
3 September 2025
3 September 2025
3 September 2025
Høyttaler Manualer
- Høyttaler Aiwa
- Høyttaler Bauhn
- Høyttaler Insignia
- Høyttaler LG
- Høyttaler Power Dynamics
- Høyttaler Vonyx
- Høyttaler Grundig
- Høyttaler Sharp
- Høyttaler Hama
- Høyttaler Vorago
- Høyttaler Jensen
- Høyttaler AOC
- Høyttaler Philips
- Høyttaler Avantree
- Høyttaler Nabo
- Høyttaler IKEA
- Høyttaler Edifier
- Høyttaler Reflexion
- Høyttaler Meridian
- Høyttaler Teufel
- Høyttaler Fender
- Høyttaler Axton
- Høyttaler Kogan
- Høyttaler Soundcore
- Høyttaler McIntosh
- Høyttaler SereneLife
- Høyttaler Turbosound
- Høyttaler Behringer
- Høyttaler Sony
- Høyttaler GoGEN
- Høyttaler Pro-Ject
- Høyttaler Yamaha
- Høyttaler Xiaomi
- Høyttaler Morel
- Høyttaler Trust
- Høyttaler Axis
- Høyttaler Gembird
- Høyttaler Extron
- Høyttaler Media-tech
- Høyttaler Pioneer
- Høyttaler EarFun
- Høyttaler Ecler
- Høyttaler AudioControl
- Høyttaler Audac
- Høyttaler Woxter
- Høyttaler KEF
- Høyttaler Audio-Technica
- Høyttaler Toa
- Høyttaler Metra
- Høyttaler Pyle
- Høyttaler Sencor
- Høyttaler Bose
- Høyttaler Orava
- Høyttaler Schneider
- Høyttaler Kanto
- Høyttaler Anker
- Høyttaler Wet Sounds
- Høyttaler JVC
- Høyttaler Niceboy
- Høyttaler Sharper Image
- Høyttaler Kicker
- Høyttaler Auna
- Høyttaler Midland
- Høyttaler OSD Audio
- Høyttaler DataVideo
- Høyttaler Fenton
- Høyttaler Audizio
- Høyttaler Bluesound
- Høyttaler Hertz
- Høyttaler Kenwood
- Høyttaler MB Quart
- Høyttaler Bigben
- Høyttaler Aplic
- Høyttaler CSL
- Høyttaler Bearware
- Høyttaler NUVO
- Høyttaler Maginon
- Høyttaler Speco Technologies
- Høyttaler Max
- Høyttaler Infiniton
- Høyttaler Sennheiser
- Høyttaler Roku
- Høyttaler GPO
- Høyttaler Advance
- Høyttaler Sonance
- Høyttaler AXESS
- Høyttaler Be Cool
- Høyttaler Artsound
- Høyttaler Denon
- Høyttaler Ion
- Høyttaler Elac
- Høyttaler Marshall
- Høyttaler Showtec
- Høyttaler Yorkville
- Høyttaler V-Tac
- Høyttaler MyDJ
- Høyttaler Braun
- Høyttaler Valcom
- Høyttaler Celly
- Høyttaler JBL
- Høyttaler Infinity
- Høyttaler Majority
- Høyttaler Nedis
- Høyttaler Helix
- Høyttaler Genesis
- Høyttaler Logilink
- Høyttaler Klipsch
- Høyttaler Worx
- Høyttaler Muse
- Høyttaler Ground Zero
- Høyttaler Karma
- Høyttaler Glemm
- Høyttaler ECG
- Høyttaler Prixton
- Høyttaler Match
- Høyttaler Speed-Link
- Høyttaler Renkforce
- Høyttaler Definitive Technology
- Høyttaler Tracer
- Høyttaler Audiotec Fischer
- Høyttaler QSC
- Høyttaler WHD
- Høyttaler Q Acoustics
- Høyttaler Bowers And Wilkins
- Høyttaler Karcher
- Høyttaler GoldenEar
- Høyttaler Pyramid
- Høyttaler FoneStar
- Høyttaler Apogee
- Høyttaler Trevi
- Høyttaler Adam Hall
- Høyttaler Homedics
- Høyttaler Monitor Audio
- Høyttaler Peavey
- Høyttaler Canton
- Høyttaler Fresh N Rebel
- Høyttaler Sven
- Høyttaler Craftsman
- Høyttaler Energy Sistem
- Høyttaler PSB
- Høyttaler Vizio
- Høyttaler Polk
- Høyttaler ESX
- Høyttaler Omnitronic
- Høyttaler Crestron
- Høyttaler Russound
- Høyttaler MEE Audio
- Høyttaler Monacor
- Høyttaler ModeCom
- Høyttaler Hercules
- Høyttaler Black Hydra
- Høyttaler Electro-Voice
- Høyttaler Proscan
- Høyttaler Wharfedale
- Høyttaler Monster
- Høyttaler Boss
- Høyttaler Tannoy
- Høyttaler JL Audio
- Høyttaler Atlas Sound
- Høyttaler Davis
- Høyttaler Mount-It!
- Høyttaler GMB Audio
- Høyttaler Mad Dog
- Høyttaler Ashly
- Høyttaler Origin Acoustics
- Høyttaler VTech
- Høyttaler Samson
- Høyttaler Memphis Audio
- Høyttaler Focal
- Høyttaler Alpine
- Høyttaler Monoprice
- Høyttaler Boompods
- Høyttaler Kramer
- Høyttaler ATen
- Høyttaler Genelec
- Høyttaler Bazooka
- Høyttaler KRK
- Høyttaler Lamax
- Høyttaler NGS
- Høyttaler Aiaiai
- Høyttaler RCF
- Høyttaler LC-Power
- Høyttaler SVS
- Høyttaler N-Gear
- Høyttaler Vimar
- Høyttaler Bogen
- Høyttaler Atlas
- Høyttaler PowerBass
- Høyttaler Manta
- Høyttaler Trendnet
- Høyttaler Prime3
- Høyttaler Duronic
- Høyttaler Harman Kardon
- Høyttaler Lexibook
- Høyttaler Ibiza Sound
- Høyttaler Creative
- Høyttaler Aconatic
- Høyttaler DAP Audio
- Høyttaler REL Acoustics
- Høyttaler Savio
- Høyttaler Sonus Faber
- Høyttaler Logitech
- Høyttaler Xcellon
- Høyttaler OWI
- Høyttaler Continental Edison
- Høyttaler Titanwolf
- Høyttaler Crosley
- Høyttaler Weather X
- Høyttaler HK Audio
- Høyttaler Phoenix Gold
- Høyttaler Sogo
- Høyttaler Krüger And Matz
- Høyttaler Indiana Line
- Høyttaler Yamazen
- Høyttaler Lexon
- Høyttaler Blue Tees
- Høyttaler BASSBOSS
- Høyttaler House Of Marley
- Høyttaler Polsen
- Høyttaler Deaf Bonce
- Høyttaler PreSonus
- Høyttaler Tangent
- Høyttaler Denon DJ
- Høyttaler FBT
- Høyttaler Transparent
- Høyttaler IHome
- Høyttaler Defender
- Høyttaler Martin Logan
- Høyttaler Andover
- Høyttaler Grimm Audio
- Høyttaler LD Systems
- Høyttaler Akai
- Høyttaler SureFire
- Høyttaler Imperial
- Høyttaler Apart
- Høyttaler Magnat
- Høyttaler Hifonics
- Høyttaler Klark Teknik
- Høyttaler Phonic
- Høyttaler BlueAnt
- Høyttaler AV:link
- Høyttaler Xblitz
- Høyttaler AudioSource
- Høyttaler Taga Harmony
- Høyttaler SoundTube
- Høyttaler James
- Høyttaler Ruark Audio
- Høyttaler MB
- Høyttaler Devialet
- Høyttaler Antelope
- Høyttaler Lenco
- Høyttaler Heco
- Høyttaler Boston Acoustics
- Høyttaler Crest Audio
- Høyttaler M-Audio
- Høyttaler Dali
- Høyttaler Metronic
- Høyttaler Berker
- Høyttaler Elbe
- Høyttaler Nikkei
- Høyttaler Eve Audio
- Høyttaler Delvcam
- Høyttaler August
- Høyttaler Adam
- Høyttaler Cerwin-Vega
- Høyttaler Ikegami
- Høyttaler Alto
- Høyttaler Revel
- Høyttaler New One
- Høyttaler Mission
- Høyttaler Califone
- Høyttaler Dynaudio
- Høyttaler Proel
- Høyttaler Audibax
- Høyttaler Mackie
- Høyttaler Bowers Wilkins
- Høyttaler Dual
- Høyttaler HuddleCamHD
- Høyttaler Magnavox
- Høyttaler ILive
- Høyttaler Moonki
- Høyttaler X JUMP
- Høyttaler PulseAudio
- Høyttaler Exagerate
- Høyttaler Ikarao
- Høyttaler Urban Revolt
- Høyttaler Audison
- Høyttaler Boynq
- Høyttaler Clarity
- Høyttaler VIETA PRO
- Høyttaler Potter
- Høyttaler Sonoro
- Høyttaler OTTO
- Høyttaler Soen
- Høyttaler Miller & Kreisel
- Høyttaler Qian
- Høyttaler Iriver
- Høyttaler Acme Made
- Høyttaler Standard Horizon
- Høyttaler The Box
- Høyttaler Essentiel B
- Høyttaler Sunfire
- Høyttaler Music Hero
- Høyttaler Lotronic
- Høyttaler Paradigm
- Høyttaler Nubert
- Høyttaler Advance Acoustic
- Høyttaler Amphion
- Høyttaler Naxa
- Høyttaler Induction Dynamics
- Høyttaler Cyber Acoustics
- Høyttaler Audio Pro
- Høyttaler IPort
- Høyttaler Cavalier
- Høyttaler ETON
- Høyttaler Ultimate Ears
- Høyttaler NEAR
- Høyttaler Irradio
- Høyttaler Louroe Electronics
- Høyttaler Rockustics
- Høyttaler MOOOV
- Høyttaler DB Technologies
- Høyttaler Kalley
- Høyttaler Elipson
- Høyttaler SOUNDBOKS
- Høyttaler Streetz
- Høyttaler Diamond Audio
- Høyttaler Rockville
- Høyttaler Fun Generation
- Høyttaler DS18
- Høyttaler Coastal Source
- Høyttaler Sirus
- Høyttaler Audiofrog
- Høyttaler Champion
- Høyttaler BoomTone DJ
Nyeste Høyttaler Manualer
1 September 2025
1 September 2025
1 September 2025
1 September 2025
1 September 2025
1 September 2025
1 September 2025
1 September 2025
1 September 2025
1 September 2025