Gioteck VX-2 (PS3) Bruksanvisning
Gioteck
Ikke kategorisert
VX-2 (PS3)
Les nedenfor 📖 manual på norsk for Gioteck VX-2 (PS3) (2 sider) i kategorien Ikke kategorisert. Denne guiden var nyttig for 25 personer og ble vurdert med 4.4 stjerner i gjennomsnitt av 13 brukere
Side 1/2
L
R
SELECT
TURBO
START
1
2
1
2
simulate the button being pressed
rapidly e.g. “boost firepower”.
The buttons supported by Turbo are
, , , , L1, L2, R1, R2
To enable turbo : Press & hold Turbo
then press the action button you wish
to turbo. The LED will flash when an
action is assigned.
To disable turbo : Repeat the steps
above and the LED will turn o.
More than one button can be
assigned to turbo at one time.
Once powered o, all buttons will
return to default without Turbo.
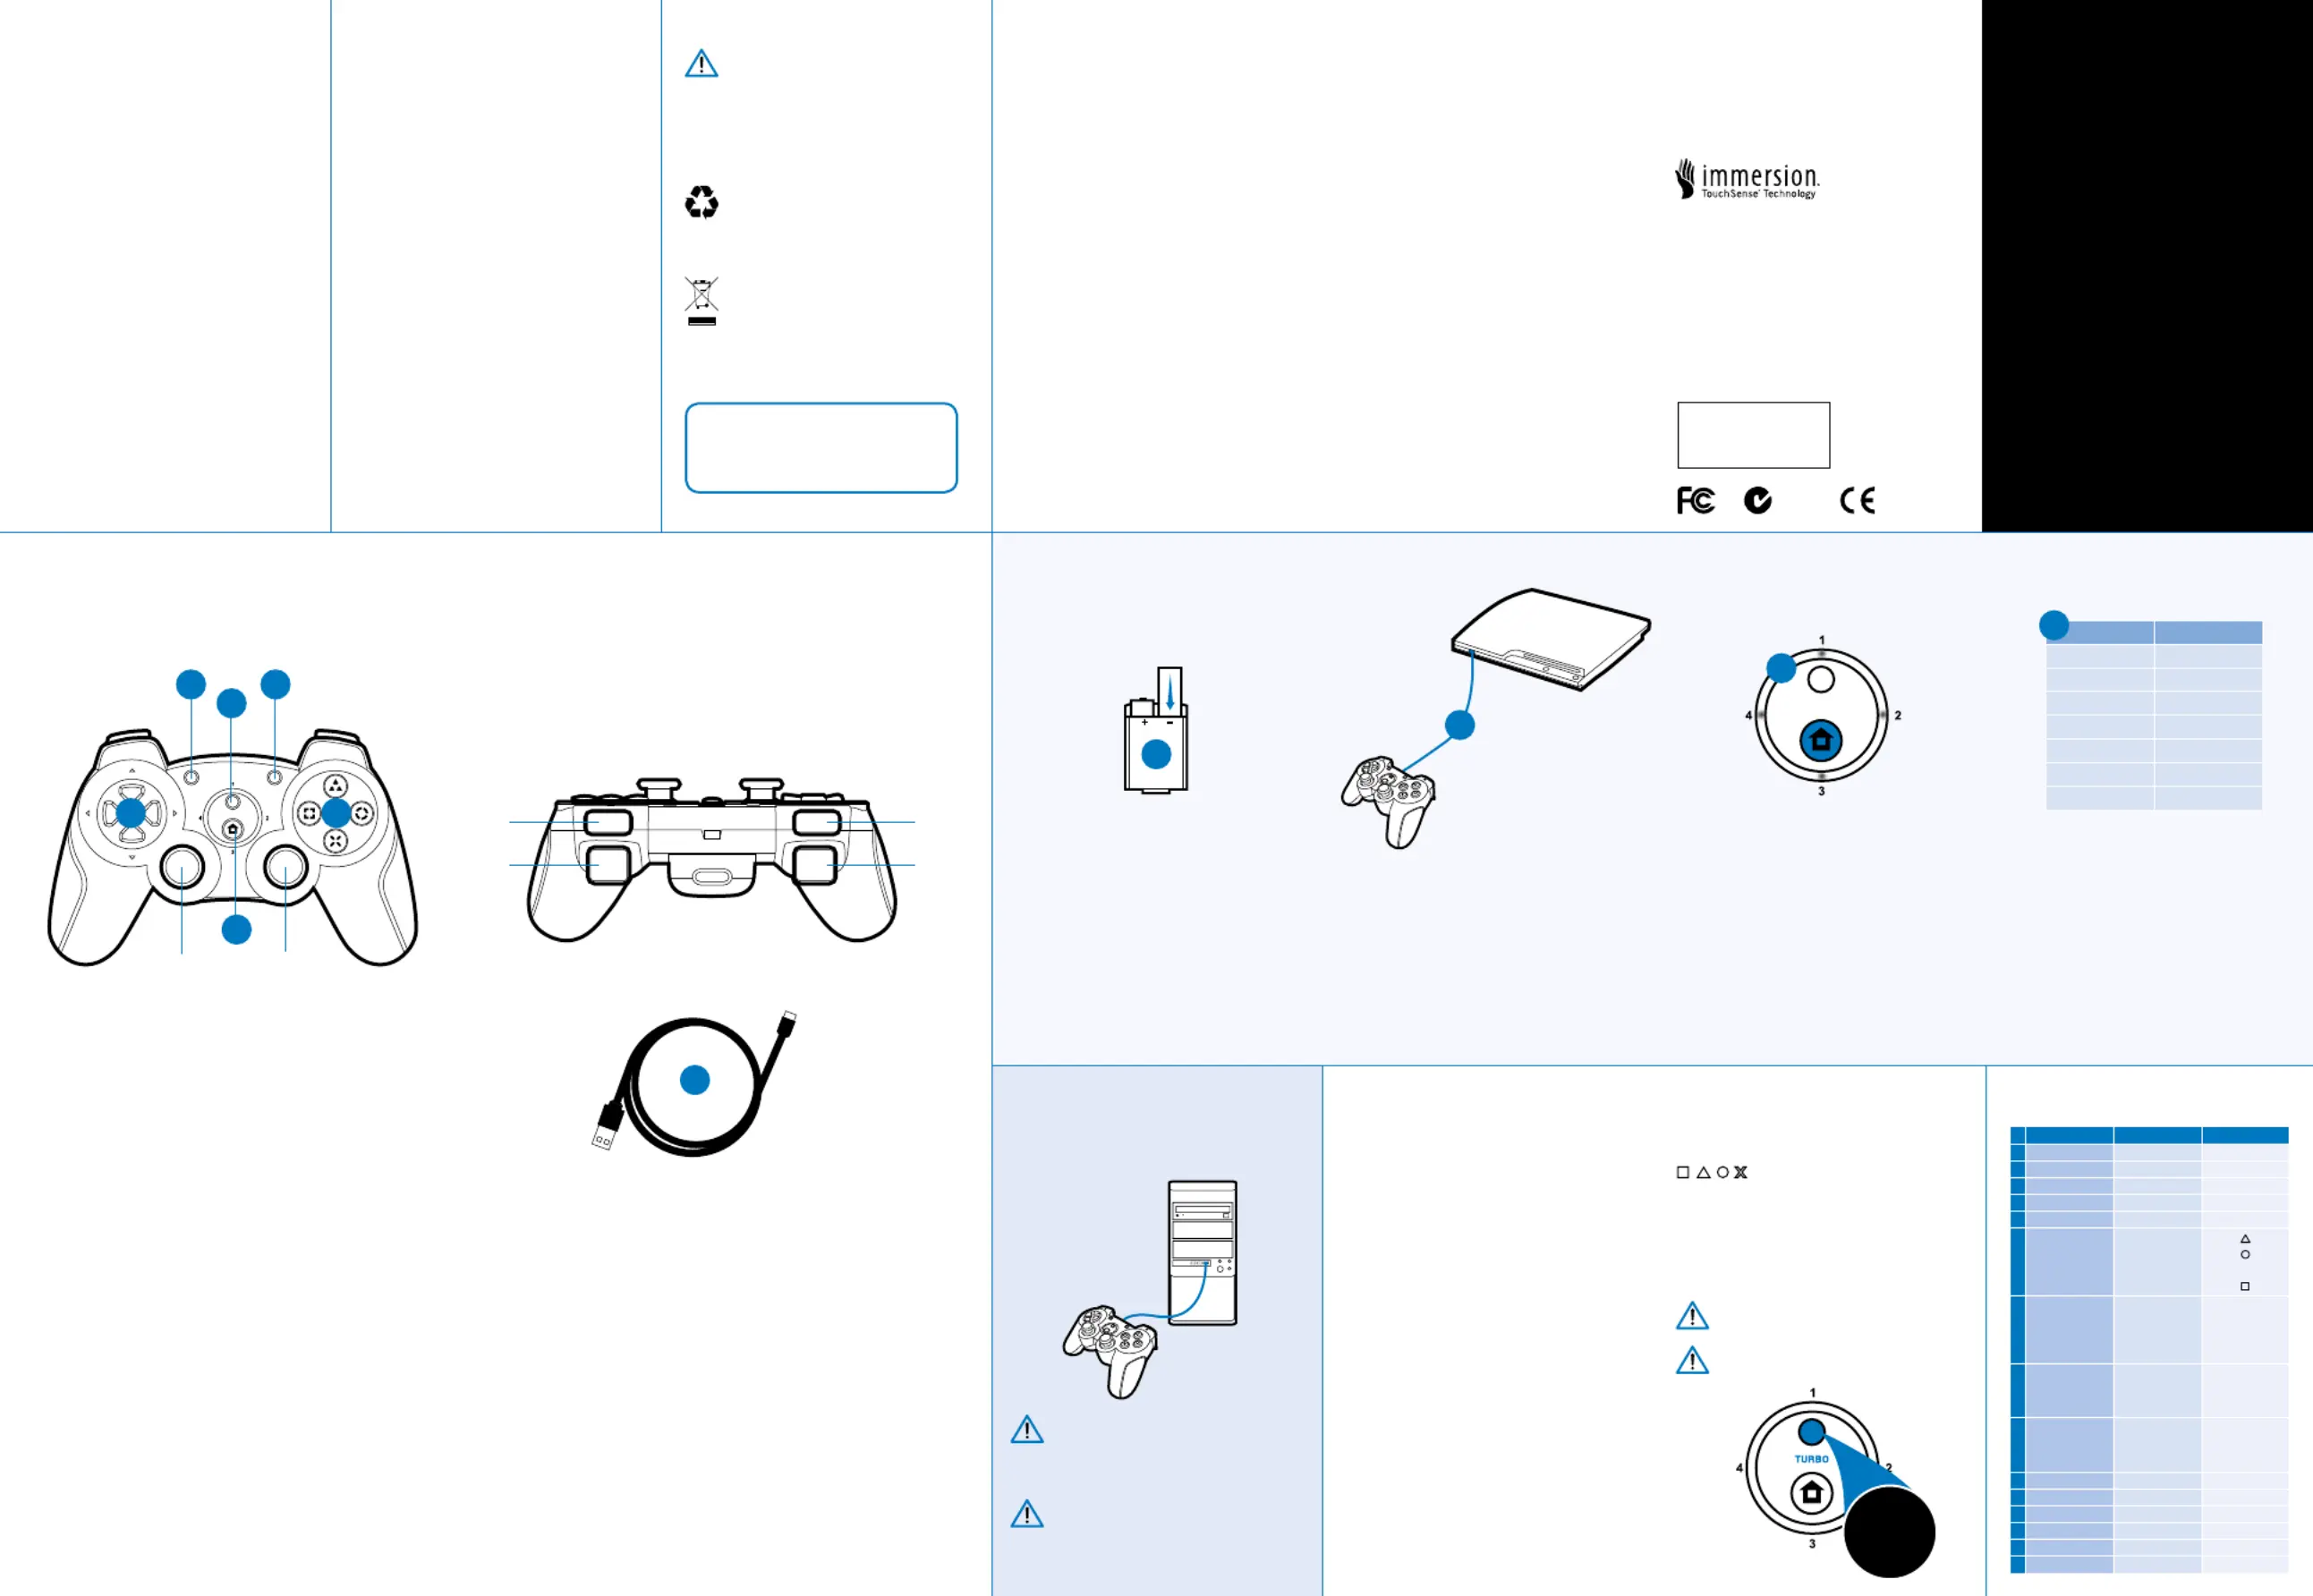
FEATURES & DETAILS PS3 SET UP & PAIRING
WARNINGS
This symbol indicates
important installation,
operational or maintenance
instructions. Always follow
these instructions closely.
ENVIRONMENT
Please help to conserve the
environment by recycling
the cardboard packaging of
this product.
This product should NOT be
disposed of in normal household
waste. It should be disposed of
separately. Please take it to an
electrical waste collection point.
PRECAUTIONS
This product has been designed
with the highest concern for safety.
However, any electrical device, if used
improperly, has the potential to
cause harm. To help ensure risk-free
operation please pay attention
to the following guidelines.
• Use only as intended. This is a
precision product, handle with care.
• Contains small parts. Not suitable
for children under 3 years of age.
• Store in a dry & dust free area.
• Do not store in areas of extreme
heat or cold, and avoid direct
sunlight or heat sources eg. heaters.
• Do not allow the product to get wet
or dirty; doing so may cause damage.
• Do not clean with benzene, paint
thinner, acetone, alcohol, or other
such solvents.
• Do not take the product apart;
doing so will void your warranty
and may cause electrical shock.
TROUBLESHOOTING TIPS &
TO VIEW THIS MANUAL ONLINE:
www.gioteck.com
Gioteck hereby declares that this product is
in compliance with the essential requirements
and other provisions of Directive 2004/108/
EC and R&TTe 1999/5/EC. To view the full
version of the Declaration of Conformity
please go online to doc.gioteck.com
TouchSense Technology Licensed from
Immersion Corporation. TouchSense
Technology for Spinning Mass Tactile
Feedback Devices protected by one or
more of the following United States
Patents:
5831408, 5844392, 5857986, 5907487,
5959613, 6020875, 6088017, 6104158, 6246390,
6252583, 6271833, 6275213, 6278439, 6343349,
6400352, 6411276, 6424333, 6715045, 6801008,
7131073, 7199790, 7209117, 7299321, 7327348,
7345672, 7502011 and other patents pending.
radiate radio frequency energy and, if not
installed and used in accordance with the
instructions, may cause harmful interference
to radio communications. However, there
is no guarantee that interference will not
occur in a particular installation. If this
equipment does cause harmful interference
to radio or television reception, which can
be determined by turning the equipment
o and on, the user is encouraged to
try to correct the interference by one
or more of the following measures:
• Reorient or relocate the receiving antenna.
• Increase the separation between the
equipment and receiver.
• Connect the equipment into an outlet
on a circuit dierent from that to
which the receiver is connected.
• Consult the dealer or an experienced
radio/TV technician for help.
This equipment complies with FCC
radiation exposure limits set forth
for an uncontrolled environment. End
user must follow the specific operating
instructions for satisfying RF exposure
compliance. This transmitter must not be
co-located or operating in conjunction
with any other antenna or transmitter.
This device complies with Industry Canada
RSS 210 standard(s). Operation is subject
to the following two conditions: (1) this
device may not cause interference, and (2)
this device must accept any interference,
including interference that may cause
undesired operation of the device.
Caution: The user is cautioned that changes
or modifications not expressly approved by
the party responsible for compliance could
void the user’s authority to operate the
equipment. This device complies with Part
15 of the FCC Rules. Operation is subject to
the following two conditions: (1) this device
may not cause harmful interference, and (2)
this device must accept any interference
received, including interference that may
cause undesired operation. Note: This
equipment has been tested and found to
comply with the limits for a Class B digital
device, pursuant to part 15 of the FCC
Rules. These limits are designed to provide
reasonable protection against harmful
interference in a residential installation.
This equipment generates, uses and can
LEGALS
This product complies with the
following legal regulations. For further
information go to www.gioteck.com
Complies with
IDA Standards
DB100398
VX-2
LED CHANNEL
1 1
2 2
3 3
4 4
1+4 5
2+4 6
3+4 7
FUNCTION KEYS
To Power On : Press the Home
button once until the LED illuminates.
To Power O : Press & hold the
Home button for 10 secs.
START : To start/pause a game.
HOME : To enter the PS3 menu.
SELECT : To select weapons or tools.
D-PAD: For moving direction
UP/DOWN/LEFT/RIGHT.
Low Battery : The chosen channel
port LED will flash continuously and
motor vibration will stop functioning.
Sleep Mode : The controller will
automatically enter sleep mode
aer 10 minutes of inactivity (all LED
indication will be O). To wake the
controller from sleep mode, press
the Home button.
Operation Time : 35 hours game play.
Turbo Function : Pressing an action
button assigned with turbo will
1. Ensure 2 x AA batteries are loaded
in your controller and that your
PS3 console is turned on.
2. Connect the USB cable between
the controller and the console.
3. Press the Home Button and pairing
will begin automatically. Once paired
the allocated channel port LED(s)
will illuminate. You can now use the
VX-2 in wired mode. To use wirelessly,
unplug the USB cable and the VX-2
will connect to the PS3 wirelessly.
The allocated channel port LED(s)
will then illuminate.
PRESS
& HOLD
KEY MAPPING
To check/change the default
key mapping and functions:
Control Panel > Game Controllers
> Properties > Test
The VX-2 cannot function as
a wireless device with a PC,
it has to maintain connection to
the PC via USB at all times.
PC SET UP
Connect the USB cable between
the controller and the computer.
The driver will install automatically.
#Function USB (PC) Function PS3 Function
1LED 1 Channel 1 LEDOFF
2LED 2 Channel 2 LEDOFF
3LED 3 Channel 3 LEDOFF
4LED 4 Channel 4 LEDOFF
5HOME N/A PS Button
6
Fire Button 1
Fire Button 2
Fire Button 3
Fire Button 4
1
2
3
4
✕
7
Dpad - UP
Dpad - Right
Dpad - Down
Dpad - Le
POV_UP
POV_RIGHT
POV_DOWN
POV_LEFT
UP
RIGHT
DOWN
LEFT
8
Le Stick-X Axis
Le Stick-Y Axis
L3
Le Stick-X Axis
Le Stick-Y Axis
11
Le Stick- X Axis
Le Stick-Y Axis
L3
9
Right Stick-X Axis
Right Stick-Y Axis
R3
Z Axis
Z Rotation
12
Right Stick-X Axis
Right Stick-Y Axis
R3
10 START 10 START
11 SELECT SELECT9
12 R1 R16
13 R2 R28
14 L1 L15
15 L2 L27
GB
01 | Select Button
02 | Turbo Button
03 | Start Button
04 | Directional Pad
05 | Function Buttons
06 | Home Button
07 | USB Cable
FR
01 | Touche SELECT
02 | Bouton Turbo
03 | Touche START
04 | Touches directionnelles
05 | Touches de fonction
06 | Touche Home
07 | Câble USB
DE
01 | Select-Taste
02 | Turbo-Taste
03 | Start-Taste
04 | Steuerkreuz
05 | Funktionstasten
06 | Home-Taste
07 | USB-kabel
ES
01 | Botón SELECT
02 | Botón Turbo
03 | Botón START
04 | Botones de dirección
05 | Botones de función
06 | Botón Home
07 | Cable de USB
IT
01 | Tasto SELECT
02 | Tasto TURBO
03 | Tasto START
04 | Tasto direzionale
05 | Tasti funzione
06 | Tasto HOME
07 | Cavo USB
PT
01 | Botão SELECT
02 | Botão Turbo
03 | Botão START
04 | Botões Direccionais
05 | Botões de Função
06 | Botão Home
07 | Cabo de USB
CZ
01 | Tlačítko Vybrat
02 | Turbo tlačítko
03 | Tlačítko Start
04 | Směrová podložka
05 | Funkční tlačítka
06 | Tlačítko Domů
07 | Kabel USB
4. To add multiple controllers (up to 7)
or to assign your controller to a
dierent port go to: Accessory
settings > Reassign controller.
Once connected 1 or 2 LEDs
around the Home button will light.
Motor vibration is not supported in PC mode.
N13179
Thank you for purchasing the
VX-2 Wireless Controller for PC
and Playstation®3 from Gioteck.
We hope that this product will
go beyond your expectations
for a quality made accessory.
Please read this booklet
thoroughly before using
the product and review the
Playstation®3 and PC manual
for additional details regarding
system operation.
Thank you & enjoy!
WIRELESS CONTROLLER
FOR PLAYSTATION®3
|
PC
01
01
02
02
03
03
04 05
04
06
L3
R1L1
R3
R2L2
07
VX-2
WIRELESS
CONTROLLER
PLAYSTATION®3
|
PC
Produkspesifikasjoner
| Merke: | Gioteck |
| Kategori: | Ikke kategorisert |
| Modell: | VX-2 (PS3) |
Trenger du hjelp?
Hvis du trenger hjelp med Gioteck VX-2 (PS3) still et spørsmål nedenfor, og andre brukere vil svare deg
Ikke kategorisert Gioteck Manualer

20 Desember 2024
Ikke kategorisert Manualer
- Danfoss
- ViewZ
- ProForm
- Akasa
- BROWE
- Genelec
- Intermatic
- GRAUGEAR
- Cane Creek
- True
- Bavaria By Einhell
- Desview
- Sommer
- Merlin
- GolfBuddy
Nyeste Ikke kategorisert Manualer

23 Oktober 2025

23 Oktober 2025

23 Oktober 2025

23 Oktober 2025

23 Oktober 2025

23 Oktober 2025

23 Oktober 2025

23 Oktober 2025

23 Oktober 2025

23 Oktober 2025