Golden Lighting Madera 1821-M1L BI Bruksanvisning
Golden Lighting
Lettelse
Madera 1821-M1L BI
Les nedenfor 📖 manual på norsk for Golden Lighting Madera 1821-M1L BI (3 sider) i kategorien Lettelse. Denne guiden var nyttig for 6 personer og ble vurdert med 4.5 stjerner i gjennomsnitt av 2 brukere
Side 1/3

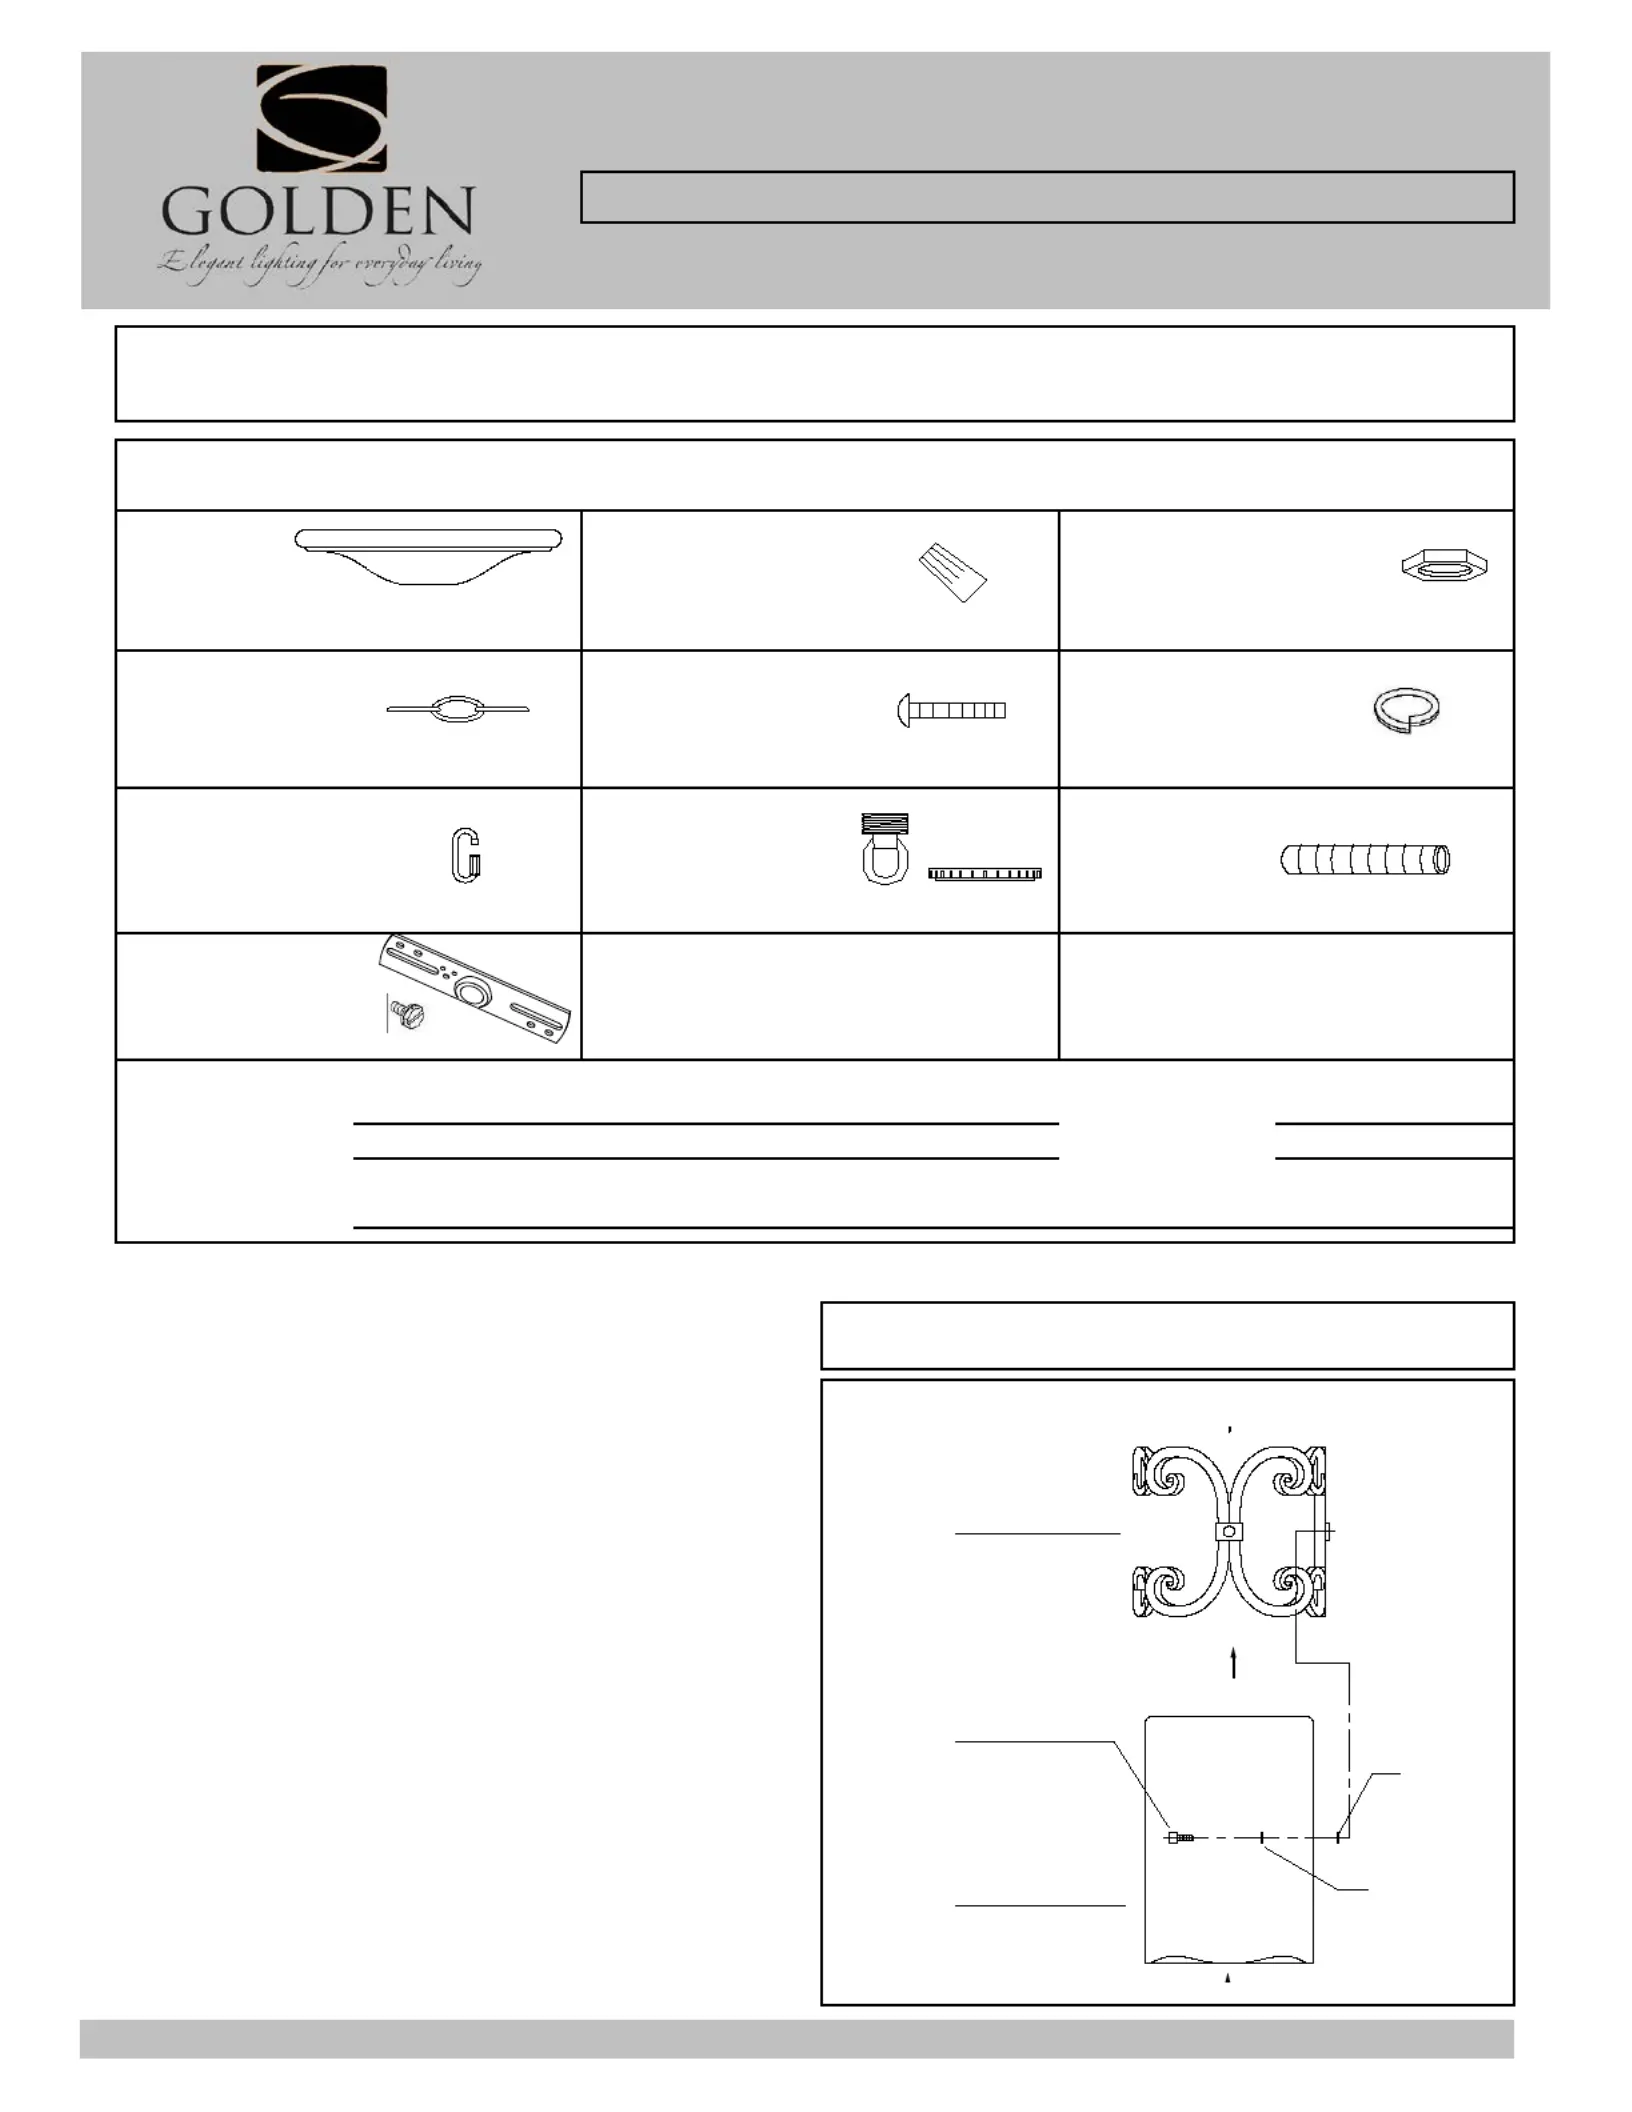
Canopy Wire Connectors Hex Nut
1ea @5-1/2"X1-1/2" 3ea P4 Orange
Chain Junction Box
Screw Spring Washer
1ea 6ft x3.8mm 2ea 8/32" x 1" 1ea @15 x 2mm
Chain Connector Nipple
2ea @4.2X50mm 1ea @3/8 x 40mm x 5mm 1ea @3/8 x 50mm
Mounting Strap
w/ ground screw
1ea 3/4"X4"
Part Needed Quantity
Reason why ( missing, scratched, broken glass, bent, bad finish)
Comments
Fig. 1
For Customer Service, contact the place of purchase to arrange for replacement parts.
PARTS & ASSEMBLY SHEET
1821-M1L BI
Read and review installation instruction sheet before
assembling the fixture.
FIXTURE ASSEMBLY INSTRUCTIONS
This fixture assembled PO:__________ Date: ________
Fixture Name: Madera 1821-M1L BI
Canopy Loop
with Collar
ASSEMBLING THE FIXTURE (Fig. 1)
* the glass shade should come with the metal cage already
attached.
1. Place each small screw (N) and washer (P) through
holes on inside of glass shade (O), add another washer (P)
on the outside of glass shade.
2. Lower metal cage (M) over glass shade, lining the holes
up with the screws and turn the small screw until tight to
secure the cage to the glass shade.
Notice:
Please review the parts listing and check for all parts before assembling the fixture. If any parts are missing or
damaged, please note on this sheet and contact the place of purchase to arrange for replacement parts.
PARTS LIST
Company Name:_______________________Co. Account #:_____________
to be filled out by retailer
2ea @3/8 x 3mm
M
N
OP
P

For Customer Service, contact the place of purchase to arrange for replacement parts.
d
Fig. 2
PARTS & ASSEMBLY SHEET
Fixture Name: Madera 1821-M1L BI
C
D
ASSEMBLING THE FIXTURE (Fig. 2)
4. Place the Socket/Top loop assembly (J) on
Glass shade (M/O).
5. Holding these pieces together, slide the Spacer
(Q) on socket and secure it by threading the Socket
ring (R) onto the threaded socket until tight.
6. By measuring determine correct number of links
needed for proper hanging height. Use a pair of
pliers to open one link of the Chain (K) then remove
the excess Chain (K) and discard it.
7. Use one chain connector (L) to attach one end of
the chain to the Top loop (J) and close the chain
connector.
8. Feed the fixture wires through the Chain (every
three links) and pull the wires until taut.
9. Slip Canopy loop collar (H) over the chain, then
do the same with the canopy (G).
10. When ready to complete the installation Use
the other chain connector and attach the other
end of the chain to the canopy loop (F) and close
the chain connector.
11. Make sure the weight of the chandelier will be
supported by the chain-not the electrical wire.
* You may now install the fixture.
Note: Complete these remaining steps after the
fixture is hung.
12. Install the light bulb (not provided) in
accordance with the fixture's specifications.
(DO NOT EXCEED MAXIMUM WATTAGE RATING)
Bulb
(Not Provided)

For Customer Service, contact the place of purchase to arrange for replacement parts.
Fig. 2
YOUR INSTALLATION IS NOW COMPLETE.
RETURN POWER TO THE JUNCTION BOX
AND TEST THE FIXTURE.
INSTALLATION INSTRUCTIONS
Fixture Name: Madera 1821-M1L BI
For Pendant Light Fixture
WARNING ! SHUT OFF POWER AT FUSE OR CIRCUIT BREAKER.
Fig. 1
L
B
C
A
JUNCTION BOX
(CEILING)
D
E
F
H
CHAIN
G
BARE COPPER
(Ground)
GREEN
(Ground)
FIXTURE WIRES
SMOOTH (BLACK)
RIBBED (WHITE)
BLACK
WHITE
HOUSE WIRES
HANGING THE FIXTURE (Fig. 1)
1. Carefully remove the new fixture from the carton and
the yellow bag that holds all parts. Check that all parts are
included as shown in the illustration and parts list.
2. Shut off the power at the circuit breaker and remove old
fixture from ceiling, including the old mounting strap.
3. Thread Nipple(C) into Canopy Loop (F) until snug.
4. Thread other end of the Nipple (C) with Canopy Loop
attached into Mounting Strap (D).
5. Place Lock Washer (B) over end of Nipple (C)
protruding through Mounting Strap (D) and thread Hex
Nuts (A) onto Nipple until tight.
6. Take this mounting strap assembly and mount to
ceiling junction box with junction box Screws (E). Tighten
screw securely with screw driver.
7. Unscrew the Canopy loop collar (H ) from the Canopy
loop. Take the canopy and pass over the Canopy loop.
approximatly one half of the canopy loop exterior threads
should be exposed. Adjust until desired height is reached.
*the Canopy loop collar should fit snugly on the Canopy
loop after the canopy is installed. Remove Canopy and
Canopy lock collar.
8. Assemble the fixture and have an assistant or secure
support hold the weight of the fixture while you complete
the wiring connections.
9. Thread the fixture wires and ground wire of the
assembled fixture through the canopy loop and nipple and
into the outlet box.
CONNECTING THE WIRES (Fig. 2)
10. Attach the power supply wires to the fixture lead
wires by connecting BLACK to BLACK (or SMOOTH) and
WHITE to WHITE (or RIBBED).
11. Attach the GROUND wire(GREEN or COPPER) from
the Junction Box and the fixture Ground wire to the green
Ground Screw on the Mounting Bracket (D) or connect
both wires together using the correct size of wire
connectors.
NOTE: Twist the wires together in the same direction you
twist the wire connector onto the wires.
12. Tuck these wire connections neatly into the Junction
Box.
13. Raise Canopy (G) to the ceiling and secure in place
by tightening the Canopy loop collar (H) into the Canopy
Loop (F).
Produkspesifikasjoner
Merke: | Golden Lighting |
Kategori: | Lettelse |
Modell: | Madera 1821-M1L BI |
Trenger du hjelp?
Hvis du trenger hjelp med Golden Lighting Madera 1821-M1L BI still et spørsmål nedenfor, og andre brukere vil svare deg
Lettelse Golden Lighting Manualer

16 Oktober 2024

15 Oktober 2024

15 Oktober 2024

15 Oktober 2024

15 Oktober 2024

15 Oktober 2024

15 Oktober 2024

15 Oktober 2024

15 Oktober 2024

15 Oktober 2024
Lettelse Manualer
- Lettelse Stamos
- Lettelse ORNO
- Lettelse Ledlenser
- Lettelse Bosch
- Lettelse AFX
- Lettelse DeWalt
- Lettelse Hama
- Lettelse Neewer
- Lettelse Hazet
- Lettelse Philips
- Lettelse Schwaiger
- Lettelse Godox
- Lettelse IKEA
- Lettelse TP Link
- Lettelse Razer
- Lettelse Kogan
- Lettelse Behringer
- Lettelse GoGEN
- Lettelse Nitecore
- Lettelse Kichler
- Lettelse Trust
- Lettelse Integral LED
- Lettelse Lutec
- Lettelse ET2
- Lettelse Quoizel
- Lettelse Crystorama
- Lettelse Brennenstuhl
- Lettelse Varaluz
- Lettelse FIAP
- Lettelse Aputure
- Lettelse Media-tech
- Lettelse NEO Tools
- Lettelse Gemini
- Lettelse Westinghouse
- Lettelse Canarm
- Lettelse Klein Tools
- Lettelse Schneider
- Lettelse Dainolite
- Lettelse Tesy
- Lettelse Martin
- Lettelse EMOS
- Lettelse Sharper Image
- Lettelse Manfrotto
- Lettelse Fluval
- Lettelse Ryobi
- Lettelse Nanlite
- Lettelse BeamZ
- Lettelse Steinel
- Lettelse Maxim
- Lettelse Nordlux
- Lettelse Brandson
- Lettelse Aplic
- Lettelse CSL
- Lettelse Bearware
- Lettelse Moen
- Lettelse NUVO
- Lettelse Maginon
- Lettelse Sonneman
- Lettelse Milwaukee
- Lettelse Generac
- Lettelse OttLite
- Lettelse Kern
- Lettelse Be Cool
- Lettelse Ansmann
- Lettelse Showtec
- Lettelse Busch + Müller
- Lettelse Valerie Objects
- Lettelse V-Tac
- Lettelse Wireless Solution
- Lettelse Infinity
- Lettelse Nedis
- Lettelse Elation
- Lettelse Magmatic
- Lettelse Chauvet
- Lettelse Karma
- Lettelse TFA
- Lettelse Weeylite
- Lettelse Black Diamond
- Lettelse Lumie
- Lettelse WAC Lighting
- Lettelse ESYLUX
- Lettelse Livarno Lux
- Lettelse City Theatrical
- Lettelse Omnitronic
- Lettelse Eurolite
- Lettelse Casalux
- Lettelse Innoliving
- Lettelse Aqara
- Lettelse Beghelli
- Lettelse Middle Atlantic
- Lettelse Rosco
- Lettelse DeSisti
- Lettelse American DJ
- Lettelse Astera
- Lettelse EXO
- Lettelse Novy
- Lettelse Profoto
- Lettelse Claypaky
- Lettelse GRE
- Lettelse Ikan
- Lettelse Ring
- Lettelse Impact
- Lettelse Olight
- Lettelse Perel
- Lettelse Blackburn
- Lettelse Sigma
- Lettelse Rayzr 7
- Lettelse Excello
- Lettelse Vimar
- Lettelse Genaray
- Lettelse Chrome-Q
- Lettelse Altman
- Lettelse Setti+
- Lettelse Kanlux
- Lettelse ARRI
- Lettelse Osram
- Lettelse Light4Me
- Lettelse GlobalTronics
- Lettelse Lume Cube
- Lettelse Digipower
- Lettelse ETC
- Lettelse Fiilex
- Lettelse Bresser
- Lettelse Portman
- Lettelse ColorKey
- Lettelse Litepanels
- Lettelse Perfect Christmans
- Lettelse Yamazen
- Lettelse Lexon
- Lettelse XQ-Lite
- Lettelse Govee
- Lettelse Peerless-AV
- Lettelse Heitronic
- Lettelse Obsidian
- Lettelse Blizzard
- Lettelse LUPO
- Lettelse Enttec
- Lettelse Fotodiox
- Lettelse GVM
- Lettelse Amaran
- Lettelse Halo
- Lettelse HQ Power
- Lettelse Currey & Company
- Lettelse Kino Flo
- Lettelse Cateye
- Lettelse Bora
- Lettelse Maxxmee
- Lettelse Wiesenfield
- Lettelse Sun Joe
- Lettelse Angler
- Lettelse Raya
- Lettelse Dracast
- Lettelse Luxli
- Lettelse Elan
- Lettelse Livex Lighting
- Lettelse Eglo
- Lettelse Hinkley Lighting
- Lettelse Underwater Kinetics
- Lettelse Marklin
- Lettelse Rollei
- Lettelse Ranex
- Lettelse Sea&Sea
- Lettelse Fuzzix
- Lettelse COLBOR
- Lettelse DMT
- Lettelse Lucide
- Lettelse LumenRadio
- Lettelse DIO
- Lettelse Paulmann
- Lettelse Melinera
- Lettelse Sagitter
- Lettelse Yongnuo
- Lettelse Audibax
- Lettelse Qazqa
- Lettelse Mazda
- Lettelse Triton Blue
- Lettelse Singercon
- Lettelse Hudson Valley
- Lettelse Forte Lighting
- Lettelse Smith-Victor
- Lettelse Zylight
- Lettelse Light & Motion
- Lettelse Cineo
- Lettelse Prolycht
- Lettelse AD Trend
- Lettelse Aveo Engineering
- Lettelse Litegear
- Lettelse Temde
- Lettelse Intellytech
- Lettelse BB&S
- Lettelse Craftmade
- Lettelse ADB
- Lettelse Trio Lighting
- Lettelse DCW
- Lettelse Kinotehnik
- Lettelse Rotolight
- Lettelse GLP
- Lettelse SLV
- Lettelse Quasar Science
- Lettelse Kuzco
- Lettelse Schonbek
- Lettelse Lowel
Nyeste Lettelse Manualer

9 April 2025

9 April 2025

8 April 2025

8 April 2025

8 April 2025

7 April 2025

6 April 2025

6 April 2025

6 April 2025

6 April 2025