Growatt Shine 4G-X Bruksanvisning
Les nedenfor 📖 manual på norsk for Growatt Shine 4G-X (8 sider) i kategorien solcelle. Denne guiden var nyttig for 15 personer og ble vurdert med 3.8 stjerner i gjennomsnitt av 8 brukere
Side 1/8

3
ShineWiFi-X
ShineWiFi-X is compatible with all Growatt on-grid inverters equipped
with the USB port, which enables remote monitoring and maintenance
of PV systems through WiFi connection.
Ø ServerSupports mobile APP and web page monitoring
Ø remote configurationSupports and firmware upgrade
Ø Supports local data saving and breakpoint retransmission
4.1 Installation instructions
4.3 Data logger configuration
2
3
User Manual
1.Twist counterclockwise to remove the cover of the USB port on the
inverter;
2.Rotate the lock on the upper end of the datalogger until the triangle
icon is facing upward;
3.Align the datalogger with the inverter's USB port, ensuring that the
triangle icon is facing upward and centered; press the lock and rotate
clockwise until it is tightened.
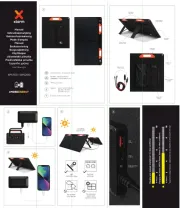
1.Scan the QR code below to download ShinePhone, or you can search
for ShinePhone in Apple Store or Google Play, then download and
install it.
2.Once the APP is installed, you can configure the datalogger and add
the PV plant as prompted. For details about configuring the datalogger,
refer to ShineWiFi-X Configuration Guide. Scan the QR code below to
download the documentation.
【 】 ShineWiFi-X Configuration Guide
1
4.
3.
1.
Ensure that the triangle icon is facing upward
and centered, then turn the lock clockwise
ShineServer Web
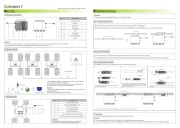
3
Power grid
Inverter
PV Panel
ShineWiFi-X
Router
Datalogger Hotspot
Cloud Server
WiFi
ShinePhone APP
USB Port
Indicator
Button
4.4 ShineWiFi-X Button Description
Operation
Description
After ShineWiFi-X is powered on,
press the button. (The indicator will
change from flashing to steady-on)
ShineWiFi-X will enter the AP
mode, which is a debug mode
intended only for use by
professionals.
When ShineWiFi-X is in AP mode,
press the button. (The indicator will
change from steady-on to flashing)
Exit AP mode
Press and hold the button for 6s until
the indicator displays three colors
(red, green and blue) at the same time,
then release the button
Restore ShineWiFi-X to
factory settings
Installation and configuration
System Diagram
Product Overview
ShineTools APP
4.2 Turn on the inverter and check the status of ShineWiFi-X
After installing the ShineWiFi-X module, turn on the inverter. If the
indicator is flashing red, it indicates that the communication between
the inverter and ShineWiFi-X is normal. The LED status meanings are
shown below:
LED status
Indication
Off
Fails to connect to the inverter
Flashing red
Successfully connected to the inverter
Flashing green
Successfully connected to the inverter and the
router
Flashing blue
Successfully connected to the inverter, the router
and ShineServer
Disclaimer: The content of this document is continually reviewed and
amended, where necessary. Growatt reserves the right to make changes to
the material at any time and without notice.
Copyright © 2023 Shenzhen Growatt New Energy Co., Ltd. All rights
reserved.
Product Appearance
2.
【ShinePhone APP】
Produkspesifikasjoner
| Merke: | Growatt |
| Kategori: | solcelle |
| Modell: | Shine 4G-X |
Trenger du hjelp?
Hvis du trenger hjelp med Growatt Shine 4G-X still et spørsmål nedenfor, og andre brukere vil svare deg
solcelle Growatt Manualer
6 September 2025
6 September 2025
6 September 2025
5 September 2025
5 September 2025
5 September 2025
5 September 2025
5 September 2025
5 September 2025
5 September 2025
solcelle Manualer
- Xtorm
- EcoFlow
- BenQ
- Technaxx
- Intex
- Jackery
- Reolink
- Ryobi
- Mestic
- SereneLife
- Omega
- Biltema
- NEO Tools
- Deye
- AEG
Nyeste solcelle Manualer
20 Oktober 2025
12 Oktober 2025

12 Oktober 2025

7 Oktober 2025

7 Oktober 2025
7 Oktober 2025
29 September 2025

15 September 2025
12 September 2025
11 September 2025